- SDR allows receiving a wide range of frequencies by digitizing the signal and processing it by software with inexpensive RTL-SDR type dongles.
- The quality of reception depends largely on the antenna chosen and its suitability to the band: discone, dipoles, QFH or collinear depending on the use.
- Tools like GQRX and OpenWebRX facilitate the practical use of SDR in Linux and Raspberry Pi, while Linrad, SDRadio and baudline allow advanced demodulation.
- There are remote SDR servers and websites that allow experimentation without hardware own and understand the complete flow of capture, analysis, and demodulation.
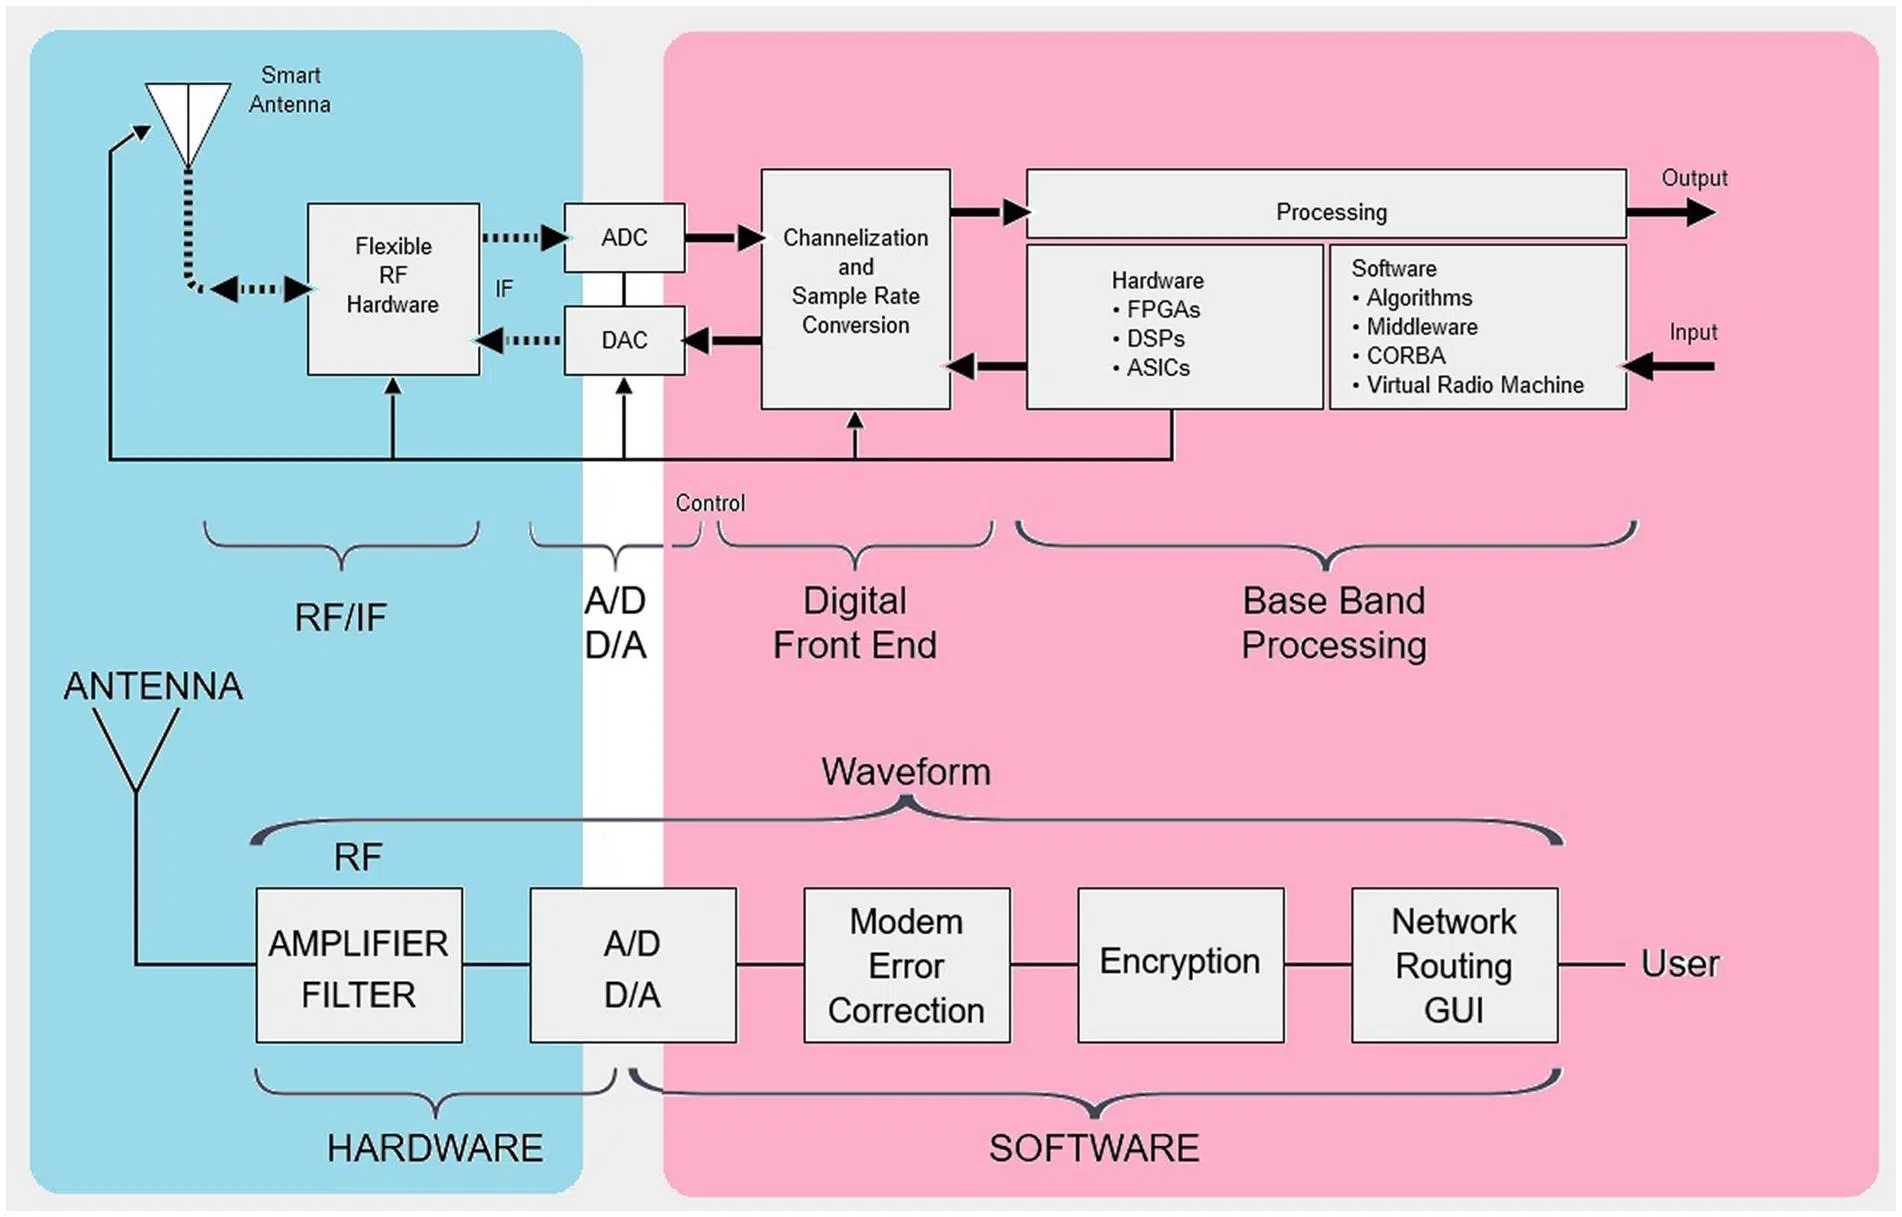
Setting up your own Software Defined Radio (SDR) is much more accessible today than it seems: with a simple USB dongle , a good antenna, and some software, you can go from zero to listening to airplanes, weather satellites, or radio stations from around the world from your computer or even a Raspberry Pi. If you also enjoy tinkering with Linux, DSP, or RF, SDR is a perfect field to keep you hooked for hours.
In the following lines, we'll see, step by step, how to set up an SDR using an RTL-SDR dongle, what hardware components are involved, how to choose antennas, what software to install (such as GQRX or OpenWebRX), and even how to process and demodulate the I/Q signal with more advanced tools like Linrad, SDRadio, or baudline. All of this will be covered with practical examples, real commands , and some ideas for further exploration if you want to go beyond simply "listening to FM."
What is Software Defined Radio and what role does RTL-SDR play?
A Software-Defined Radio (SDR) receiver changes the traditional approach to radio: instead of doing almost all the work in analog hardware, the RF signal is converted into digital data as quickly as possible, and the software handles filtering, demodulating, and presenting the information. The core of the device, in inexpensive dongles, is typically a converter chip and a tuner that cover a vast range of frequencies.
When we talk about an RTL-SDR (for example, a modern version like the v4), we're referring to a very inexpensive USB dongle that was originally designed as a digital TV receiver and, thanks to the RTL2832U chip, can be repurposed as a general-purpose SDR receiver. These devices can receive signals ranging from low-frequency HF signals to VHF and UHF bands, where commercial FM radio, aircraft ADS-B, digital terrestrial television (DTT), service communications, and much more are used.
In practice, a typical RTL-SDR dongle gives you access to frequencies from about 500 kHz up to approximately 1,7 GHz , opening the door to listening to amateur radio on the 40-80 m bands, shortwave broadcasts, FM radio, weather satellite transmissions, aircraft traffic, service radio, and so on. All of this, of course, also depends on the antenna and the receiving environment.
Internally, the RTL-SDR relies on a couple of key components: the RTL2832U chip , responsible for capturing the I/Q signal and sending it to the computer, and a tuner such as the R828D , which covers the frequency range. A high-stability oscillator (TCXO) is usually added, and many models include additional features such as Bias-T for feeding active antennas.
Internal components and important features of the RTL-SDR
If you want to go beyond simply "plug and play," understanding what's inside the dongle will help you optimize reception, noise mitigation, and compatibility with advanced software.
At the heart of it all is the RTL2832U , a chip that acts as a digital demodulator . Its function is to take the RF signal coming from the tuner, sample it, and produce a complex I/Q signal that the PC software can interpret. This chip is responsible for allowing us to use the device with a wide range of SDR programs under Linux, Windows , or even on a Raspberry Pi.
In the radio frequency section, we have an R828D tuner (or a similar model depending on the dongle) that provides frequency coverage. This component allows us to move from low frequencies up to the GHz range, selecting small "slices" of the spectrum that are then digitized.
Another key feature is the inclusion of a TCXO (Temperature Compensated Crystal Oscillator) , which offers excellent frequency stability. Thanks to this oscillator, the tuned frequency doesn't fluctuate as much when the dongle heats up, which is especially important when performing fine-tuning on the HF band, decoding narrow signals, or maintaining synchronization with satellite signals.
Many modern RTL-SDRs also include integrated Bias-T , meaning the ability to inject direct current through the same coaxial cable that carries the RF signal. This allows you to power LNAs (Low Noise Amplifiers) or active antennas directly from the dongle without needing additional power supplies, which is very useful if you're placing the antenna far away and need to compensate for cable losses.
An important detail is that these models usually offer direct HF coverage (below 24 MHz), something many cheap dongles don't include as standard. Being able to tune into HF gives you access to a world of amateur radio communications, international shortwave broadcasting, distant AM stations, and specialized signals that you won't find on the typical commercial FM band.
The importance of the antenna in an SDR setup
However impressive your SDR dongle may be, the antenna is king. A bad or poorly positioned antenna will only let you hear noise and a few strong stations; an antenna suited to the band you're interested in can transform the user experience, allowing you to "see" distant and weak signals that were previously undetectable.
Many RTL-SDR kits come with small telescopic antennas , a mini-tripod, and sometimes a suction cup for attaching them to a window. These antennas are fine for beginners: they're good for testing the hardware, listening to strong FM, or doing some quick experiments. But if you want to "play around seriously," you'll need more specialized antennas.
To cover a wide range of VHF/UHF frequencies, a very popular option is the discone antenna . This type of antenna is almost omnidirectional and broadband, allowing you to monitor everything from VHF services to UHF signals without having to constantly change antennas—very convenient when you're exploring the spectrum.
If your goal is to take advantage of the RTL-SDR's ability to receive HF (shortwave) , a well-sized dipole antenna for the band you're interested in (for example, 40 or 80 meters) can make a world of difference. Even a simple long wire, properly installed, can yield remarkable results if propagation conditions are favorable.
For tracking weather or communications satellites, antennas like the QFH (Quadrifilar Helix) or the turnstile are widely used; their design optimizes the reception of signals from satellites in low Earth orbit, which move rapidly across the horizon. And if you'd like to track aircraft, a collinear antenna for 1090 MHz optimized for ADS-B becomes the perfect companion for RTL-SDR.
Practical first steps in Linux: listening to FM radio with GQRX
A very simple way to try out your SDR is to use it to listen to commercial FM radio on a Linux system, such as Debian, Ubuntu, or any derivative. You'll verify in just a few minutes that the dongle works and that the software is correctly installed.
The first step is to install the basic tools: the rtl-sdr package , which contains console utilities like rtl_test, and a graphical interface program like GQRX , which acts as an SDR receiver. It's also useful to install sox , a command-line tool for handling audio and performing additional tests with WAV files and sound devices.
sudo apt update

sudo apt install rtl-sdr gqrx-sdr sox
On many systems, the Linux kernel attempts to automatically load the digital TV drivers for the dongle, preventing rtl-sdr from using it as an SDR receiver. To avoid this, the corresponding module is usually added to the modprobe system blacklist, like this:
sudo bash -c 'echo "blacklist dvb_usb_rtl28xxu" > /etc/modprobe.d/blacklist-rtl.conf'
After making this change, it is highly recommended to restart the system so that the kernel stops automatically loading that module. Once restarted, it's a good idea to verify that everything is working and that the dongle is responding correctly to the rtl-sdr utilities.
rtl_test -t
If everything goes well, the command will display information about the dongle, confirming that the system has recognized the RTL2832U and that it can be accessed without conflicting with the TV driver. With this validated, we can proceed to graphical use via GQRX to begin actual reception.
To start GQRX, simply run:
gqrx
The first time you launch GQRX, it will display a hardware configuration window where you can select the RTL-SDR device from the available list. It's important to copy or adjust the gain, intermediate frequency, and sample rate settings to match your dongle and your computer, although the default values usually work reasonably well to get started.
To listen to FM radio , in the mode section select WFM (Wideband FM) , which is the standard used by commercial FM between 87,5 MHz and 108 MHz. In the frequency field, enter the station you want to listen to in kHz, without a decimal point: for example, for 93,1 MHz you should enter 93100. If everything is configured correctly, you should hear the station through the system speakers in a few seconds.
FM basics: WFM and NFM
When working with SDR and receiving modes, it's helpful to remember exactly what FM (Frequency Modulation) is . In a radio wave, there are two fundamental parameters that can be varied to carry information: the amplitude and the frequency of the carrier. In AM, the amplitude is modified; in FM, the instantaneous frequency is slightly varied.
In FM, the content (voice, music, or data) is encoded as small deviations around a center frequency . This type of modulation has several advantages: the signal is less sensitive to noise that alters the amplitude, and it allows for higher audio quality thanks to the available bandwidth, especially in commercial FM, where around 200 kHz of bandwidth is used to allow stereo transmission and good fidelity.
Within the FM family, in SDR environments you will often see references to two main variants: WFM (Wideband FM) and NFM (Narrowband FM) . WFM, as its name indicates, is the wideband FM used by commercial radio stations in the 88-108 MHz range, designed for maximum sound quality at the cost of consuming more spectrum.
NFM is used in systems where spectrum efficiency takes precedence over fidelity, such as many service communications, amateur radio links, radiotelephones, and portable devices . By using a narrower bandwidth, more channels can be placed in the same spectrum segment, although the audio quality is lower than that of WFM.
In practice, when you want to listen to commercial FM radio with your RTL-SDR and GQRX, the correct mode is WFM , while for other service bands or amateur radio in VHF/UHF it will be more common to use NFM , adjusting the bandwidth and filters according to the signal you are monitoring.
Testing SDR without your own hardware: remote servers and SDR websites
If you haven't yet purchased an RTL-SDR but want to experiment with the concept of Software Defined Radio , there are several online and remote options that allow you to practice from your browser or using dedicated clients. This is very useful for understanding the workflow before investing in hardware.
One of the best-known platforms is linked to the Airspy ecosystem: there's an online directory of shared receivers where users from all over the world make their SDR devices available so others can connect remotely. From this list, you can choose a receiver in a specific country and listen to what's being broadcast there in real time.
To get the most out of these remote receivers, there's software called SpyServer that lets you set up an SDR streaming server on a computer with a connected dongle. Detailed tutorials are available that explain how to configure the server on Windows or Linux and how to connect from Windows clients to explore the spectrum remotely.
Another very popular alternative is KiwiSDR , a platform where different SDR stations share access through a direct web interface. From a browser, you can select a receiver, view the spectrogram, tune into HF bands, and listen to shortwave radio stations from around the world with just a few clicks, without needing to install anything locally.
Also worthy of mention is OpenWebRX , a free software project that allows you to expose an SDR receiver through an interactive web interface. It was originally created by András Retzler and later taken over and expanded by Jakob Ketterl, resulting in a very versatile tool with a fairly active community of contributors.
Install and configure OpenWebRX on a Raspberry Pi
If you have a Raspberry Pi and a compatible SDR dongle, you can set up your own web-accessible receiver with OpenWebRX. The easiest way to do this on Debian-based systems is to use the official repositories maintained by the project to simplify installation, rather than compiling from scratch.
The typical process begins by adding the GPG key and repository to the system. On a Raspberry Pi with a version similar to Debian Buster, it would be done as follows:
sudo bash -c 'wget -O - https://repo.openwebrx.de/debian/key.gpg.txt | apt-key add -'

sudo bash -c 'echo "deb https://repo.openwebrx.de/debian/ buster main" > /etc/apt/sources.list.d/openwebrx.list'

sudo apt update
Once the repositories are added, installing OpenWebRX itself is reduced to a single command:
sudo apt install openwebrx
During this process, the installer will ask you to set an administrator password , which you will use later to access the web configuration panel. It is important to remember this password, because without it you will not be able to adjust the station or the band profiles.
With the installation complete, you can now access the OpenWebRX web interface from another computer on your network. Simply enter the Raspberry Pi's IP address followed by port 8073 into your browser , like this:
http://[IP_RASPBERRY]:8073/
If you only have one compatible SDR device connected, OpenWebRX may detect it automatically and start working almost without any further configuration. However, in installations with multiple dongles or more specialized devices, you'll typically see an error message indicating that the device and band profiles need to be configured before normal use.
In the upper right corner of the interface, you'll see the "Settings" button , which takes you to the settings screen. Clicking it will prompt you for a username and password: the username is "admin" and the password is the one you chose during installation. Once logged in, you'll access the main settings panel with several sections.
The first recommended section is “General settings ,” where you can enter your station's general information: geographic location, amateur radio call sign (if you have one), station name or description, etc. After filling in these fields, click “Apply and save” to save the changes to your OpenWebRX settings.
The next step is to define and configure the SDR device that OpenWebRX will use. In the main panel, you'll find the "SDR devices and profiles" option . Upon entering it, you'll see a list of detected or pre-configured devices. If yours is listed, simply click on it to modify its parameters; if not, you can create a new entry with "Add new device ," provided the hardware is supported by the software (a list of compatible devices is available on the project's official website).
Within each device's settings, you can add various adjustments, such as hardware type , sampling rate, frequency range, gain, PPM correction, and so on. The usual procedure is to select the parameter you want to modify, click "Add," and then enter the appropriate value for your dongle and its intended use.
Once you have finished configuring general settings, devices, and bands, it is recommended to reload the configuration by restarting the service from the Raspberry Pi terminal . The standard command for this is:
sudo systemctl restart openwebrx.service
After the service restarts, reload the page in your browser and, if everything is configured correctly, you should be able to tune to the defined bands and view the spectrum in real time from any device on the network, or even from the Internet if you decide to open the port and expose your station to the outside.
Demodulation in detail: from the I/Q signal to audio using Linrad, SDRadio and baudline
Beyond simply pressing "play" in GQRX or OpenWebRX, a very interesting aspect of SDR is understanding how the digitized signal is demodulated. In the amateur radio community, programs like Linrad , SDRadio , and baudline have historically been used to experiment with WAV files recorded from the radio, analyze spectra, and obtain demodulated audio with great flexibility.
Imagine you've captured a signal using a tool like baud rate or similar and saved the result as an audio file named radio-downconverter-28000-sps-162-khz.wav . This file would contain the signal already processed by a downconverter and sampled at 28000 sps , within a frequency range of, say, 154 kHz to 168 kHz, for a couple of minutes. This file is your raw material for performing delayed demodulation tests.
At some point, someone might have given you that compressed file with the .wav.gz extension . Some older browsers (like certain versions of Internet Explorer) had a problem: when downloading the file, they would mistakenly save it with the ".wav.wav" extension, so you had to manually rename it to ".wav.gz" and then decompress it with any tool compatible with ZIP or GZIP.
To work with this type of capture, you can use SDRadio , a Windows program originally designed to use the sound card as a front-end for an SDR. In this approach, the WAV file is played from a Linux machine and the audio is sent to the sound card, which in turn feeds the line input of a Windows PC running SDRadio, which performs the demodulation.
sox -t .wav radio-downconverter-28000-sps-162-khz.wav -t ossdsp /dev/dsp3
In this scenario, /dev/dsp3 would be the sound card of the Linux machine (for example, a Sound Blaster). From there, a cable connects the line out to the line in of the Windows PC. Once the correct sound source is selected in the mixer on Windows, simply start SDRadio, press RX , choose the demodulation mode (AM, SSB USB/LSB, etc.), center the frequency, and adjust the bandwidth.
A curious feature of SDRadio is that it uses a complex I/Q signal as its source : it assigns the left channel of the stereo input to the I component and the right channel to the Q component. However, the original WAV file can be a mono signal; when played back with SOX, the same content is sent to both channels, and it's still possible to hear the AM station clearly. This leads to interesting situations, such as being able to receive the signal not only in AM mode but also with acceptable results in SSB modes (USB and LSB), depending on how the downconversion was performed.
If you want to avoid the Windows part and use only Linux, Linrad is a very powerful SDR tool focused on weak signals and CW, although it also supports AM, SSB, and FM. The great advantage here is that it can directly process a WAV file like the one in our example, without needing intermediate sound cards or physical "bridges" between devices.
To tell Linrad which file to process, a text file called adwav is used in the program's main directory. This file must contain, on a single line, the name of the input WAV file and the name of an associated parameter file. You could create it like this:
echo "radio-downconverter-28000-sps-162-khz.par" > adwav
After creating the adwav file , start Linrad and, in the main menu, select the option “2=Process first file named in 'adwav'” . The first time a file of this type is processed, the program asks several questions about the sampling and demodulation parameters, and then displays the main window with the spectrum analyzer and the controls necessary for reception.
Another interesting possibility is to try real-time processing with Linrad while capturing the signal with sox. Linrad doesn't directly support standard input (stdin), but you can use a FIFO file , that is, a pseudo-file that acts as a pipeline between processes. The workflow would look something like this:
cd linrad

mkfifo fifo.wav

echo "fifo.wav fifo.par" > adwav

./linrad
Once Linrad has started and you select the option to process the first adwav file , open another console (for example with CTRL+ALT+F2) and run:
cd linrad

sox -r 896000 -w -t ossdsp /dev/dsp1 -t .wav fifo.wav
In this setup, /dev/dsp1 would be the audio source from which you get the raw 896 kSpS capture. Linrad would read from fifo.wav almost in real time, with a few seconds of buffer delay. In practice, this configuration can be quite demanding on memory and CPU, and it's not always easy to find parameters that don't cause "Out of memory. Try less demanding parameters" errors, especially with such high sample rates.
Finally, some users have demonstrated that it's also possible to demodulate directly with baudline . For example, by loading the AM station file, adjustments can be applied in the playback window, such as a negative frequency shift (e.g., -6469 Hz), a high-pass filter at approximately 164 Hz, and a significant increase in digital gain (e.g., +48 dB). With these parameters, baudline is able to reproduce intelligible audio, including music and foreign-language broadcasts, simply by manipulating the spectrum in real time.
This entire ecosystem of tools (SDRadio, Linrad, baudline, sox, etc.) illustrates how, in the world of Software Defined Radio , the boundary between hardware and software is blurred: the same WAV file can be analyzed, filtered, and demodulated in many different ways, by changing programs or parameters without physically touching the original receiver.
With a simple RTL-SDR dongle, a decent antenna, and a set of utilities like GQRX, OpenWebRX, SDRadio, Linrad, or baudline, anyone with curiosity and a desire to learn can delve into concepts of DSP, programming , and radio frequency that, until recently, were reserved for expensive and complex professional equipment.

Passionate writer about the world of bytes and technology in general. I love sharing my knowledge through writing, and that's what I'll do on this blog, show you all the most interesting things about gadgets, software, hardware, tech trends, and more. My goal is to help you navigate the digital world in a simple and entertaining way.