- NIC Teaming allows you to group several physical network cards into a single logical adapter to gain bandwidth and high availability.
- En Windows 11 It's unbearable. Intel PROSet/ANS, therefore classic teaming depends on PowerShellHyper-V or unofficial solutions.
- Windows Server maintains native and graphical management of NIC Teaming, while in client environments, tools and configurations must be combined.
- Proper switch configuration (LACP, VLAN and port groups) is key to stable and efficient NIC Teaming.
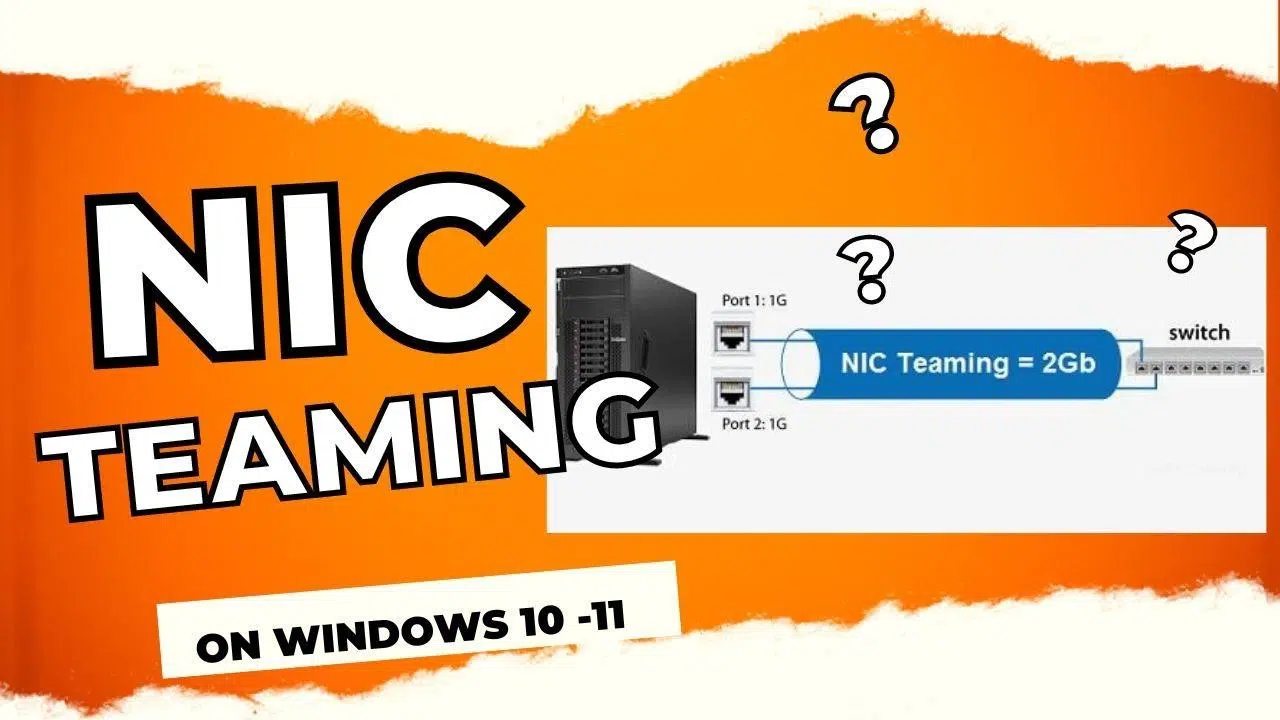
If you have a computer with multiple physical network cards and want to get a little more out of it, configuring NIC Teaming in Windows 11 can be a very interesting way to gain effective bandwidth and, above all, improve the high availability of your connection. Although this feature originated and has been more developed in Windows Server, with a few tricks and the help of PowerShell it's still possible to implement it in certain scenarios with Windows 11.
Throughout this article, we'll explore how NIC Teaming works, its limitations in Windows 11 compared to Windows 10 and Windows Server , how to leverage it in Hyper-V environments, and the current options for using LBFO (Load Balancing/Failover) technologies. We'll also include practical PowerShell commands , important warnings, and some real-world examples to help you avoid surprises once you implement it.
What is NIC Teaming and why is it relevant in Windows 11?
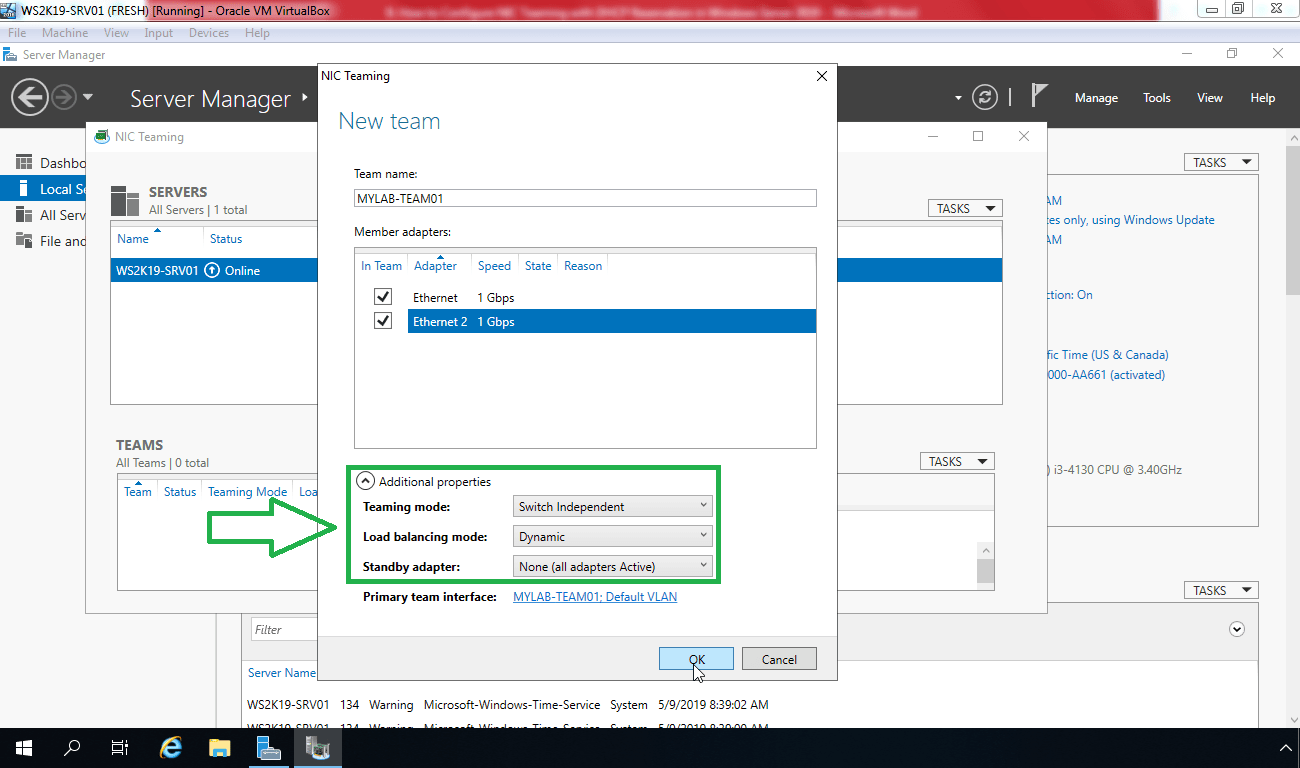
When we talk about NIC Teaming, we're referring to the ability to group multiple physical network interfaces into a single logical adapter . This virtual adapter is what the operating system sees as a single network card, but behind the scenes, it's using several real NICs in parallel.
The main objective is to achieve three major network benefits : increased aggregate bandwidth (e.g., two 1 Gbps interfaces working together), fault tolerance if one of the cards or cables fails, and load balancing between different traffic flows to distribute network usage.
This functionality was natively incorporated into Windows Server 2012 and later versions, either through Server Manager or via PowerShell. On desktop systems like Windows 10 and Windows 11, the situation is different: support has been reduced, especially by Intel, which has stopped offering Intel PROSet and Intel ANS (Advanced Network Services) in Windows 11.
In Windows Server it is easy to create a team from the graphical console, while in Windows 10 and certain editions of Windows 11 the most realistic way to achieve something similar is through PowerShell, the Hyper-V virtual switch, or unofficial solutions that restore LBFO.
Limitations and changes of Intel PROSet / ANS in Windows 11
A key point that often comes as a surprise is that Intel PROSet and Intel Advanced Network Services are no longer supported in Windows 11 or future versions of Windows. These technologies were precisely what allowed users to create teams and VLANs directly on network cards using Intel drivers .
Intel has made it clear that Windows 10 is the last client operating system to officially support Intel PROSet and ANS, including all the teaming and VLAN capabilities associated with those drivers. While Intel network drivers exist and are updated in Windows 11, they no longer include these advanced interface grouping features.
The possibility of using the PowerShell command `New-NetSwitchTeam` in Windows 11 to create teams has been discussed in some forums. Intel indicates that they have seen the command run, even on some of their laptops , but they do not guarantee that the created team will function correctly or be stable.
Furthermore, Microsoft's official documentation for the NetSwitchTeam module notes that, in client editions of Windows, these cmdlets can only be used to remotely manage the Hyper-V extensible switch on servers , and not to run the switch directly on the client system itself.
Therefore, the "official" answer is clear: there is no SLA in Windows 11 , and with it, the traditional teaming mechanism based on Intel drivers disappears. However, you can explore options related to the Hyper-V switch, a restored LBFO, or advanced configurations in Windows Server if your environment allows it.
Practical example: NIC Teaming on a Windows 11 computer
To understand how NIC Teaming can be used in Windows 11, let's look at a specific example: a user who buys a second-hand Intel NUC Extreme 9 with a 2 TB SSD and space for an ITX graphics card. This machine, besides being a powerful little device, has two 1 Gbps Ethernet interfaces, designed specifically for parallel operation.
The user's goal is to create a NIC teaming setup with these two interfaces to double the effective bandwidth and achieve some fault tolerance. From a hardware perspective , this is ideal: two physical ports connected to a managed switch allow for the creation of an aggregated link to the device.
The first step is to configure your HP switch so that the two ports where the NUC connects operate in trunk mode, enabling link aggregation. This typically involves enabling LACP or a static trunk mode, depending on the switch model and the network topology you want to deploy.
Once the network part is set up, open a PowerShell console with administrator privileges in Windows 11 to see what interfaces are available and prepare the ground before creating the team.
The following command obtains a list of network adapters present in the system, in this case LAN01 and LAN02 as the main cards, as well as other interfaces such as Wi-Fi or USB adapters :
Once you have identified the interfaces that will be part of the team, run the PowerShell command to create the team, using LANTEAMING as the logical name and adding LAN01 and LAN02 as members:
After a few seconds, you can verify that the virtual team has been generated correctly using Get-NetSwitchTeam , which displays the team name and the interfaces that comprise it:
The properties of the new logical adapter show an effective speed of 2 Gbps, resulting from the sum of the two 1 Gbps interfaces . From now on, traffic can be distributed between the physical ports, and if one becomes unavailable, the other maintains connectivity.
Running ipconfig clearly shows that the operating system exposes the new LANTEAMING adapter, while the physical cards remain "hidden" at the IP configuration level:
In this case, the IP address assigned by DHCP matches the one previously assigned to the LAN01 interface, but now that IP address is associated with the LANTEAMING device , not the physical NIC. If one of the two ports goes down (for example, by disconnecting the LAN01 cable), the speed will be reduced on the remaining link, but connectivity will be maintained.
This type of configuration therefore offers high network availability in the event of card, switch port or even patch cable failures, all in a relatively transparent way for the operating system and for applications that only see a logical network adapter.
NIC Teaming in Windows 10 with PowerShell
In Windows 10, the situation is slightly less complicated, as Microsoft's native options still overlap with those of Intel ANS. A common way to set up NIC Teaming is to use PowerShell to create a Switch Team , as in the previous example, but with an officially supported system.
The idea is the same: we have two or more physical network interfaces, for example LAN1 and LAN2 , and we want them to function as a single interface. The first step is to verify that the interfaces are active and have the correct driver using the Get-NetAdapter command, checking the status and link speed.
Next, we open a PowerShell console with administrator privileges and create the team with a command very similar to the following, specifying the team name and the cards to be integrated:
If everything goes well, running Get-NetSwitchTeam will show that the device has been created and is in good working order, ready to receive an IP configuration and function as the system's primary logical adapter. From there, we can manage the IP address of the new adapter from the CPL file in Windows (Network and Sharing Center), just as we would with any other network interface.
Windows 10 connections will be reorganized: the system will display the team adapter and leave the physical NICs as part of the network, without their own IP configurations. Load balancing and failover are again achieved, depending on the configured mode and the compatibility of the remote switch.
NIC Teaming in Windows Server from Server Manager
In Windows Server systems (2012, 2016, 2019 and later editions) NIC Teaming can be managed entirely graphically from Server Manager , without always needing to resort to PowerShell, although cmdlets are still available and are very useful for automating deployments.
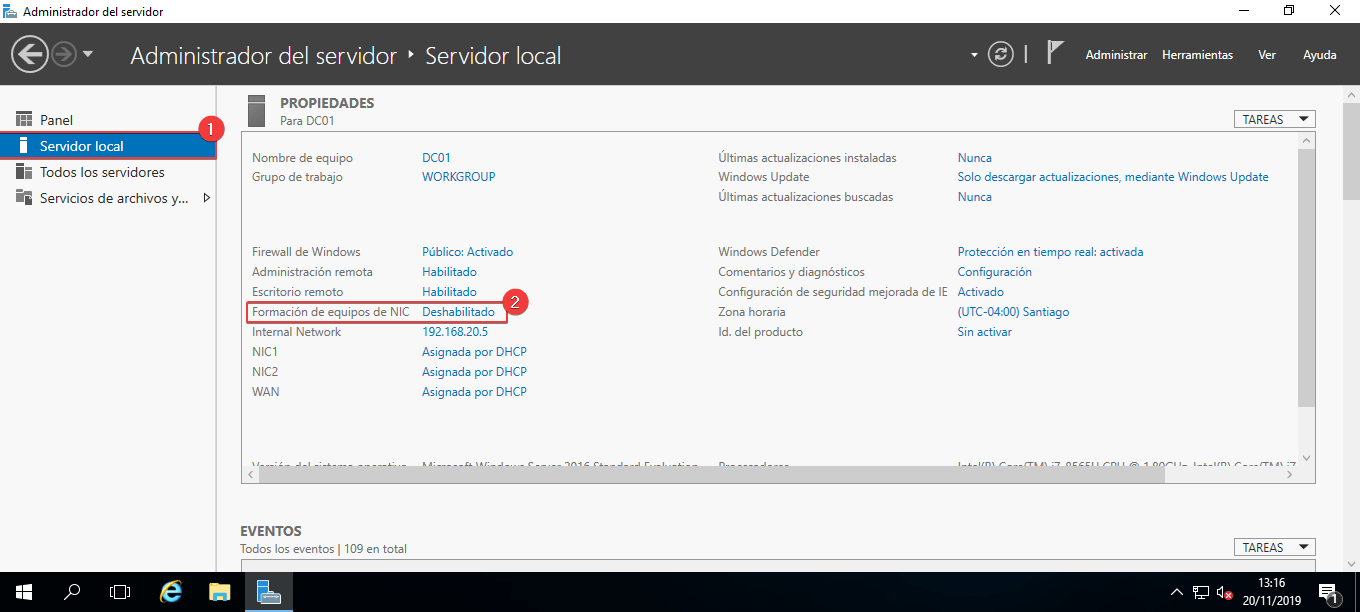
Within the Local Server section of Server Manager , just above the network adapter information, you'll find the NIC Teaming option. If it's listed as disabled, simply click on that status to open the corresponding configuration wizard.
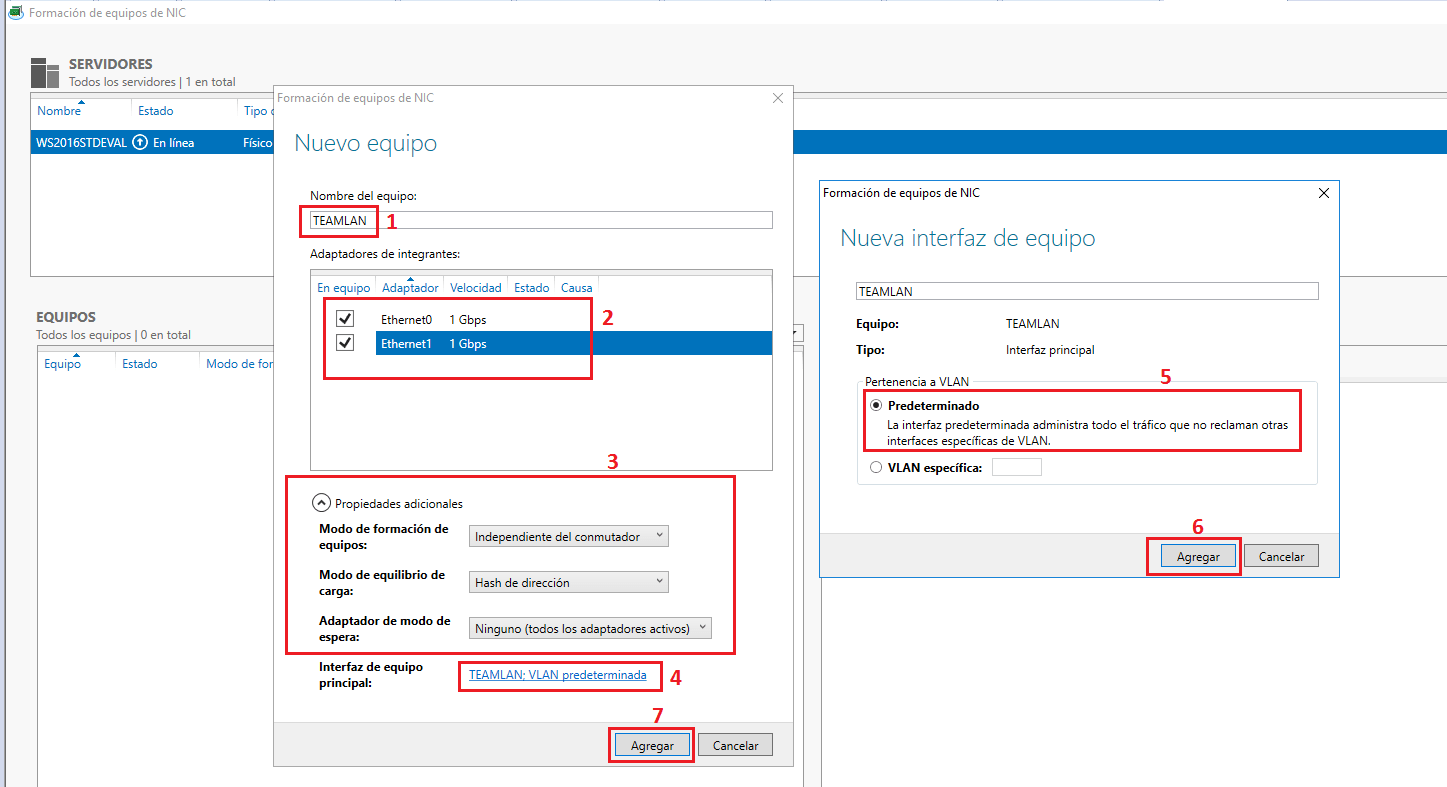
In the NIC Teaming administration window, you'll see a panel with the detected physical adapters. By selecting one of them in the adapters and interfaces section, you can add it to a new team . At that point, you'll be prompted to name the team, which the system will use to create the associated logical adapter.
Once the name has been specified and the interfaces that will be part of the team have been selected, the advanced options can be displayed, where parameters such as which adapters will be active and which ones on standby , the load balancing mode (for example, address hash or dynamic mode) and the type of teaming (independent of the switch or dependent, LACP, etc.) appear.
Some of these options will have no effect if we are working on virtual machines instead of physical interfaces, but in physical environments they allow fine-tuning the team's behavior, depending on whether performance or fault tolerance is the priority.
Once the team is created, the new logical network adapter appears in the system as if it were another NIC, and can be configured from the server's Network and Sharing Center . Later, you can always return to the NIC Teaming wizard to add or remove interfaces, change the operating mode, or reconfigure parts of the setup.
Hyper-V virtual switch and VLAN in Windows
Another element closely related to NIC Teaming in Microsoft environments is the Hyper-V virtual switch . This switch allows virtual machines created on a Hyper-V host to communicate with other machines, whether on the same machine, on the internal network, or to external networks.
Before a virtual switch can be installed and configured, the computer must meet certain prerequisites, such as having hardware compatible with virtualization (Intel VT-x, AMD-V), having Hyper-V enabled in Windows features, and having at least one suitable physical NIC that can be linked to the switch.
Once these requirements are met, a basic virtual switch can be created from Hyper-V Manager or via PowerShell. There are three main types of switch: external, internal, and private . The most relevant for NIC teaming and production scenarios is the external switch, which connects the virtual machines to the physical network.
External virtual switches offer an option to allow the management operating system to share the selected network adapter . This means the same physical NIC can be used by the host (Windows) and by virtual machines connected to that switch, with traffic managed through the Hyper-V extensible switch.
Furthermore, VLAN IDs can be configured on both the virtual machine network adapters and the virtual switches themselves. A specific VLAN ID can be set on internal or external switches; the management operating system and VMs communicating through that virtual switch will use that same VLAN ID.
If finer control is needed, the virtual switch can be configured with advanced properties such as port mode, native VLAN, or various tagging options . This is often done using PowerShell, ensuring that the Hyper-V configuration is compatible with the physical switches and the rest of the network.
Once the virtual switch has been created and configured, it is advisable to review related documentation on virtual network configuration, DHCP services, and routing in Hyper-V environments , as the performance and stability of the virtual infrastructure depend heavily on how the entire setup is configured.
Restore LBFO and NIC Classic Teaming in Windows 11
With the disappearance of Intel ANS and the lack of official support for LBFO (Load Balancing/Failover) in Windows 11, some advanced users have opted to look for alternative ways to continue using NIC Teaming in lab equipment or non-critical environments.
A recent example is that of a user who, when setting up a NAS and a media server with Windows 11 IoT Enterprise LTSC 2024 , found that he could not enable LBFO as he did in Windows 10. He also could not migrate to Windows Server because some lab applications were incompatible with that system.
After extensive research and building upon the previous work of other researchers (such as Graham Sutherland, who compiles valuable documentation on this topic), he developed a one-time installation solution that restores LBFO capabilities in Windows 11. This solution is published in a GitHub repository.
https://github.com/hifihedgehog/Windows11LBFO
This method has enabled LBFO-type teaming to work on Windows 11 Pro 24H2 and Windows 11 IoT Enterprise LTSC 2024 , both on virtual machines and physical hardware. The community is testing the solution and reporting issues on GitHub, allowing for continuous refinement.
The great advantage of this approach is that it restores advanced link aggregation capabilities , such as LACP compatibility and efficient traffic balancing between multiple NICs and a managed router or switch. In the specific case of the aforementioned home lab, seeing LACP link aggregation in operation between the router and the host (with multiple clients transferring data simultaneously) is a real treat for anyone who enjoys fine-tuning their network.
However, it should be noted that these types of solutions are not official or supported by Microsoft , so their use should be limited to test environments or laboratories where some risk is assumed and there is time to troubleshoot if something breaks after an update.
High availability, load balancing, and usage scenarios
Beyond the technical aspects, it's important to understand the real-world benefits of NIC Teaming and LBFO. The most obvious advantage is high network availability : if one physical link fails (network card, switch port, patch cable, etc.), the other remains operational, maintaining connectivity without the operating system having to manually switch to a different adapter.
The second key element is load balancing . Depending on the configured mode (e.g., IP hash, MAC hash , dynamic mode), traffic is distributed across the different network interface cards (NICs) of the device. This doesn't always mean a single session will be twice as fast, but it does mean that multiple simultaneous connections can make much more efficient use of the available links.
In advanced home or lab environments, this is especially noticeable when performing simultaneous transfers from multiple clients to a NAS or media server . Instead of overloading a single interface, the traffic is distributed, improving the experience for all clients.
In production scenarios, such as file servers, machines hosting multiple virtual machines with Hyper-V, or hosts serving critical business applications, NIC Teaming becomes another piece of the high availability puzzle, alongside clusters, redundant storage , and dual power supplies.
However, to truly leverage the potential of teaming, it's crucial that the switch or router configuration is consistent with the team's configuration. Enabling LACP, correctly defining port groups, reviewing VLANs, and ensuring load balancing mode compatibility are tasks that make the difference between a stable team and one plagued by intermittent problems.
In short, NIC Teaming remains a very powerful tool for those who need to go beyond basic network connection, although in Windows 11 you have to combine native solutions, Hyper-V and community projects to achieve what was previously accomplished with a few clicks in Intel PROSet or Server Manager.

Passionate writer about the world of bytes and technology in general. I love sharing my knowledge through writing, and that's what I'll do on this blog, show you all the most interesting things about gadgets, software, hardware, tech trends, and more. My goal is to help you navigate the digital world in a simple and entertaining way.