- Differentiated workflows between UEFI, Legacy, and MyASUS, with clear keys and confirmations.
- Critical check after reset: mode Boot, Secure Boot and Boot Order.
- Passwords of the BIOS They are not deleted when restoring; they require specific management.
- Specific features by manufacturer (Surface, ASUS, Acer, Dell) and common shortcuts.
Restoring the firmware to its default settings is a quick fix when your PC starts up erratically, errors appear after tweaking settings, or changes have been made that you don't remember. By loading the default UEFI/BIOS configuration , the system returns to a stable factory state without erasing your files or Windows , providing a clean slate for troubleshooting configuration issues.
This guide will show you, step by step, how to boot into both UEFI and Legacy BIOS modes, as well as how to use the MyASUS interface and desktop cases. You'll also find common shortcuts (such as F2, Delete, F9, and F10), key warnings about boot modes, firmware passwords, and brand-specific instructions (Acer, Dell, ASUS, Surface). Everything is explained in clear, Spanish (Spain) so you can proceed with confidence and avoid any boot surprises.
What does restoring UEFI/BIOS defaults entail?
UEFI and Legacy BIOS are the firmware layers that initialize the hardware before the operating system. "Loading defaults" reverts settings to a base profile optimized by the manufacturer. This is useful if you've modified boot, storage , or security parameters and your computer isn't behaving as expected. It doesn't erase your system or data, but it can change critical options that affect booting, so it's advisable to check certain settings after the reset to avoid black screens, boot loops , or errors like "BOOTMGR is missing . "
There are clear differences in how they're handled: UEFI allows navigation with a keyboard, touchpad, or mouse; Legacy only allows using the keyboard. Additionally, depending on the model, the manufacturer labels the options differently (Default, Load Optimized Defaults, Restore Defaults, etc.). Don't worry if the screen isn't identical to the screenshots in the manuals: the names change, but the workflow is usually very similar, so it's normal for there to be interface variations between models.
The steps in this guide apply to a wide variety of devices: laptops , desktops, all-in-ones, mini PCs, and even handheld gaming devices. The key combinations to access the firmware vary (F2, Delete, Esc, F10…), but once inside, the actions to reset, confirm, and save (F9/F5/F10 depending on the device) remain fairly consistent across brands.

Restore settings according to firmware mode
Below you'll see how to load default settings in different scenarios. Pay close attention to the mode (UEFI or Legacy) and whether your interface is the manufacturer's standard interface or a custom one (for example, MyASUS). Following these steps will help you complete the process with clear confirmation and successful saving.
UEFI mode (laptops, All‑in‑Ones, and gaming handhelds)
In UEFI, you can navigate using the keyboard, touchpad, or mouse. The restore option is usually called Default, Load Optimized Defaults, or something similar. When finished, the computer will restart to apply the changes cleanly and effectively.
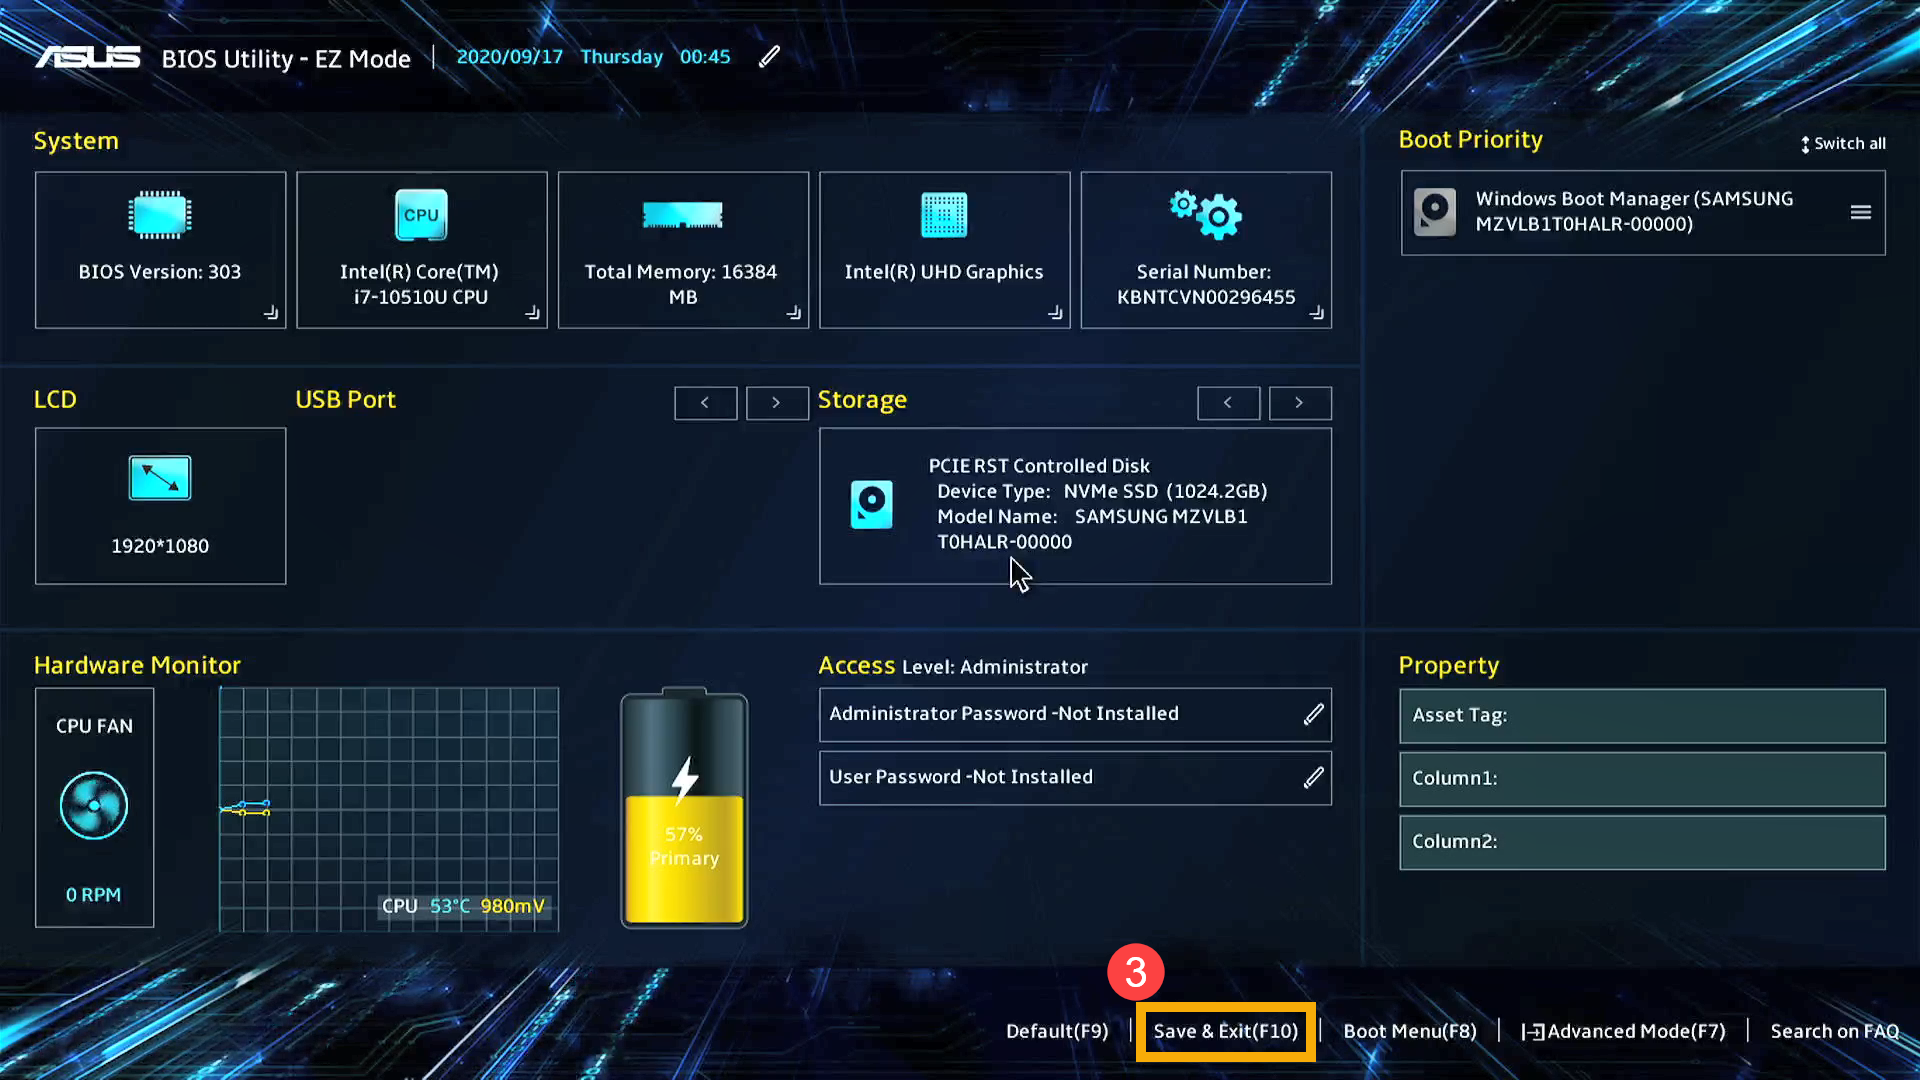
- Press the F9 key, or use the cursor to select the “Default” option if it appears on the screen.
- Confirm the loading of default values by choosing “Ok” and pressing Enter (or clicking “Ok”).
- Press F10, or select “Save and Exit” from the corresponding menu.
- When prompted, select "OK" to save and exit. Your computer will restart and return to Windows.
Important note: Depending on the model, the names and location of the options may vary slightly. If you don't see "Default," look for text such as "Load Optimized Defaults" or "Restore Defaults." The essential thing is to load the base profile, confirm, and save before exiting.
Legacy Mode (Classic BIOS)
In Legacy BIOS, navigation is exclusively via the keyboard. The process is similar: load optimized values, confirm, save, and exit. This method is common in older systems or specific configurations that don't use a UEFI interface. Stay calm and follow the keystrokes precisely to avoid getting lost.
- Press the F9 key to load default values.
- Confirm by selecting “Yes” and pressing Enter.
- Press F10 to save changes.
- Confirm again with "Yes" and press Enter to exit. The system will reboot.
MyASUS interface in UEFI
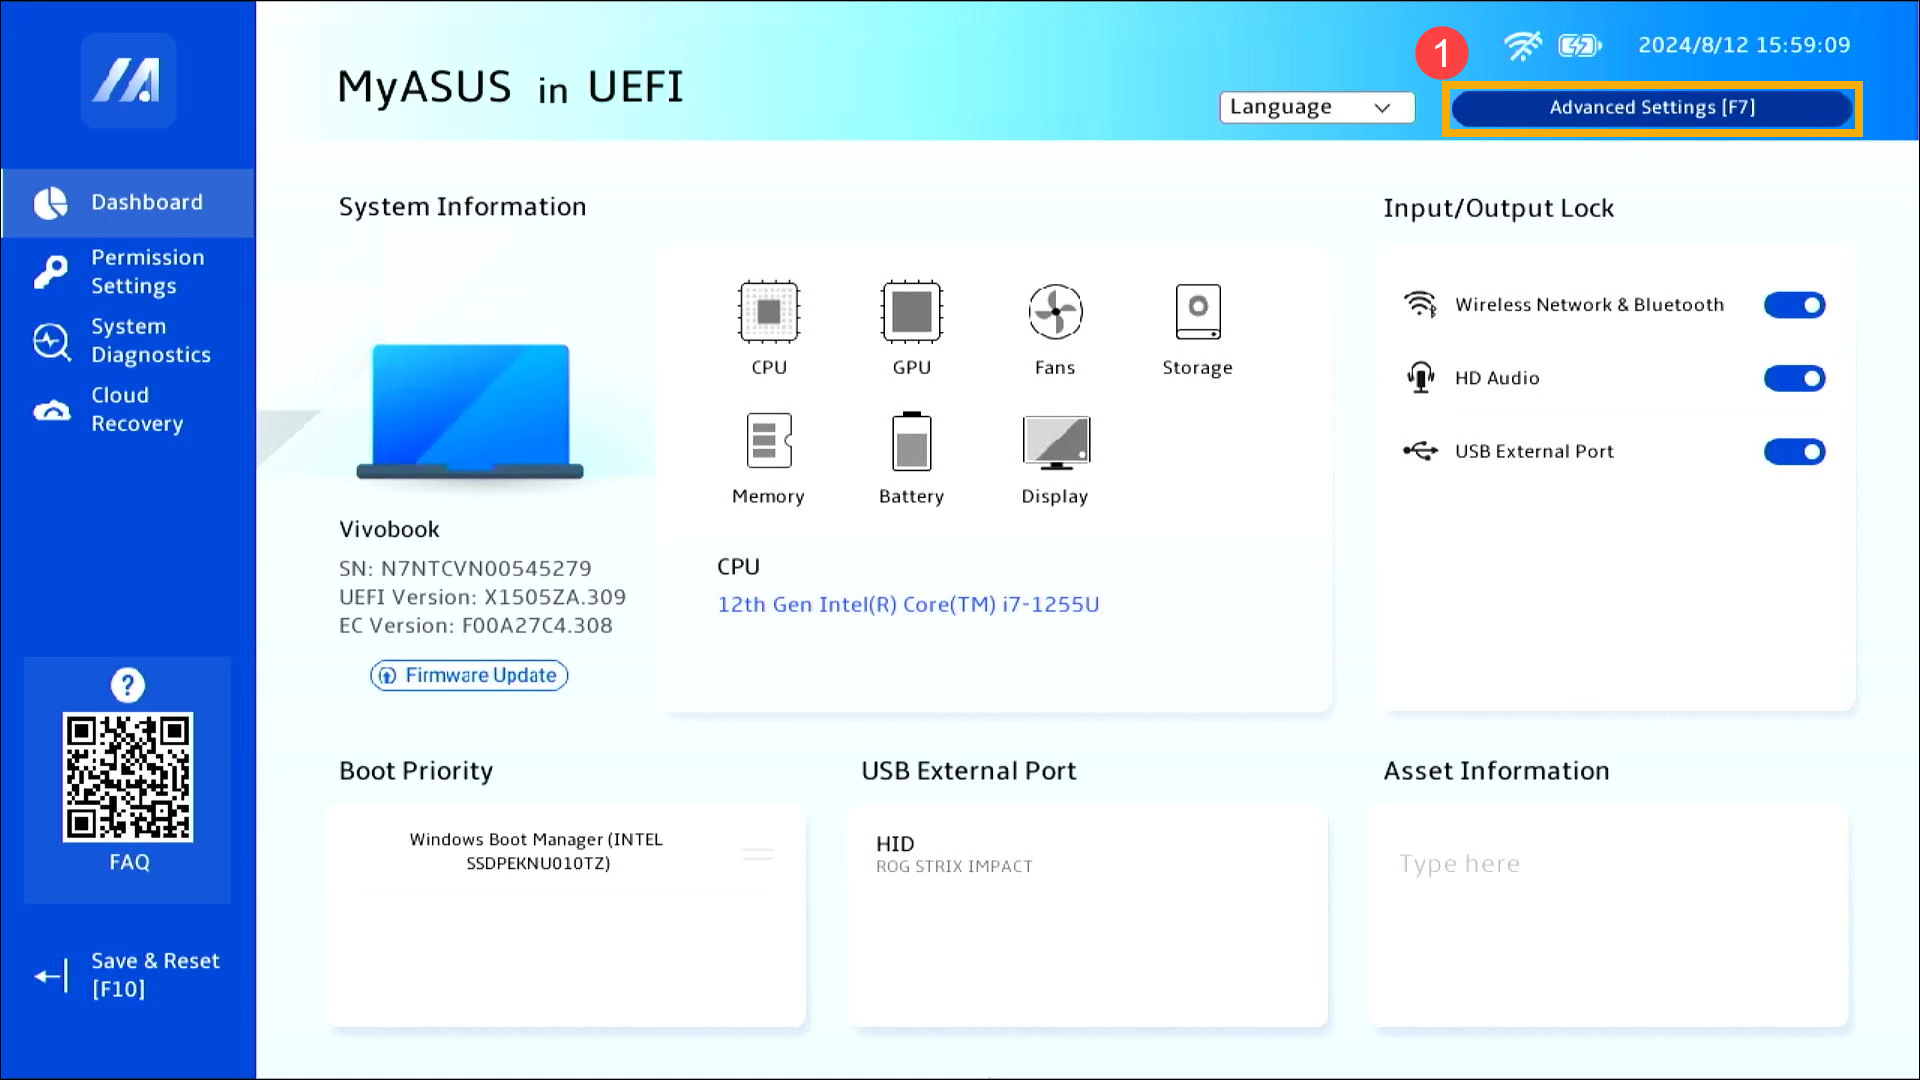
Some ASUS devices feature a customized UEFI interface (MyASUS). This allows you to switch between a basic and an advanced view. To perform a factory reset, it's best to open the advanced options and proceed with loading default settings directly and safely.
- From the setup screen, press F7 to enter “Advanced Settings,” or click “Advanced Settings.”
- Press F9 and confirm with "Confirm." Alternatively, you can go to the "Save & Exit" page and choose "Reset to Defaults."
- To save and exit, press F10 and confirm with "Confirm." Alternatively, under "Save and Exit," choose "Save Changes and Exit."
- The computer will automatically restart and return to Windows.
Keep in mind that the menu layout may vary depending on the model. If you can't find the exact path, look for equivalent options in "Save and Exit" or in the general settings tabs. The important thing is to activate the reset, confirm, and save the changes.
ASUS Desktop in UEFI (varies F5/F9)
On some ASUS desktop motherboards, the key to load defaults is F5 instead of F9. The rest of the process is identical: confirm, save, and exit. If your screen displays "Default" or "Predeterminado," you can also click with your mouse. Make sure to complete all confirmations before restarting.
- Press the F5 key, or select the “Default” option on the screen.
- Confirm the upload with “Ok” and Enter (or click “Ok”).
- Press F10 or choose “Save & Exit.”
- Confirm again with "Ok" and Enter. The PC will restart.
Common generic shortcut (Acer and other manufacturers)
If you just need a quick fix: power off completely, enter the firmware, and load default settings. On many Acer laptops, this is F2 to enter, and on desktops, it's usually Delete; then, press F9 to load and F10 to save. It's a universal method that generally works on many models, useful when you want to reset in two minutes.
- Press and hold the power button for about 10 seconds until the device completely shuts down.
- Turn it on and, as soon as you see the logo, repeatedly press F2 (laptops) or Del (desktops) to enter the BIOS/UEFI.
- Press F9 and then Enter to load the default settings.
- Press F10 and then Enter to save and exit.
If boot problems persist after restoring, contact your brand's official support. There could be a hardware conflict, a pending firmware update, or a security setting that needs to be reconfigured. You can also boot into the advanced options menu to try additional repairs. Don't worry: with a proper checklist, most cases can be resolved in minutes.
Critical settings to check before and after restoring
Restoring the UEFI/BIOS doesn't erase Windows, but it can change settings that affect startup. Before resetting, take photos of key screens; then, check and correct anything necessary. This review will prevent surprises like the system not finding the disk or a security feature preventing startup. If you use BitLocker with TPM , check its settings after the reset; a 2-3 minute check can save you a lot of diagnostic time.
- Boot Mode (UEFI vs. Legacy): Note the current mode. A Windows installed in GPT/UEFI will not boot if you switch to Legacy, and vice versa.
- Secure Boot: If you were using it, re-enable it after a restore. Some systems require it to boot or for security features.
- Boot Priority (Boot Order): Ensures that the system disk is first. If you have multiple disks or USB connected, adjust the order.
- SATA/Controller Mode (IDE/AHCI/RAID): Modern Windows typically uses AHCI. Changing this without the proper driver can result in blue screens or no boot.
- Virtualization (Intel VT-x/AMD-V, VT-d/IOMMU): Re-enable if using Virtual machines or advanced containers.
- Graphics: Default graphics selection (integrated/dedicated), shared VRAM, and PCIe mode (Gen 3/Gen 4). Important if using an external GPU.
- System date and time: Adjust the time if it's misconfigured; otherwise, you'll experience SSL warnings and issues with online services.
After checking these points, save and restart. If the device doesn't boot, return to the firmware and check Boot Mode, Boot Order, and Secure Boot. In many cases, with these three settings correctly configured, the system will come back to life without further complications.
Particularities in Surface devices
On Surface devices, UEFI restoration is not standalone: there's no way to "reset only the UEFI" without completely resetting the device. If your plan was to fix a battery problem via the firmware, it's best to consult official support before taking any drastic steps. Explaining the symptom in detail will help you receive a tailored recommendation and avoid unnecessary data loss.
Common mistakes and how to solve them
- Black screen After the reset: Restore UEFI if you installed Windows in GPT, adjust Boot Order and enable Secure Boot if necessary.
- Disks that "disappear": Check the SATA mode (change it to AHCI if applicable) and, on computers with RAID, confirm that the controller and drivers match your installation.
- Virtualization Disabled: Re-enable VT‑x/AMD‑V and VT‑d/IOMMU if you are using virtual machines, WSL2, or software that requires it.
- Abnormal graphics performance: Select the appropriate GPU as primary and the correct PCIe mode for your card (Gen 3/Gen 4).
With these procedures and checks, you'll have mastered the UEFI/BIOS reset on most modern computers and older models as well. By performing the process carefully, confirming the key windows, and reviewing critical boot settings, you can easily restore system stability and continue working with complete peace of mind.

Passionate writer about the world of bytes and technology in general. I love sharing my knowledge through writing, and that's what I'll do on this blog, show you all the most interesting things about gadgets, software, hardware, tech trends, and more. My goal is to help you navigate the digital world in a simple and entertaining way.