You've probably heard of Windows 8 To Go, which lets you install a portable version of Windows 8 on a Microsoft-certified USB flash drive. If you're a long-time Windows 7 user, you might be wondering if there's a way to install Windows 7 on a USB drive or external hard drive.
With Windows 7 on a USB flash drive or external hard drive, you can take it with you wherever you go and run Windows 7 on any PC you want to work on.
Windows Setup can detect the USB hard drive, but when you select the external disk as the target location to install Windows 10/8/7, you will get the error “Windows cannot be installed on this disk.” Fortunately, there is a solution for this, and it’s quite simple. Even those who don’t know how to install Windows 7 on a USB can follow this guide to do so.
How to install Windows 7 on a USB with VirtualBox
To install Windows 7 on a USB drive and take it with you wherever you go, the best option is to use third-party tools. One such tool is VirtualBox . To use it, simply follow these steps:
- Step 1: The first thing you need to do is connect the USB device to your machine and do a Backup of all the data on that USB drive.
- Step 2: The next thing you should do is download VirtualBox portable. Once downloaded, double-click the executable file and extract the contents of the file to the USB.
- Step 3: Then go to the VirtualBox portable folder on the USB and from there run the Portable-VirtualBox (.exe) file.
- Step 4: The next thing you should do is follow the steps which are detailed on screen for create a virtual disk like this. This will allow you to install Windows 7 on a USB. Follow the Windows 7 installation guide in VirtualBox completely to complete the process.
- Step 5: Once the installation process is complete, you can safely close VirtualBox and remove the USB drive.
- Step 6: Now that you have been able to install Windows 7 on a USB you can use this version of the operating system on any Windows machine you want.
To use Windows 7 on another machine, just plug in the USB with Windows 7, open the USB drive and run the portable-VirtualBox file.
How to Install Windows 7 on USB with AOMEI Partition Assistant
You may have read some other tutorials or guides that talk about how to install Windows 7 on USB or external hard drive, but the process may be cumbersome and not easy to follow. Now I will recommend you a free tool called AOMEI Partition Assistant Standard. This is a professional third-party disk partition management tool, it only takes a few steps to create a Windows 7 portable USB drive.
Provides Windows to Go feature that allows you to run Windows 10/8/7 from a USB flash drive. And it doesn't require a Microsoft certified USB.
Things you need to prepare:
- You need to prepare a USB flash drive larger than 13GB (we recommend you use a USB 3.0 drive due to its faster read and write speed). All data on this USB flash drive will be erased, please make a backup in advance.
- If you plan to create a completely new system, you need to download the Windows 7 ISO file.
How to install Windows 7 on a USB?
Once you have prepared the items listed above, you can follow the steps below to create a bootable Windows 7 USB drive.
- Step 1: After download AOMEI Partition Assistant. Connect the USB drive to a computer USB and make sure your machine detects it.
- Step 2: In the main interface, if you see the USB drive is displayed in AOMEI Partition Assistant, please click the option Windows to Go Creator en all tools. Then, select Windows To Go Creator.
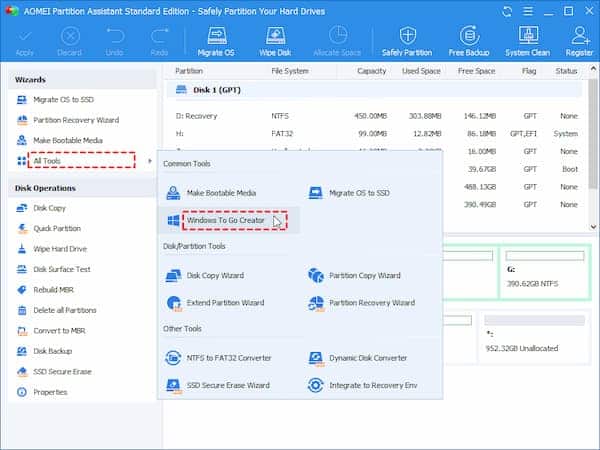
- Step 3: Then choose the first option “Creating Windows To Go for Personal Computer” and click "Following".
- Note: If you want to boot Windows from USB in Mac, you can choose the second option.
- Step 4: Choose "Create Windows To Go with system disk/ISO» and select the prepared ISO file. Click on "Following" to continue.
- Step 5: Select the USB drive you have prepared and click "Continue".
When the process is complete, use this newly created bootable USB drive to boot any Windows PC and take this portable version of Windows 7 with you.
The USB flash drive used to install Windows 7 is an MBR disk, which means it can only boot PCs with Legacy boot mode enabled. If you want it to boot computers in UEFI boot mode, you can convert it to a GPT disk without data loss.
In addition to the ability to install Windows 7 on a USB drive, AOMEI Partition Assistant Standard also provides many other excellent features, such as migrating the operating system to an SSD without reinstalling Windows, merging partitions, and resizing partitions without data loss.
If you need more advanced features like converting dynamic disk to basic without data loss, you can try the professional edition of AOMEI Partition Assistant.
Don't miss: Slow USB in Windows 7 | 4 Methods to Fix It
Install Windows 7 on USB using WinToUSB software
WinToUSB is software that lets you carry your operating system anywhere on a device like a USB drive. That's why we consider it another excellent way to install Windows 7 on a USB drive. Just follow the steps below.
- Step 1: Connect your USB device or external hard drive to your Windows 7 computer and create a backup of the information that is on the USB if you have anything saved there.
- Step 2: Visit the official page of WinToUSB and download the software to your PC. Once downloaded, run the setup file following the on-screen prompts to complete the installation.
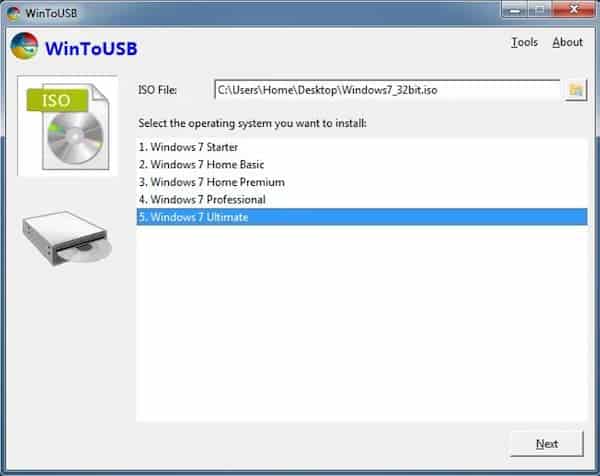
- Step 3: Start WinToUSB and on the main screen Click the button next to the ISO file box until you find Windows 7. Select the OK button to open it and choose the version of the operating system you want to install on the USB. Select the Next button.
- Step 4: You will be prompted to select the file destination. When you select USB you will see a message that says “The selected device needs to be formatted. Are you sure you want to continue?, click yes to continue.
- Step 5: Finally, You will be asked to select the system partition and the boot partition on the USB drive. If you have not partitioned the USB drive, you can select the same partition (whole drive) as the system partition as well as the boot partition. And if you have two or more partitions, select one to use as the boot partition and another partition with at least 16GB of space as the system partition.
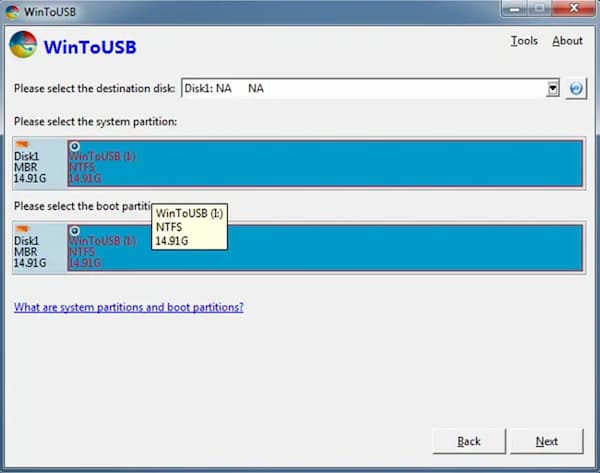
- Step 6: Click on the NEXT to start the process of installing Windows 7 on a USB. Please note that this process can take several minutes or even hours depending on the capacity of the USB you are using.
Final words
If you want to install Windows 7 on a USB drive or hard drive to use on another PC, you'll need to use a third-party tool like the ones we've mentioned in this article. This is the best way to achieve this installation on an external device. If you know of other third-party tools that also work, please leave a comment.

My name is Javier Chirinos and I am passionate about technology. Ever since I can remember, I have been interested in computers and video games, and that passion has turned into a job.
I have been publishing about technology and gadgets on the Internet for over 15 years, especially in mundobytes.com
I am also an expert in online marketing and communication and have knowledge in WordPress development.