- FFmpeg allows you to transform image sequences into custom videos by controlling framerate, codecs, and resolution.
- There are several input methods (format specifiers, glob patterns, and concat demuxer) to accommodate different filename types.
- It is possible to enrich the resulting videos by adding audio, watermarks, effects, speed changes, and scaling.
- FFmpeg stands out for its power and automation, while graphical alternatives offer simpler workflows for non-technical users.
If you've ever wondered how to turn a mountain of photos into a smooth video (whether it's a time-lapse, a slideshow, or a social media clip), FFmpeg is probably the most powerful tool you'll find… and it's free software. It might seem a little intimidating because it's controlled from the terminal , but with a few clear commands and some practice, it becomes an incredible ally for automating tasks that would take forever with a graphics editor.
This guide will show you, in considerable detail, how to use FFmpeg to create videos from image files : from installing it and preparing your photos, to controlling the speed, output format, adding audio, overlays, and even experimenting with fast and slow motion effects. You'll also see several different methods for working with image sequences (format specifiers, glob patterns, concat demuxer) and some less technical graphical alternatives if the command line isn't your thing.
What is FFmpeg and why is it worth learning how to use it?
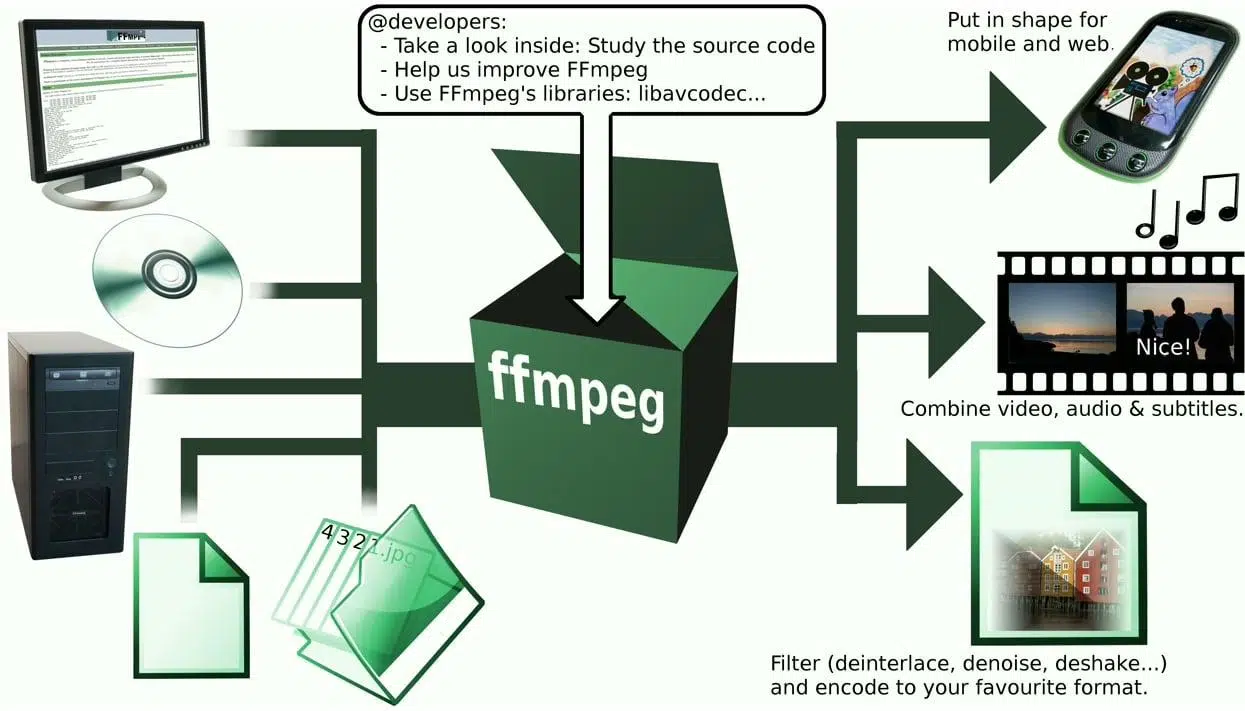
FFmpeg is a set of open-source tools and libraries for processing virtually any video, audio, and even image format. Its name comes from "Fast Forward Moving Picture Experts Group," and although it might not seem like it, it's the technology behind many platforms you use daily: streaming services , social networks, media players, online converters, and more.
Unlike traditional editors with a graphical interface, FFmpeg is controlled with commands typed in the terminal . This might seem daunting at first, but it gives you pinpoint control over encoding, codecs, filters, quality, resolutions, and, most importantly, allows you to automate batch processes with scripts or integrate it into other systems.
Among its strengths is its cross-platform compatibility : it runs on Linux , Windows , macOS, and other UNIX -like systems . Furthermore, it's distributed under GPL/LGPL and BSD licenses, so you can use it in both personal and commercial projects without paying a fee.
With FFmpeg you can, for example, create a timelapse from thousands of photos , extract images from a video , combine photos, add audio tracks, insert watermarks, change the codec, reduce file size, or generate animated GIFs… all from the terminal.
Installing FFmpeg on different systems
Before you start converting images to video, you need to have FFmpeg properly installed . It's already available in the official repositories of many GNU/Linux distributions, and it's also easy to add to macOS and Windows.
On Debian, Ubuntu, and derivatives, it's usually installed using the system's package manager. From the terminal, you can do something as simple as updating the package index and then installing the ffmpeg package with administrator privileges.
On macOS, the easiest way is to use Homebrew as your package manager . First, install Homebrew (if you don't already have it), and then add FFmpeg with a single `brew` command. This avoids having to manually download binaries and manage paths.
On Windows, you have several options: download the official executable from the FFmpeg website and add it to your PATH, or use installers like Chocolatey to install it from the command line. In either case, once installed, you can run the ffmpeg command from any terminal or command prompt.
Regardless of your system, you can verify that the installation went well by typing `ffmpeg -version` in the terminal . If you see version and build information, as well as a list of supported codecs and formats, you're all set to proceed.
Basic concepts: video inputs, outputs, and containers
Before delving into the image sequences, it's helpful to understand some concepts about how FFmpeg handles inputs and outputs , and what the MP4, MKV, or AVI formats you'll see in the commands look like.
The general structure of an FFmpeg command usually follows this pattern: input parameters and files (indicated with -i), then filters and encoding options, and finally the output file. In between, you can add parameters for video (-vf), audio (-af), codecs (-c:v, -c:a), bitrates, frame rates, etc.
The output files are saved within a video container . MP4, MKV, AVI, MOV, WEBM… these are all containers. They don't define the video or audio codec themselves; they only indicate how everything is packaged so that players can understand it. For example, an MP4 file might contain H.264 video and AAC audio, while an MKV file might combine H.265 video with FLAC audio and subtitles.
For most uses (especially on the web, mobile devices, and home media players), MP4 with H.264 video is the most practical format , as it offers excellent compatibility and a well-balanced quality-to-size ratio. If you need advanced features (multiple tracks, complex subtitles, etc.), MKV is a great option, although it's not as well supported by web browsers.
With FFmpeg you can list the huge number of available codecs with ffmpeg -codecs or specific encoders with ffmpeg -encoders; in reality, for most projects with images, H.264 (libx264) and AAC or MP3 audio will suffice , if you decide to add sound.
Prepare the images to convert them into video
The key to FFmpeg working correctly when stitching photos is that the image sequence is properly ordered and named . This is especially important if you're going to use format specifiers like %d, %02d, %03d, etc.
FFmpeg understands different naming patterns. One very common one is to use leading zeros for numbering , for example, photos like photo-001.png, photo-002.png, … photo-999.png. In that case, the pattern in the command would be something like photo-%03d.png (the 3 indicates the number of digits).
If you're not too concerned about the number of digits, you can also use names without leading zeros : image1.jpg, image2.jpg, image3.jpg… with a pattern like image%d.jpg. Again, FFmpeg will take care of finding the files whose names match that pattern.
There's also the option of using wildcards like glob patterns , such as *.jpg or image-*.png, which is ideal when your photos aren't numbered but do share a common extension or prefix. In that case, FFmpeg scans for all files that match that pattern.
If a % character appears in filenames for any reason, you must escape that symbol by doubling it, using %% instead of % , so that FFmpeg does not interpret it as a format specifier of the numbering pattern itself.
Convert a sequence of images into a basic video
Once you have all your images numbered and in the same folder, creating a simple video is as easy as specifying the input pattern and the output file name . For example, if your photos are named img-01.png, img-02.png, etc., you could do something like this:
ffmpeg -i img-%02d.png video_output.avi
In this case, FFmpeg will look for files whose names begin with img- followed by two digits, and package them into an AVI file. The playback speed and default codec will depend on your FFmpeg build's standard settings, but for basic use, it's usually sufficient.
For more precise control, it's common to also specify the input frame rate with `-framerate` and the output codec with `-c:v`. A typical example for MP4 might be:
ffmpeg -framerate 5 -i img-%02d.png -c:v libx264 -pix_fmt yuv420p video.mp4
Here you specify that 5 images per second should be read, that the video should be encoded with H.264 (libx264) and that the pixel format should be yuv420p, which is the most compatible with common televisions, browsers and players.
Choosing the right frame rate
The frame rate (fps) determines how many images are displayed per second in your final video. There is no single correct value: it depends entirely on the effect you are aiming for and the source material.
If you're creating a stop-motion animation or a fast time-lapse, frame rates like 24 or 25 fps (the film/TV standard) usually give a sense of smooth movement. For very intense time-lapses, you can go up to 30 fps or even higher.
On the other hand, for a slow-motion slideshow , where you want each photo to be displayed for a few seconds, you'll probably want a much lower frame rate: 1 or 2 fps, for example. This allows each photo to remain on screen longer without having to duplicate files.
Keep in mind that if you don't set the framerate in the input, FFmpeg may use a default value (often 25 fps ) that might not match what you want and could generate a video that is too fast or too slow depending on the number of photos.
In addition to frame rate, you can control playback speed afterward with filters such as setpts for video (e.g., setpts=0.5*PTS to make it play at twice the speed) and atempo for audio (atempo=2.0 to make the sound play at twice the speed).
Create videos from a single image
You don't always need a full sequence. Sometimes a single photograph that remains on screen for a certain amount of time is enough , for example, as an intro or a static screen with title and logos before the main content.
This is achieved using the `-loop 1` option , which tells FFmpeg to loop the image, along with `-t` to set the total clip duration. A typical command might be:
ffmpeg -loop 1 -i cover.jpg -c:v libx264 -t 10 -pix_fmt yuv420p cover.mp4
This example generates a 10-second video in which your cover image (.jpg) remains static. From there, you can combine this short clip with another main video to create a single, continuous file, including the intro.
If you also want to apply a slight motion effect (smooth zoom, panning, etc.), you can use video filters such as zoompan or combinations of scale, crop, and pad to simulate a small camera movement.
Method 1: Format specifiers for numbered sequences
When your photos are properly numbered (image1.jpg, image2.jpg, image3.jpg…), the most direct method to convert that sequence into a video is to use format specifiers in the input path.
For example, if your files are image1.jpg, image2.jpg, … image50.jpg, you can create a video by reading one image per second and generating an output at 30 fps with this command:
ffmpeg -framerate 1 -i image%d.jpg -c:v libx264 -r 30 -pix_fmt yuv420p output.mp4
In this context, `-framerate 1` indicates that one frame per second is read , and `-r 30` sets the output video frame rate to 30 fps. FFmpeg will take the first image as the one with the lowest number; if you want to start at a different image, you can add `-start_number 8`, for example, to start at image8.jpg.
If you've numbered the files with leading zeros (image01.jpg, image02.jpg, …), you'll need to adjust the pattern: image%02d.jpg for two digits, image%03d.jpg for three, and so on. It's important that the pattern matches the exact way you've written the names, or FFmpeg will return "file not found" errors.
The -c:v libx264 option specifies that the H.264 video encoder should be used, while -pix_fmt yuv420p ensures that the resulting file is compatible with most current players, browsers, and mobile devices.
Method 2: Glob pattern for non-sequential names
If your images don't follow a simple numbering system, but share a common file extension or prefix , you can use FFmpeg's glob pattern to select them all at once without renaming them one by one.
Imagine you have a bunch of .jpg files mixed with other formats in a folder, and you want to use all the .jpg files (regardless of their names) to create a video. A typical command would look something like this:
ffmpeg -framerate 30 -pattern_type glob -i «*.jpg» -c:v libx264 -pix_fmt yuv420p output.mp4
Here, the `-pattern_type` glob indicates that you'll be using a wildcard style pattern, and the `*.jpg` tells FFmpeg to consider all files ending in `.jpg` in the current directory. This will generate a slideshow where each image represents a different frame of the video.
If you have filenames with a common prefix, you could do something like "image-*.png" to select only the files that begin with image- and end with .png. It's a clean way to filter without having to reorganize your folders too much.
However, it's worth remembering that the order in which the images are processed will depend on how the system returns the files that match the pattern. If you need a specific order that doesn't follow the alphabetical order, it might be better to rename the files or switch to another method like the `concat demuxer`.
Method 3: Concat demuxer for custom presentations
When you want complete control over the order and duration of each image , the concat demuxer is your best friend. The idea is simple: you create a text file that lists the images and how long each one should be displayed, and then FFmpeg generates the video following that script.
First, in the same folder as the photos, create a file called something like input.txt . Inside, add lines like this:
file 'imagen01.jpg'
duration 3
file 'imagen02.jpg'
duration 5
file 'imagen03.jpg'
duration 2
Each `file / duration` block specifies the image path and the number of seconds it will remain on screen . You can vary the duration so that some photos are displayed longer than others, which is perfect for narrated presentations, project summaries, and more.
Once you have the text file ready , you run a command like this:
ffmpeg -f concat -safe 0 -i input.txt -c:v libx264 -pix_fmt yuv420p output.mp4
The `-f concat` parameter indicates that you are using the concatenation demuxer , and `-safe 0` allows for less restrictive paths (for example, if you use absolute paths). FFmpeg will read each line, internally assemble the sequence in working memory, and generate the video with each frame displayed for the specified time.
Add audio, text, and watermarks to your videos
Once you've mastered the process of converting photos to video, it's very common to want to add an audio track (music, narration, effects) and some text or logo overlay to give it a more professional finish.
To incorporate audio into an image-based presentation, you can take advantage of glob patterns and add a second -i pointing to a sound file. For example:
ffmpeg -framerate 1 -pattern_type glob -i «*.jpg» -i audio.mp3 -shortest -c:v libx264 -r 30 -pix_fmt yuv420p output.mp4
In this case, -shortest indicates that the final duration of the file should match the shortest track, so if the audio is longer than the image sequence, it will be cut off right when the photos finish.
If you want to overlay an image with a logo or watermark onto an existing video, you can use the overlay filter . For example:
ffmpeg -i video.mp4 -i watermark.png -filter_complex «overlay=10:10» output.mp4
The `overlay=10:10` part indicates the (x,y) position where the watermark image is placed over the video. If you want to adjust the transparency, you can chain a `blend` filter with `all_opacity` to set, for example, 70% opacity for the watermark.
Control quality, resolution, and file size
FFmpeg offers many options for balancing image quality, resolution, and final video size . One of the most important is the -crf parameter when using libx264 as the codec.
The value of -crf (Constant Rate Factor) defines the target quality: the lower the number, the better the quality (and the larger the file); the higher the number, the more compression and the smaller the file size. Values like 18 usually provide very high quality, with almost no visible loss, while 22-23 save a considerable amount of space while maintaining a very respectable appearance for web projects.
If you need to change the video resolution, you can use the scaling filter by adding `-vf scale=WIDTH:HEIGHT`. For example:
ffmpeg -i input.mp4 -vf scale=640:480 -c:v libx264 -pix_fmt yuv420p output_480p.mp4
In this example, the video is converted to 640×480 (480p) . You can adapt the pair of values to the specific resolution you need (1280×720 for 720p, 1920×1080 for Full HD, etc.), keeping in mind that scaling up doesn't create detail, it only enlarges the image.
Common problems when converting images to video
When working with FFmpeg, especially when managing many photos, it's common to encounter some typical errors that are worth keeping in mind to avoid going crazy.
One of them has to do with incorrect or inconsistent filenames : if an intermediate numbering is missing, if there is a strange jump, or if the command pattern does not match the actual image name, FFmpeg may stop with error messages or ignore some frames.
Typos are also common in commands : a missing quotation mark, a misspelled hyphen, a parameter that should be separated, etc. It's a good idea to carefully review the syntax and, if necessary, consult the official documentation or usage examples before driving yourself crazy.
Another important detail is the pixel format . If you don't set yuv420p to the output, some older players may have compatibility issues with certain pixel formats by default. Adding `-pix_fmt yuv420p` usually saves a lot of trouble.
Finally, remember that FFmpeg is under active development . If you're using a very old version, you might encounter bugs, unusual behavior, or limitations that have been fixed in newer versions. Keeping FFmpeg up to date is generally a good idea, especially if you work with modern formats or high resolutions.
Automate complex workflows with scripts and YAML
When you start using FFmpeg for more than just a one-off experiment, it makes a lot of sense to automate repetitive tasks with scripts. Some projects combine FFmpeg with YAML configuration files and utilities like yq to build highly flexible workflows.
For example, you can have a script that reads a config.yml file where you define a list of elements (images, videos, duration of each, volume levels, start and end cuts, etc.) and automatically generates temporary clips that it then concatenates into a single final video following those parameters.
These types of systems allow you to create intros with still images, main video blocks and institutional closings , adding smooth transitions (with filters such as xfade for video and acrossfade for audio), retouching resolution, standardizing the audio, and generally ensuring a very consistent style and quality throughout a series of videos.
The advantage of this approach is that anyone can edit the YAML file (or a form that generates it) to define what they want to mount, while the script handles all the invocations to FFmpeg, without the end user needing to touch the command line directly.
Non-technical alternatives to FFmpeg for combining images and video
All of the above is great if you're comfortable writing commands and don't mind dealing with syntax and the terminal . But it's true that for many people, that environment is a bit of a slog, and they prefer something more visual where they can drag and drop.
In this area, there are editing programs like Wondershare Filmora and other editors with graphical interfaces that allow you to create photo slideshows, add transitions, insert music, and export to MP4 with just a few clicks. They don't offer the same precision or automation capabilities as FFmpeg, but they are very accessible for non-technical users. If you're looking for Windows-centric alternatives, you can also consult guides on how to create videos with classic editors.
Recently, AI-powered solutions have also emerged for creating videos , where you simply upload a photo, write a short description, and the system takes care of animating the image, adding camera movement, interpolating frames, extending the clip's duration, or even generating automatic soundtracks.
These tools are designed for those seeking visually appealing results without delving into concepts like codecs, containers, framerate, or filters, at the cost of sacrificing fine-tuning control over each parameter. FFmpeg, on the other hand, remains the ideal choice when you need precision, reproducibility, and the ability to integrate it into automated workflows or complex projects.
Once you understand how FFmpeg interprets naming patterns, how to manage frame rate, codecs, pixel format, durations, and concatenation, it becomes a kind of Swiss Army knife that lets you go from simple image collections to polished video pieces , ready for time-lapses, presentations, online courses, marketing campaigns, or any other project you can think of, all with the freedom of free software and the power of the command line.


Passionate writer about the world of bytes and technology in general. I love sharing my knowledge through writing, and that's what I'll do on this blog, show you all the most interesting things about gadgets, software, hardware, tech trends, and more. My goal is to help you navigate the digital world in a simple and entertaining way.