
AOMEI Partition Assistant Standard is a powerful and easy-to-use free disk partitioning software program that gives you complete control over your hard drive. It offers a full suite of features for creating, resizing, deleting, merging, and splitting partitions. It also includes a helpful wizard-like NTFS to FAT32 and FAT32 to FAT32 conversion tool, as well as migration to a new hard drive or SSD . Additionally, it creates Windows PE boot disks ( Windows Preinstallation Environment).
You might also be interested in: How to Create a Recovery Partition in Windows 10
Safely partition your hard drive with AOMEI Partition Assistant
AOMEI Partition Assistant Standard Edition securely partitions your hard drive. It manages hard drive partitions without restarting your system or interrupting your workflow. This powerful tool provides a more comprehensive application for easily creating and formatting partitions. Its key features include:
- Changing drive letters and paths.
- You can mark the partition as active.
- Explore the partition to see files.
- Partition extension and contraction.
- Add a mirror.
- Initialize a new disk before you can use it.
- Converting empty MBR to GPT disk and vice versa.
- Converting empty dynamic disk to basic disk.
Get full control over your hard drive
AOMEI Partition makes full use of disk space. Resize partitions as needed. You can also shrink or extend any disk for file or application storage on any partition. When your system says, " The system drive is running out of space ," you can extend the drive or delete its contents.
Extend partition
AOMEI's Extend Partition feature solves the low disk space problem of system partitions in a simple way. It will extend your disk space by adding the space allocated by UN, and if you don't have any space allocated by UN, you can shrink the partition to free up some space accordingly.
This tool also helps when a Windows 10 update produces the error " Failed to update system reserved partition ." The most common cause of this message is that the system reserved partition is extremely small. Creating multiple partitions and specifically assigning a destination to the system reserved partition can prevent this problem. AOMEI Partition Assistant handles this task very well with its intuitive interface and super simple steps.
Merge partition is a great feature that comes in handy when, for example, your C drive is not big enough, however, the D drive that is used to store data somehow has redundant space. The solution to this is simple. Move the free space from C to D or merge D with C to get a larger partition. Merging partition also helps when, for example, you want to create a primary partition when there are already 4.
Immigration
If you are considering migrating your operating system to another drive, AOMEI Partition Assistant Standard Edition is an excellent tool to get help from. We have checked that AOMEI Partition Assistant Standard prevents computers from being damaged due to incorrect operations by creating a bootable CD wizard.
Another useful feature helps to integrate AOMEI Partition Assistant or AOMEI Backupper into the built-in Windows recovery environment. This helps to partition, backup and even restore your computer in RE system.
Creator of Windows To Go
It allows you to install and run a fully functional Windows on an external hard drive, USB flash drive , or Thunderbolt drive. You can then boot from it on any computer where you want to use Windows 10, 8.1/8, or 7. You don't need it.
You don't need to purchase Windows 10/8.1/8 Enterprise Edition to create a Window To Go USB drive. This tool can help you install Windows system to your USB flash drives or removable hard drives. Moreover, it can also migrate your current system to the USB flash drives or removable hard drives.
NTFS to FAT32 Converter
Easily convert file systems between NTFS and FAT32 without data loss. It also converts FAT or FAT 32 to NTFS file system in an all-in-one package that is reliable, efficient and easy to use.
Bad Sector Function
AOMEI Partition Assistant offers an excellent tool that scans for bad sectors on your PC's hard drive. Bad sectors can potentially render data unreadable and unrecoverable, corrupting your saved data and slowing down your PC. This tool can improve your system's performance.
Use the Check Bad Sector feature and make sure that your disk is error-free. The downside is that it only finds a bad sector and does not repair it. Partition Assistant can frequently check your partitions and fix errors to ensure the integrity of your data.
AOMEI Partition Wizard PRO VS FREE
Partition Wizard comes in two flavors. Namely, Standard – free and Pro which comes with a $48 subscription. The Standard version comes with the needs of the average user and includes things like partition splitting, copying, resizing, creating, deleting, formatting, changing ownership (e.g. active to inactive) and even secure erase.
It includes some useful wizards such as converting from NTFS to FAT32 and vice versa, and also migrating to a new hard drive or SSD. The Pro version, which requires a $48 subscription, is best suited for IT experts who understand hardware concepts and want to maintain drives regularly. The Pro version primarily includes features such as:
- Allocate free space from one partition to another.
- Migrate OS from GPT Disk to GPT/MBR SSD or HDD.
- Migrate operating system from MBR Disk to GPT SSD or HDD.
- Convert boot/system disk between MBR and GPT styles.
- Convert dynamic disk to basic disk without data loss.
- Convert partition between primary and logical.
- Quick partition alignment.
- Command line partition.
- Partition Recovery Wizard.
- SSD Secure Erase Wizard.
- Partition extension wizard.
- Clean up the system disk.
- Change the serial number.
Download Aomei Partition Assistant.
Creating Windows To Go with Aomei Partition Assistant
As we mentioned earlier, Aomei Partition Assistant is available in two versions: the Standard (or free) edition and the Pro (or commercial) edition. Fortunately, the Windows To Go feature is included in the Standard (free) edition. So, the obvious first step is to install Aomei Partition Assistant Standard.
Next, you'll need a suitable USB flash drive. The minimum recommended capacity is 20GB. However, to leave room for the operating system to grow, I would suggest an absolute minimum of 32GB and preferably 64GB. Windows To Go will run on USB 2.0 flash drives, but you'll almost certainly end up with a slow system.
For best results, I would recommend using a quality high-speed USB 3.0/3.1 drive. I use Sandisk Extreme flash drives which are super fast, much faster than standard USB 3.0 drives. You will also need the latest Windows 10 ISO.
Download the Windows 10 ISO from Microsoft.com.
Create ISO
The best way to download the latest ISO is through the Media Creation Tool. Run the downloaded executable, and when you reach the next options window, make sure to enable the option to create installation media for another PC.
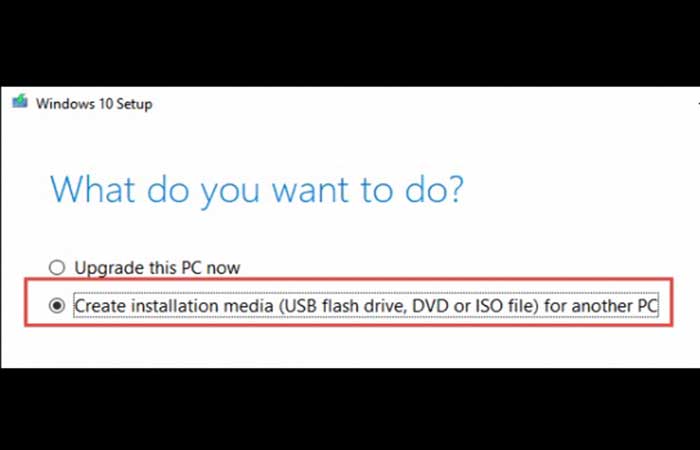
Step 1: Click Next . In the next window, settings such as Language, Edition, and Architecture (64/32-bit) will be automatically selected based on your existing operating system configuration. You don't need to change anything here; just click Next . Now you'll need to enable the option to create an ISO file:
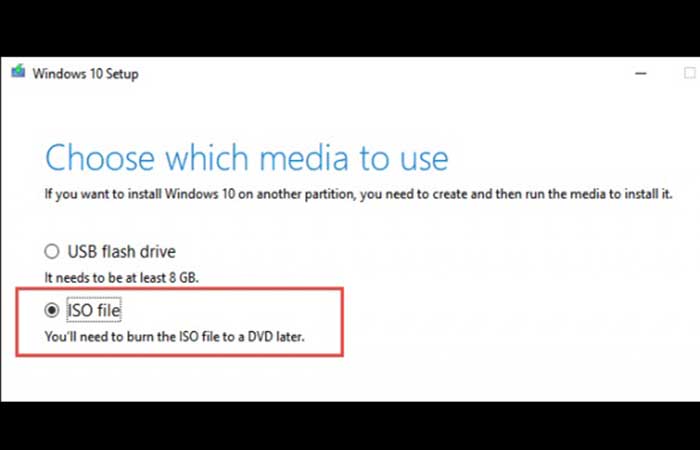
Step 2: Click Next , then browse to and select the location where you want to save the ISO file. That's it! The tool will now proceed to create your Windows 10 ISO and save it to the location you selected. Now we're ready to create the Windows To Go bootable flash drive.
Create bootable flash drive
These are the steps you must follow:
Step 1: Connect your USB flash drive and launch AOMEI Partition Assistant. NOTE: Do not use a flash drive containing data/files, as the drive will be erased during the process. Transfer the data/files to a different location or use an empty drive. In the AOMEI Partition Assistant interface, click All Tools in the left-hand menu panel and then click Windows To Go Creator.
Step 2: In the next window, the " Create Windows To Go for PC " option should be enabled by default. There's nothing to do here; simply click Next . If, in the next window, AOMEI Partition Assistant hasn't automatically identified and listed the Windows 10 ISO file (that you downloaded earlier), you'll need to specify it manually. Click the folder icon at the far right of the dialog box.
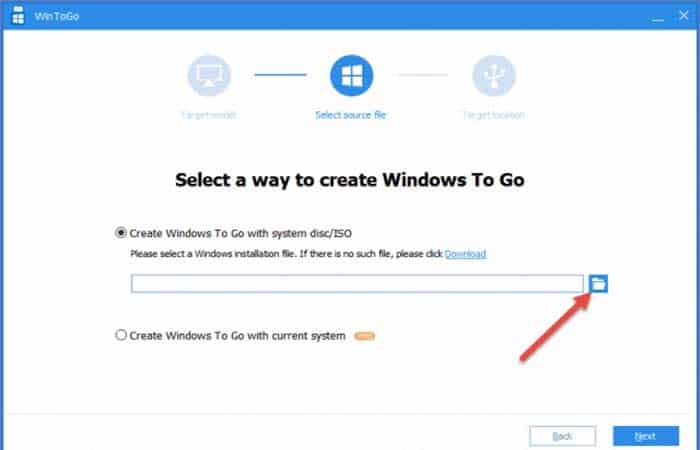
Step 3: In the File Explorer window, navigate to the location where you saved the Windows 10 ISO, highlight it (left-click), and then click the Open option . You should now see the ISO file listed in the dialog box.
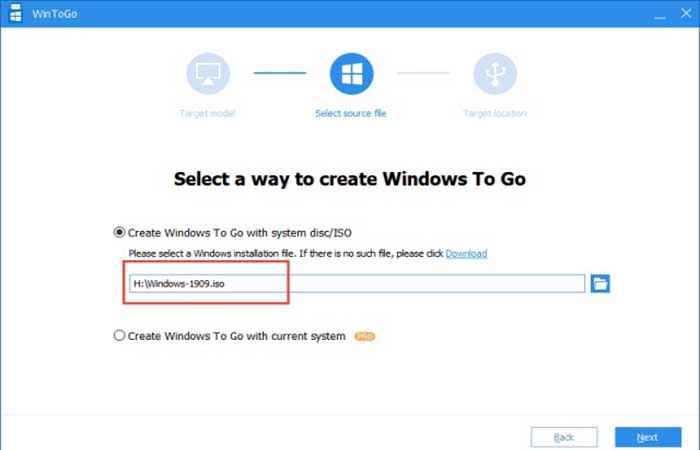
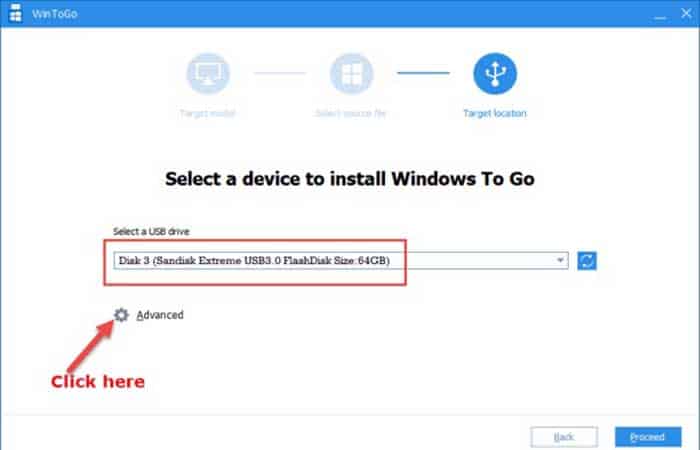
Step 4: Click Next . You should now see a window with your connected USB drive listed. Click the gear icon to open the advanced settings.
You might also want to know: How to Repair Master Boot Record (MBR) in Windows 10
Step 5: In the advanced settings, the top option will be set to General by default; this is the correct setting, so leave it as is. Below the bottom option, " Target System Boot Mode ," there is a drop-down menu with two options: Legacy or Legacy & UEFI. Legacy is for older machines running Legacy BIOS. Legacy & UEFI is for newer machines running UEFI. If you are unsure, select the Legacy & UEFI option.
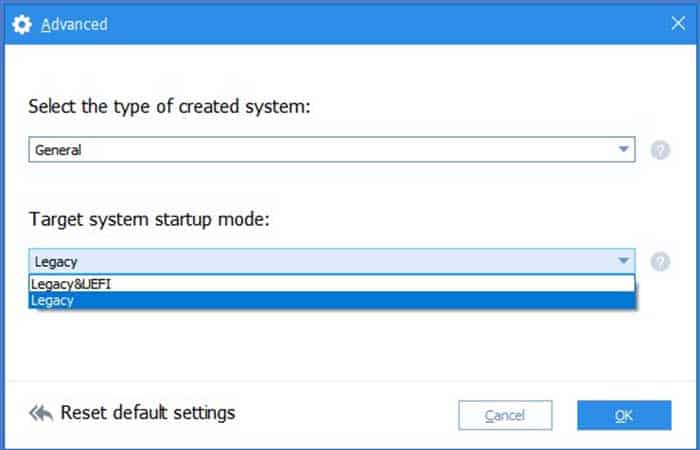
Step 6: Once you've made your selection, click OK , and then, back in the main window, click Continue . A warning will appear: “This operation will erase all data on this USB drive. Are you sure you want to continue? ” Click Yes, and the Windows To Go bootable USB flash drive will be created. When the process is complete, restart your computer and set the bootable USB flash drive as your boot device through the boot menu.
You'll need to go through all the usual setup options that apply to a new installation, such as language, region, keyboard layout, and more, and when you're done, you'll have Windows 10 installed on your bootable flash drive ready to use anywhere.
Notes
Here are some things to keep in mind, some based on our experience:
- The system will automatically reboot during the first part of the setup process. If you miss the reboot and the PC boots back into the main operating system, don't worry. Simply reboot the system again, select the bootable USB flash drive as the boot device, and then you can finish the setup.
- The Windows 10 Home edition was installed on our USB flash drive even though our primary OS was Windows 10 Pro. We assume this could be due to the limited amount of space on the flash drive that automatically triggers a Windows 10 Home installation or a limitation in Aomei Partition Assistant Standard.
- We signed in with my Microsoft account during the setup process, and when it was fully installed, we were surprised to see that the operating system had been automatically activated. We expected to end up with an uninstalled copy. Windows license 10, so it was a nice surprise.
Creating Windows To Go with Rufus
Rufus is a free, portable tool for creating bootable USB drives that also includes a Windows To Go option . However, we've repeatedly read that Rufus works best with Windows To Go certified USB drives, and we've also seen numerous user reviews reporting problems when using Rufus for this purpose.
That said, we tested the Rufus method ourselves, using the exact same type of USB 3.0 flash drive, and we experienced no issues, either with the creation process or with booting and running Windows 10 from the flash drive.
The requirements are more or less identical; of course, you'll need to download Rufus, plus the Windows 10 ISO (as explained earlier), and the same recommendations regarding the USB flash drive also apply. Here are the steps to follow:
Step 1: Connect your USB flash drive and run Rufus: It's portable, so double-click the downloaded executable to run it.
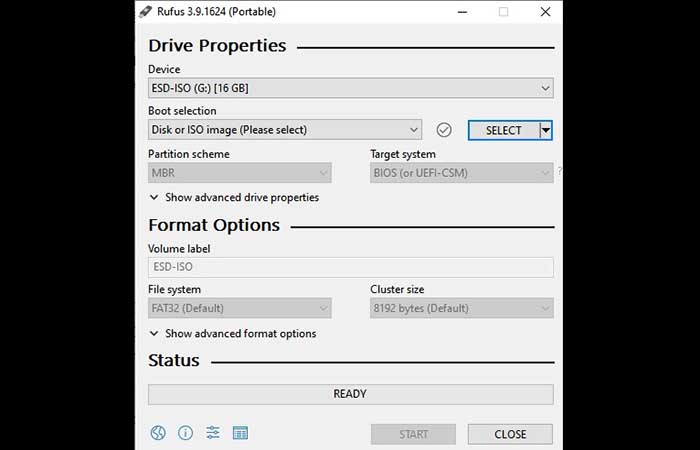
Step 2: Click the SELECT button , then navigate to and select the Windows 10 ISO you downloaded earlier. You will now see the ISO file in the boot selection list. You will also notice a new configuration option in the interface called Image Option.
Step 3: Expand the image options section and make sure you select Windows To Go.
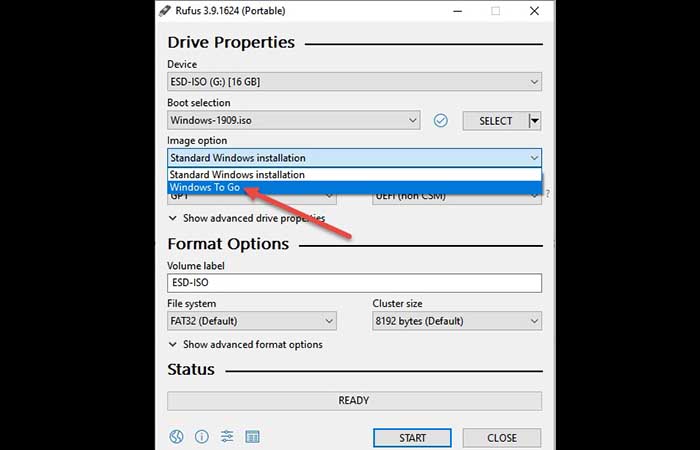
Step 4: Next, under Partition Scheme , select either MBR or GPT . MBR is for older computers running legacy BIOS. GPT is for newer computers running UEFI. We recommend going with MBR and only selecting the GPT partition scheme for UEFI if you are 100% sure about it.
Step 5: When you select the MBR partition scheme, the file system will automatically be set to NTFS by default, and the cluster size to 4096 bytes by default.
Step 6: Once you've finished these settings, the Rufus interface should look like this:
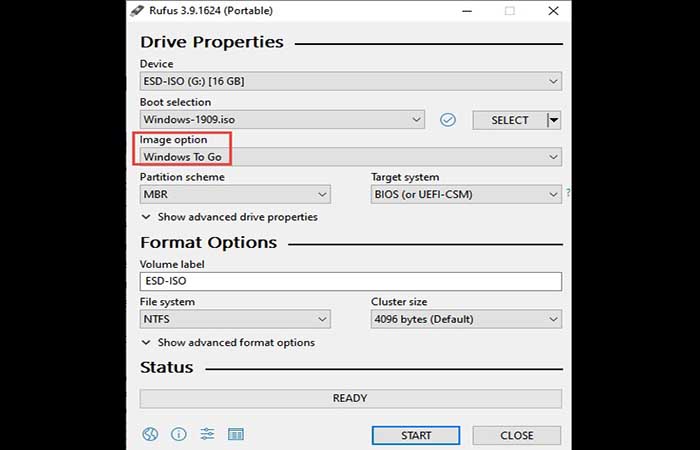
Step 7: Click START and in the window that appears, select the edition of Windows 10 you want to install. Unless you're using a high-capacity USB drive, we suggest you go with Windows 10 Home.
Step 8: Once you've selected your Windows 10 edition, click OK . A warning about deleting data from the drive will appear. Click OK again, and the creation process will continue.
The creation process can take quite a while, and in each case, the completion time depends entirely on the type of flash drive used; for example, USB 2.0 will be much slower than USB 3.0.
We didn't actually time our own, which isn't recommended, but we'd estimate between 50 and 60 minutes. In both cases, the operating systems installed on the SanDisk Extreme USB 3.0 flash drives were fast and responsive. However, these are clean, uncluttered operating systems with no third-party software installed.
Check out: No Bootable Device: Error 3f0 (Boot Device Not Found)
Final thoughts
Without a doubt, this free partition manager software strikes a good balance between a well-thought-out interface and easy-to-use yet basic and advanced features that anyone would expect for free. As a partition software, we have reviewed it as the most adequate software that anyone would expect from another great software of this kind, all for free.
However, its pro version adds breadth and depth, making it the best choice for the business environment. The latest version of AOMEI Partition Assistant Standard Edition for Windows works with both 32-bit to 64-bit versions of Windows 10, Windows 8.1, Windows 7, Windows Vista, Windows XP, and Windows 2000. You can download and install it for free.

My name is Javier Chirinos and I am passionate about technology. Ever since I can remember, I have been interested in computers and video games, and that passion has turned into a job.
I have been publishing about technology and gadgets on the Internet for over 15 years, especially in mundobytes.com
I am also an expert in online marketing and communication and have knowledge in WordPress development.