- Using free WiFi analyzers allows you to detect interference, neighboring networks, and areas without coverage to optimize your home network.
- Choosing the correct channel in 2,4 GHz, 5 GHz or 6 GHz reduces saturation and improves speed, stability and latency.
- The quality of hardwarethe configuration of router and device compatibility influences the effectiveness of any adjustment.
If your Wi-Fi is choppy, videos freeze, your ping spikes when you play games, or you experience strange, unexplained dropouts, it's very likely not just the router or your internet provider's fault. In many apartments and buildings, the real cause is often interference from nearby Wi-Fi networks and improper channel usage . The good news is that you don't need to pay for expensive software to fix it: with a few free tools and some patience, you can significantly improve your network performance.
In the following lines, you'll see, step by step, how to map WiFi interference, understand what's happening in the "air" of your home, and choose the best available channel using free apps for Windows , Android , iOS , and other systems. We'll also see the real differences between 2,4 GHz, 5 GHz, and 6 GHz , which channels are best to use, how to adjust your router settings without messing things up, and what limitations your devices have when connecting.
Why WiFi channels make such a difference
Imagine your Wi-Fi network is a highway, with each channel representing a lane. If all the cars (networks) are in the same lane, a traffic jam occurs, latency increases, and the effective connection speed decreases . That's exactly what happens when you and several neighbors share a channel or use overlapping channels.
In the 2,4 GHz band, this is especially egregious: there are only a handful of "useful" channels, and in a building with many apartments, it's common for several networks to use the same channel (for example, channel 6) or very close channels (5 and 7) that overlap with each other . The result is micro-outages, unstable Wi-Fi, and speeds far below what your fiber optic connection should provide.
In an isolated house, or if you have few neighbors with routers, this channel saturation is usually not a problem . But in densely populated areas (apartment buildings, offices, commercial premises) interference is commonplace, and choosing the right channel can make a huge difference in the user experience.
The key is to detect which channels are cleaner and which are saturated, both by nearby WiFi networks and by other devices transmitting on the same frequencies (cordless phones, microwaves, IP cameras, etc.). This is where free WiFi analyzers come into play.
WiFi Analyzer and other analyzers: map your wireless environment
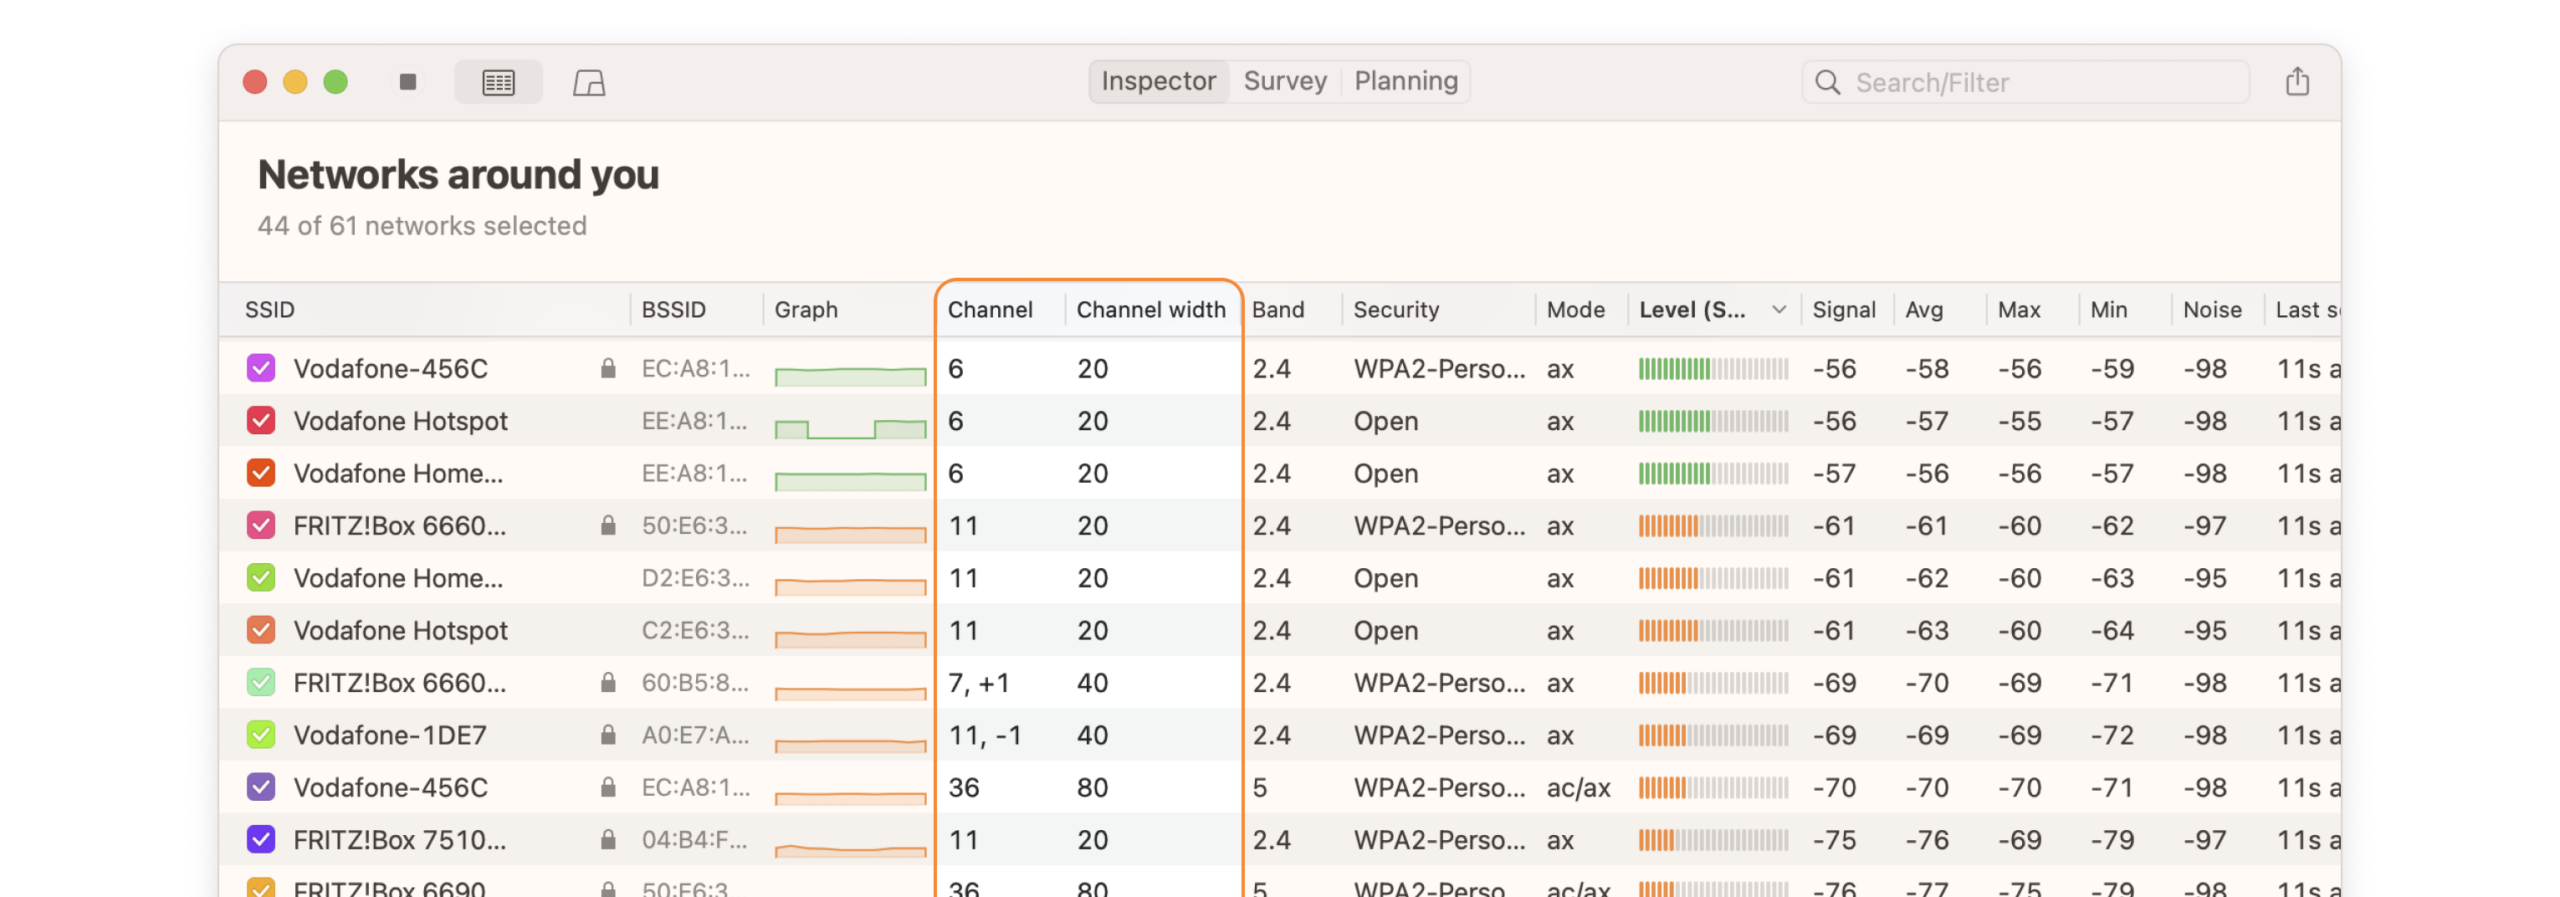
To bring order to the chaos of networks around you, you need a clear picture of what's happening in the air. Tools like WiFi Analyzer, NetSpot, Acrylic, NetSurveyor, WifiInfoView, and Xirrus Wi-Fi Inspector let you do just that: see which networks are present, on which channel they're broadcasting, at what power level, and what type of security or standard they use.
WiFi Analyzer for Windows is one of the most popular and user-friendly options. It's a free app available in the Microsoft Store that can:
- Identify wireless connection problems detecting interference and conflict zones.
- Recommend the best available channel depending on the congestion in your area.
- Helping you find the best location for your router or access point measuring the signal at different points in the house.
There is also a paid Pro version, which adds extra features (more filters, less waiting, no advertising, etc.), but with the free version you can already analyze channels and make very accurate decisions about your WiFi.
On Android, there's another very popular app with the same name, Wifi Analyzer (open source) , which turns your phone into a portable analyzer. It displays all the available networks, their channels, and an overlay graph showing their signal strength, allowing you to walk around your home and see in real time where the coverage drops and which channels are experiencing the most interference.
In addition to these, there are other very useful free or freemium tools:
- NetSpot (Windows)It includes a Channel Scanner that shows real-time usage on 2,4, 5 and 6 GHz, ideal for choosing a channel with the least possible interference.
- Acrylic Wi-FiIts Wi-Fi scanner analyzes the spectrum and provides detailed data on signal strength, channel, security type and speed, with interference detection and problem diagnosis functions.
- Xirrus Wi-Fi InspectorDesigned for Windows and macOS, it monitors network status in real time, detects unauthorized access points, and assists with IT support tasks.
- WifiInfoView (Windows): shows very detailed information about each network (SSID, MAC, PHY level, quality, maximum speed, router model) and allows you to group them by channel to see at a glance where there is more congestion.
- NetSurveyor (Windows)Ideal for validating your network configuration, identifying areas with poor coverage, detecting interference, and generating reports. PDF with easy-to-interpret graphics.
With any of these apps, you can literally "map" the interference: you can see which networks overlap, which channels are interfering with your Wi-Fi, and in which rooms the signal drops significantly . From then on, you're no longer going in blind when you adjust your router settings.
Real benefits of analyzing WiFi interference
Beyond the novelty of seeing neighboring networks and colorful graphs, using a WiFi analyzer has very practical advantages both at home and in small businesses . These are the key benefits:
1. Detect connectivity problems before they become permanent
In an office or a home with remote work, a failing WiFi is not just a nuisance: This can translate into losses in productivity, dropped video calls, or problems with critical services.With an analyzer you can immediately see if the problem is channel saturation, poor location of the access point, or an area with too much attenuation due to walls.
2. Improve network performance
By identifying interference, overloaded channels, and dead spots, you can relocate the routerAdding a repeater or mesh system, or changing the channel to a less congested one, won't work miracles, but it usually provides a noticeable improvement in stability and perceived speed.
3. Increase the level of security
These tools also help to Detect unauthorized access points and suspicious networks that may be trying to spoof your Wi-Fi or take advantage of internal resources. They complement other apps designed to find out who is connected to your network and if there are intruders stealing bandwidth.
4. Reduce costs and unnecessary gadgets
Many people buy PLCs, cheap repeaters, or lots of extenders unnecessarily because their network is unreliable. Analyzing the issue first with free tools reveals that... Sometimes simply choosing the right channel or repositioning the router is enough. so that everything improves, saving you on devices, maintenance, and configuration headaches.
Measurement reliability: hardware, interference, and adjustments
Although WiFi analyzers provide a great deal of useful information, they are not infallible crystal balls . Their accuracy depends on several factors that should be taken into account to avoid drawing incorrect conclusions.
The first factor is the quality of the WiFi hardware in the device you're using for measurement . A laptop with an old card or a damaged antenna can show misleading signal levels or miss networks that are actually present. The better the WiFi radio and its antennas, the more reliable the data you see will be.
External non-WiFi interference also plays a role : microwaves, DECT phones, Bluetooth, thick walls, metals, mirrors , building structures… All of these can distort the signal and make a network seem weaker than it actually is, or make channel changes less noticeable than you expect.
Software versions shouldn't be overlooked . Keeping both the operating system and analytics apps up to date reduces errors, visual bugs, and compatibility issues with new standards like Wi-Fi 6 or Wi-Fi 6E. Newer versions typically provide more accurate measurements and improved data interpretation.
Finally, there's the device's own configuration : power-saving options, outdated drivers , incorrectly configured Wi-Fi regional settings—all of these can skew what you see on the screen. Make sure your network configuration is clean and standard before relying entirely on the graphs.
In any case, although analyzers do not completely replace real speed tests or other diagnostic techniques, they are an excellent basis for understanding what is happening and making informed decisions about the channel and coverage.
Choose the best channel with WiFi Analyzer (Windows and Android)
One of the key features of WiFi Analyzer and similar apps is precisely its ability to recommend the optimal channel based on the surrounding networks . This saves you from having to manually interpret all the graphs.
On Windows, after installing the app from the Microsoft Store and running it, you'll see a summary of your network: SSID, current channel, band, security type, etc. From there you can go to the "Analyze" view , where the full spectrum of networks around you appears, each with its signal strength and channel.
In that view, you'll see your own Wi-Fi network marked, along with all the nearby networks. If you notice you're on the same channel as several strong networks, it's a clear sign of congestion . The graph also lets you see what's happening on adjacent channels: even if they don't share the exact same channel, heavy use on nearby channels can cause partial overlap and noise.
On Android, WiFi Analyzer has a very convenient feature called "Channel Rating ." Instead of just displaying a graph, it shows each channel with a star rating based on congestion. By selecting your network, the app even suggests which channels would be best for you , ordered from most to least recommended.
Once you have a clear recommendation (for example, switching from channel 6 to 1 or 11 on 2,4 GHz, or moving to another less congested 5 GHz channel), it's time to apply that change to the router and measure again to check for improvement.
Compare signal and locate “dead zones”
Besides channels, another key use of these tools is mapping your Wi-Fi signal strength in every room . This helps you determine where it's worthwhile to place a repeater or mesh node and where simply relocating the router is sufficient.
If you notice that the signal drops significantly or disappears in a specific area, you have several options to improve coverage :
- Place a WIFI repeater at an intermediate point where a good signal still arrives.
- Install a WiFi Mesh system, with several satellites that create a mesh network and better distribute coverage.
- Bet for PLC with WiFi, which carry the network through the electrical installation to areas where the radio signal does not reach well.
The apps also typically include an AP (access point) list mode where you can see, for each network: name, channel, signal strength, security, and sometimes the router brand . For your own connection, you can even see the IP address, DNS, and negotiated link speed, which helps to finalize the diagnosis.
The apps also typically include an AP (access point) list mode where you can see, for each network: name, channel, signal strength, security, and sometimes the router brand . For your own connection, you can even see the IP address, DNS, and negotiated link speed, which helps to finalize the diagnosis.
Change the channel from the router: automatic or manual
Once you know which channel suits you best, the next logical step is to change it on your router . There are two main approaches: automating the process or adjusting it manually.
Some internet providers offer user panels on their website or app where you can change the channel without directly accessing the router's interface. This is convenient if you want to help a family member remotely or if you're not very familiar with technical menus. Some routers from certain companies even have an option to automatically switch between the best signals , analyzing channel saturation on both the 2,4 GHz and 5 GHz bands.
If you enable the smart automatic channel option, the router will automatically adjust itself based on detected interference. This can be a convenient "forget it or leave it" solution , although it's not always 100% accurate for all your devices and locations in your home.
The other option is to change the channel manually . To do this, you need to access your router's settings, usually by typing 192.168.1.1 or 192.168.0.1 into your web browser. There, you enter your administrator username and password (these are usually found on a sticker on the router itself or are typical combinations like admin/admin or 1234/1234 if they haven't been changed).
Once inside, go to the WiFi / Wireless / WLAN section and locate the 2,4 GHz network settings, and optionally the 5 GHz settings. You'll see a field called "Channel," which is usually set to "Auto." Change this value to the specific channel recommended by your analyzer and save the settings and/or restart your router to apply the changes.
It's advisable to repeat the measurement with WiFi Analyzer or another tool, always from the same spot in your house, to check if the new channel gives you better speed, lower ping, and fewer dropouts . This way, you're adjusting based on data and not through blind trial and error.
Not all devices support all channels or bands
One detail that's often overlooked is that not all devices can connect to every channel or band you configure . Sometimes you switch to the "cleanest" channel according to the app... and suddenly a phone or tablet loses the network connection.
In the 5 GHz band, for example, there are so-called DFS channels that share spectrum with weather, aviation, or traffic radars. Many cheap or older devices don't support them, and even if your router can broadcast on that band, some clients won't even show that network in the list or will disconnect if the router detects a radar signal and has to change channels due to regulations.
There are also devices that only operate on 2,4 GHz ( older laptops , inexpensive IoT devices , older printers, etc.), so no matter how much you optimize the 5 GHz band, these devices will remain tied to 2,4 GHz and its limitations . And some low-end customers have limited channel tables: they don't see all the channels available in your country.
Therefore, before making drastic changes, it's advisable to check the specifications of your mobile phones, tablets, or laptops to see which bands and channels they support. And if, after changing channels, you notice that one of them has stopped connecting, return to the previous channel or try a more standard one, even if it's a bit more congested.
Which WiFi channel to use on 2,4 GHz, 5 GHz and 6 GHz
Beyond the automatic recommendation of apps, there are some general rules worth remembering to avoid overlaps and get the most out of each band.
At 2,4 GHz , only channels 1, 6, and 11 do not overlap when using the most common 20 MHz channels. Ideally, you should choose the least congested of these three . If all three are equally busy, it's sometimes better to use the same channel as the strongest nearby network: this way, devices follow the CSMA/CA protocol and take turns more efficiently, whereas partial overlap with intermediate channels generates more noise and collisions.
In the 5 GHz band , the spectrum is broader and there is usually less congestion. Typical channels in Europe include 36, 40, 44, 48, and the entire DFS block (52, 56, 60, 64, 100, 104, 108, 112, 116, 120, 124, 128, 132, 136, 140). Most home routers operate on the first few channels (36-48), which are for Wi-Fi use only and tend to be the most recommended.
However, in the 5 GHz band you can experiment with different channel widths (20, 40, 80, and even 160 MHz) . The wider the channel, the higher the theoretical speed, but also the fewer available channels and the greater the likelihood of interference in congested environments. In apartments with many neighbors, it's usually better to use 20 or 40 MHz for greater stability.
In the 6 GHz band (Wi-Fi 6E and higher) , the available spectrum is enormous (1200 MHz), and channels of 20, 40, 80, 160, and even 320 MHz are permitted. With 20 MHz bandwidth, you can have up to 59 channels, but this number decreases as you increase the bandwidth. This band offers significantly less congestion and very low latency, but its range and ability to penetrate walls are shorter , and there are still few compatible devices.
In any band, the main idea is the same: look for a channel with few nearby networks and low signal strength from other access points , adjusting the channel width according to the environment (wider in isolated houses, narrower in apartment blocks).
Practical differences between 2,4 GHz, 5 GHz and 6 GHz
When deciding which band to connect each device to , it is important to be clear about what each one actually offers and not just focus on the label of "faster" or "greater range".
The 2,4 GHz band is the oldest and offers the best coverage over long distances and through walls , but it's heavily congested with all sorts of devices (WiFi, Bluetooth, cordless phones, sensors, etc.). It's perfect for basic browsing, email, HD streaming , and devices that are far from the router or have modest chipsets.
The 5 GHz band offers significantly more bandwidth and more non-overlapping channels , resulting in much higher real-world speeds and less interference, provided the distance to the router isn't excessive and there aren't too many walls in between. It's ideal for 4K streaming, online gaming, remote work with a VPN , and large file transfers.
The 6 GHz band is designed for high-speed wireless scenarios with low latency and low congestion , such as very high-quality streaming, wireless virtual reality , etc. However, its range is more limited, and there are still few routers and clients that support it, so for now it coexists as a complement to the 2,4 and 5 GHz bands.
Many modern routers also unify the bands under a single SSID using features like Band Steering or Smart Connect . In this case, the router automatically decides which band to connect each device to. If you want to choose manually, you'll need to disable this option in the router's control panel to separate the networks into two different names.
Extra mobile apps to get the most out of and protect your WiFi
In addition to pure analyzers, there are a good number of mobile apps that help you improve coverage, speed, and security with your mobile phone in hand.
Tools like Signal Strength on Android clearly show you the strength of the networks reaching your location, the connection speed, and other useful data. With this information, you can test different locations for your router or the device you're connecting to , or decide if it's really worth changing channels.
For intruder detection, there are apps like "Who's on My WiFi?" or Fing - Network Scanner . They scan the devices connected to your network and show you the IP address, name, manufacturer, and sometimes model. If you see something you don't recognize, someone might be using your WiFi without permission , in which case you should change the password and, if you want to be extra careful, enable MAC filtering.
Additionally, Speedtest by Ookla or similar tools allow you to check your upload and download speeds, as well as your ping, at different points in your home. Combining these with channel analysis gives you a fairly comprehensive view of your actual connection status.
For iOS, apps like Network Analyzer or WiFi Guard detect connected devices and, in the case of WiFi Guard, can even notify you when a new one connects , which is very practical for finding out instantly if someone connects to your network without permission.
This entire set of applications, many of them free or open source, form a perfect “WiFi toolbox” for any user who wants to control their network without resorting to expensive solutions.
Ultimately, mapping interference, understanding how channels work, and using free tools to adjust your router and coverage puts you in a position of advantage: you go from suffering from unreliable WiFi to having a much more stable, faster, and secure network , tailored to the specifics of your home and the devices you use daily.

Passionate writer about the world of bytes and technology in general. I love sharing my knowledge through writing, and that's what I'll do on this blog, show you all the most interesting things about gadgets, software, hardware, tech trends, and more. My goal is to help you navigate the digital world in a simple and entertaining way.