- Setting up automatic incremental backups using external drives with sufficient capacity.
- Methods for recovering individual files using the timeline or full system restoration via Recovery Mode.
- Diagnosing and resolving connection errors, unmounted disks, and quota problems in NAS storage.
- Use of disk repair tools and recovery software to rescue damaged or deleted backups.

Having an up-to-date backup on your Mac is, essentially, peace of mind. Time Machine is Apple's flagship tool for this, as it takes care of saving your entire digital world without you having to lift a finger, allowing you to recover files deleted by mistake or even revert to a previous state if a system update goes haywire.
However, it's not all smooth sailing. Sometimes, the system throws up cryptic errors, or worse, we think we have everything backed up, only to discover the copy is invalid. In this guide, we'll break down how to ensure your backups work and how to fix those frustrating errors.
What exactly is Time Machine and how does it work?

For those who aren't very familiar, Time Machine is a built-in macOS software that performs incremental backups . This means that after the first full backup, the system only saves the changes made, saving time and disk space. It can protect everything from your documents and emails to your applications and user profile settings.
To get started, you'll need an external hard drive (either USB or Thunderbolt) that ideally has two or three times the capacity of your Mac's internal drive. If you have a 512GB drive, don't take any chances and look for one of at least 1TB to allow enough space for historical versions of your files.
Step-by-step setup for a foolproof backup

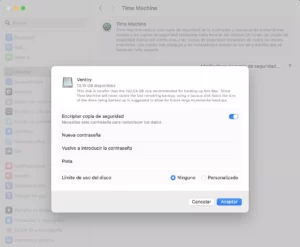
To activate the system, go to the Apple menu, open System Preferences, and find the Time Machine section. From there, click Select Backup Disk and choose your external drive. Once you've done this, you can configure Time Machine in macOS for automatic backups so your Mac works automatically in the background.

- Data customization: Not everyone needs to back up every folder. In the Options tab, you can add items to the exclusion list. save disk space external.
- Multiple units: If you have multiple disks, Time Machine is smart and will use them alternately, giving you an extra layer of security.
- Manual backups: If you're going to make a major change to the system, you can force an immediate backup from the Time Machine icon in the menu bar by selecting Back up now.
How to recover your data without dying in the attempt
There are two main ways to recover your data. The first is the simplest: go to the folder where the file was located and open Time Machine . You'll see a vertical timeline that lets you navigate by date; when you find the correct version, just click Restore.
If the problem is more serious, such as your Mac not starting up or you want to erase the entire system for a clean install, you'll need to enter Recovery Mode (Command + R when turning on) . There you'll find the option to restore from a Time Machine backup, which will allow you to copy your entire system to the destination hard drive. Keep in mind, however, that this will erase everything currently on your local disk.
Troubleshooting: When Time Machine cannot find the disk

It's frustrating to connect your drive and have the system say no copies are available. This can happen due to hardware issues, such as faulty cables or dirty ports , so cleaning the contacts with a microfiber cloth is often the first step. It's also possible the drive isn't mounted correctly; in that case, use Disk Utility to try mounting it manually or run the First Aid function to repair logical errors.

If you suspect the disk has been formatted by mistake, Apple's standard tools won't help. This is where data recovery software (like Disk Drill) comes in, which can scan the file system and rebuild backups that haven't yet been overwritten.
Advanced problems: Full storage and NAS
A common problem occurs when your Mac warns that the disk is full, but when you check your NAS or external drive, there appears to be space. This is usually because file system snapshots or the NAS's Recycle Bin are blocking the available space. It's vital to empty these Recycle Bins and delete old snapshots so that macOS recognizes the actual free space.
For those using a NAS via SMB, it's crucial to ensure the protocol is configured to SMB version 3 and that options like "Opportunistic Locking" are enabled. Additionally, the Mac's startup disk should have at least 20% free space to prevent local snapshots from crashing the backup process.
To ensure your system is always safe, the ideal approach is to combine Time Machine automation with regular checks of the external disk's health and keep local storage clear, thus ensuring that any restoration process is fast and, above all, free of unexpected errors.


Passionate writer about the world of bytes and technology in general. I love sharing my knowledge through writing, and that's what I'll do on this blog, show you all the most interesting things about gadgets, software, hardware, tech trends, and more. My goal is to help you navigate the digital world in a simple and entertaining way.