- Windows Scan and Fax and Scanner cover scanning to PDF and image without installing anything.
- Easy installation by USB or network; support for WiFi, Bluetooth, and networked devices.
- Key settings: format, color and resolution with preview and cropping.
- Common bug fixes and additional apps (OCR, clouds, and advanced workflows).
If you've ever struggled with a scanner or multifunction printer in Windows, you'll know that it's all about being clear about the process and having the right tools; with the Windows Scanner app, everything is simplified, and there's even third party options to cover any need, from the most basic to advanced flows, including saving to PDF, preview and quality adjustments.
In this practical guide I teach you how to connect and add the scanner in Windows 10 and 11, use Windows Scan step by step, integrated alternatives such as Windows Fax and Scanner or even Paint, as well as tips for WiFi, scanning to a pendrive, solving common errors and, if you are interested, a technical section to automate scanning with the Microsoft API; all in a single clear, updated and very complete article.
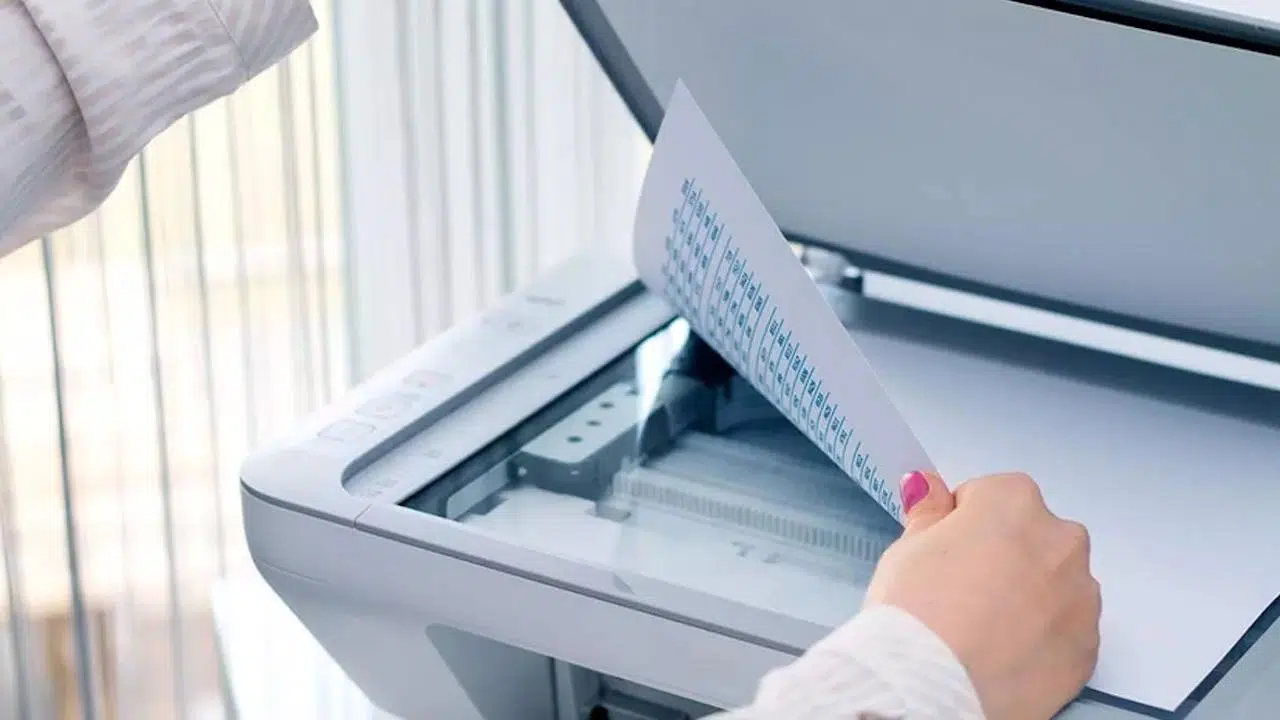
Connect and install the scanner in Windows
Typically, Windows detects the scanner when you turn it on and connect it via USB or the network, installing the driver automatically. When this happens, you'll see the device in Settings > Devices > Printers & scanners, and you can start scanning without further ado. without touching anything other than the scan button.
If you're using a cable, use the USB Type B (square) connector to the printer/scanner and the USB Type A (flat) connector to the PC. Some models have cable variants, but they almost always end in a standard USB connector, so plug it in and wait a few moments for Windows to "think" and install what's necessary. It is normal to hear several connecting and disconnecting sounds during the process..
To add it manually: open Settings (Win + I) > Devices > Printers & scanners > Add a printer or scanner; Windows will search the network (it may take a while) and, when your computer is listed, select Add device; if it doesn't appear, use the link "The printer I want isn't listed" and follow the wizard, especially useful for network scanners, Bluetooth or shared.
For wireless or Bluetooth connections, you may be asked for a PIN during pairing; check your device documentation or the label. If you can't find it, contact the manufacturer. because without that PIN you won't be able to complete the setup.
Check the detection in the Device administrator: Right-click Start > Device Manager > “Printers” (if it’s a multifunction device) or “Imaging Devices” (if it’s just a scanner); if it appears correctly, it’s ready to use; if not, update the driver from the manufacturer's website, Something key when Windows doesn't install a compatible driver by itself.
Scan with the Scanner app (Windows Scan)
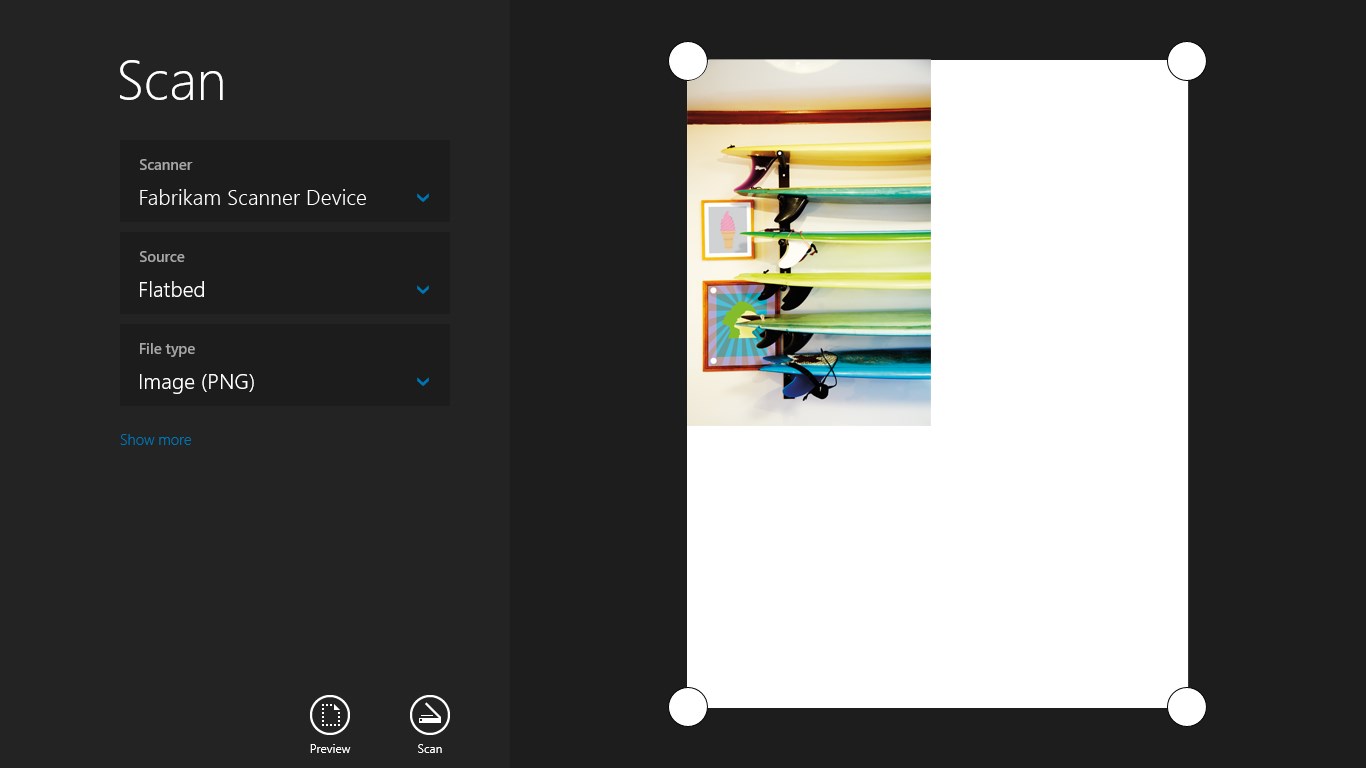
Open the Start menu and type “Scanner” to launch the Microsoft app (Windows Scan); you’ll also see “Windows Fax and Scan,” which works, but the experience is simpler in Windows Scanner. especially if you want to save directly to PDF.
Before scanning, check “File Type”: JPG, PNG, TIFF, Bitmap (BMP), OpenXPS, XPS, and PDF; JPG is ideal for photos because of its compression, PNG is great for graphics/illustrations, TIFF is typical for printing environments, BMP is large and doesn’t compress, XPS/OpenXPS are “PDF-like,” and PDF is perfect for documents, if you need to share or archive comfortably.
Expand “Show more” to see the remaining settings: Color Mode (color, grayscale, or “pure” black and white) and Resolution (DPI); the higher the DPI, the more detail and size; 200 DPI is usually sufficient for text, 300 DPI is a quality standard, and 600 DPI is for photos or fine details; going above 1200/2400 DPI slows things down significantly and isn't always worth it. especially in multi-page documents.
Use "Preview" to give the scanner a first pass; this way you can frame accurately and crop out unwanted content. Move the handles until you get close to the edge without cutting off relevant content. You will save time and reduce the size of the final file.
Press “Scan” and wait; There It depends on the scanner, the resolution and the selected area, but it usually takes one or two minutes at most; by default, the file is saved in the “Scans” folder within Images, and the “View” button opens it in your default viewer, to check immediately if it turned out the way you wanted.
En Windows 11 The procedure is identical: change the aesthetics, but not the steps; open the app, choose format, color, DPI, preview, crop, and scan; if you're coming from Windows 10, you won't notice any differences in the flow. and you can continue using your usual habits.
Other ways to scan without installing anything
Paint can also scan: File > From Scanner or Camera; select the device if you have multiple devices and adjust the options; if disabled, check that the scanner is properly installed/turned on; this is a useful feature if you often do quick touch-ups in Paint. because the result appears directly on the canvas for editing.
WiFi scanner and manufacturer apps
Many multifunction devices include their own step-by-step WiFi installation guide. Connect the device to the power supply using the included cable, download the official software from the manufacturer, select your model, and let it install. drivers and utilities; when the wizard asks for a network, choose your Wi-Fi, enter the password, and follow the checks, will be ready to scan wirelessly.
The advantage of manufacturer packages (e.g., HP Smart) is that they add valuable features: scanning shortcuts, cloud delivery, diagnostics, ink levels, and a unified brand control ecosystem; they often include a mobile app for launching jobs from your phone. Ideal if you work hybrid and don't always turn on your PC.
If you have Canon equipment, solutions like CaptureOnTouch offer icon-based workflows and direct sending to services like OneDrive, Google Drive, SharePoint or Dropbox; they also incorporate functions such as blank page separation, basic OCR or barcode, useful in multi-page documents.
Scan directly to a flash drive
If your printer/scanner has a USB port, you can scan to a flash drive without a PC. Insert the flash drive, select the scan option on the device's control panel, and select the USB destination. After the scan is complete, remove the flash drive and connect it to your computer to transfer the files. An excellent trick if there is no WiFi or you don't have the cable at hand.
Troubleshooting common problems
Outdated or missing driver
If Windows doesn't detect your scanner or you can't scan, install/update the driver from the manufacturer's website; then run the troubleshooter: Settings > Update & Security > Troubleshoot > Printer (or from Control Panel > Devices and Printers, right-click on your computer > Troubleshoot), Let Windows diagnose and apply fixes.
In Device Manager, if you see the device with a warning icon, try "Update Driver" or uninstall and redetect it. Sometimes a reboot with the scanner on will force a reinstallation. which resolves conflicts after USB port changes.
Conflict with the antivirus
Sometimes the antivirus blocks the scanning app or communication with the device. To check, temporarily disable the antivirus from its icon in the taskbar and try scanning. If it works, add the scanning app or service to the antivirus exclusions. so you won't have to deactivate it every time.
Scanner app errors (permissions and destination folder)
If you see messages like “You don't have permission to save to the current destination folder,” try changing the folder under “Save file to” within the app itself or run the app as an administrator; check the permissions of the “Images\Scans” folder. because they are saved there by default.
If that folder has been corrupted, you can restore it with File History: open Search > type “Restore your files with File History” > find the folder by name > select it > tap “Restore”; if the problem persists, uninstall and reinstall the Scanner app from the Microsoft Store, This regenerates routes and permits..
Check the scanner with Paint
Open Paint > File > From Scanner or Camera. If it's disabled, your PC isn't detecting the scanner. If it's working, you'll hear the sound and see a preview. This simple test will determine if the problem is with the drivers/detection or just the Scanner app. and guides you in the next action.
Connectivity and networks
“Check Connection” errors usually indicate network interference, active VPNs, or too many connected devices; disconnect the VPN, restart router and equipment, and try reducing the number of devices connected to the same Wi-Fi; also try starting the scan from the computer instead of the printer (or vice versa), depending on which work order is failingIf you don't know how many computers are on the network, learn how to check. how many devices are connected to my WiFi to identify saturation.
Other cases
Check cables and ports, power cycle the scanner and PC, and rerun the troubleshooter from Settings > Devices > Printers & Scanners; sometimes a simple restart of the spooler service or changing the USB port can fix occasional freezes. especially after system updates.
Windows 10 and Windows 11: Same steps, different look
The scanning experience doesn't change between Windows 10 and 11: the menus look different, but opening Windows Scanner, choosing format, color, DPI, preview, crop, and scan works the same in both; the default saving to Pictures\Scans is also the same. so there is no extra learning curve.
For developers: Automate scanning with the Microsoft API
If you want to integrate scanning into your UWP/WinUI app, Windows exposes the Windows.Devices.Scanners API along with Windows.Devices.Enumeration to discover scanners and launch jobs with progress, preview, cancellation, and source selection (AutoConfigured, Flatbed, Feeder). allowing you to create custom flows.
Start by adding the namespaces and creating a DeviceWatcher that listens for additions/deletions from locally installed scanners with WIA drivers available for the app; this way you keep an up-to-date list of devices. key if the hardware appears/disappears.
using Windows.Devices.Enumeration;
using Windows.Devices.Scanners;

void InitDeviceWatcher()
{
    var scannerWatcher = DeviceInformation.CreateWatcher(DeviceClass.ImageScanner);
    scannerWatcher.Added += OnScannerAdded;
    scannerWatcher.Removed += OnScannerRemoved;
    scannerWatcher.EnumerationCompleted += OnScannerEnumerationComplete;
}

private async void OnScannerAdded(DeviceWatcher sender, DeviceInformation deviceInfo)
{
    await MainPage.Current.Dispatcher.RunAsync(
        Windows.UI.Core.CoreDispatcherPriority.Normal,
        () => {
            MainPage.Current.NotifyUser($"Scanner {deviceInfo.Id} agregado", NotifyType.StatusMessage);
            // Actualiza tu lista de dispositivos
        }
    );
}
To scan, get an ImageScanner from the device ID and run the operation with the appropriate source: Default (let the system decide), AutoConfigured (if the device supports it), Flatbed or Feeder, depending on whether you have a flat cover or a document feeder.
var myScanner = await ImageScanner.FromIdAsync(deviceId);
var result = await myScanner.ScanFilesToFolderAsync(ImageScannerScanSource.Default, folder)
                           .AsTask(cancellationToken.Token, progress);
If your scanner supports autoconfiguration, let it select the optimal color mode and resolution at runtime; if not, check before calling the operation and use Flatbed/Feeder instead. avoiding errors when the feeder is empty.
if (myScanner.IsScanSourceSupported(ImageScannerScanSource.AutoConfigured))
{
    var result = await myScanner.ScanFilesToFolderAsync(ImageScannerScanSource.AutoConfigured, folder)
                               .AsTask(cancellationToken.Token, progress);
}
You can preview without saving to a folder, which is useful for showing a crop before the final scan; also check if your device supports previewing the selected source. especially in flatbed.
if (myScanner.IsPreviewSupported(ImageScannerScanSource.Flatbed))
{
    var preview = await myScanner.ScanPreviewToStreamAsync(ImageScannerScanSource.Flatbed, stream);
}
Implement cancellation with CancellationTokenSource and report progress to improve the UX; upon cancellation, clear your view state and list of Temporary files, avoiding half-baked results.
var cancellationToken = new CancellationTokenSource();
var progress = new Progress<UInt32>(p => { /* actualiza barra de progreso */ });

void CancelScanning()
{
    cancellationToken.Cancel();
    // Limpia la UI y el estado
}
If you need to allow the user to choose any folder, use FolderPicker and declare the Image Library functionality in the manifest; without that capability, your app won't be able to write to those locations. and the save will fail due to permissions.
With the above steps you will have full control to integrate the scanning flow into your software, including source selection, saving, preview, progress and cancellation, and without depending on external utilities.
Connect the scanner correctly, choose the right tool (Windows Scan, Fax and Scanner, Paint or manufacturer solutions), adjust format, color and DPI, and know the Tricks Problem-solving skills make the difference; with all of the above, you'll be able to digitize documents and photos with quality, share them in PDF or image format, and automate processes if needed. both in Windows 10 and Windows 11.

Passionate writer about the world of bytes and technology in general. I love sharing my knowledge through writing, and that's what I'll do on this blog, show you all the most interesting things about gadgets, software, hardware, tech trends, and more. My goal is to help you navigate the digital world in a simple and entertaining way.