- It is possible to replace failing disks in a NAS with RAID 1 or SHR without losing data if one drive is replaced at a time and the rebuild is allowed to complete.
- To increase capacity by switching to larger disks, it is advisable to plan sizes and combinations using RAID simulators and respect the limitations of each system.
- External backups and SMART disk health monitoring are essential to minimize risks during replacement operations.
- Synology SHR-type systems simplify storage management and expansion, but require adherence to minimum size rules in future replacements.
If you have a NAS with RAID 1 and one or more drives start failing, it's normal to break out in a cold sweat. We're talking about your photo library, your backups, your virtual machines… in short, data you absolutely don't want to lose . The good news is that, if you take your time and follow the correct procedure, replacing a failing hard drive (and choosing reliable ones ) and, while you're at it, upgrading your storage capacity, is much easier than it seems.
In this article, we'll walk you through what to do if, for example, you have a multi-bay NAS with a pre-configured RAID 1 array , but the drives are several years old and starting to accumulate bad sectors. We'll cover how to migrate your data to new drives, how to increase storage capacity (for example, from 6 TB to 8 TB or more), and what to consider if your NAS uses classic RAID technologies or hybrid systems like Synology's SHR.
Understanding your scenario: NAS, RAID 1 and disk status
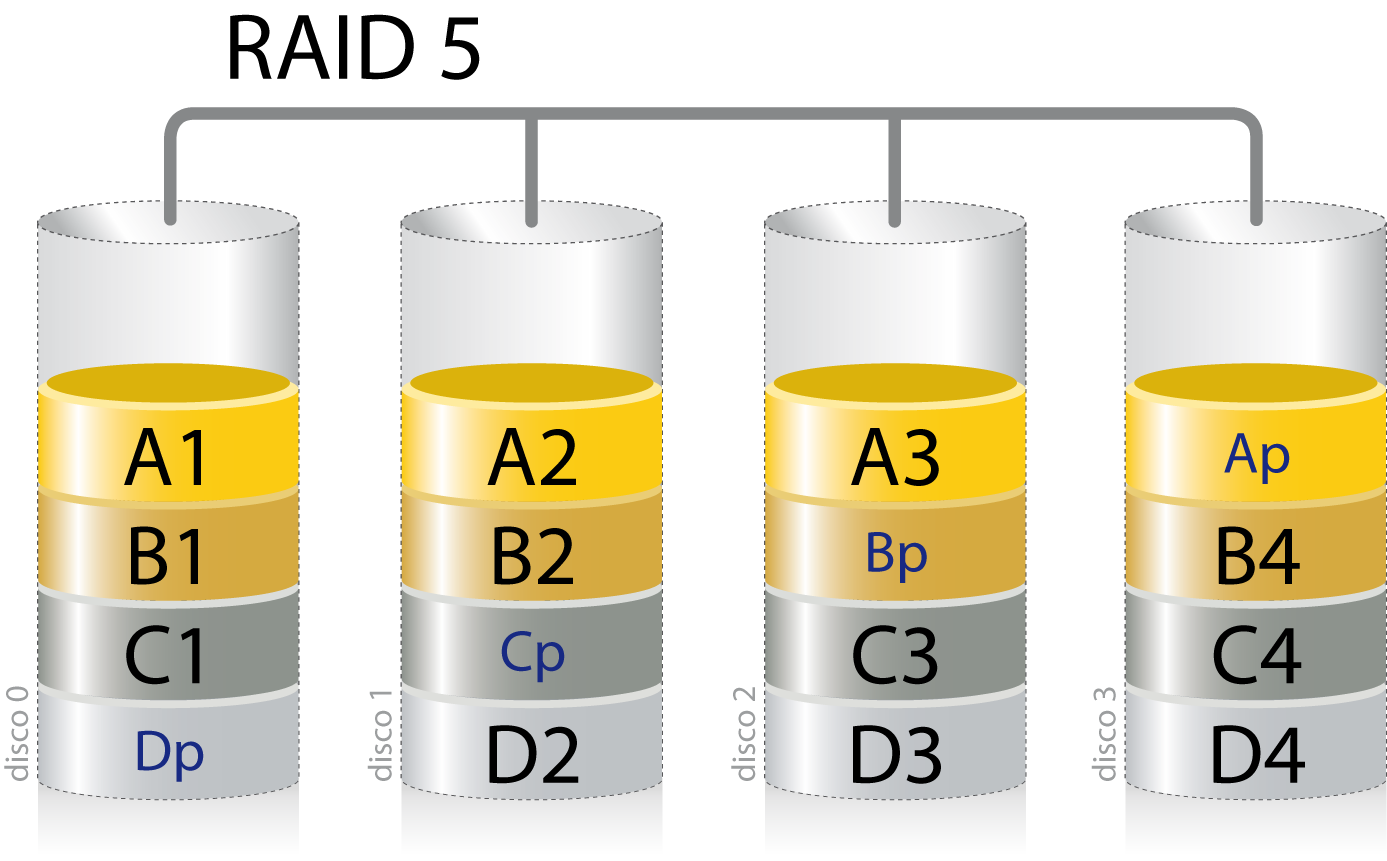
Before changing anything, it's essential to understand your exact NAS configuration . Working with a classic RAID 1 is not the same as using an SHR (Synology Hybrid RAID) system or other levels like RAID 5 or RAID 10. While the basic concept of redundancy is similar, the methods for expanding capacity and replacing disks vary considerably.
Imagine a very common real-world scenario: you have a four-bay NAS , only two of which are in use with 6TB drives configured in RAID 1 (mirroring), and the other two bays are empty. Both drives are around three years old and have been used intensively, and they're starting to report SMART attribute errors : one has 29 bad sectors, the other has 64. They haven't died yet, but it's only a matter of time before one of them fails.
In a situation like this, you usually have two clear objectives: first, to migrate your data to new disks to avoid losing information if the problem suddenly worsens; second, to take advantage of the change to increase capacity, for example, going from 6 TB to 8 TB or even more, especially if your data volume keeps growing. It's also important to manage partitions correctly during the migration to avoid losing data when moving volumes or partitions.
The big question is: if you add new, larger drives, integrate them into the RAID 1 array, let them synchronize, and then remove the old ones, will you be able to use the full capacity of the new drives without having to delete the storage group and start from scratch? The answer depends heavily on how your RAID array is configured and the specific operating system of your NAS.
It's also a good idea to check the health of your current drives now. Using your NAS tools (for example, Synology Storage Manager), you can view SMART data for each drive and see metrics such as reallocated sectors, operating hours, and read errors. Drives with more than 70.000 hours (over 8 years of use) and increasing reallocated sectors are clear candidates for priority replacement.
Classic RAID 1 vs SHR and other RAID types
To make the best decision when replacing drives in a NAS, you need to have a basic understanding of what type of RAID you're using . Many people get confused because each manufacturer has its own "flavor" of RAID or abstraction layers, but the underlying principles are the same.
In a classic RAID 1 array , two (or more) disks are mirrored: what is written to one is replicated to the other. The total available capacity is that of the smallest disk. If you have a 6 TB disk and an 8 TB disk in a RAID 1 array, the system will only be able to use 6 TB, leaving the rest of the larger disk unused until all the disks in the array are the same size.
Synology, for example, also offers its own system called SHR (Synology Hybrid RAID) . It's essentially a Linux-based RAID management system, but with an automation layer designed to simplify things for those who don't want to grapple with the technical details of RAID 1, 5, 6, 10, etc. SHR allows for more flexible combinations of disks of different sizes and is generally more beneficial when you want to expand your storage over time.
While a traditional RAID requires careful planning of disk sizes from the outset, SHR allows you to replace drives one by one with larger ones, and the system will optimize the available space. However, there are rules: for example, in a single-disk failover volume, if you add larger drives, subsequent replacements cannot be smaller than the largest drive currently installed.
For other RAID levels like 5 or 6, the process of expanding capacity becomes a bit more complex. They typically require some additional planning, longer rebuild times, and a greater degree of risk while the volume is degraded. Therefore, if you're just starting out or don't want to overcomplicate things, SHR-type systems or a simple RAID 1 are usually the best balance between security and simplicity.
When is it mandatory to replace a NAS hard drive?
While you can tolerate bad sectors for a while, there are several situations where it's best not to postpone disk replacement . Waiting "to see what happens" often ends badly when the disk decides to fail in the middle of a RAID rewrite.
The first and most typical scenario is when one of the drives clearly fails : the NAS starts beeping, displays critical alarms, the volume goes into a degraded state, and you see in the administration panel that a drive has stopped responding or fails the SMART tests. In that case, there's no doubt; it's time to replace it as soon as possible, provided the rest of the system is still functioning.
The second scenario is more preventative: when your NAS is working well, but you're nearing its capacity limit . If you only have a few hundred gigabytes free and you add photos, videos, backups, or virtual machines every month, the smart thing to do is upgrade your storage before you run out of space or try to free up some room . This way, you can take the opportunity to replace older drives with larger ones without feeling rushed.
There are also hybrid situations, such as having multiple drives in the same volume, all functional but years old, and noticing that some have accumulated more hours of use or more reallocated sectors than others. By reviewing the SMART data, you can identify which drives are most likely to fail first and schedule their replacement in advance.
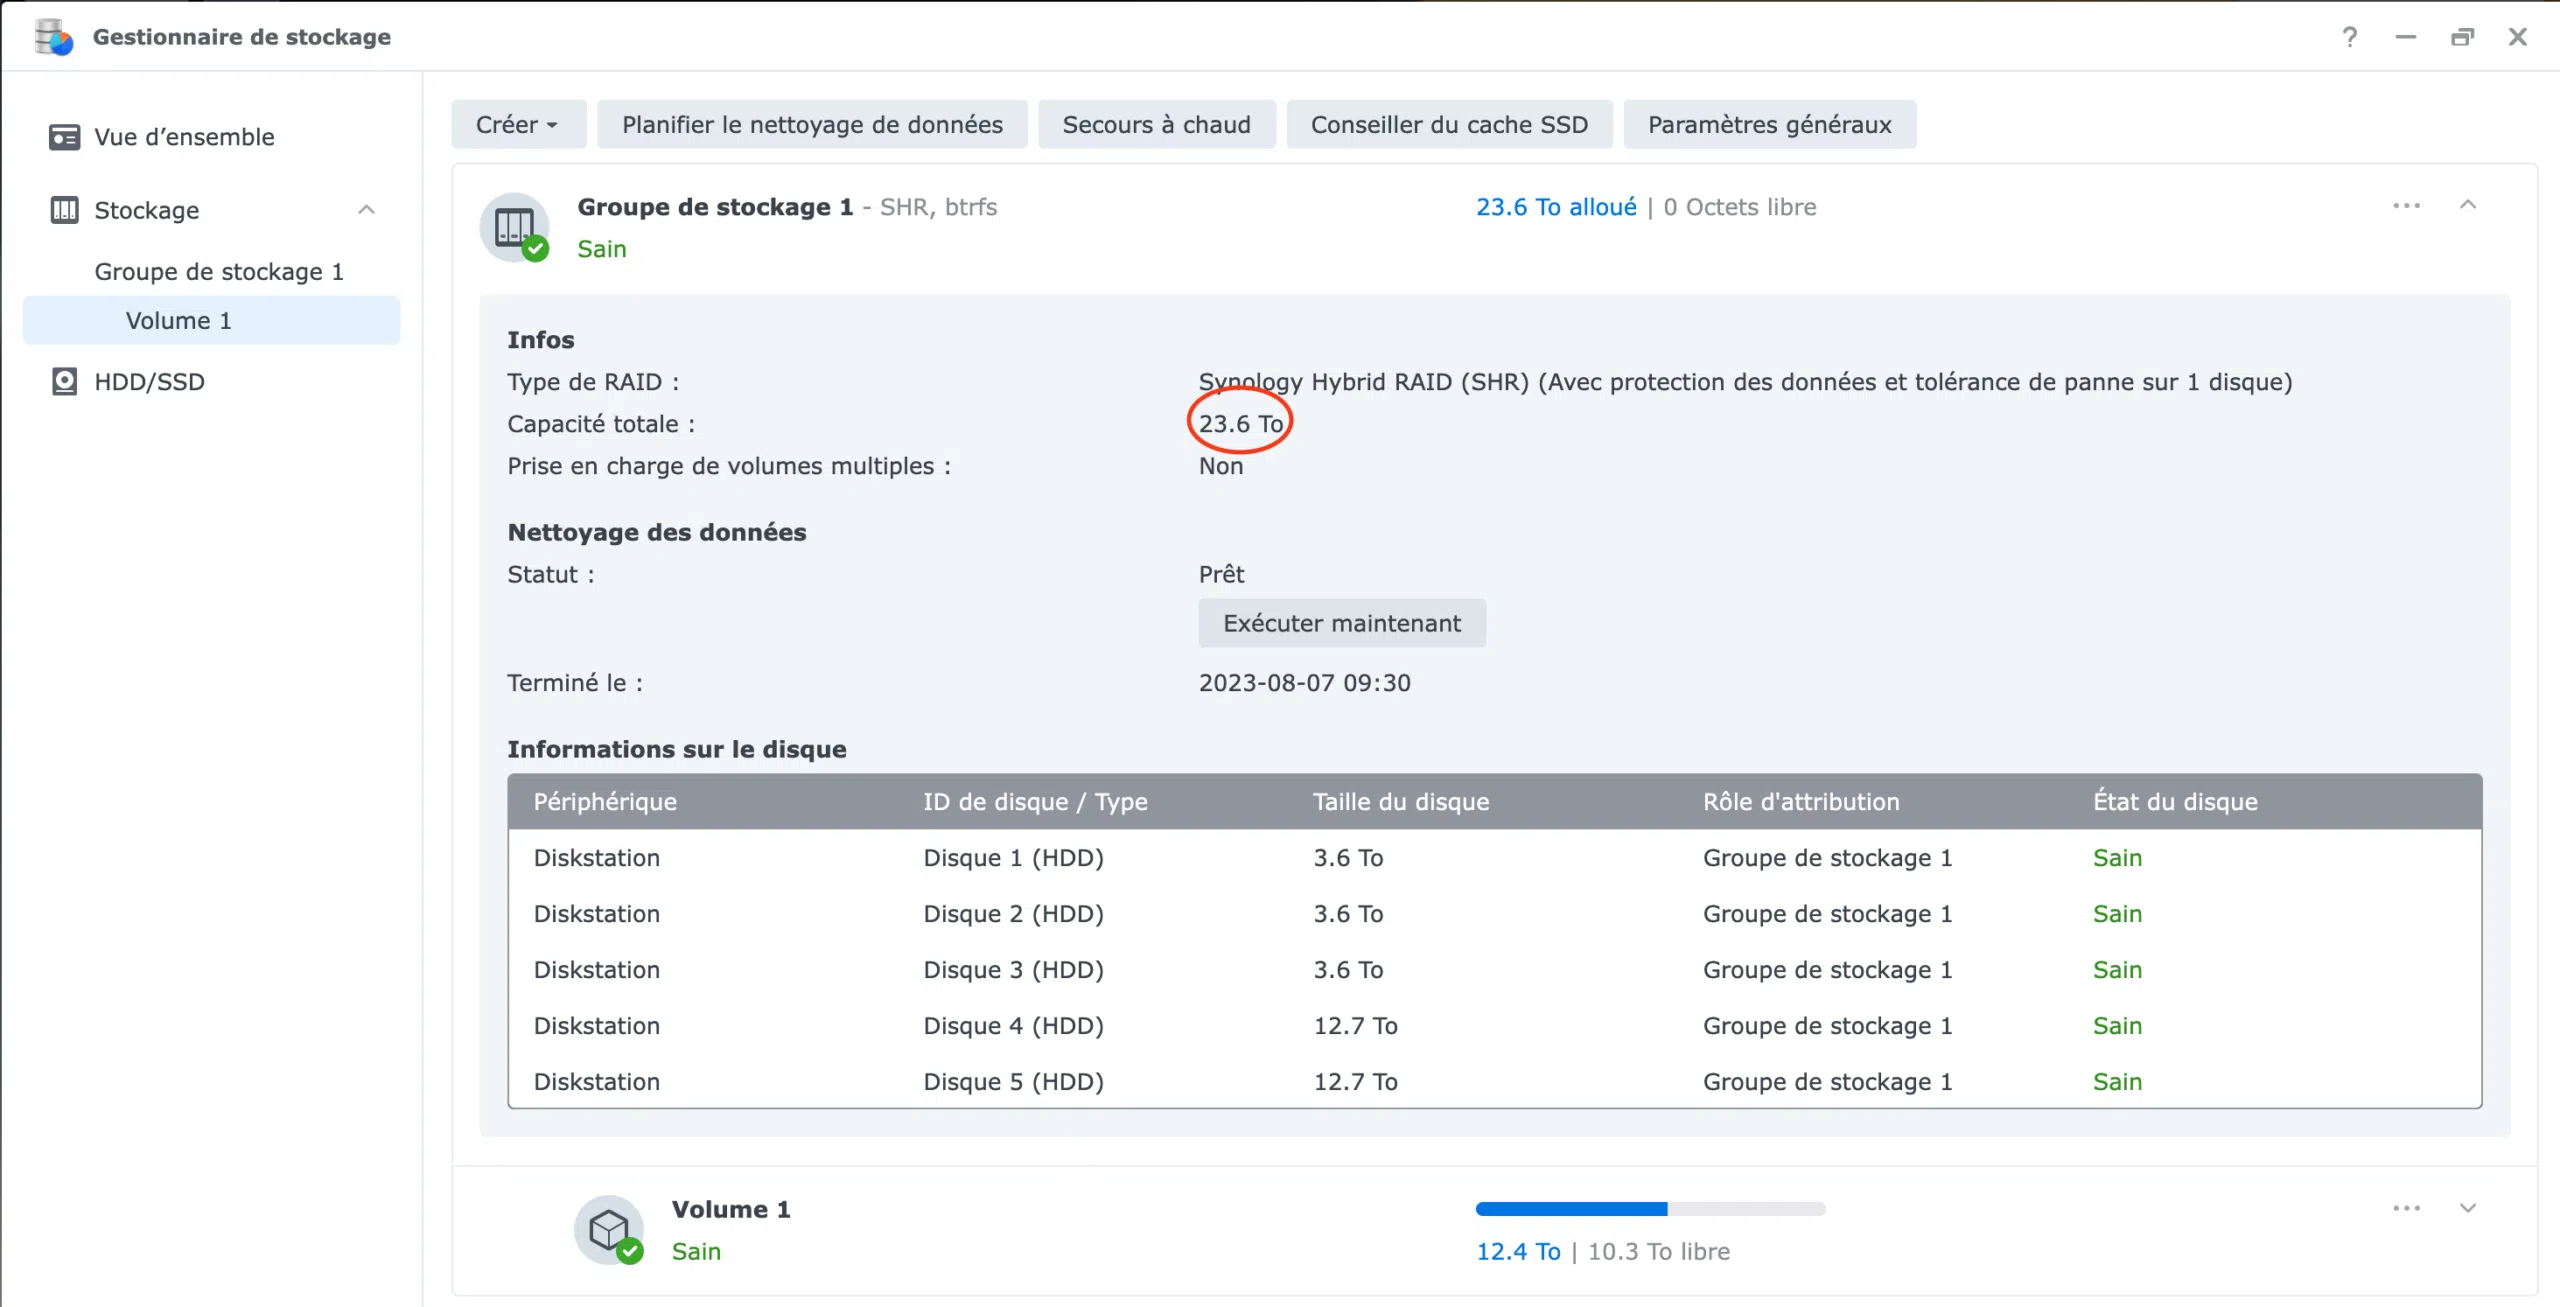
A typical example in a five-bay NAS: five 4TB drives in an SHR volume, giving you about 14TB of usable space. Over time, you'll see that space is running out, and two of the drives have accumulated more than 71.000 operating hours, while the other three barely have half that. The sensible thing to do is start by replacing those two older drives with newer, higher-capacity ones, increasing the total storage without having to replace everything at once.
Prior recommendations: backups and planning
Before turning off the NAS or removing the first tray, it's crucial to understand one thing: RAID is not a backup . While RAID 1 protects against a single disk failure, it doesn't protect against human error, ransomware, accidental deletions, power surges, or volume-level data corruption.
Therefore, whenever you consider making changes of this kind, you should at least have an external backup of the data you can't afford to lose. This could be on another remote NAS (or by mounting network drives as local disks ), on a cloud service (like Synology C2 in the case of Synology), or on well-labeled external drives that you store disconnected. It's a basic precaution, even if you've already performed many replacements without incident.
The second key point is planning the process. Replacing disks in a RAID volume involves rebuild or repair periods that can last hours or even days, depending on the disk capacity, the NAS model, and the workload. While the volume is degraded, you are more vulnerable: any further failure could result in serious data loss.
Therefore, it's best to perform these operations during periods of low activity, such as holidays or weekends, when the NAS isn't under heavy use. This reduces stress on the disks while the system rebalances and copies data, and also prevents users from complaining about slow performance while the repair is in progress.
Finally, if you're going to mix drives of different sizes, it's a good idea to use tools like the manufacturer's capacity simulators (Synology offers a very useful one) to visualize how much usable space you'll get with each combination of drives and RAID/SHR levels. This helps you avoid unpleasant surprises like discovering you have several terabytes "dead" because the chosen configuration isn't utilizing them efficiently.
How to replace a faulty disk in a NAS with RAID 1 or SHR
The practical procedure for changing a NAS drive is much simpler than it seems, especially in systems like Synology, which offer very guided and automated interfaces . Even so, it's advisable to follow some basic steps to minimize risks.
The most important thing is not to replace more than one disk at a time in a volume that only tolerates the failure of one drive (such as a RAID 1 or an SHR with one-disk tolerance). If you remove two disks simultaneously, the volume will lack the redundancy needed to rebuild itself, and you could lose everything. Be patient: one new disk at a time, however tempting it may be to go faster.
The typical workflow for a NAS like Synology would be as follows: First, you properly shut down the NAS from the administrative interface to avoid abrupt shutdowns. Once it's off, you remove the tray from the drive you want to replace, place the new drive in that tray, and insert it into the same bay.
When you restart the NAS, it's normal for it to start beeping regularly or displaying error messages: the system detects that one of the original disks is missing and warns you that the volume is degraded. Open Storage Manager and you'll see a red or orange warning indicating a problem with the storage pool.
In the Volumes or Storage Groups tab, you'll see that the RAID appears in a "degraded" state . At this point, the interface usually offers a clear option such as "Repair Now" or something similar. Clicking this will display the available disks to integrate into the RAID; select the new disk you just inserted and confirm that you want to use it for the repair, understanding that everything on it will be erased.
From there, the NAS initiates a quick disk initialization process and then begins the actual rebuild . This process can take many hours or even several days if the volume is large, the NAS is modest, or there is a heavy workload. During this time, the system is usually still usable, but ideally, it should not be overloaded with unnecessary tasks to avoid prolonging the repair.
Increase capacity: replace disks with larger ones
If your goal is not only to replace a failing disk, but also to increase the available space on the NAS , the procedure is very similar, but with one nuance: in most configurations you will need to replace at least two disks with larger ones so that the expansion is really noticeable in the volume.
In the case of a multi-bay SHR system, you can do something as practical as identifying the two drives with the most usage hours or worst SMART health and replacing them with two new high-capacity drives (for example, upgrading from 4 TB to 14 TB). The RAID simulator will tell you what storage gain you can expect after that specific replacement.
The process itself is the same as when you replace a faulty disk: you turn off the NAS, replace one disk with the new one, turn it on, start the storage group repair, wait for it to finish (even if it takes days) and, once the volume is back to a "correct" state , you repeat the process with the next disk you want to update.
In a real-world example, replacing two old drives with larger ones in a five-bay NAS can easily take three or four days of rebuilding , but ultimately you go from about 14 TB to around 24-26 TB of usable space, depending on the specific drive combination. All of this is achieved while keeping the data on the volume intact and without needing to reformat from scratch.
It's important to remember that once you've installed much larger disks in a system like SHR, the next disk you replace cannot be smaller than the current maximum size. In other words, if you currently have 14 TB disks in the volume, you can't later replace one with an 8 TB drive, even if the disk that physically fails is one of the smallest. The system will force you to respect the existing maximum size to maintain RAID consistency.
In pure RAID 1 configurations, if you add two new 8TB drives and migrate the mirror to them, once the synchronization is complete and the old drives are removed, you'll need to check if your NAS allows you to "expand" the volume to utilize the full size. Many systems automatically detect that the RAID is now based on larger drives and offer an option to expand the volume without data loss.
Choosing hard drives: capacity, brand and reliability
When selecting new drives for your RAID 1 NAS, there's often a debate about brands, models, and technologies. Ideally, you should opt for drives specifically designed for NAS use , such as the WD Red, Seagate IronWolf, or equivalent series, built for 24/7 operation, vibration resistance, and multi-bay environments.
In practice, many people reuse hard drives from external USB enclosures or projects that have been gathering dust in a drawer, as long as they're in good condition and have only a few hours of use. It's a way to reduce costs if you already own the hardware, although it's not the most "standard" approach from a support and warranty perspective.
Beyond the brand, it's worth considering parameters such as spin speed, the type of NAS-oriented firmware , and the estimated annual failure rate. It's also a good idea to review failure statistics from major vendors (such as the periodic reports from some data centers) to get an idea of which models are performing best in the long run.
The ideal capacity will depend on your projected growth. If you currently have 6 TB in use and are growing at a rate of 1 TB per year, upgrading to 8 TB might not be enough in just a few years. Sometimes it's more cost-effective to take advantage of a sale on larger drives (for example, 12 or 14 TB) and secure capacity for several years , rather than increasing by 2 TB increments each time you run out of space.
Finally, while drives of different capacities can coexist in SHR or certain RAID configurations, it's advisable to maintain a balance: there's little point in combining a tiny drive with a huge one if the system won't be able to utilize most of the additional capacity. Again, RAID simulators are your best allies here to avoid wasting money on terabytes that will go unused.
Risk management: reconstruction timelines and best practices
When you replace a disk in a RAID 1 or SHR volume, a rebuild process begins that puts considerable stress on the remaining disks . The system intensively reads all the data from the healthy drives and copies it to the new disk, which can reveal weak sectors that were previously undetected.
That's precisely why it's so important not to force too many changes at once or overload the NAS with heavy tasks during the repair. It's advisable to avoid massive backups, heavy transcoding, or intensive virtualization while the process is underway, thus reducing the likelihood of a second disk failing at the worst possible moment.
Another good practice is to gradually replace the hard drives throughout the NAS's lifespan, without waiting until they're all ten years old and start showing bad sectors simultaneously. If you notice that certain drives have accumulated significantly more operating hours, you can replace them before critical errors occur.
It's a good idea to enable email or mobile app alerts for your NAS, so you're notified immediately of any critical issues such as disk degradation, temperature problems, or volume degradation, and can act quickly. Letting weeks go by with a RAID array in a degraded state is practically inviting disaster.
In short, although modern systems like SHR greatly facilitate the process of expanding and replacing disks, it remains key to respect the basic rule of prudence: one change at a time, backups made, and patience while the NAS does its work in the background.
With minimal planning, monitoring SMART status, and an active external backup strategy, replacing a failing hard drive in a RAID 1 NAS or upgrading to higher capacity drives is a fairly manageable task; the system takes care of almost everything, and you only need to ensure that each step is completed correctly and that the health of your data remains intact at every stage of the process.


Passionate writer about the world of bytes and technology in general. I love sharing my knowledge through writing, and that's what I'll do on this blog, show you all the most interesting things about gadgets, software, hardware, tech trends, and more. My goal is to help you navigate the digital world in a simple and entertaining way.
Table of Contents
- 1 Understanding your scenario: NAS, RAID 1 and disk status
- 2 Classic RAID 1 vs SHR and other RAID types
- 3 When is it mandatory to replace a NAS hard drive?
- 4 Prior recommendations: backups and planning
- 5 How to replace a faulty disk in a NAS with RAID 1 or SHR
- 6 Increase capacity: replace disks with larger ones
- 7 Choosing hard drives: capacity, brand and reliability
- 8 Risk management: reconstruction timelines and best practices