- Windows 11 You can modify the brightness by content, ambient light and HDR.
- Disable CABC on Screen and the sensor if your device includes it.
- En Intel Turn off "Display Power Saver"; on AMD, "Vari-Bright".
- With HDR, calibrate and review settings to maintain stable luminance.
If your screen in Windows 11 raises and lowers the light on its own, you are not alone: this is a common behavior caused by various image saving and processing functions; you can see how change screen brightness in windows 11.
The good news is you can control it. With a few tweaks to your Windows settings, Intel or AMD dashboards, and a couple of extra checks, You can stop those automatic brightness changes and maintain stable luminance without sacrificing image quality or battery life if you don't want to.
What causes brightness to change on its own in Windows 11?
The main actor in many portable modern is called Adaptive brightness and contrast control to the content (often abbreviated as CABC). This feature analyzes whether what you see is mostly dark or light and adjusts the luminance to optimize power consumption and visibility. It's normal to notice a slight adjustment when switching from a window with a black background to a white one: It is designed this way to save energy and extend the battery life..
In addition to the CABC, some teams include ambient light sensors (see how set automatic orientation and brightness) that tell Windows to raise or lower the brightness based on the lighting in the room. If you work near a window or under lights that change intensity, you can see brightness fluctuations caused by the sensor, not by the content on the screen.
Another ingredient is HDR. On compatible displays, Windows 11 applies tone mapping and brightness management to display dark and bright scenes with more dynamic range. Sometimes, when moving the pointer or entering the "Use HDR" menu, slight variations in luminance are perceived due to how the system applies this processing. If the flickering or slight drop in brightness only occurs with HDR enabled, the source is probably there; check if your display supports HDR.
Finally, graphics drivers provide their own power profiles. On Intel, there is a «Screen power saving» which reduces consumption by slightly lowering the perceived brightness depending on the content. At AMD, the equivalent function is called Vari-Bright. These options tend to activate more aggressively when you are on battery power, and With alternating current the effect decreases or disappears.
Disable content-adaptive brightness and contrast in Windows 11
Windows 11 includes a toggle so the brightness no longer responds to what's displayed on the screen. If you prefer a fixed luminance, disables content adjustment and ready.
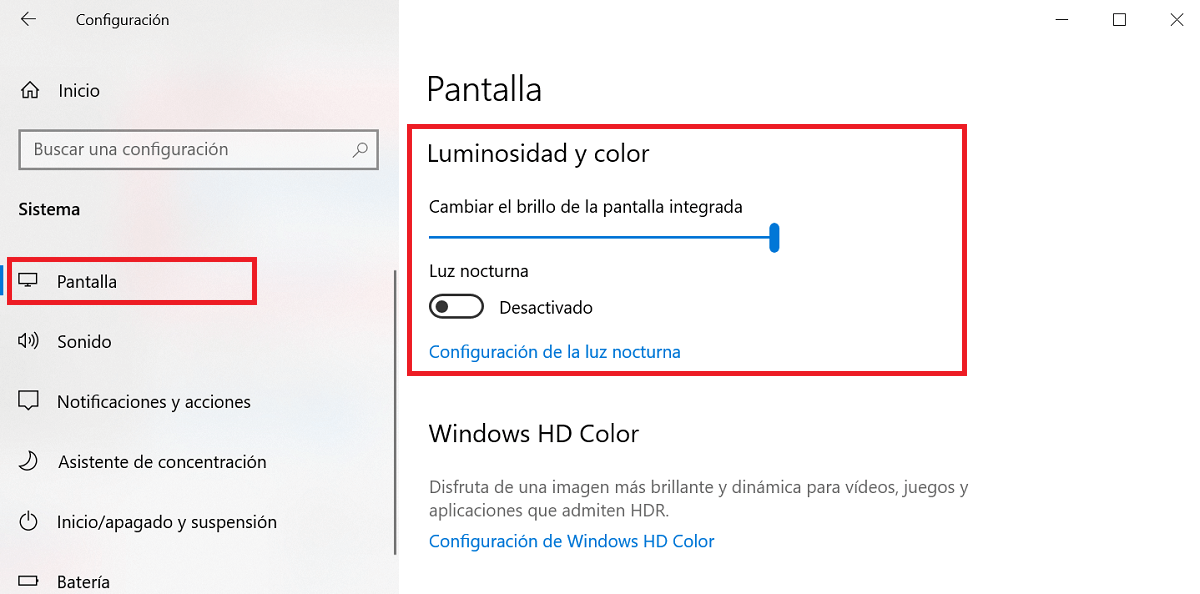
- Open Windows Settings (press the Start button and type “Settings”). Go to System > Display.
- In the Brightness section, expand the additional options by pressing the arrow to the right of the slider. Find "Change brightness based on content" and set it to Off.
In some compilations or brands it may appear with a very similar name, such as "Content Adaptive Brightness Control"If you don't see it, check after installing the latest updates and, above all, update graphics drivers, because this adjustment depends largely on them.
Specific options on Surface devices
On Surface, brightness and contrast adapt automatically by design. Microsoft says that It is normal to notice subtle changes when switching between dark and light content., as the best balance between readability, quality and consumption is sought.
If you need to disable it, go to Settings > System > Display and, under Brightness, set the option to Off. "Change brightness based on content"This setting sets the luminance regardless of what's on the screen.
There is a useful trick if you just want to temporarily stop the behavior: plug your Surface into a power outletWhen using power, the system automatically limits or disables several energy-saving features that modify brightness, so the luminance change often disappears while you're plugged in.
If your Surface has an Intel or AMD processor, you can also fine-tune the behavior from the GPU manufacturer's panel. It is the most effective way to preserve the configuration. as you want both in battery and current.
Intel: Adjust or disable display power saving
Intel-based computers have the Addiction commands Intel graphics, available in the Microsoft Store. From there, you can reduce the aggressiveness of the save or turn it off altogether.
- Open the Intel Graphics Command Center. If you don't have it, install it from the Microsoft Store.
- Go to System in the side menu and enter the tab Start / stop (or Energy, depending on the version).
- Test the settings first Energy efficiency to find a balance between quality and battery life.
- If you still notice unwanted changes, put "Screen Power Saver" to Off. It is the parameter that most influences these brightness variations.
With this setting, the brightness will not "auto-optimize" based on the content, so the luminance will remain stable even when switching between apps with very different backgrounds.
AMD: Vari-Bright and Power Modes
On AMD platforms, the equivalent function is called Vari-Bright. It's in the Radeon Control Panel and can also be affected by the system's power mode.
- Open Radeon Settings (right-click on the desktop and choose Radeon, or search for it in the Start menu). Go to the Display tab.
- Locate the block Vari-Bright and turn off the switch if you want to prevent content-based luminance changes. You can adjust the slider if you prefer to reduce, rather than eliminate, their effect.
On some AMD-powered Surface models (such as certain versions of Surface Laptop), in addition to Radeon, Adaptive brightness control responds to the system's power mode. Click the battery icon in the taskbar and move the control to "Maximum performance"This position minimizes luminance cuts due to energy savings.
If you combine the Vari-Bright switch off with the higher performance mode, the brightness should stop flickering when switching windows or moving the pointer over dark areas.
Disable automatic brightness based on ambient light
Many laptops include a light sensor that regulates brightness based on the lighting in the room. If you have it enabled, The system will adjust the screen as the light in your environment increases or decreases., regardless of the content on the screen.
- Right click on the desktop and choose "Screen settings" to go directly to Screen.
- In the Brightness section, expand the additional options and uncheck "Automatically change brightness when the light changes"This box only appears on devices with a light sensor.
By disabling that control, the brightness will stop responding to ambient light and will depend solely on the value you set on the slider, or on the CABC rules if you keep it activated.
When the problem appears with HDR active
If you notice that the brightness drops slightly when you change the pointer or hover over interface elements, and it only occurs with HDR enabled on one of your displays, it's likely that tone mapping is interacting with high-contrast content. In dual-monitor scenarios (one HDR and one SDR), this may be more noticeable on the HDR panel.
To narrow down the cause, first disable any content-aware brightness adjustment (CABC) and automatic ambient light adjustment. Then, try turning off HDR temporarily. from Settings > System > Display > "Use HDR" on the affected display. If the flickering disappears on its own after disabling HDR, the source is HDR processing.
As an improvement step with HDR enabled, run Microsoft's HDR calibration app (Windows HDR Calibration, available in the Store). This tool adjusts brightness, saturation, and tone mapping levels for your specific monitor and can reduce or eliminate those micro changes in luminance.
Note that when you open the "Use HDR" page in Settings, Windows displays a preview with managed brightness which may look a little dimmer; this is expected while you're in that area. Outside of that, with calibrated HDR and no CABC, the brightness should remain stable.
Update drivers and check manufacturer utilities
Before or after touching these settings, it is a good idea to make sure that integrated graphics drivers are updated (check Solutions if screen brightness doesn't work). Both Intel and AMD improve with There energy and image management, and CABC/Vari-Bright options They may change location or behavior with new versions.
In addition, some manufacturers include their own utilities that incorporate display profiles or energy saving. Check if your device comes with a brand app (Dell, Lenovo, HP, etc.) and check that there is no profile that forces dynamic luminance; disable it or use a "Standard" mode if that possibility exists.
Manage color: Enable automatic color management (optional)
If you work with photography, video or design, activate the automatic color management in Windows 11 helps all the apps represent colors consistently. It does not control brightness, but Improves color accuracy and reduces artifacts (banding in gradients, for example).
- Go to Settings > System > Display profile > Colour.
- Select the screen and activate Automatically manage application colors.
Even on 8-bit displays, Windows uses techniques such as dithering to provide smoother transitions, which improves the overall perception of the image without affecting the luminance.
Quick Start Guide: Recommended Order of Checks
To solve it without leaving any loose ends, we suggest this order. This way you will know where the cause was. and you will avoid unnecessary changes.
- Connect the laptop to the power supply. If the fluctuations disappear, the origin is an energy saving on battery.
- In Settings > System > Display, turn off "Change brightness based on content".
- If your device has a sensor, uncheck it "Automatically change brightness when the light changes".
- Open your GPU panel: on Intel, turn off «Screen power saving»; on AMD, disable Vari-Bright.
- If the problem is with HDR, calibrate with the Microsoft app and check «Use HDR» on the affected screen.
- Update graphics drivers and, if applicable, set the power mode to “Maximum Performance” when working on sensitive tasks.
In dual monitor environments (one HDR and one SDR), try to keep the same savings logic disabled on both and applies calibration only to the HDR panel, to avoid any inconsistent behavior that might confuse you.
If you still see intermittent luminance changes despite all these steps, try temporarily resetting your GPU panel's video settings and reconfigure only the necessary settings from scratch. In many cases, some inherited energy profile or an older driver version may be enforcing dynamic brightness rules without it being visible to the naked eye.
The key is to identify which of the layers is acting: Windows CABC, light sensor, GPU savings (Intel/AMD) or HDR itselfBy adjusting each one accordingly, you can maintain a stable and consistent image, and reactivate whatever suits you best when you need to maximize battery life or gain a little visual comfort.

Passionate writer about the world of bytes and technology in general. I love sharing my knowledge through writing, and that's what I'll do on this blog, show you all the most interesting things about gadgets, software, hardware, tech trends, and more. My goal is to help you navigate the digital world in a simple and entertaining way.