- OCCT combines CPU, GPU, VRAM, and PSU testing with real-time monitoring and graphics to accurately diagnose instability.
- CPU:OCCT quickly detects stability issues; Linpack maximizes temperature; GPU:3D stresses core/VRAM; and PSU forces real-world power surges.
- Reports in PNG, a Spanish-language interface, and an updated sensor engine make it easy to validate setups, overclocks, and refurbished equipment.
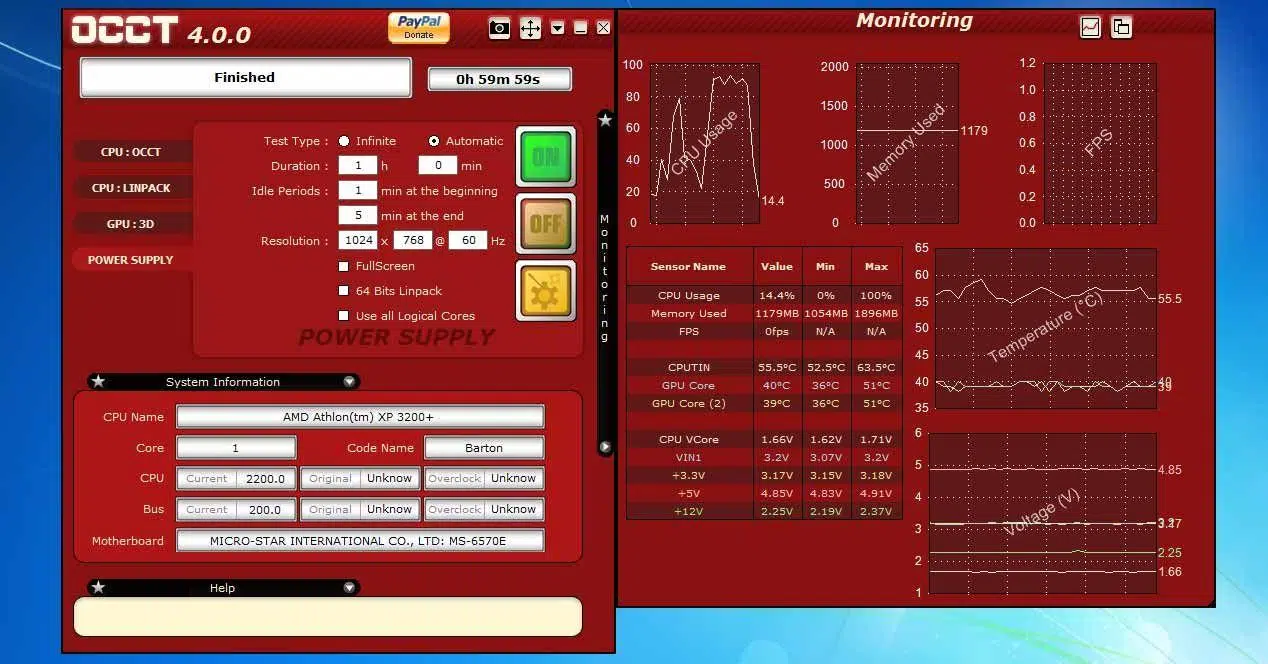
When we talk about putting a PC through its paces to test its stability, one name comes up time and again: OCCT. It was created years ago as a utility that combined stress testing and monitoring in one place, and today it remains a benchmark because it allows for highly accurate verification of the stability of the CPU, GPU, memory, and even the power supply.
OCCT, short for Overclock Checking Tool, began in 2003 as a personal project with a very clear goal: to avoid having to open two different programs to stress-test and monitor the system simultaneously. Over time, the interface has been refined, tests have been added, and its sensor reading engine has been strengthened, making it a very practical tool today for both overclocked systems and PCs running at stock frequencies that need a quick and reliable health check.
What is OCCT and why is it still so useful?
OCCT is a testing and monitoring suite that condenses into a single panel what you would normally do with several applications. You can run tests for your processor, memory, graphics card, and power supply, all while the program displays real-time graphs of temperatures, voltages, frequencies, and load. The moment you start a test, another monitoring window appears with readings from motherboard and component sensors, allowing you to see if anything goes wrong before it's too late. This "all-in-one" approach explains why it has become essential for validating stability after hardware changes or performance adjustments.
Unlike other utilities, OCCT groups its options into thematic tabs: CPU:OCCT, CPU:Linpack, GPU:3D, GPU:Memtest, and Power Supply. Each tab stresses the system differently and is designed to find specific problems: CPU instability, GPU artifacts, graphics card memory errors, or insufficient power delivery from the power supply. This segmentation helps to accurately diagnose where the system is failing when a crash or blue screen occurs, instead of searching blindly.
History and evolution: from university project to polished tool
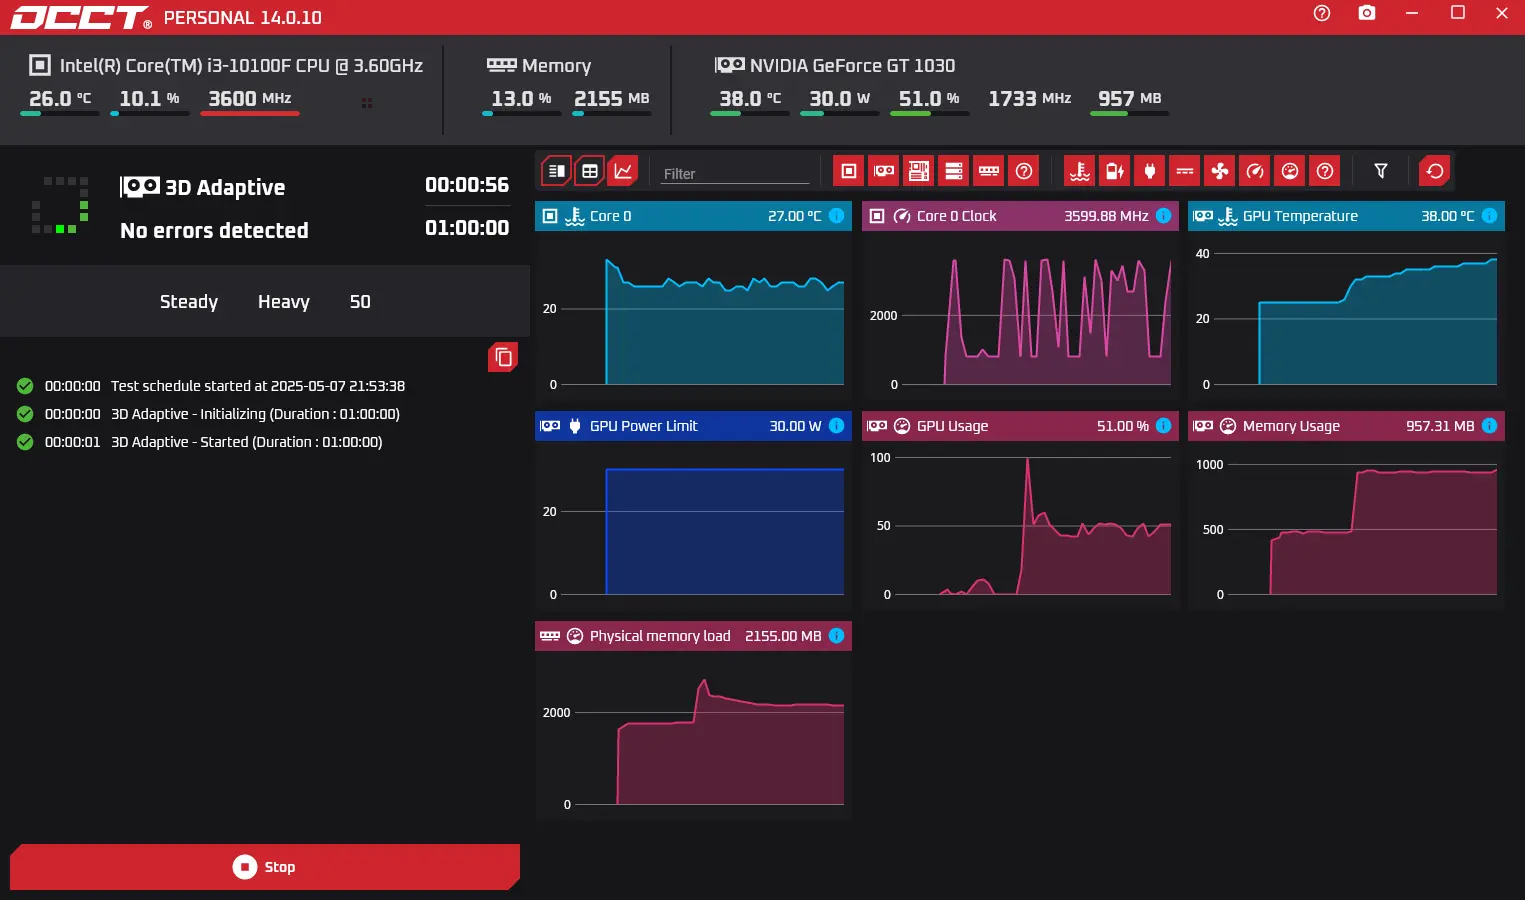
What began in 2003 with the goal of validating overclocks without complications has matured with each version. The so-called "v3" represented a visual and functional leap: a completely revamped interface based on tabs and modules; a small integrated help panel ; and improved graphs that add a second line showing CPU usage or FPS during the test, as well as including the test settings in the subtitles of each graph.
The monitoring engine was updated to recognize more hardware and fix known bugs, such as incorrect core detection (that typical case of seeing three out of four). Since then, OCCT includes five main tests (CPU:OCCT, CPU:Linpack, GPU:3D, GPU:Memtest, and Power Supply), eliminating the need for a collection of disparate programs to cover all the critical components.
Test Panels: How OCCT is Organized
The program's tabs are organized by component or load type. CPU:OCCT is the flagship test for overall CPU and RAM stability; CPU:Linpack is used to generate extreme heat and push cooling systems to their limits; GPU:3D stresses the core and VRAM by continuously rendering a scene; and Power Supply simultaneously stresses the CPU and GPU to measure the power supply's resistance. When starting the test, OCCT can run in automatic mode: you choose the duration in hours and minutes, and the program adds a monitoring window before and after the test to capture startup and cooling behavior.
The settings are specific to each tab. In CPU, you can define whether the test runs in 32-bit or 64-bit mode, the size of the dataset to be loaded into memory, the number of threads to use, and whether to enable AVX instructions. In GPU:3D, you select the DirectX version , resolution (the monitor's native resolution is recommended), whether to run in full screen, the FPS limit, visual error detection, and shader complexity. In Power Supply, the program alternates between heavy CPU and GPU loads, even with 3D scene animation, to increase the power demands on the PSU and detect drops or instability.
CPU:OCCT, the key test for system stability
The CPU:OCCT benchmark is designed to uncover stability issues faster and with a more reasonable thermal load than other benchmarks. If you intend to validate a 24/7 overclock or undervolt, it's common to run it for 1 to 2 hours; however, many errors will surface within the first 5-10 minutes if there's a serious problem. The size of the dataset matters: the larger the dataset, the more RAM is involved , and the greater the likelihood of detecting voltage control errors or latency issues.
You can also adjust the number of threads to see if instability only occurs under full load or even in scenarios with less parallelism. And if you want to go all out, enable AVX to simulate heavy content creation or computational workloads, knowing that power consumption and temperatures will increase, which helps validate your cooling solution.
CPU:Linpack, when the goal is to heat to the maximum
Linpack (the mathematical library for linear algebra operations) is the classic floating-point CPU performance test. In OCCT, it's used as a profile that pushes the processor to its maximum operating temperature, generally exceeding the temperatures of other tests. It's ideal for seeing if the heatsink, pump, or fans can handle the load, but it's not the best for detecting all the system's logical stability errors, since its load pattern doesn't always replicate the same real-world usage conditions.
In this tab, you can choose the Linpack version and memory size to use, as well as enable or disable logical CPUs (SMT/HyperThreading). If running CPU:OCCT makes you feel more confident, running Linpack for a while will give you a picture of the worst-case thermal scenario; if you see strange spikes or aggressive throttling, it's a good time to check the thermal paste, fan curve, or any excessively high voltages.
GPU:3D and GPU:Memtest, stress for the graphics card and its memory
OCCT's GPU:3D tab continuously renders a complex scene to stress both the GPU core and VRAM. You can set the resolution, enable fullscreen mode, and enable error detection to catch artifacts or calculation errors. The load is reminiscent of FurMark benchmarks, but with its own criteria and without the historical risks associated with FurMark if configured incorrectly; even so, it's a very demanding test, capable of raising temperatures above those of any game, especially in high ambient temperatures.
OCCT also includes a specific test for GPU memory (GPU:Memtest). This test detects errors in the VRAM, which is very useful when you receive a new or refurbished card and want to ensure the memory doesn't exhibit read/write pattern defects. It's perfect for quality control, but it's not always the definitive test for validating graphics card overclocks, because an overclock that passes Memtest could fail under certain shader combinations or very specific 3D loads.
Power Supply: Testing the power supply
This is one of OCCT's most unique features. The PSU test runs simultaneous CPU and GPU loads to force power spikes that reveal power supplies with low reserve capacity or unstable regulation. In practice, the program makes the 3D scene move while it's being rendered, adding load variations and forcing the power supply to respond quickly. If there's a serious problem, the PSU may activate protection circuits and shut down the system; in the worst-case scenario, poor-quality hardware can fail with an unpleasant "light show," so it's best to use this test responsibly and under supervision.
For those reusing a power supply in a new setup, or who have purchased a refurbished unit, this test provides a fairly clear picture of its response. It doesn't replace a laboratory bench with specialized instruments, but for a home user or a technician who needs a quick reading, it offers significant value.
Monitoring and graphics: seeing is believing
Beyond pure stress testing, OCCT excels in data presentation. Its graphs allow you to show or hide parameters (temperatures, voltages, RPM, power consumption, frequencies) to prevent clutter. At the bottom of each panel, the sensors are listed with their current, minimum, and maximum values, and at the end of the tests, you can download highly illustrative PNG reports with curves for each CPU core, each GPU, and voltage variations, now including a second line that reflects CPU usage or FPS during the test.
In the free version, detailed reports are available for the first five tests and are permanently unlocked with a license. This format is incredibly convenient for documenting client setups or comparing settings between runs, and if you place OCCT on a second screen while you work, the live value tables become your best friend.
Download, portability and licensing model
OCCT can be obtained from the developer's official website (OCBASE) . It's portable: it doesn't require installation, making it ideal for carrying on a USB drive and testing multiple computers. It's free for personal use, although each time you run a test you'll see a brief countdown with a donation invitation. If you work with many computers or want the extra features, you can opt for paid licenses at a very reasonable cost (historically, there have been options ranging from very low monthly fees to affordable perpetual licenses and even higher-priced network licenses). The goal is to unlock features like unlimited reporting and simplify the workflow when evaluating multiple PCs daily.
The user experience feels designed for the user: a well-crafted Spanish interface, clear modules and contextual help, and it makes it easy to maintain and optimize your PC.
Recommended configuration according to objective
For general CPU and memory stability, prioritize the CPU:OCCT tab with medium or large data sizes, all threads, and test with AVX enabled if your use case requires it (editing, computing, etc.). An hour is usually a good starting point, although if errors appear within 10 minutes, you'll have saved time. If you're looking for maximum thermal stress, add a session with CPU:Linpack and observe temperatures and any drops due to throttling, as this will show whether the cooling is adequate.
For the GPU, run GPU:3D at native resolution, full screen, and with error detection enabled. If you want to simulate a more realistic thermal limit, set an FPS cap; if your goal is to push it to the limit, leave it uncapped. Supplement this with GPU:Memtest to check the VRAM, which is especially useful when you've adjusted memory frequencies or when you're delivering a card to a customer and need to certify its condition.
Safety tips and best practices
Stress tests are not a game: they can cause protective shutdowns and even damage if there's faulty hardware. Use an aggressive fan profile during tests, check that airflow is adequate, and avoid long sessions in the summer if the room is very hot, because the GPU can reach unrealistic temperatures compared to everyday use. Always monitor the temperature and voltage panel; if anything seems out of the ordinary, stop the test. The PSU tab, in particular, should be used with caution, as it can expose the weaknesses of a weak power supply.
Remember that OCCT also allows monitoring before and after each test, so you can identify spikes at the beginning and see how long the system takes to stabilize at the end. This is a very useful feature for detecting sluggish pumps in AIO liquid coolers or fans with poorly configured curves that don't respond in time to a load spike.
OCCT for newly built, refurbished, or overclocked PCs
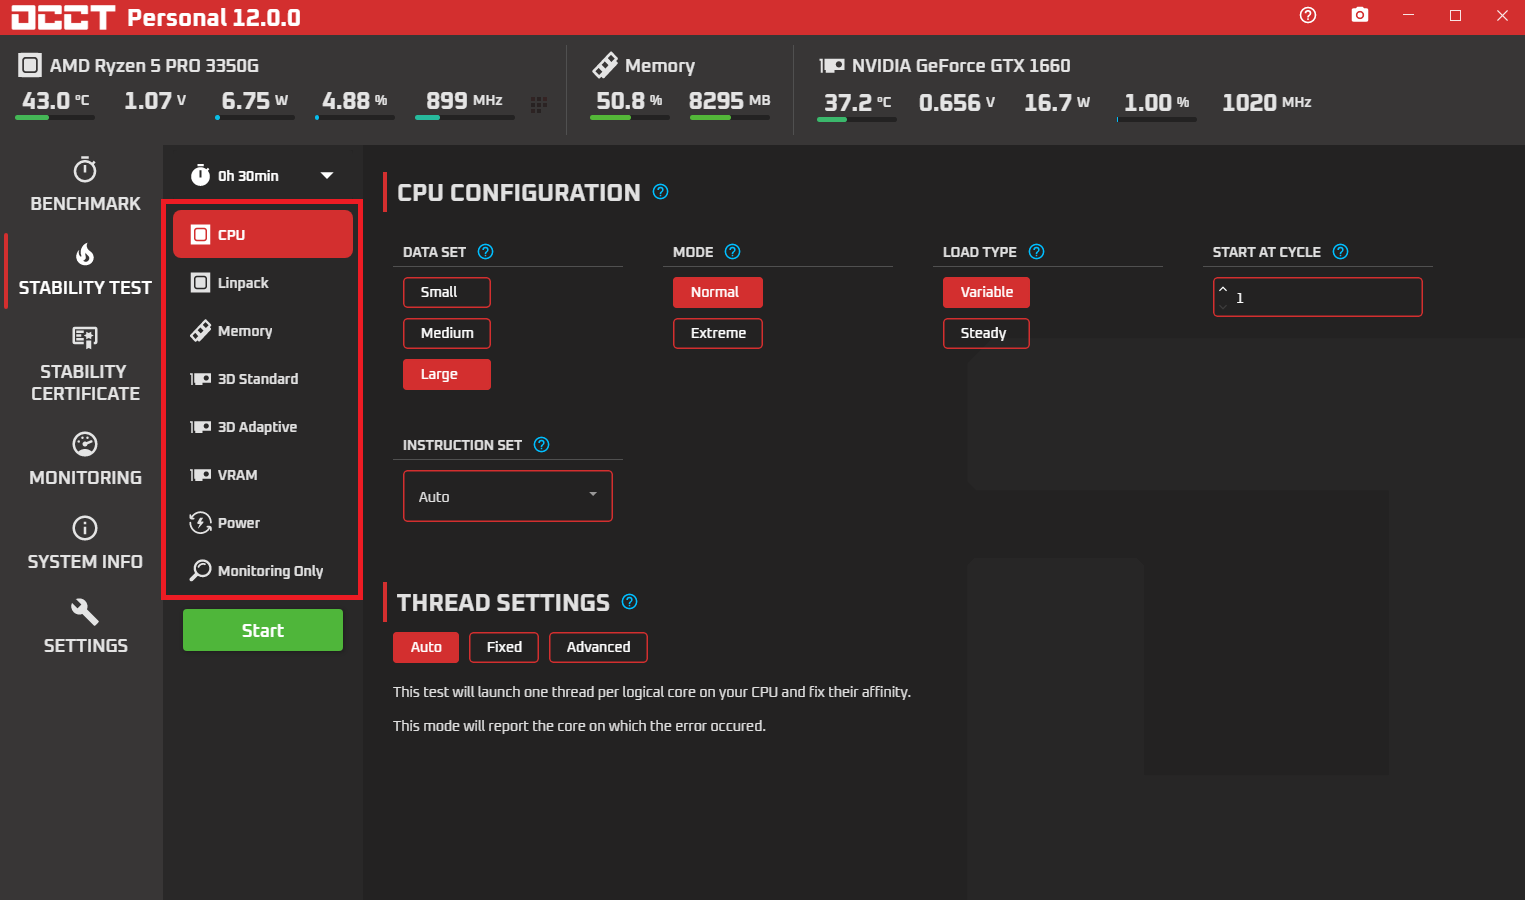
If you've just built a PC, OCCT helps you detect faulty components before you ship it. A cycle of CPU:OCCT, GPU:3D, and GPU:Memtest, followed by a brief PSU test, will give you a clear picture. For refurbished systems or those with used parts (especially power supplies), the Power Supply test lets you decide if the unit is worth keeping. And if you overclock, OCCT is your ally for consolidating "24/7" profiles, ensuring that voltages aren't too low (or too high) and that the system won't crash under loads that a game might not reveal.
Those who undervolt will appreciate the ability to adjust threads, AVX, and data size, as it allows for granular control over stability. If your version doesn't display the exact same options recommended in older guides (for example, "dataset size: none/small/medium/large"), use the available sizes and prioritize CPU:OCCT when the goal is logical stability, and CPU+RAM (if your version presents it as a separate tab) to enhance memory management. If in doubt, run both and compare where errors appear first.
Practical comparison with other tools
If you're coming from Open Hardware Monitor and find it lacking, OCCT is practically the opposite in terms of features: comprehensive monitoring plus a stress test, all within a modern interface and with graphical reports. Many enthusiasts use games to validate stability, but few apps push it as hard as OCCT. Compared to Furmark, OCCT opts for a very demanding load design without resorting to the risks of historical configurations that compromised poorly protected GPUs; even so, the GPU test is impressive, and the PSU test is unique without external hardware.
Parameters and functions not to be overlooked
– 32/64-bit mode in CPU tests: useful for replicating specific conditions or older compatibility. – DirectX selection and fullscreen in GPU:3D: important if you want a load similar to modern games. – Error detection in GPU:3D: enable this option to catch artifacts and calculation errors. – FPS limit: helps control temperature and noise if you only want to validate stability without pushing the graphics card to extreme thermal limits. – 10-second countdown per test in the free edition: if you plan to run many rounds, consider upgrading to the license to save time and unlock unlimited reports.
The Spanish interface, the help module, the extra CPU/FPS line in the graphs, and the subtitles with the test settings are all quality touches. Combined with the updated sensor engine (with improved hardware detection and bug fixes), they make for a more robust experience and ensure the data you see responds with less delay and greater accuracy.
Suggested procedure for a complete stability test
1) Initial verification of idle temperatures and voltages using OCCT in monitoring mode. 2) CPU: OCCT 30-60 minutes, medium/large data size, all threads, with and without AVX if applicable to your usage. 3) CPU: Linpack 10-20 minutes to validate heat dissipation and verify no abnormal throttling. 4) GPU: 3D 20-30 minutes at native resolution, full screen, error detection enabled; then, if necessary, GPU: Memtest for VRAM. 5) Power Supply 10-15 minutes with close monitoring of voltages and temperatures. Between tests, allow a short period of downtime with monitoring to observe post-load behavior, as this period also provides valuable insights.
If OCCT detects errors in any of the phases, note the tab and the exact settings (included in the graph subtitles). Adjust voltages, frequencies, or fan profiles, and repeat the failed section before running the entire battery again. This saves time and helps you narrow down the source of the problem methodically.
Frequently Asked Questions and Cases: Undervolting in Ryzen and Dataset Options
With CPUs like a Ryzen 5 7500F undervolting, it's common to wonder what to use if the interface shows CPU mode and threads, but not the traditional "dataset size," while you see that option in CPU+RAM with small/medium/large sizes. The practical answer: for silicon stability, focus on CPU:OCCT with all threads and, when possible, enable AVX to explore the thermal/electrical limits. Then, complement this with CPU+RAM, choosing a large dataset to allocate more memory. There isn't a single best approach, but the important thing is that both address different needs: CPU:OCCT detects logical errors quickly, while CPU+RAM stresses controllers and reduces latency.
If you search for "core cycling with SSE/AVX," interpret that recommendation as "test with and without AVX": first without, to validate everyday stability, and then with AVX for the worst-case scenario. If your version doesn't offer the same labeling as an older guide, use the current equivalents; the developers have refined the names and menus, but the underlying workloads still serve the same purpose.
When to stop and how to interpret mistakes
An early failure usually indicates that your voltage margin is too tight or that there are memory/IMC issues. If it only occurs with AVX, you might need a specific offset for those instructions or to lower the AVX low-frequency target. If it appears in GPU:3D with error detection enabled, look for artifacts: these can point to excessive GPU overclocking or unstable VRAM. And if it fails in Power Supply, consider checking the power supply (especially if it's old or low-end), because the PSU test is designed to reveal the truth when power delivery is lagging.
A system passing two hours of OCCT doesn't guarantee absolute infallibility, but it does indicate a high degree of confidence. The idea is to combine tests that target different bottlenecks so that errors aren't hidden. With this strategy, OCCT becomes a quick and fairly comprehensive way to certify stability for everyday or professional use.
OCCT has earned its reputation because, in addition to conducting rigorous testing, it does so in an organized and visual way, eliminating the need to switch between windows and programs. Add to that its portability, the availability of ready-to-save graphical reports, and the ability to stress-test even the power supply, and it's easy to see why so many enthusiasts, technicians, and system builders rely on it as their go-to tool for validating builds, detecting faulty components, and verifying overclocks or undervolts.

Passionate writer about the world of bytes and technology in general. I love sharing my knowledge through writing, and that's what I'll do on this blog, show you all the most interesting things about gadgets, software, hardware, tech trends, and more. My goal is to help you navigate the digital world in a simple and entertaining way.