- Word It allows you to create and print identical or different labels, both with manual data and through mail merge.
- Label options include choice of supplier, product number, and creation of custom sizes.
- In environments with SharePointInformation tags are inserted according to administrator directives for managing metadata.
- Word for the Web does not create labels from scratch, but it does allow you to work with online label templates.
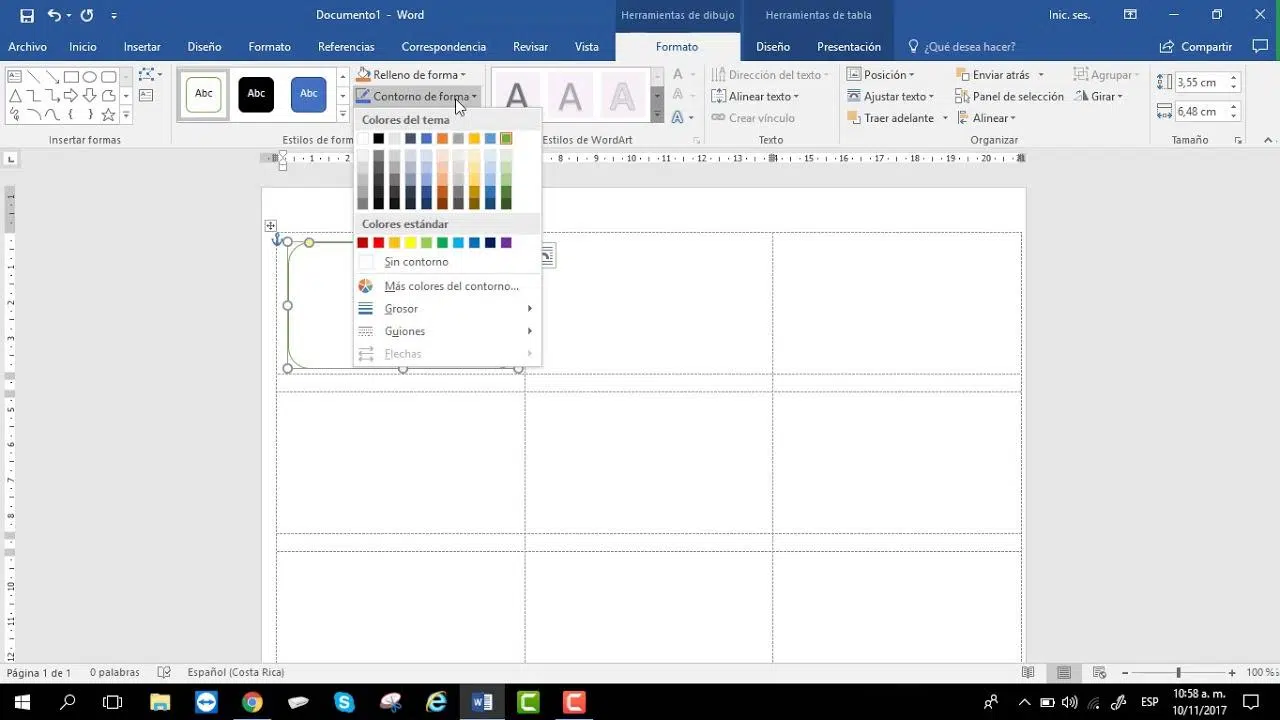
If you work with documents daily, sooner or later you'll need to create and insert labels in Word , whether for envelopes, packages, internal documents, or even to design your own stickers. Word isn't just a word processor: it's a very flexible tool that allows you to design entire sheets of print-ready labels.
Furthermore, in many SharePoint environments and information management policies, it's mandatory to insert metadata tags within the file itself before saving or printing. Alternatively, if you're looking for something more creative, you can also use Word to design custom stickers with your address, logo, or messages , provided you then use suitable adhesive paper in your printer.
What is a label in Word and what is it used for?
In Word we can talk about two different types of labels: on the one hand there are physical labels that are printed on adhesive sheets (the typical address labels for envelopes, file labels, etc.), and on the other hand there are information labels (metadata) linked to SharePoint that are embedded within the document as part of a policy.
Printed labels are managed from the Mailings tab and the Envelopes and Labels tool , which allows you to configure the size, the number of labels per page, and the content that will be repeated or varied on each label. This feature was originally designed for postal addresses and bulk mailings , but it can easily be adapted for other uses.
In the case of metadata tags, these form part of an information management policy in SharePoint libraries . Their purpose is to display key properties within the document itself, such as category, confidentiality level, or any other data defined by the administrator.

Create and print a page of identical labels in Word
If what you need is a full sheet with the same label repeated in all positions (for example, your company address or standard text), Word includes a very simple wizard in the Mailings tab.
To begin, open a blank document and go to the Mailings tab > Labels . In some versions, the option is within the Create section, while in others it appears directly as the Labels button, but the functionality is the same.
In the window that opens (Envelopes and Labels), you'll see an area called Address . This is where you can enter the text you want to appear on each label: a postal address, a sender's name, a short message, or any other information you need. It only accepts text content, although you can later apply formatting from the generated document.
Before you start typing, it's a good idea to click the Options button . This is where you choose the supplier and model of your label sheets—for example, Avery or other manufacturers—and the product number printed on the label pack . This way, Word automatically adjusts the size of each label, the margins, and how many fit per page.
If your reference isn't listed or you're working with unmarked sheets, you can select New Label and define a custom label . There you can manually adjust the width, height, margins, row and column spacing, etc., to ensure the design fits your paper.
Once you've configured the label type, return to the main Envelopes and Labels window and enter the address or text in the Address field. If you want to modify the appearance, you can later select the text in the resulting document, right-click, and change the font, size, or alignment using the Font and Paragraph options.
At the bottom of the window, you'll see the option " Full Page of the Same Label ." Enable this option to have Word generate a sheet where all cells are identical. Then, you can choose to print directly or click " New Document" to create a Word page with the complete grid of labels, which you can review, save, and edit at your leisure before printing.

Design custom labels and stickers in Word
Although Word's label feature was primarily designed for printing addresses on envelopes , it can be used for much more. You can use these same templates to create custom stickers , product labels, logo stickers, or any simple design you can think of.
The first step is to decide what type of paper you're going to use. If you want adhesive labels, you'll need to buy special sticker paper compatible with your printer (inkjet or laser) and in a standard or measurable label format. If you only want cut-out labels, regular paper will suffice, and you can then use glue or tape.
Once you're clear on the format, repeat the same process: open Word and go to the Mailings tab, Create section, and click the Labels button . From there, access Options to select the brand and product number, or to define a new custom label with the exact dimensions of your sheet.
It's important to configure the format first, as the margins for the Address field and the usable space within each label depend on these parameters. If you choose a template with many labels per page (for example, 30 per sheet), the text area will be narrower, and you'll need to adjust the layout to avoid overcrowding.
Once you've adjusted the options, return to Envelopes and Labels and enter your desired content. You can add a business name, a slogan, an address, a phone number, or even combine multiple lines of information. Then, click New Document to have Word generate the page with all the labels in place.
In this new document, you can customize each cell as if it were a small layout box: apply bold, change the font, modify the font size, or adjust the alignment (center, left, right). Although the label tool isn't designed for complex graphic designs, it works very well with simple text and a few additional basic elements.

Insert a single label or different labels on a sheet
You won't always want to print a full page of identical labels. Sometimes you only need a single label in a specific position on a sheet you've already partially used, or to generate many different labels on the same page (for example, a list of names).
If you only need one label, in the Envelopes and Labels window , choose the single label option and specify the exact position where you want it to appear, indicating the row and column within the label sheet. This way, you can reuse partially used sheets without wasting space.
To create a page with different labels (such as credentials, name tags, or various addresses) , the most practical approach is to use the mail merge function along with a data list in Excel or a database. However, if the volume is small, you can also fill the Word-generated sheet label by label, editing each cell manually.
Once Word has created the label document, you can treat each item as a small, independent paragraph . If you're interested, you could even experiment with different font sizes within the same label to make the name stand out from the address or other contact information.
Create labels using mail merge in Word
When you need to print many different labels from a list of data (customers, suppliers, partners, students, etc.), mail merge is what really saves you time. Word connects to a data source and automatically populates each label with the information from each record.
Start by creating or opening a blank document and go to the Mailings tab . From there, in the Mail Merge Tools group, select the Labels option . A specific window (Mail Merge Wizard: Labels) will open to guide you through the process.
First, you'll need to configure the label size . On the Labels tab within that window, you can choose the product type under Product Labels (for example, Avery US Letter or other manufacturers) and then select the specific product number from the dropdown menu. This defines how many labels are printed per page and the dimensions of each label.
Once you've set up your template, you need to specify where Word will get the data from. On the Mail Merge tab, click Select Recipient List . Here you can choose an Excel spreadsheet , a Word contact list, or another compatible source. It's important that your list is well-structured, with clear column headings (First Name, Last Name, Address, City, Postal Code, etc.).
After linking the list, place the cursor on the first label in the Word document (which will serve as the basis for the rest) and use the Insert Merge Field option . A list will appear with all available fields, corresponding to the columns in your data source. Add fields such as First Name, Last Name, Address, City, or any other you wish to display, in any order you like.
After placing the merge fields and formatting them as desired (font, size, line breaks, etc.), you can use the tools on the Mailings tab to preview the results record by record . This will allow you to verify that the data fits correctly and is not cut off at the end of the label.
When everything is ready, click Finish and Combine . You have the option to generate a new document with all the labels already filled in (Edit individual documents) or send it directly to print. It's best to create the document first to review the result and, if necessary, adjust formatting details in specific labels.
Insert labels linked to SharePoint policies
In professional environments where SharePoint is used to manage documents, there may be an information management policy that requires metadata tags to be inserted within Office files . These tags are not adhesive labels or printed on label paper; instead, they are visible fields within the document (such as a header or a specific area).
This type of tag allows an organization to display internal document properties (metadata) within the content itself . For example, a law firm might require meeting notes with clients to include a tag indicating "attorney-client privilege," or a company might mark documents as "Confidential," "Draft," or "Internal Use."
You won't be able to insert these labels until the site or list administrator has configured the corresponding policy in the document library . When that policy is active, a Label command appears in Word (or other Office applications) on the Insert tab, usually within the Barcode group, allowing you to add the label to your document.
There's an important detail: documents that were already in the library before the policy was activated don't automatically receive that tag. For it to be generated, the file must be unprotected and then re-protected , or uploaded again with the policy already in effect. In contrast, new documents uploaded to a library with an active policy do have the tag assigned from the start.
How to manually insert a SharePoint label in Word
When working with a SharePoint library that requires the use of tags, you may need to manually insert the tag into the document , depending on how the administrator has configured the policy.
To do this, first make sure the library is open in the SharePoint site. If it's on the homepage, simply click its name in the Quick Launch menu . If it's not there, you can click View all site content and then select the name of the library where your file is saved.
Once you've located the document, select the one you want to work with, click the arrow next to its name, and choose the "Edit in Microsoft Office" option (for example, "Edit in Microsoft Office Word"). This will open the file in Word so you can modify it.
In Word, place your cursor in the exact location in the document where you want the label to appear. Then go to the Insert tab , and in the Barcode group, click Label . Word will insert the label defined by the SharePoint policy at that location. Finally, don't forget to click Save to save the changes to the library.
Insert a SharePoint label when saving or printing
In some stricter configurations, the SharePoint site library may require that a tag be automatically inserted when you save or print a document. If you reach that point without the file having a tag, a prompt will appear asking you to insert one.
When Word asks if you want to insert the label and you click Yes , the program will add the label in a predefined location. The exact position depends on whether the file is in read-only or edit mode, and on the type of Office application you are using.
If the document is read-only, the label is placed at the current cursor location —that is, where you were positioned when saving or printing. However, if you are editing the file, Word, Excel, or PowerPoint use a standard position designed to make the label clearly visible.
In Word, the label is inserted in the header of the first page of the document . In Excel, it appears in the first cell of the first worksheet in the workbook. And in PowerPoint, it's placed in the center of the first slide of the presentation. This ensures that the key policy information is always visible.
Mastering all these Word functions related to labels, both those printed on paper and those related to SharePoint, allows you to work in a much more professional and organized way : you will save time preparing full sheets of stickers or addresses, you will make the most of each sheet of labels and, if you work in business environments with information policies, you will effortlessly comply with the requirements of metadata and document classification.


Passionate writer about the world of bytes and technology in general. I love sharing my knowledge through writing, and that's what I'll do on this blog, show you all the most interesting things about gadgets, software, hardware, tech trends, and more. My goal is to help you navigate the digital world in a simple and entertaining way.