- Allows you to create personalized documents from a list of recipients
- Fits letters, envelopes, labels or mass emails
- Merge fields and advanced rules ensure a high level of customization
If you've ever wondered how to send the same personalized document to multiple people, ensuring each recipient receives only the information relevant to them, you need to learn how to use the Mail Merge feature in Word . This tool, though sometimes overlooked, is one of the most powerful and versatile ways to save time, avoid errors, and achieve a professional finish in all types of personalized communications. Whether for letters, envelopes, labels, or emails, the process opens up a world of possibilities and is much simpler than it seems.
In the following lines, you'll find a complete guide that covers all the essential steps and tricks for mastering mail merge in Word, from the basics to advanced options like field formatting and automatic rules. It also includes practical tips to avoid common mistakes and get the most out of your documents, whether you're printing, emailing, or storing them digitally. If you want your communications to be more effective and professional, keep reading because you'll learn absolutely everything.
What exactly is Mail Merge in Word?
Word's Mail Merge feature lets you create a batch of personalized documents, all with an identical structure and design, but with data specific to each recipient. This means you can generate letters, emails , labels, or envelopes where only details like name, address, date, or any other relevant information from a list or database change.
The secret lies in linking a template document (the one you design in Word) to a data source : this could be an Excel file, a table created in Word itself, an Access database, or even an Outlook contact list. When you do this, Word uses merge fields (placeholders within the text) that are automatically populated with the corresponding information from each record in the list. This way, you can send the same personalized message to dozens or hundreds of people in a matter of minutes, without losing quality or making mistakes from copying and pasting.
When is it useful to use mail merge?
The most classic use is mass mailings, but there are many other situations where mail merge is the smartest option:
- personalized letters for clients, students or employees.
- Printed envelopes with the exact details of each recipient.
- Stickers for postal shipments, identifiers or promotional material.
- Personalized emails automatically sent from Word using contact information from a spreadsheet.
- Documents with variable information, such as certificates, invitations or notices, where only some fields change.
Documents and data involved in the combination
Every correspondence combination typically involves three key elements :
- Data origin: This is the file where you store the recipient information: first names, last names, addresses, email addresses, dates, amounts, etc. Generally, an Excel spreadsheet, a Word table, a database, or a contact list is used.
- Model document: This is the template you design in Word, with the format and text you want all the resulting documents to have, but leaving spaces for variable data to be inserted using the combined fields.
- Combined document: This is the final result of the process, a file where each page (or email, label, envelope, etc.) contains the individual data for each record in the data source. You can choose to print, edit, or send it directly.
Combination types and model document
In Word, the mail merge function adapts to different types of template documents , depending on your objective:
- Menus: When you want to send personalized letters where only a few key details change.
- Clutch: If you are looking to print data directly onto envelopes, avoiding labels.
- Tags: Perfect for printing on sheets of adhesive labels, very useful for postal mailings, product decoration or filing.
Although the basic process is the same, some steps or fields may vary slightly depending on the template document chosen.
Step by Step: How to Mail Merge in Word
Below is a practical guide to help you master the entire process:
1. Prepare the data source
Before opening Word, make sure you have your recipient list ready. If you're using Excel, put the headers (First Name, Last Name, Email, etc.) in the first row, and then each entry in its own row below. You can add as many columns as you need for the variable data you want to include.
Don't forget to save and close the Excel file before linking it to Word to avoid import errors. If the list is in Word, use a well-organized table.
2. Create the template document in Word
Open a new document or choose a template and write the base text that all recipients will share. Think about where you'll need to insert variable fields (such as names or amounts) and leave spaces in those places.
Note! You can create very elaborate designs with logos, digital signatures, tables, images, etc. Everything in the template will be repeated exactly in each customized copy.
3. Start the mail merge
In the top ribbon, click the Mailings tab and look for the Start Mail Merge option . There you can choose from letters, envelopes, labels, email messages, or other custom merge types depending on the purpose of the mailing.
For those less experienced, it is recommended to use the Step-by-Step Mail Merge Wizard , available from that same menu, as it will guide you visually and simply through all the necessary steps.
4. Link the document to the data source
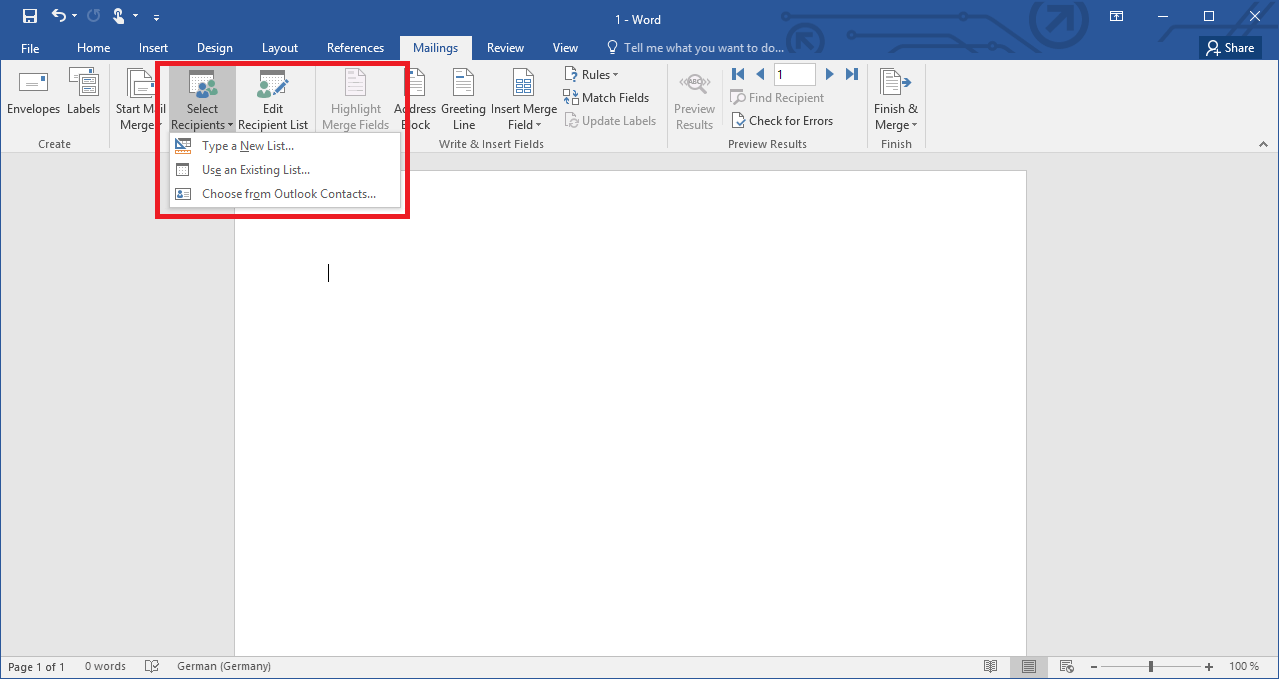
Click Select Recipients and choose Use an Existing List if you're starting with a pre-made Excel file or table. Navigate to the file and select it. If the file has multiple sheets, choose the one containing the main list. When you click OK, Word will automatically recognize the column headers as available fields for the merge.
If you prefer, you can create a new list directly in Word or even import contacts from Outlook.
5. Insert the merge fields
Once the template document and the data source are linked, you can insert the merge fields wherever you want the custom data to appear. You can do this from the Insert Merge Field menu on the Mailings tab. For example, to greet each recipient by name, position the cursor where you want the name to appear in the text and select the "Name" field.
- You can insert complete address blocks, automatic greeting lines (“Dear…”), and any other individual fields available in the data source.
- You can customize the text, formats, and order of fields to create a presentation that's exactly how you need it.
6. Customize the format of the merge fields
Many people are unaware that merged fields can be formatted to display data such as dates, amounts, or numbers in a specific way. If, for example, when displaying a date you prefer it to appear as "20/03/2024" and not "03/20/2024" (the typical error in Anglo-Saxon formatting), you must edit the field.
To do this, you can press Alt+F9 to view the field codes in the document. In the date field, add the desired format, like this: {MERGEFIELD Fecha_Alta \@ «dd/MM/yyyy»}. Do the same for monetary amounts, adding the format {MERGEFIELD Cuota_Mensual \#.##0,00€}. Press Alt+F9 again to see the formatted result.
7. Use advanced rules: If…Then…Else
Word lets you add conditional rules to display different text depending on the value of a field. For example, if the "City" field is "Valencia," you can display a different message than for other cities. To do this, use the Rules – If…Then…Else option on the Mailings tab. This allows you to tailor messages, warnings, or instructions specifically for certain recipients, enhancing the professionalism of each email.
8. Visualize the result before finishing
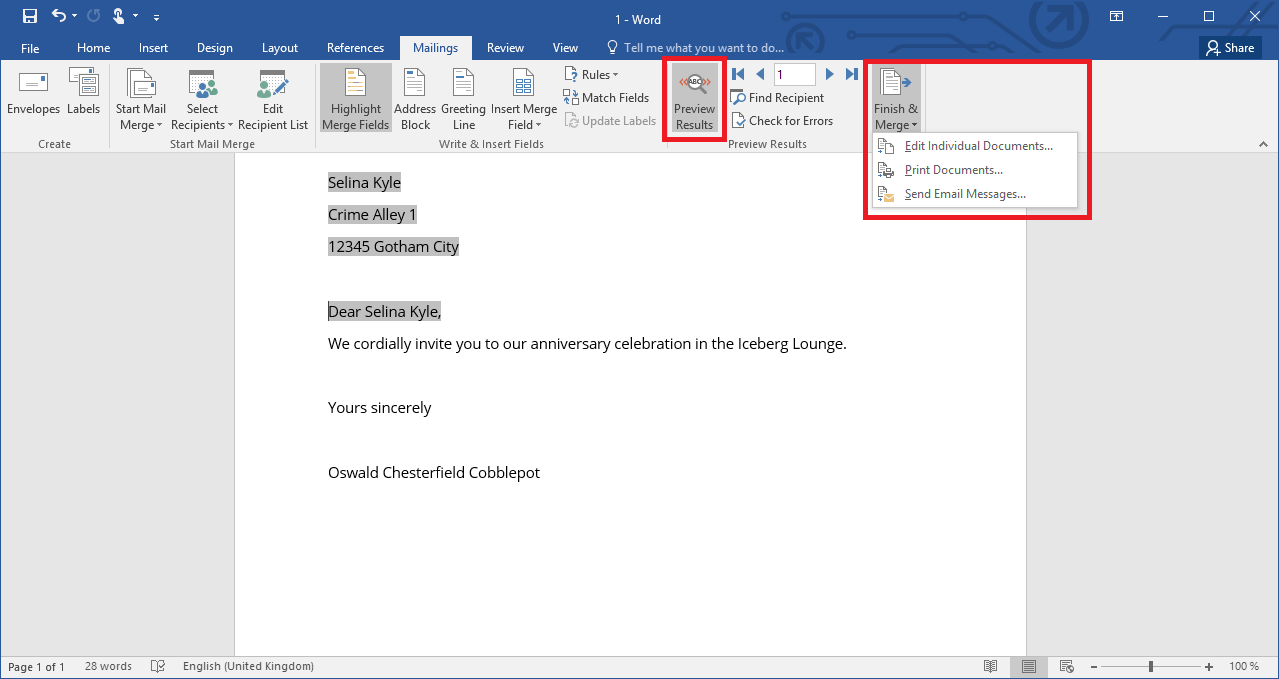
Before generating the final documents, use the results preview to check how each combination looks. You can navigate through the records using the arrows on the ribbon to verify that all the data appears correctly and that the fields are properly connected. This step is highly recommended to avoid last-minute surprises.
9. Finalize and generate the combined documents
When everything is ready, go to the Finish and Merge option . Here you decide the destination of the merge:
- Edit individual documentsA new Word file is generated with all the customized records, one per page. You can review and edit it before printing or sending.
- Print documents: The process sends each personalized document directly to the printer, ideal for physical letters or labels.
- Send emails: Automatically sends each personalized document to the email address specified in the corresponding field of the data source, using Outlook as the sender.
Additionally, you can choose whether to use all records, just a current one, or a specific range of recipients.


Passionate writer about the world of bytes and technology in general. I love sharing my knowledge through writing, and that's what I'll do on this blog, show you all the most interesting things about gadgets, software, hardware, tech trends, and more. My goal is to help you navigate the digital world in a simple and entertaining way.