
Many people who have started using the Windows 11 operating system have reported encountering a translucent box on the screen , just above the taskbar. They also indicate that this box becomes highlighted when they hover the mouse over it.
When this happens, users are unable to navigate through any of the elements located behind the box (Excel spreadsheets, browsers, etc.). To help you fix the translucent box on your Windows 11 screen, keep reading this post.

What causes the translucent box on the screen?
In some cases, your mouse or touchpad cursor tends to get stuck inside the aforementioned box. Many users have even reported dropping the box to a distant location on the desktop, while others were unable to hold the box down. This is an issue that is not limited to a specific OEM, it actually appears on major OEMs like Dell, Lenovo, HP, among others.
You may see an invisible box on your computer screen mainly due to the following factors:
- Outdated PC Windows: A reported bug in Windows 11 (the OS is still in its early days) caused the box on the screen and if the PC's Windows is a later build than the latest version of Windows 11, then that could be the reason for the box on the screen.
- MiniSearchHost Process: MiniSearchHost is a process to perform a quick search from the taskbar and if your mini-menu is not closed completely, then that might be displayed as a transparent box on the screen.
- System transparency effects: Transparency effects are used to make the overall look and feel of Windows transparent, but if the effect is not applied correctly to a menu, it could be the cause of the translucent box appearing on the screen.
- SteamVR Message: every time Steam detects (or "thinks") that a set of virtual reality is connected to a system, it creates a popup to use the SteamVR dashboard, but if the popup does not load properly then it may display as a box on the system screen.
Methods to fix translucent box on Windows 11 screen
To successfully fix the translucent box on the Windows 11 screen, you need to try any of the following methods:
Try a Windows Update
An incompatibility between different operating system modules or a bug in Windows 11 could have caused a translucent box on the screen. For many, this method has been effective in solving the problem.
But before proceeding with that solution, make sure the box doesn't appear when the system boots into the BIOS; otherwise, the problem could be due to a hardware issue.
- First, you have to right click on Windows and open the box Configuration.
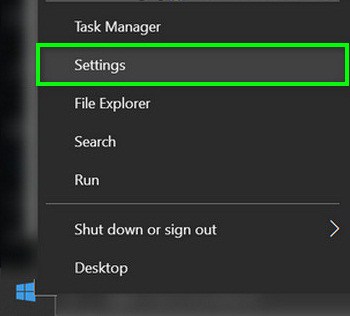
- Now, on the left half of the screen, go to the tab Windows update and then on the right half click on Search for updates.
- Then make sure to install all the Windows 11 updates (don't forget to reboot the system after each update) and when you're done, open Advanced.
- Now select Optional updates and make sure to install all the Optional updates.
- Once all available updates are installed, restart your system and upon reboot, check to see if the box on the screen is cleared.
End the MiniSearchHost process in the System Task Manager
The MiniSearchHost process, identified by many users as causing a translucent box on your screen, may also be the cause of the box appearing on your screen. Therefore, ending the MiniSearchHost process in the system's Task Manager can resolve the issue.
- Right click on the button Windows and open the task manager.
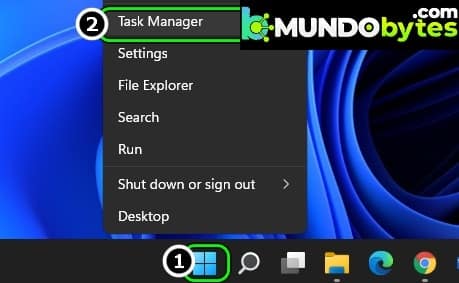
- Now search y right click at the MiniSearchHost process (you can find it in Search). If the MiniSearchHost process could not be found, you should try the steps below.
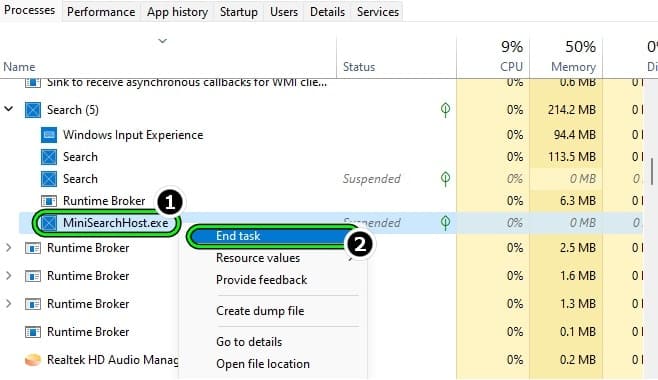
- Then select Finish homework and then confirm to finish the task.
- Next, check if the box has disappeared from the screen.
- If 'MiniSearchHost' could not be found in the processes tab, switch to the Details from Task Manager and press the key M on the keyboard.
- Now right click in the process MiniSearchHost and select Finish homework.
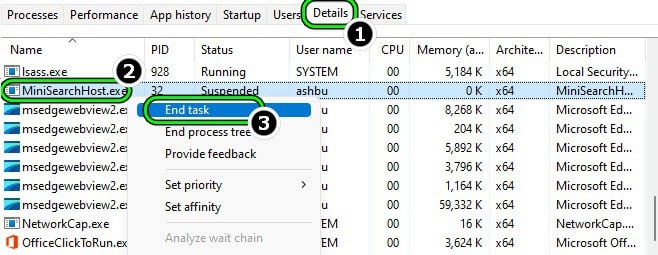
- Then confirm to finish the task and then check if the box on the screen is removed.
- If the problem persists, check if finalize All processes related to the search in Task Manager solves the problem.
Note that if the message box reappears, you can repeat the steps above. However, if you need to repeat this process repeatedly, you can set up a script to do so (until Microsoft fixes the bug).
Restart Windows Explorer via Task Manager
The transparent box you see on the screen could be caused by a fault within Windows Explorer. In this scenario, restarting Windows Explorer can resolve the error, as long as it is done through the task manager.
- Right click on Windows and open the task manager.
- Now right click on the process of the Windows Explorer (you can find it by pressing the W key on your keyboard) and select Restart. In case you encounter more than one Windows Explorer process (a rather rare phenomenon), restart all of them. If no Windows Explorer process is displayed in Task Manager, follow steps 4 and below.
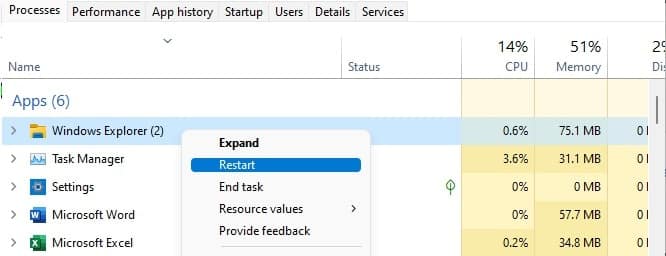
- Once Windows Explorer restarts, check to see if the box has been removed from the screen.
- If the Windows Explorer process is not present in the processes tab, switch to the Details and click with the right click on explorer.exe.
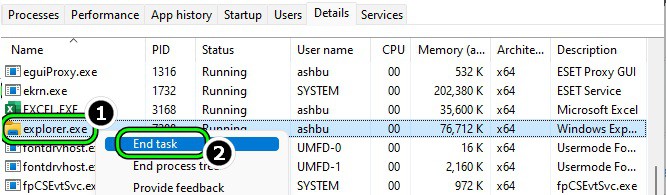
- Then select Restart and then check if the transparent box issue is resolved.
- Otherwise, check if when rebooting the system the box is cleared from the screen.
- If a user has to perform the above steps repeatedly, setting up a batch file with the following would be a better approach:
@echo off
taskkill / im explorer.exe / f
start explorer.exe
Departure from
Disable SteamVR prompt
The box that appears on screen could be an indication that SteamVR is stuck. This usually happens when Steam “thinks” that there are VR controllers connected to the system, so disabling SteamVR Prompt can help you resolve the issue.
- Starts SteamVR and open your Configuration.
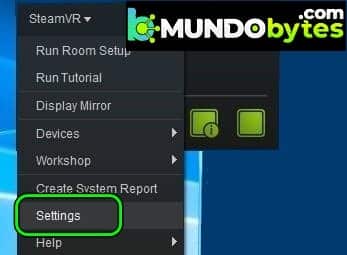
- Now go to the tab Developer and, in the right panel, uncheck the option Enable VR Panel.
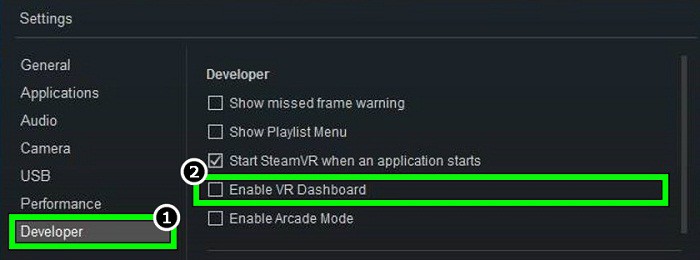
- then restart your system and upon restart, check to see if the box on the screen has disappeared.
- If not, and a SteamVR message is displayed when connecting a VR controller (or prompts for Big Picture Mode), check Do not show again and close the message.
- Then check if the box on screen issue is resolved.
- If the problem persists, check if End all Steam processes in Task Manager solves the problem.
In the taskbar disable task view
One of the reasons why you might encounter the translucent box on the screen is because of the stuck entry of the search menu; usually, when you hover over the search icon. This is when disabling recent searches when you hover over the search icon or simply removing the search icon from the taskbar can help you fix the glitch.
Disable Show recent searches when I hover over the search icon
- First, happens the mouse over the Search icon on the taskbar and waiting a second there.
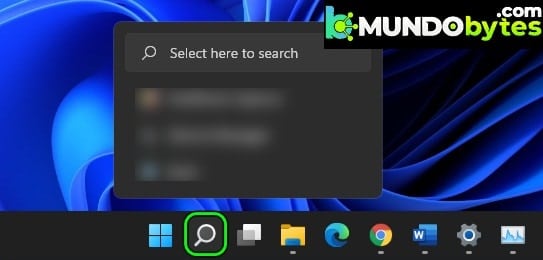
- Afterwards, check if the box on the screen has disappeared.
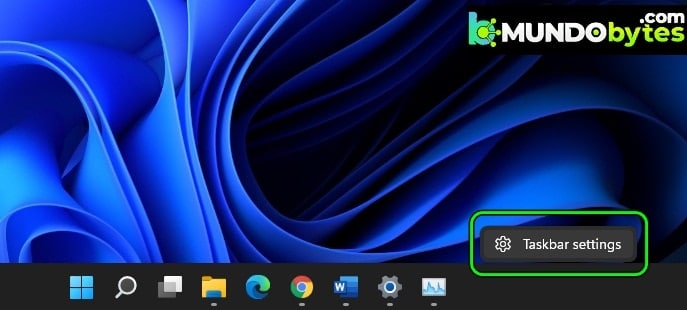
- Otherwise, right-click on the taskbar. tasks of the system and opens Configuration from the taskbar.
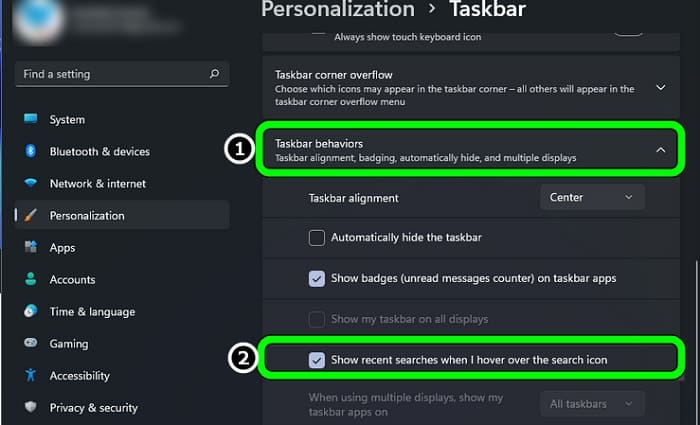
- Now make sure to expand the option Taskbar behaviors y uncheck the option of Show recent searches when I hover over the search icon. Some users may not be able to see this option. If so, you can try the following method.
- then restart the system and when restarting, check if the screen is free of the translucent box.
Exclude the search icon from the taskbar
- If that fails, open the Taskbar settings and, in the section Elements from the taskbar, disable Search.
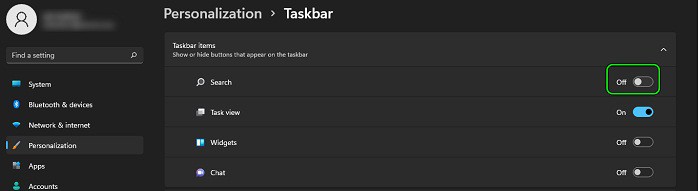
- Now restart your system and upon reboot, check if the translucent box issue is resolved.
- Please note that a user may need to use search from the Start menu as search in the taskbar would not be available.
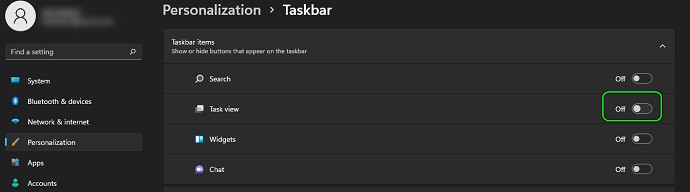
Excludes the task view icon found on the taskbar
- To start, right click on Windows and select Taskbar settings.
- Now, in the Taskbar Items section, disable The View of tasks by placing the switch in the off position and then check if the screen is free of the transparent box.
Disable transparency effects in system settings
As you know, transparency effects are functional in improving the visual quality of Windows, especially because they add color to the overall appearance of the desktop. That is why the translucent box on the screen can be the result of a failure of the aforementioned effects, partly because they are not applied correctly in the menu. At this point, you can get rid of the transparent box by disabling the transparency effects on your system.
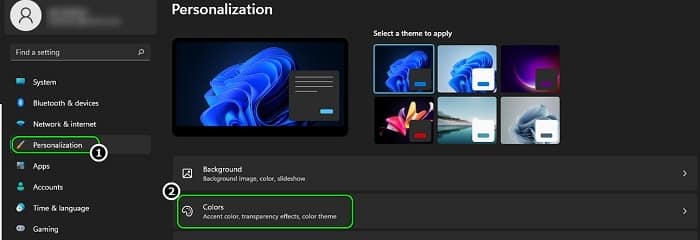
- First, you need to right click on Windows and open Configuration.
- Now, on the left panel of the window, go to the tab Personalization. and then in the right panel, open Colours.
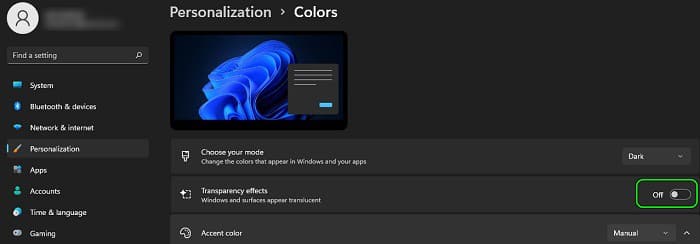
- Then disable the effects transparency by placing your switch in the off position and then check if the translucent box has disappeared from the screen.
Change the screen resolution
If the screen resolution is not optimal depending on the display, that can cause a failure in the graphics driver and thus cause the issue in question.
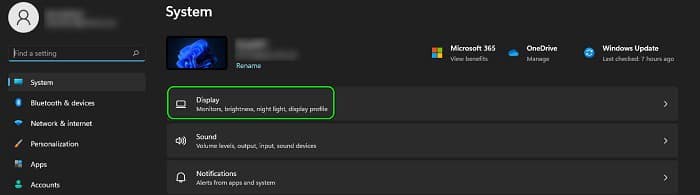
- The first thing you need to do is right click on Windows and open Configuration.
- Now, in the right panel of the tab System, open the Screen and then, in the section Scale and layout, change the Screen resolution (preferably lower than your current screen resolution).
- then confirms to change the screen resolution and then check if the screen does not have the transparent box.
Update or reinstall the graphics driver
A user may see a transparent box on the screen if their system's graphics driver is outdated or corrupted. Here's how to fix the transparent box in Windows 11 by updating or reinstalling the system's graphics driver.
Update the graphics driver
- To start, right click on Windows and open el Device administrator.
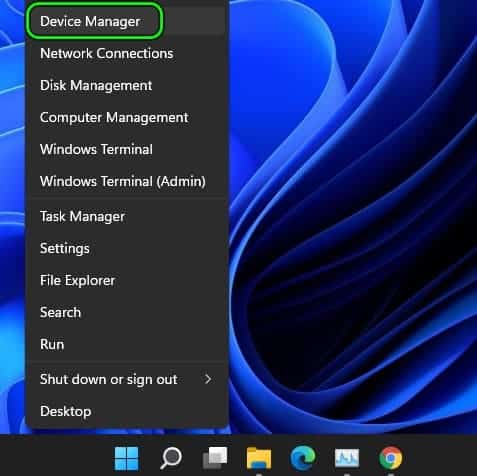
- Now expand Display adapters y right click at the graphic device.
- Then select Update Driver and select Search for drivers automatically.
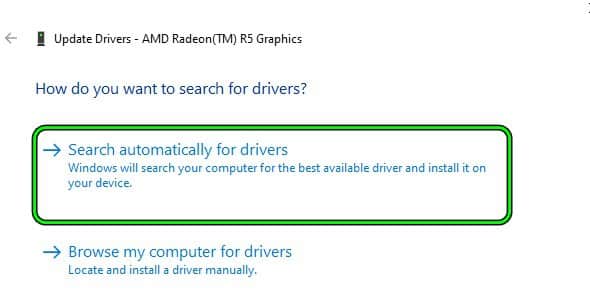
- If a driver update is available, download it e install it.
- Now restart your system and when restarting, check if the box is cleared from the screen.
- On the contrary, download the controller of latest graphics from the OEM website and start it , the administrator.
- Now sigue the prompts on the screen to install the graphics driver and once done, restart your system.
- When restarting, check if the screen is free of the transparent box.
Reinstall the graphics driver
- Right click on Windows and open Device Manager.
- Now expand the tab Display adapters and right click in the Graphic card.
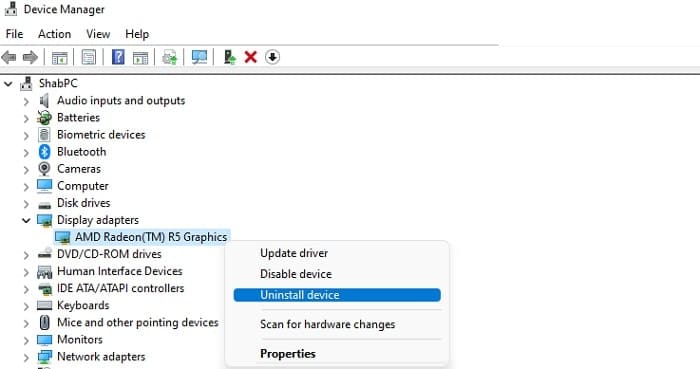
- Then select Uninstall driver and in the next menu, select Try to remove the driver for this device.
- Now click on uninstall and once the graphics driver is uninstalled, restart your system.
- When restarting, let it Windows install a generic graphics driver and check if the box on the screen has disappeared.
- On the contrary, Install the latest OEM driver as administrator (previously downloaded) as administrator and then check if the screen does not have the translucent box.
End processes in Task Manager and perform a clean boot of the system
If none of the above worked for you, then the box on the screen could be a result of a processor stuck in operation or it may be caused by a third-party application utility. In this scenario, ending all non-essential processes in the System Task Manager and performing a clean system boot may resolve the issue.
- Right click on Windows and open the task manager.
- Now End all non-essential processes one by one until the box is removed and the problematic process is found.
- Otherwise, check if performing a clean boot resolves the issue. If so, you may find the problematic enabling the applications/services one by one (which were disabled during the clean boot process) until the problematic one is found.
Users report that the following causes a box to appear on their screens, and if you have any of these, check if disabling or uninstalling them resolves the issue:
- Lenovo Vantage App
- Chrome Picture-in-Picture Mode
- Zoom
- skype
For illustrative purposes, we will analyze the Zoom client uninstallation process.
- Right click on Window and open Applications and features.
- Now, in the right panel, look for Zoom and click three vertical ellipsis in front of it.
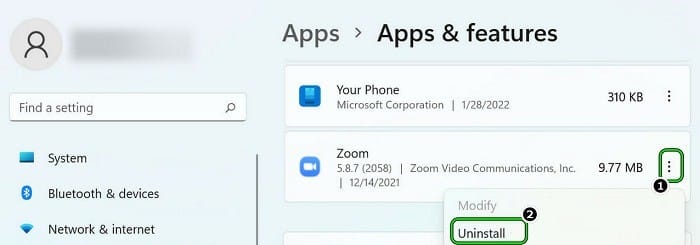
- Then select uninstall and later, confirms to uninstall the Zoom client.
- Now sigue the on-screen prompts to uninstall Zoom, and once done, restart your PC.
- When you reboot, hopefully there won't be a translucent box on the screen.
I hope that each of our recommendations is useful to you. Thank you for always visiting our portal, hopefully we will read each other in a future post. Until then.

My name is Javier Chirinos and I am passionate about technology. Ever since I can remember, I have been interested in computers and video games, and that passion has turned into a job.
I have been publishing about technology and gadgets on the Internet for over 15 years, especially in mundobytes.com
I am also an expert in online marketing and communication and have knowledge in WordPress development.