- Drivers 570+ and open option are critical with RTX 50; on 24.04 use nvidia-driver-570-server-open.
- On WSL you need a driver with CUDA support, kernel ≥ 5.10.43.3 and glibc distro.
- Control the toolkit version with the repo NVIDIA (12.8 recommended for RTX 50).
- Set PATH/LD_LIBRARY_PATH and check with nvcc to avoid loading failures.
If you work with machine learning, computer vision, or high-performance computing, installing NVIDIA CUDA is almost mandatory to take advantage of GPU acceleration. Choosing the right driver and toolkit version It is key to avoid mistakes and get the most out of hardware from the first minute.
In this guide I explain, step by step and without detours, how to leave CUDA ready both in Windows through WSL (Windows Subsystem for Linux) as in Ubuntu 22.04 and 24.04. You will also see requirements, checks, special cases such as the RTX 50 And what happens when you install only the driver and you see an nvcc of a specific version without having requested it.
Requirements and compatibility
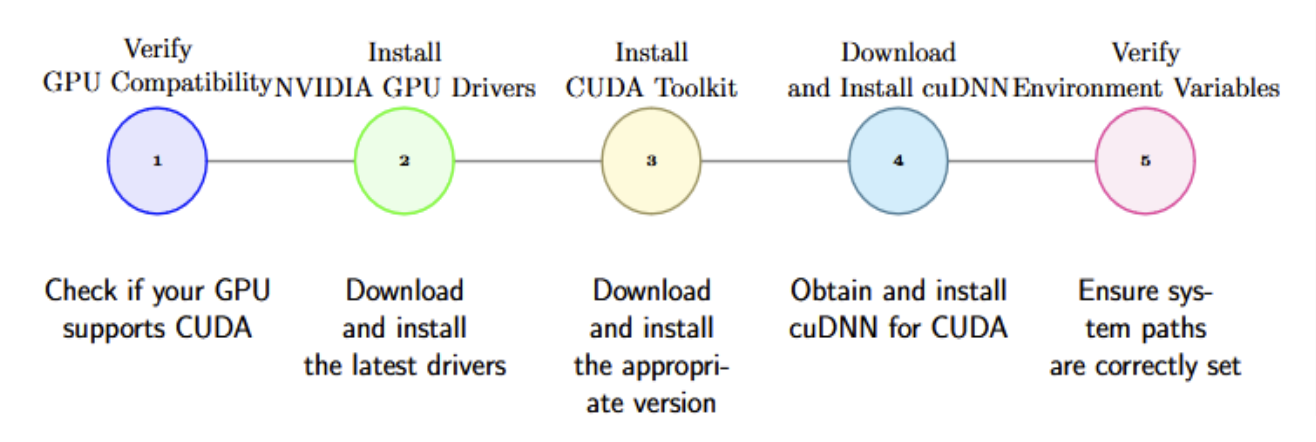
Before touching anything, it is a good idea to check the starting point. You need at least one CUDA-compatible GPU (see the official NVIDIA guide for a list of models) and for reference, having 6GB of dedicated video memory is recommended for many AI workflows.
If you're going to be using Windows with WSL, support is broad: Windows 11 and recent updates to Windows 10 (version 21H2 and later) allow running ML tools, libraries, and frameworks that use CUDA within a Linux distribution on WSL. This covers PyTorch, TensorFlow, Docker, and NVIDIA Container Toolkit. just like in a native Linux.
In public cloud environments with NVIDIA GPU instances, it's often best to start with the VM image provided by the cloud provider. These images already come with the appropriate driver and CUDA Toolkit. and you'll save yourself some tricky steps. If you're installing on your own machine, read on.
For GPU features in WSL, ensure that the Linux kernel within WSL is up to date. Version 5.10.43.3 or later is required. You can check it from PowerShell with:
wsl cat /proc/versionIf you need to update WSL, go to Windows Settings → Windows Update and click on Check for updates. Keeping the kernel up to date avoids incompatibilities with CUDA and other GPU components in WSL.
CUDA on Windows via WSL: Driver, WSL, and Distro
Order matters. First, install the NVIDIA driver with CUDA support on WSL. Download and install the CUDA-enabled NVIDIA driver on WSL recommended by NVIDIA for your GPU and version of Windows. This driver enables GPU acceleration within the Linux subsystem.
After the driver, enable WSL and install a glibc-based distribution, such as Ubuntu or Debian. With WSL enabled and installed, run the updates from Windows Update to keep the WSL kernel up to date.
Check the kernel version from PowerShell (or a console) with:
wsl cat /proc/versionIf your kernel is compliant (≥ 5.10.43.3), you can now work with ML frameworks and tools like PyTorch or TensorFlow within WSL, in addition to using Docker and NVIDIA Container Toolkit as if you were on native Linux. If you encounter any issues, NVIDIA centralizes feedback and CUDA support in WSL through its community.
NVIDIA Drivers on Ubuntu 22.04 and 24.04 (includes RTX 50)
In Ubuntu, the first step is also the driver. There's an important caveat here with newer GPUs: RTX 50s require drivers 570.xxx.xx or higher. Older versions may not work properly, so classic installation methods may fail.
In Ubuntu 22.04 it is practical to use the official NVIDIA installer in .run format. Start with a few prerequisites:
sudo apt -y install gcc makeDownload the installer from the NVIDIA website, give it execution permissions, and launch it. Choose the MIT/GPL option to install the open source driver and avoid the “No devices found” error after a reboot:
wget https://us.download.nvidia.com/XFree86/Linux-x86_64/570.124.04/NVIDIA-Linux-x86_64-570.124.04.run
sudo chmod +x NVIDIA-Linux-x86_64-570.124.04.run
sudo ./NVIDIA-Linux-x86_64-570.124.04.run
When finished, reboot the system for the driver to load correctly:
sudo shutdown -r nowIn some environments, it may be advisable to rebuild the GRUB configuration to ensure that the system boots with the correct kernel parameters after installing the driver. If you have doubts about Boot, regenerating GRUB usually solves it before you go crazy with diagnoses.
Another recommendation that appears in recent deployments with this branch of the driver is to disable GSP and reboot. Disabling GSP can prevent conflicts on certain computers., especially if you see abnormal behavior after installing the 570.
For Ubuntu 24.04 there is another nuance: the ubuntu-drivers tool may still not recognize a RTX 5090 nor offer the appropriate option. In that case install the correct package manually and remember to include the suffix open:
sudo apt install nvidia-driver-570-server-openWithout the open postfix, the system may not identify the GPU and display “No devices found.” After installation, reboot for the module to load:
sudo shutdown -r nowIf you prefer, in 24.04 you can apply the same procedure as in 22.04 using the NVIDIA .run installer. Choose the method that best suits your flow and the policies of your environment.
Installing the CUDA Toolkit on Ubuntu (12.4 vs 12.8 and environment paths)
Once you have the driver, it's time to install the toolkit. With the current ecosystem, PyTorch works seamlessly with CUDA 12.4 and 12.8, but if you're using an RTX 50, 12.8 is recommended for advanced features and optimized kernels. Let's take a look at a robust method using NVIDIA's local repository:
First, download the pin file to prioritize the NVIDIA repo:
wget https://developer.download.nvidia.com/compute/cuda/repos/ubuntu2404/x86_64/cuda-ubuntu2404.pinMove that pin to the APT preferences directory:
sudo mv cuda-ubuntu2404.pin /etc/apt/preferences.d/cuda-repository-pin-600Now download the local repository of the toolkit (example with 12.8.1 for Ubuntu 24.04):
wget https://developer.download.nvidia.com/compute/cuda/12.8.1/local_installers/cuda-repo-ubuntu2404-12-8-local_12.8.1-570.124.06-1_amd64.debInstall it with dpkg and add the GPG key to the keyring from Ubuntu to have APT trust the repo:
sudo dpkg -i cuda-repo-ubuntu2404-12-8-local_12.8.1-570.124.06-1_amd64.deb
sudo cp /var/cuda-repo-ubuntu2404-12-8-local/cuda-*-keyring.gpg /usr/share/keyrings/
Update indexes and install the toolkit:
sudo apt-get update && sudo apt-get -y install cuda-toolkit-12-8Restart the computer to avoid surprises with newly installed libraries:
sudo shutdown -r nowAfter installation, it's a good idea to verify that CUDA is available and add the paths to your environment. Add the variables to your shell so that nvcc and the libraries are in the PATH in future sessions. For example, in Bash:
echo 'export PATH=/usr/local/cuda/bin:$PATH' >> ~/.bashrc
echo 'export LD_LIBRARY_PATH=/usr/local/cuda/lib64:$LD_LIBRARY_PATH' >> ~/.bashrc
source ~/.bashrc
If you use Zsh, you can add it to ~/.zshrc and, for non-interactive sessions, to ~/.profile or ~/.bash_profile. The goal is that any terminal or login has located the CUDA libraries without you having to configure anything every time.
Check the installation with:
nvcc --versionIf you prefer not to manage local repos, there are additional scripts and resources that can help you when you get stuck. Remember to maintain consistency between driver and toolkit versions. usually solves 90% of problems.

Windows for specific tools: CUDA 10.1 and cuDNN 7.6.4 (Model Builder case)
There are tools that require specific, older versions. This is the case with certain image classification scenarios with Model Builder, which require CUDA 10.1 and cuDNN 7.6.4 for 10.1In this context, make sure of the following:
- Have an NVIDIA developer account To access downloads.
- Exclusively install CUDA v10.1; no higher versions for that specific scenario.
- Download cuDNN v7.6.4 for CUDA 10.1, unzip and copy the necessary binary.
After downloading the cuDNN zip, unzip it and copy the cudnn64_7.dll file to the toolkit path. Remember that you cannot have multiple versions of cuDNN at the same time. in the same environment. Example route:
<CUDNN_zip_files_path>\cuda\bin\cudnn64_7.dll -> <YOUR_DRIVE>\Archivos de programa\NVIDIA GPU Computing Toolkit\CUDA\v10.1\binDon't have a local or Azure GPU available? These scenarios can be run on a CPU, but training will be substantially slower. Consider using a VM with GPU if There is critical.
Checks, routes and common questions
What CUDA version do you have on your system? The quick check is:
nvcc --versionIf you're on Ubuntu and have installed a driver with APT (e.g., nvidia-driver-525) and you see nvcc 11.2 listed without having explicitly installed the toolkit, don't panic. In some configurations, the driver installation may drag CUDA packages or were already included in the base system image. You won't always be able to choose the toolkit version if you only install the driver.
If you need to check the exact CUDA version, install the NVIDIA repository and the specific toolkit package (e.g., cuda-toolkit-12-8) as we have seen. This ensures that the toolkit version is aligned with the driver. and with the needs of your frameworks.
Remember to configure the environment variables to locate binaries and libraries. In Bash, you could add to your ~/.bashrc:
export PATH=/usr/local/cuda/bin:$PATH
export LD_LIBRARY_PATH=/usr/local/cuda/lib64:$LD_LIBRARY_PATH
In Zsh, use ~/.zshrc and, if you want it to apply to logins, ~/.profile or ~/.bash_profile. Without these paths, some applications will not find the CUDA libraries., even if the toolkit is installed.
In Windows, if you're unsure which GPU you have, you can confirm it in several ways. From Settings: right-click the Start menu → Settings → System → Display → Related settings → Advanced display. The make and model are displayed under “Show information”. Also from the Task Manager: Performance tab → GPU to see details.
If you don't see the GPU in Settings or Task Manager but know that NVIDIA is installed, open the Device administrator → Display adapters → Install the appropriate driver for your GPUUpdates can be viewed in GeForce Experience, and if that fails, you can always download the latest driver from the NVIDIA website.
In WSL scenarios, remember: NVIDIA driver with CUDA support in WSL, WSL enabled, glibc-based distro, kernel 5.10.43.3 or higher, and then your frameworks (PyTorch/TensorFlow) or containers with NVIDIA Container Toolkit. This installation order avoids bottlenecks and hard-to-debug errors..
On Ubuntu 22.04/24.04, if you're using an RTX 50, stick with the 570 branch, and on 24.04, use the nvidia-driver-570-server-open package or the .run installer. Don't forget to reboot and, if necessary, disable GSPFor the toolkit, 12.8 is the safe bet with RTX 50; PyTorch also supports 12.4, but you'll get better optimizations with 12.8.
Once everything is in place, you can run your flows on native Linux or WSL with Docker or directly with PyTorch/TensorFlow. If something doesn't start, check versions, environment paths and compatibility before changing half of your installation. Many issues are resolved by aligning the driver and toolkit and ensuring the system "sees" the GPU.
This guide brings together the essentials for reliably installing CUDA on Windows (via WSL) and Ubuntu, covering requirements, RTX 50 drivers, installing the 12.8 toolkit with a local repository, environment paths, and how-tos. With this map, you should be able to put your GPU to work with as little friction as possible..
Passionate writer about the world of bytes and technology in general. I love sharing my knowledge through writing, and that's what I'll do on this blog, show you all the most interesting things about gadgets, software, hardware, tech trends, and more. My goal is to help you navigate the digital world in a simple and entertaining way.