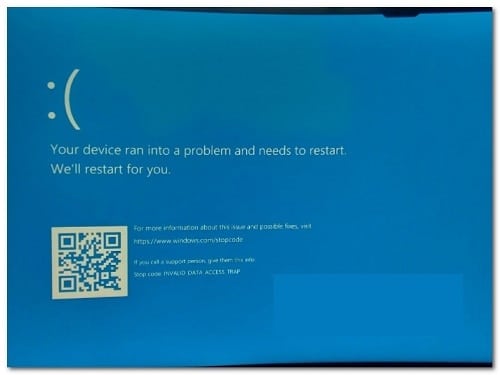
According to reports, some users of Windows 11 They get a BSOD (blue screen of death) every time they try to perform an update or when they perform a certain action such as deleting, moving, or copying files from the operating system drive. If you want to know how to fix the BSOD crash, be sure to read the information described in this guide.
What causes BSOD crash?
After investigating this issue, it turns out that there are multiple causes that could be responsible for the BSOD crash. To help you identify them, we have prepared this list of reasons why you might be seeing this problem on your computer with Windows 11:
- Controladores USB 2 / USB 3 damaged: It turns out that this can occur due to an issue with your USB drivers. This is reported to occur primarily when using a USB 2.0 or 3.0 PCI card. To fix this issue, you will need to manually update your USB 3 driver fleet.
- Bad disk error: bad sectors on your HDD or SSD They can also be the underlying cause of why you are experiencing the BSOD when performing certain system actions. This is much more common with traditional hard drives and can usually be fixed by running a CHKDSK scan with the /f parameter.
- System File Corruption: System file corruption can also be responsible for this crash, especially if you are dealing with this issue while trying to update your current version of Windows 11. To fix this issue, you will need to run SFC and DISM scans in quick succession (with administrator access) in an attempt to repair your system files. Additionally, you can perform a repair installation procedure or even a clean install.
- Outdated BIOS firmware: If you are using an older motherboard model that was released before the release of Windows 11, you are likely experiencing this crash due to an outdated BIOS firmware. In this case, you need to use a USB flash disk to update the current version of your BIOS to the latest one.
- Legacy media third-party apps that interfere: If you are using the legacy Media Features app or the Windows 10 version of VLC, you are likely to get this type of BSOD when your operating system is forced to use some common dependencies that are currently in use by some of these apps. To fix this problem, you will need to uninstall the problematic apps from your system.
- Third-party apps interfering with media recording: Certain feature updates (and cumulative updates) that are mandatory for Windows 11 may be inhibited by capture software such as Avermedia or a traditional media burning app such as PowerDVD. If you have these apps installed on your system, uninstall them before checking if the issue is resolved.
Methods to fix BSOD crash
Now that we have gone through all the possible reasons why you might be seeing this BSOD crash on Windows 11, let’s go over some methods that have been confirmed by other users who have been dealing with the same type of issue.
Uninstall media related apps (if applicable)
It turns out that the solution that seems to help many Windows 11 users eradicate the INVALID_DATA_ACCESS_TRAP blue screen of death is to uninstall all media apps.
There are no official explanations as to why this is effective, but community members suspect that some old dependencies using legacy apps like VLC and Media Feature are somehow conflicting with the new file sharing protocol in Windows 11.
If you experience this issue when trying to access some native Windows 11 components, follow the instructions below to uninstall legacy media player apps such as VLC, BS Player, and Media Feature Pack.
This is what to do:
- Press Windows key + R to open a dialog box Run. Afterwards, you will have to write the following command inside the text box 'appwiz.cpl' and press the keys Ctrl + Shift + Enter to open the menu Programs and characteristics.
- In the window User Account Control, click Yes to grant administrator access.
- Inside the menu Programs and Features, scroll down through the list of installed programs and locate the legacy multimedia programs you currently have installed.
- Right click on the multimedia program and click uninstall in the context menu that just appeared.
- Follow the on-screen instructions to complete the uninstallation. If you have multiple media apps available, uninstall them individually.
- Once all legacy media applications are uninstalled, restart your PC and see if the problem is fixed by repeating the action that previously caused the BSOD crash.
If the problem is still not resolved or if this method is not applicable, move down to the next potential solution below.
Reinstall all USB 2 and USB 3 drivers
It turns out that one scenario that often causes the INVALID_DATA_ACCESS_TRAP BSOD crash is a scenario where your USB 2.0 or 3.0 drivers are corrupted or partially incompatible with your PC's current configuration.
To solve this problem, you will need to access the Device administrator and manually update all USB drivers on Universal serial bus controllers.
This method has been confirmed to be effective in situations where every attempt to update Windows 11 resulted in the same blue screen of death (INVALID_DATA_ACCESS_TRAP).
If this scenario is applicable, follow the instructions below to reinstall all USB 2.0 and USB 3.0 drivers.
This is what to do:
- Start by pressing Windows key + R to open a Run dialog box.
- Next, you need to type the command “devmgmt.msc”And press Log in to open a dialog box Run.
Nota: At the UAC (User Account Control), Click on Yes to grant administrative privileges.
- once you're inside from Device Manager, expand the drop-down menu associated with Universal Serial Bus Controllers.
- You will then see a list of USB controller drivers. Right-click on each one and click Uninstall until you get rid of all of them.
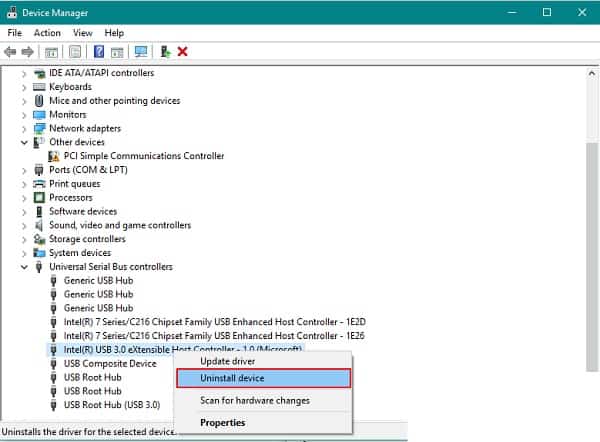
Nota: Repeat this action for each USB controller driver you have under Universal Serial Bus controllers until all devices are uninstalled. DO NOT restart your PC until this is complete.
- Once all the Universal Serial Bus drivers have been uninstalled, restart your PC.
- On next startup, your Windows installation will notice that the USB 2.0 and USB 3.0 drivers are missing and will install generic driver equivalents that will not cause this behavior again.
- Repeat the action that was previously causing the INVALID_DATA_ACCESS_TRAP BSOD crash and see if the issue is now resolved.
If the same type of problem continues to occur, please move on to the next possible solution below.
Uninstall Capture Software and Power DVD (if applicable)
If you have this problem when trying to upgrade to Windows 11 or trying to install a pending feature update and you don't have any third-party media software installed, you should take a look at whether you have PowerDVD or a capture software like Avermedia installed on your computer.
Capture software products and CD/DVD burning suites like PowerDVD are known to interfere with certain cumulative feature updates, so it wouldn't hurt to uninstall them before checking to see if they work. INVALID_DATA_ACCESS_TRAP it is solved.
If you are looking for specific instructions on how to uninstall your capture or recording software, please move on to the next method below:
- Start by pressing Windows key + R to open a dialog box Run.
- Write 'appwiz.cpl' inside the text box and press Ctrl + Shift + Enter to open the menu Programs and characteristics.
- If prompted in the UAC window, click Yes to grant administrator access.
- From the menu Programs and Features, scroll down through the list of installed programs and locate PowerDVD, Avermedia, or any other third-party media capture or burning applications you have installed.
- Right click on the program you want to uninstall and click uninstall in the context menu that just appeared.
- Within the uninstallation screen, follow the on-screen instructions to complete the uninstallation.
- Once all the applications that potentially interfere with the Windows feature update are uninstalled, restart your PC and see if the problem is fixed by repeating the action that previously caused the BSOD crash.
If the problem is still not resolved or if this method was not applicable, move down to the next potential solution below.
Implement a CHKDSK scan
According to some affected users, the INVALID_DATA_ACCESS_TRAP blue screen of death can also appear as a result of some bad sectors on your HDD that might be blocking the operating system when it tries to perform a certain action.
In the event that bad sector data ends up affecting a critical service and crashing your system, you will most likely see INVALID_DATA_ACCESS_TRAP due to a critical crash.
Some users who were facing this issue while trying to move, delete, or manage files on the operating system drive confirmed that running a CHKDSK scan ended up resolving the issue completely.
Nota: A CHKDSK (Check Disk) scan will scan your disk space for inconsistencies and attempt to repair them automatically (if you run it with the /f parameter.
You can also follow this method if you experience the INVALID_DATA_ACCESS_TRAP crash when you try to update your Windows version to the latest one.
Here is a quick guide on how to run a CHKDSK scan:
- Start by opening a dialog box Run pressing the key Windows + R.
- Next, you need to type the command 'cmd' inside the text box and press the keys Ctrl + Shift + Enter to open the symbol of the system high.
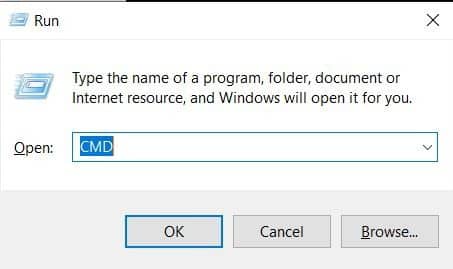
- In the indicator of UAC (User Account Control), Click on Yes to grant administrative privileges.
- Once you are inside the elevated command prompt, type the following command and press Log in To start an offline CHKDSK scan with the option to automatically repair damaged system files:
chkdsk / f
- Once the CHKDSK scan is complete, restart your computer and wait for the next startup to complete.
- After your PC restarts, repeat the action that was causing the BSOD and see if you still end up seeing the INVALID_DATA_ACCESS_TRAP error.
If the issue is still not resolved, move down to the next potential solution below.
Update your BIOS version
According to some technical Windows users who have been experiencing this issue, the BSOD crashes with the error code INVALID_DATA_ACCESS_TRAP which can be caused by an outdated BIOS firmware that is not updated to suit Windows 11.
This is even more likely if you experience this issue when trying to update your Windows 11 to a newer version.
In this case, you will need to update your current BIOS version and upgrade it to the latest version available from your motherboard manufacturer.
If you are still experiencing the INVALID_DATA_ACCESS_TRAP BSOD crash despite following all the possible solutions above, create a USB flash drive. Boot that contains the BIOS update and install it from the startup screen.
Nota:Each manufacturer has their own BIOS updates depending on their different models and the steps to install it will be slightly different. There is no universal way to update a BIOS via USB, so the best we can do is create some general steps that should point you in the right direction.
Important: Before you begin the steps below, take a moment to There to review the official documentation provided by your manufacturer on how to update your BIOS version via USB.
Here are the general instructions on how to do this:
- The first thing you need to do is make sure you have a blank USB flash drive ready.
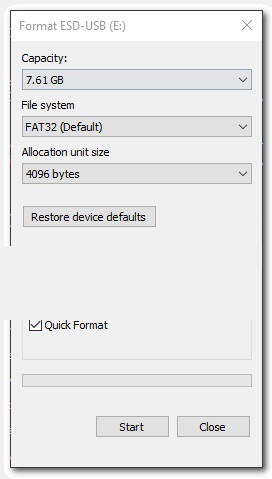
- If the USB flash drive you plan to use already contains data, make a backup and then right-click the flash drive and select Format right in the context menu that just appeared on your screen.
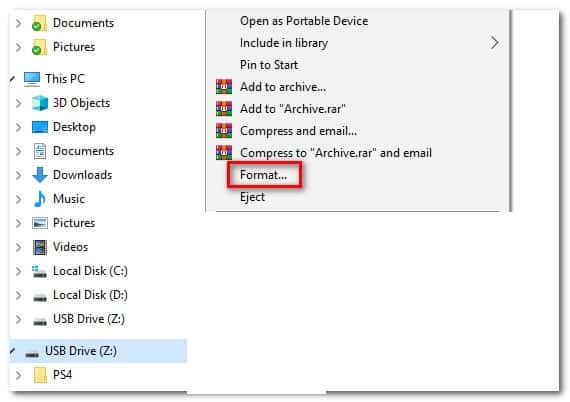
- Once you are inside the window Format, configure the System of files in FAT32 and check the box associated with Quick format.
- Then click Start once you are ready to format the drive.
- Once the formatting procedure is complete, the next step is to download the BIOS update that you want to install from the manufacturer's website and copy it to the USB flash drive.

Nota: You may need to create some specific files for the files to allow them to be installed from a USB drive.
- After the boot files are copied to the USB flash drive, restart your computer and press the required key (setup key) at the next startup to enter your BIOS setup.
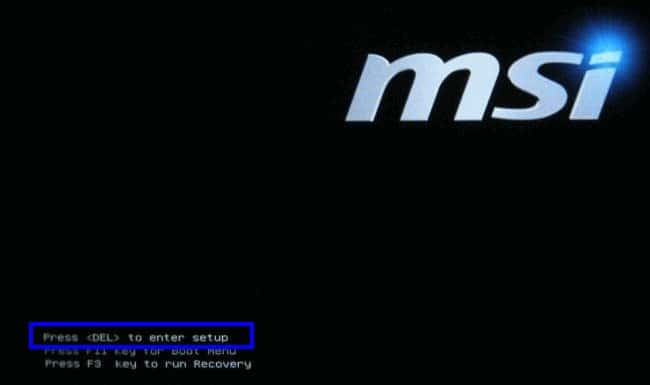
Nota: In most cases, the key Configuration es Esc, Del or one of the F keys (F2, F4, F6, F8, F12). If none of these keys work, search online for specific steps to access your BIOS setup according to your motherboard model.
- Once you are inside your BIOS settings, look for an option called Update system BIOS (or similar).
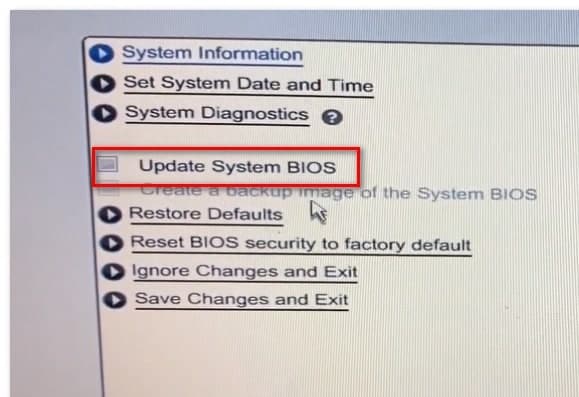
- When prompted to confirm the process, do so as instructed and then select the drive that contains the BIOS update.
- Once you select the appropriate drive and confirm, your BIOS update process will begin automatically.
- When the operation is complete, restart your computer and wait for it to start up.
- Once the next boot sequence is complete, you can safely remove the USB flash drive from your computer.
- Repeat the action that previously caused the INVALID_DATA_ACCESS_TRAP error and see if the problem is now resolved.
In case the issue is not resolved or you are already using the latest BIOS firmware version available, move on to the next method below.
Implement SFC and DISM scans
Another scenario that could indirectly cause a critical crash with the INVALID_DATA_ACCESS_TRAP status code is some sort of system file corruption. Most likely, a critical process used in the action you are taking when you receive the error is inaccessible due to some sort of system file corruption.
If this scenario sounds like it might be applicable, you should be able to resolve the most common instances of file corruption by running a couple of utilities capable of correcting this behavior: SFC (System File Checker) y DISM (Deployment Image Servicing and Management).
Both utilities are useful for situations where you are dealing with corruption in a system file. The key difference is that the two have different approaches when it comes to repairing system file corruption. And that is why we recommend running them in quick succession.
SFC is much more efficient when dealing with logical errors originating from a disk problem, while DISM is better for repairing operating system components.
But keep in mind that DISM requires an Internet connection as it relies on the WU component to download healthy copies to replace the corrupt filesOn the other hand, SFC is completely local and uses a local cached copy to replace corrupt instances.
If you have not tried to correct the error so far INVALID_DATA_ACCESS_TRAP Using these two utilities, follow the instructions below to run both in quick succession from a command prompt. CMD high:
- Starts with a dialog box Run by pressing the Windows key + R.
- From the screen that just appeared, type the command 'cmd' and press the keys Ctrl + Shift + Enter to open a command prompt with administrator access.
- After seeing the notice of UAC (User Account Control), click Yes to grant administrator access.
- From the CMD window that just appeared, type the following command in order and press Log in after each to start a DISM scan:
Dism.exe / online / cleanup-image / scanhealth
Dism.exe /online /cleanup-image /restorehealth
Nota: DISM will actively use Windows Update to download healthy copies. It is important that you have a good internet connection before starting this procedure. The first command will scan your system for inconsistencies, while the second will repair them.
- As soon as the DISM scan is complete, restart your computer and wait for the next startup to complete.
- After your PC restarts, follow step 1 again to open another elevated CMD prompt.
- Within the elevated CMD prompt, type the following command and press Log in To start an SFC scan:
sfc / scan now
Nota: Once you start the SFC scan, do not terminate it prematurely, even if it appears to be frozen indefinitely. If you do this, you could end up causing additional logical errors as the utility is busy mitigating current system issues.
- Finally, restart your computer once again and see if the problem is resolved at the next system startup.
If you are still experiencing the same type of critical BSOD crash (INVALID_DATA_ACCESS_TRAP) despite running both scans (SFC and DISM) in quick succession, move down to the final possible solution below.
Perform a repair installation
In case the above SFC and DISM scans do not fix the problem in your case, there is a high chance that you are dealing with some kind of system file corruption that cannot be fixed conventionally. In this case, the only viable solution is to perform a series of instructions that will reset all the components of the operating system.
If you have come this far without solutions, there are two ways to solve this problem:
- Perform a repair installation.
- Perform a clean installation.
If you don't mind losing the data currently stored on your operating system drive, a clean installation It is a less tedious procedure that only takes a few clicks and does not require installation media. However, the main disadvantage is that you will lose your personal data (apps, games, user preferences, etc.) unless you back up your data in advance.
If you do not want to lose your personal data, you must make a repair facilityBut keep in mind that this procedure is a bit longer and you will need to use supported installation media.
However, the big advantage is that you can keep all your personal components, including applications, games, user preferences, and personal media. The operation will only rest the operating system components.
My name is Javier Chirinos and I am passionate about technology. Ever since I can remember, I have been interested in computers and video games, and that passion has turned into a job.
I have been publishing about technology and gadgets on the Internet for over 15 years, especially in mundobytes.com
I am also an expert in online marketing and communication and have knowledge in WordPress development.