- Shutter Encoder is a free, cross-platform converter based on FFmpeg, compatible with a wide variety of video, audio, and image formats.
- Its interface organizes functions such as conversion, quick editing, render queues, and presets, facilitating a streamlined workflow for both beginner and advanced users.
- It allows you to adjust bitrate, resolution, colorimetry, audio and add watermarks, integrating preprocessing tasks without the need for a full video editor.
- It includes support for custom FFmpeg commands, greatly expanding its possibilities for professional workflows and advanced configurations.
If you work with video, audio, or images, sooner or later you'll need a converter that won't let you down. Shutter Encoder is precisely that Swiss Army knife that allows you to convert, compress, re-encode, and even download content without complicating your life or spending a penny.
Although it may look simple, it's very powerful inside: it's based on FFmpeg, the de facto standard in the professional world, and adds a clear interface that anyone can use. In this Shutter Encoder tutorial, you'll learn step by step how to download and install it, understand its interface, configure the main video and audio settings, create watermarks, work with presets, and even launch custom FFmpeg commands from within the program itself.
What is a Shutter Encoder and why is it worth using?
Shutter Encoder is a free file conversion and processing program designed primarily for video, although it also handles audio and images with ease. It was developed by video editors who understand the real-world needs of their work, which is why it includes many practical features in a single tool.
Its internal engine is based on FFmpeg, which is why it supports a huge number of formats and codecs. You can work with H.264, ProRes, GoPro Cineform, common audio formats , still images, image sequences, and more. All of this without paying for licenses, because the program is funded through voluntary donations.
Unlike other more limited converters, Shutter Encoder combines the best of several philosophies: it has the ease of use of Handbrake , the versatility of utilities like Avidemux for quick editing tasks, and also offers direct access to high-quality intermediate codecs for professional workflows in editing and post-production.
Another key point is its compatibility with multiple operating systems. It's available for Windows, macOS, and Linux , allowing for integration into almost any environment without relying on platform-specific software. Its goal is to be as comprehensive, efficient, and universal as possible for anyone working with audiovisual content.
How to download and install Shutter Encoder correctly
Before you start converting files, the first thing to do is obtain the program from a reliable source. The download should always be done from the official Shutter Encoder website, avoiding third-party sites that may include outdated versions or unwanted software.
To do this, go to the official website: https://www.shutterencoder.com/en/ . Once there, go to the "Downloads" section where you will see the available versions for each operating system clearly listed: Windows, macOS, and Linux. Choose the one that corresponds to your computer.
On Windows, the installation process is very simple: just run the downloaded file, select the installation language, and follow the wizard with the typical "Next" steps. In a few moments, Shutter Encoder will be ready to use without any complicated configuration.
On macOS and Linux, the procedure may vary slightly depending on the distribution or system version, but the principle is the same: download the corresponding installer or package, open it, and follow the instructions. If you use package managers or community repositories like Chocolatey on Windows or similar ones on Linux, you can also use those methods, provided the package is verified and up to date.
Once the installation is complete, open the program for the first time. At that point, you can adjust the interface language and take a quick look at the general preferences to customize it to your liking before you start converting videos nonstop.
Getting to know the Shutter Encoder interface
When you launch Shutter Encoder, you'll see that its appearance is functional and perhaps a bit understated. The font combination might not win any design awards, but the interface structure is very well thought out , and you quickly learn where everything is.
At the top, you'll find a toolbar with a gear icon on the left, which provides access to the program's general options. From there, you can adjust global preferences such as default paths, language, and queue behavior . On the right, you'll see the standard minimize, maximize, and close icons, along with a help button and a special icon that allows you to open another instance of the program to work with multiple windows simultaneously.
Just below is the main file selection box. Here you can drag and drop the videos, audio files, or images you want to process, or use the "Browse" button to search for them using your system's file explorer. There are also buttons to clear the list or delete specific items, and of course, you can select multiple files at once.
Right-clicking on an existing file opens a very useful context menu. From there, you can view detailed file information, analyze the GOP (frame compression structure) , and access additional features like screen recording. This last option allows you to capture your desktop, although performance can vary greatly depending on your hardware; some users report slight flickering, but the final video usually works correctly.
The key area of the interface is the "Choose function" box. This is a drop-down menu where you'll see a list of all the tasks that Shutter Encoder can perform: cutting video without recompressing, converting to common formats, converting to intermediate codecs like ProRes or GoPro Cineform, extracting only the audio or only the video, converting sound files, generating image sequences, or even downloading videos from YouTube.
Below is the output section, where you define what will be generated and where it will be sent. You can configure up to three different outputs for the same job , send files directly to WeTransfer, or use an FTP server to automate transfers. At the bottom of the window, you'll see the progress bar and task queue information, allowing you to monitor the rendering progress at a glance.
Queue management, presets, and workflow
One of the most practical things about Shutter Encoder is how it handles chained tasks. When you select a file and choose a function from the list, you'll see three dashes appear in the function box . These dashes represent the option to manage the render queue.
If you click on them, the main button that normally says “Start function” changes to “Add to queue.” This way, you can prepare several conversions with different settings and add them all to the queue to process them later in one go, without having to keep track of when each one finishes.
Next to the function controls, you'll also see a star. This star represents the presets. Whenever you configure a function with specific parameters (for example, a set of options to compress to H.264 at a certain bitrate), you can save that configuration as a preset using the key combination Control + S.
These presets are saved and can be reused as many times as you like from the same interface, which is incredibly convenient when you always apply the same parameters to your projects. You can even set one of these presets as the default configuration when you start the program, so that Shutter Encoder opens directly with those settings already loaded.
Thanks to this queuing system and presets, the workflow becomes much more streamlined. You can leave several large conversions chained together , close everything, and leave, knowing that the program will process each task on the list without constant supervision.
Video settings: size, rotation, and bitrate
When you select a video-related function, Shutter Encoder enables a series of specific panels. In the upper right, for example, you'll find options to resize, rotate, or flip the video horizontally or vertically. This is very useful when you receive a clip recorded in the wrong orientation or want to adapt it to a specific format.
Below this, you'll usually find the bitrate section, where compression is controlled. From here, you can set a constant or variable bitrate . Variable mode allows the program to adjust the bitrate according to the complexity of each scene, while clicking the VBR option to switch modes lets you configure a constant quality, equivalent to a CRF or similar parameter depending on the codec used.
In constant quality mode, you'll see a numerical control whose scale varies depending on the selected codec (H.264, H.265, ProRes, etc.). The lower the number, the higher the quality and the larger the file size , and vice versa. This way of working is very convenient because it focuses more on perceived quality than on a fixed number of kbps.
One particularly useful feature of this section is the ability to define a target file size. By entering the desired size in megabytes, Shutter Encoder automatically calculates the bitrate needed to achieve a final result that approximates that size. This is incredibly helpful when you need to adhere to a specific limit, for example, when sending files via email, uploading to a platform with strict size restrictions, or copying to a small storage device.
All these settings are applied in combination with the function you have chosen (for example, conversion to H.264, creation of a low-resolution file, etc.), allowing you to control the balance between visual quality and file size quite well without wasting too much time doing blind tests.
Quick editing: cuts, subtitles, filters and cropping
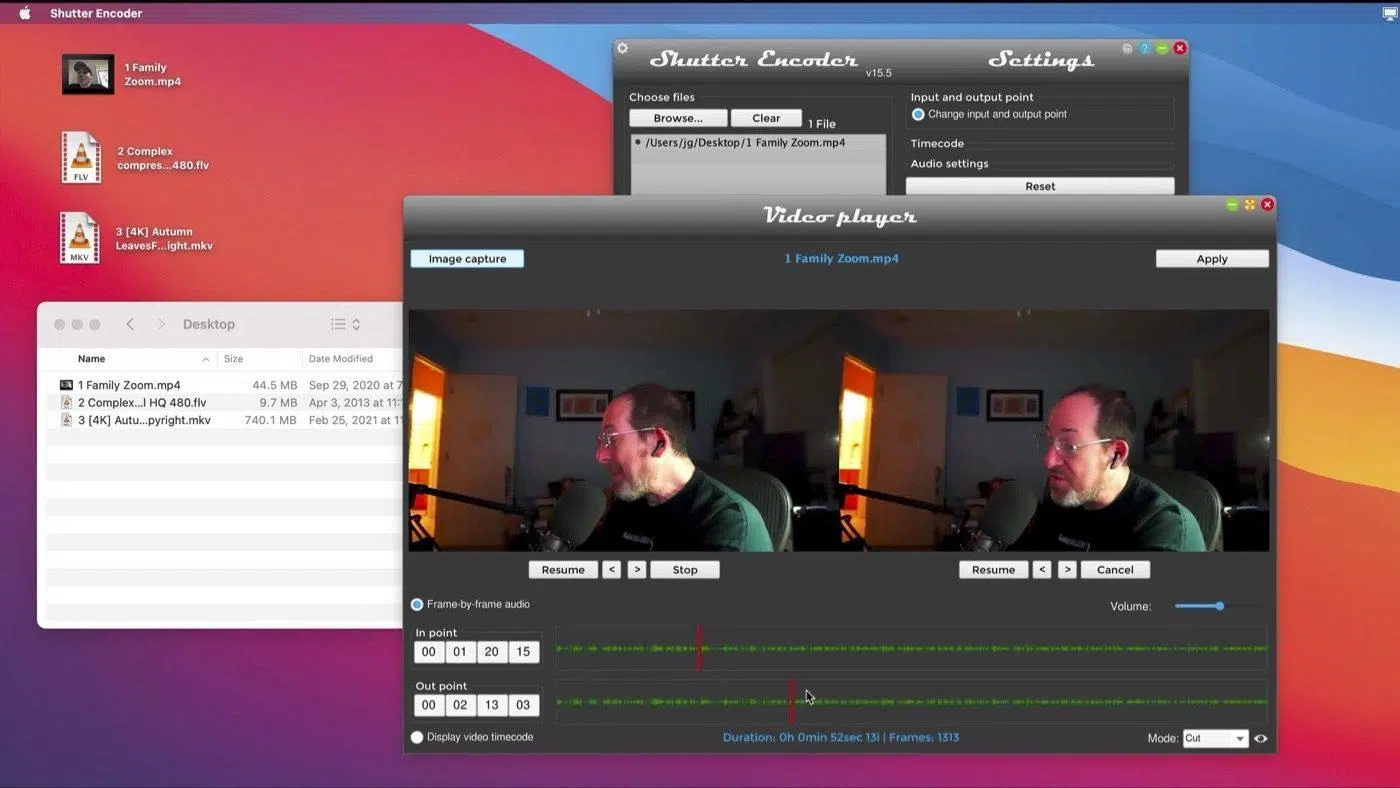
In addition to converting, Shutter Encoder includes a gateway to minor editing tasks without needing to open a full video editor. This is achieved through the "Edit" section. Activating this feature opens a dedicated window where you can work on the clip before sending it to the render queue.
Within this window, you can mark in and out points using the I and O keys, allowing you to quickly and precisely cut sections of the video . This is ideal for removing unnecessary parts, unwanted credits, or mistakes at the beginning or end of the recording without getting bogged down in complex timelines.
The editing tool also offers options to add subtitles or watermarks, as well as apply filters and crop the image. With cropping, you can focus attention on a specific area of the frame , remove black borders, or adapt the video's aspect ratio (for example, converting from 16:9 to a more square format for social media).
The color filters, effects, and corrections are coordinated with the rest of the project settings, so what you see in the preview is what will be applied in the export . It doesn't replace a full professional editor, but it does efficiently handle many light tasks that would otherwise require you to open a much more resource-intensive program.
Once you've finished editing the way you want, simply return to the main window and start the conversion. All changes to cuts, subtitles, filters, and cropping are integrated into the rendering process, without any additional steps.
Audio settings, image sequences, and colorimetry
In addition to video, Shutter Encoder gives you detailed control over the audio. In the audio section, you can change the codec, bitrate, sample rate , and other key track parameters, as well as extract only the audio from a video file to generate, for example, an MP3 or WAV file from a complete recording.
Another interesting possibility is working with image sequences. If needed, you can convert a video into a series of independent frames in your chosen format (JPG, PNG, WEBP, etc.), or perform the reverse process and assemble a video from an ordered set of numbered images. This is very useful for motion graphics, animations, or frame-by-frame processing.
Regarding color, Shutter Encoder's colorimetry section allows you to modify the color space, which is especially relevant if you work with professional video workflows involving different cameras and standards. You can adapt the source material to the colorimetry expected by your editing software or the destination platform.
Within this section, you can also load LUTs (lookup tables) to apply color corrections or predefined looks. This allows you to apply a consistent visual treatment to multiple clips from the same production even before sending them to the main editor, saving steps in the grading phase.
Finally, the advanced options also include video speed control, allowing you to speed up or slow down the clip without using a more complex editor. All of this makes Shutter Encoder more than just a converter; it's a highly versatile pre-processing tool.
Convert and compress video to H.264 with Shutter Encoder
One of the most common tasks today is converting or recompressing video to H.264, the leading codec for online distribution due to its balance between quality and file size. In Shutter Encoder, the process is quite straightforward. First, select or drag the video file you want to compress to the program's main window.
When the file appears in the list, open the "Choose function" menu and locate the option corresponding to H.264. Selecting it will automatically activate the specific settings associated with this function, including bitrate, resolution, codec profile, and other parameters relevant to this standard.
In the Settings section, you can adjust the bitrate according to your desired quality and file size. You can choose a fixed bitrate if you know the approximate value you need, or use the constant quality mode so the codec maintains consistent visual quality throughout the clip , adjusting compression for complex or simple scenes as needed.
If you need to adhere to a specific file size, use the option to indicate the approximate final size. Shutter Encoder will calculate the necessary bitrate for that value, greatly simplifying the preparation of files intended for submissions, platforms, or devices with limited storage space . Once everything is to your liking, press the "Start Function" button or add it to the queue to process it along with other jobs.
While the conversion is running, the bottom bar displays real-time progress, estimated time remaining, and the status of each task. This allows you to monitor the encoding process at a glance , without needing to open additional windows or monitors.
How to add a logo or watermark to a video
Adding a watermark or logo to your videos is a great way to identify them and prevent misuse. Shutter Encoder makes this easy to do in its settings. To do so, go to "Settings" and then to "Overlay ," where you'll find the option to add an image or video as a watermark.
When you select “Add image or video as watermark,” your system's file explorer will open, allowing you to choose the file you want to use as your logo. This can be a PNG with transparency, a JPG, or even a short video clip if you prefer an animated element. Once selected, you'll see a preview where your video and the watermark are combined.
In this preview, you can adjust the size, position, and opacity of the logo. You can place it in any corner, in the center, or wherever you prefer, and reduce its intensity so it doesn't distract the viewer too much . The interface allows you to make these adjustments interactively until it looks exactly as you want it.
When you're happy with the result, click "Apply" to confirm the changes. Then simply click "Start Function" to have the program begin processing the video with the embedded watermark. The resulting file will already include the integrated logo , ready to publish or send to your clients.
If you consistently use the same logo in your projects, it might be helpful to save these parameters as a preset for reuse. This way, you won't have to reposition and redo the settings each time ; you can simply load the corresponding preset and you're good to go.
Advanced features and custom commands of FFmpeg
One of the biggest draws of Shutter Encoder for advanced users is that it's not limited to predefined options. The "Choose Function" field, in addition to being a drop-down list, is also an editable text box . This means that if you click inside and start typing, you can directly enter FFmpeg commands.
Remember that Shutter Encoder largely functions as a graphical interface for FFmpeg, so behind each button, what's actually being executed is an instruction from this powerful command-line engine . For most users, the pre-built functions are more than enough, but if you're proficient with FFmpeg, this option allows you to take control much further.
For example, you could create a specific command to generate a sequence of images in WEBP format from a short video of a few seconds, taking advantage of the quality and compression offered by this format. The command could include specific parameters for the codec, compression level, quality, whether the output loops, audio usage, frame synchronization, and output scaling. By typing that exact command into the function box , Shutter Encoder would execute it just as if you were in a terminal.
This hybrid approach is perfect for those who don't want to constantly struggle with the console, but also don't want to sacrifice FFmpeg's extreme flexibility in special situations. It combines the convenience of a user interface with the freedom of a full command-line system , giving you the freedom to fully customize your complex workflows.
If you want to delve even deeper into everything you can do with Shutter Encoder, its developers maintain a fairly comprehensive official documentation. Although some of the content is originally in English, you can always use automatic translation tools to look up very specific options. This way, you can take advantage of all those aspects of the program that might initially go unnoticed.
Overall, Shutter Encoder becomes a powerful tool for anyone working with video, audio, or images, whether in creative or professional settings. Its combination of simplicity, advanced features, and extensive codec support makes it a serious alternative to other, more well-known converters, especially if you're looking for something free, cross-platform, and flexible enough to handle all kinds of projects.

Passionate writer about the world of bytes and technology in general. I love sharing my knowledge through writing, and that's what I'll do on this blog, show you all the most interesting things about gadgets, software, hardware, tech trends, and more. My goal is to help you navigate the digital world in a simple and entertaining way.
Table of Contents
- 1 What is a Shutter Encoder and why is it worth using?
- 2 How to download and install Shutter Encoder correctly
- 3 Getting to know the Shutter Encoder interface
- 4 Queue management, presets, and workflow
- 5 Video settings: size, rotation, and bitrate
- 6 Quick editing: cuts, subtitles, filters and cropping
- 7 Audio settings, image sequences, and colorimetry
- 8 Convert and compress video to H.264 with Shutter Encoder
- 9 How to add a logo or watermark to a video
- 10 Advanced features and custom commands of FFmpeg