- Windows Mixed Reality requirements, limits, and key settings to balance quality and performance.
- Pairing drivers, audio/voice, Windows + Y input, and using Edge in MR.
- Quest 3 Integration with Windows 11 via Mixed Reality Link and virtual monitors.
- Ergonomics tips, troubleshooting, and must-play VR games.
Making the leap to virtual reality on a Windows 11 PC is easier than it seems if you know what to do and in what order. In this guide, we bring together in one place the requirements, space preparation, boundary settings, controllers, and display adjustments , as well as key new features like Quest integration with Windows 11.
We don't just cover the basics: you'll see advanced options (native resolutions vs. scaling, refresh rate, IPD), how to manage input with the Windows + Y shortcut, the role of Microsoft Edge in Windows Mixed Reality, and solutions for common tracking, performance, and display issues . And, if you're interested, we wrap up with recommended games and what's coming in VR in the next few months.
Space requirements and preparation
Before starting, it's a good idea to validate your equipment and clear the playing area. Check that your PC meets the minimum requirements of the headset manufacturer (adequate GPU, modern CPU, sufficient RAM, USB/DisplayPort/HDMI ports, and an updated version of Windows). For Windows Mixed Reality , the process includes a PC check and software download from the Mixed Reality Portal.
Prepare the space, including the area above your head. Remove obstacles, fragile objects, and avoid hazards such as low ceiling fans or ladders . The clearer the area, the easier it will be to establish reliable boundaries and move around safely.
Connect the headset to your PC, but don't put it on yet. First, complete the setup on your computer: install the manufacturer's software, let it update the firmware and drivers , and follow the wizard to recognize ports and peripherals. Then you'll pair the controllers and create the boundary.
Once the space and software are ready, the fun begins: put on your headset and enter the Windows Mixed Reality environment. If you use voice commands, Cortana can help you teleport and open apps with simple commands right from your virtual home.
Motion Controllers and Pairing
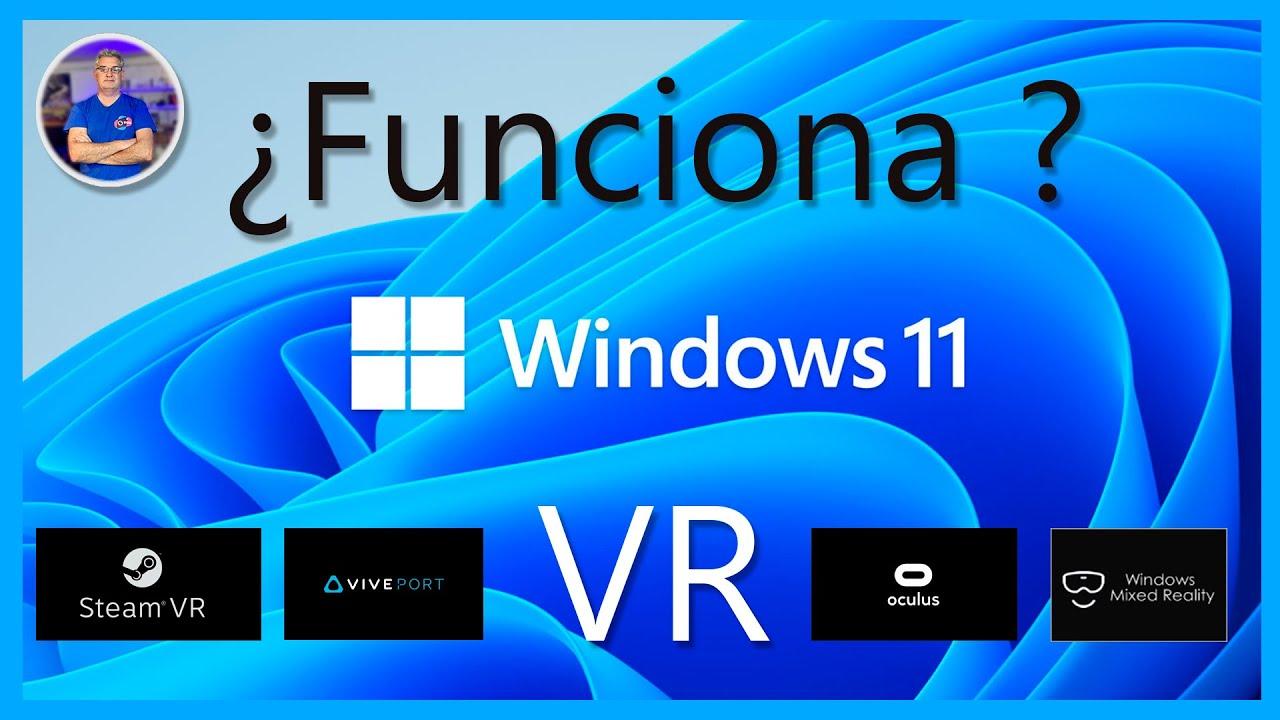
Depending on the visor model, the controllers may come ready to use or require pairing. In helmets with integrated radios, the controllers are usually already paired from the factory ; when you turn them on for the first time with the helmet, they are automatically detected.
If your headset doesn't have a built-in radio, you'll need to pair the controllers with your PC. Windows Mixed Reality requires Bluetooth 4.0 for the motion controllers ; if your computer doesn't have Bluetooth, add a compatible USB adapter . An adapter isn't needed if you're using the headset's built-in radio.
Are you only going to play with an Xbox controller or keyboard and mouse? You can skip pairing motion controllers . However, if you want to use them later, it's best to set them up from the start to avoid any surprises.
By ecosystem, remember: Oculus/Meta uses Touch, HTC Vive and Valve Index use base stations and their controllers , and PlayStation VR relies on Move or the DualShock/DualSense controller. Pairing steps vary, but each platform's setup wizard guides you precisely.
Limits, scales and security
Windows Mixed Reality offers two approaches to use. The room-scale experience allows you to walk around in a defined area; it is the most immersive and recommended if you have enough space (ideally 1,5 x 2 meters or more).
The alternative is to use it sitting or standing in a fixed location. Desktop scaling works well in small spaces without defined boundaries , but keep in mind that some apps and games aren't designed for this mode and might not behave as expected.
If you choose to move around the room, clear the area and follow the wizard's steps to center the viewfinder, trace the outline, and validate the perimeter. While drawing the boundary, try to keep the headset facing the PC for better tracking stability.
Keep in mind the maximum compatible size limit: Windows Mixed Reality supports up to approximately 5,7 x 5,7 m (18 x 18 ft) or a 4 m radius from the center . This limit is due to the stability of single-anchor tracking and the headset cable (in many models, ~3 m), factors that, beyond a certain distance, compromise accuracy and safety.
Audio, voice, and input control in Windows Mixed Reality
Many modern visors include speakers and a microphone. If your helmet is older, use a Bluetooth headset with a microphone or a 3,5 mm jack , usually located under the visor or at the end of a short cable (depending on the model).
Cortana's voice commands in mixed reality allow for quick tasks like teleporting or opening apps. Activate the voice feature in settings to streamline actions without touching controllers —especially useful when starting out.
Windows manages input (keyboard/mouse) using the headset's presence sensor. By default, input automatically switches to the mixed reality environment when you put on the headset , but you can always manually switch with Windows + Y. If you prefer full control, select manual switching and ignore the sensor.
To re-enter mixed reality after the first time, simply put on your headset while it's still connected. You can also open the Mixed Reality Portal from the Start menu and force audio/input routing with Windows + Y if needed.
Display and IPD Settings: Quality vs. Performance
Windows Mixed Reality automatically balances quality and performance. In the Settings > Mixed Reality > Headset display panel, you'll find several key sections to fine-tune.
In Visual Objects, the quality of the virtual home is adjusted between modes such as Automatic. The native resolution of the headset appears in the Resolution section . If you connect a high-resolution headset (for example, 4320 x 2160), you can choose between native rendering (better quality) or enabling automatic scaling (better performance) to reduce the graphical load.
IPD (interpupillary distance) adjustment can be done via software or offered as a physical control on the visor. If the software option is disabled, use the dial or slider on the helmet to adjust the lenses for optimal clarity and comfort.
The refresh rate affects smoothness and GPU load. You can let Windows decide or force 60 Hz or 90 Hz . On powerful systems, 90 Hz is usually preferable; if you experience stuttering, lower it to 60 Hz or enable scaling to maintain stability.
These controls are available starting with Windows 10 version 1903 and, of course, in Windows 11. Extra tip: Keep your GPU and headset software up to date, close background apps, and adjust graphics settings in games until you find the perfect balance between quality and performance.
Microsoft Edge in Windows Mixed Reality
To use the new Edge (based on Chromium) as a Win32 app within the mixed reality home, you need Windows 10 version 1903 or later, or Windows 11. Update from Windows Update if you don't already have it.
Several important issues have been resolved with cumulative updates: brief freezes when launching Win32 apps (including Edge), icons disappearing from the menu, old windows placed in the home screen but unusable , links opening in the desktop browser, and general keyboard and visual improvements. If you're upgrading from a very old version, update to avoid these problems.
Some behaviors to be aware of persist: websites open at home are lost when closing Mixed Reality Portal (Edge windows remain where they were), Edge audio is not spatialized, and during WMR sessions, virtual monitors appear as generic physical monitors in the system's Display settings.
Quest 3 and Quest 3S: Windows 11 Integration (Horizon OS v72)
Horizon OS version v72 adds an experimental productivity-focused feature: a direct and simplified connection to your PC using Microsoft Mixed Reality Link , announced at Meta Connect 2024. The goal is to access the Windows desktop from the headset seamlessly.
Key advantages include quick connection with a floating Connect button and virtual displays that replace the physical monitor . You can add up to three virtual monitors to enhance multitasking in an immersive environment.
Looking ahead, compatibility will be built directly into Windows 11, eliminating the need to install Mixed Reality Link on the PC. This will streamline the process and facilitate adoption in professional environments.
Initial setup summary: Activate the experimental feature on the headset (Quest 3/ Quest 3S ; pair with PC using Microsoft Mixed Reality Link), install the Mixed Reality Link app on Windows 11 and the Windows app for Quest from the Horizon Store, and pair devices with a QR code generated on the PC and scanned with the headset.
A significant current limitation: it requires an active local network (Wi-Fi or similar). Unlike the Apple Vision Pro, which can connect without Wi-Fi , this network dependency limits its use on the go (airplanes, trains). Even so, Meta is committed to deep integration with Windows to improve the experience in the medium term.
Impact: This integration can redefine productivity in VR, bridging the gap between hybrid and remote workflows. Meta positions itself as a key player competing with Apple by offering virtual monitors, direct access to Windows, and simplified setup.
Quick FAQs: How does it connect? With Mixed Reality Link and Horizon OS, pairing via QR code. How many virtual monitors? Up to three. Is Wi-Fi required? Yes, for now. Will additional apps be installed? Initially, yes; Windows 11 will integrate this feature in the future . Target sectors: Enterprise, creative, and intensive multitasking.
Basic components and system requirements
A good VR setup combines a headset, PC/console, and suitable peripherals. For the PC, consider a GPU like the NVIDIA GTX 1060 or AMD RX 480 as a starting point , an Intel i5-4590 or Ryzen 5 1500X CPU, 8 GB of RAM, a modern HDMI/DisplayPort video output, and free USB ports.
By headset category: PC headsets (e.g., Rift S, HTC Vive, Valve Index) offer the most powerful experience; standalone headsets like Quest 2 are more portable but can connect to a PC for demanding titles; and console headsets (PlayStation VR) work with PS4/PS5 with great ease of use.
Tracking: Many modern headsets use integrated (inside-out) cameras, eliminating the need for external sensors and simplifying setup . Others, such as Vive/Index, use base stations for highly accurate positioning over large areas.
Accessories that make a difference: cable management in the ceiling or side guides, a VR mat to keep you centered , hygienic covers for the face foam and, if needed, additional sensors in systems with base stations.
Additionally, reserve a clear area (ideally 2 x 1,5 m) and a good internet connection for downloads , updates, and multiplayer . On Windows, SteamVR and the manufacturer's software coexist without issue if you follow the setup instructions.
Step-by-step configurations
- PC VR (e.g. Rift S): Install the official Oculus software, connect USB and video to the PC, and follow the wizard to calibrate. Inside-out tracking makes it easy to assemble and create the guardian to define your safe area.
- Standalone headset (example Quest 2): Unpack and load, install the mobile app, pair headset and phone, connect to Wi-Fi and draw the boundaries with the built-in cameras. Then install games and apps from the store.
- Console (PlayStation VR): Connect the processor unit to the console with the included cables, pair controllers and position the camera correctly to cover your play area. Complete the guided on-screen calibration.
- With your mobile (Trinus VR): Install TrinusVR on PC and smartphone, Choose the glasses profile in the PC app and use auto-adjustment, connect via Wi‑Fi or USB, enable Trinus on both and launch the game in windowed mode.
- Station installation (Vive/Index): reserve about 2 x 1,5 m (more if you are going to move around a lot) and Place base stations with good line of sight to your areaOnce you've pinned them, the setup process is similar to other headsets: official software, connections, firmware, and limits.
- Generic VR headset setup for PC: Install the manufacturer's app on Windows (10/11). Connect USB and DisplayPort/HDMI (you can use an adapter if necessary), let the firmware update, adjust IPD (software or physical wheel) and you'll be able to download VR experiences.
Ergonomics, performance and safety
Properly adjusting the scope prevents fatigue. Tighten the straps just enough and center the lenses for a clear view ; if you have physical IPD control, adjust it until blurriness and halos are eliminated.
If you play sitting down, choose a stable and comfortable chair. Remember to take regular breaks to rest your eyes and neck, especially during long sessions.
To improve performance, update your GPU and headset drivers, close unused programs, and lower the graphics settings in demanding titles or force 60Hz if your system is struggling. The goal in VR is consistently smooth gameplay.
Safety first: clear the area, use virtual boundaries, and stay aware of your surroundings even when fully immersed. Adding a VR mat helps you orient yourself by touch.
Troubleshooting common problems
- Tracking: Poor lighting is detrimental to the viewfinder cameras. Use uniform light (without glare) and avoid strong reflections. Ensures line of sight between controllers and sensors/stations.
- Visualization: Check cable and adapter connections. Adjust the lens distance/IPD to fine-tune sharpnessIf the problems persist, restarting the headset/PC resolves many issues.
- Performance: When you notice latency or stuttering, update drivers, reduces post-processing/supersampling options and closes background processes. WMR's automatic scaling can help with high-resolution displays.
Recommended games and where VR is going
VR shines in gaming: it's estimated to have reached nearly 61% penetration among gamers worldwide. Some iconic titles you can enjoy include Batman: Arkham VR, Beat Saber, Dirt Rally, Fallout 4, Minecraft , The Elder Scrolls V: Skyrim, Half-Life: Alyx, Project CARS 2, Ace Combat 7, Star Wars: Squadrons, and Hitman 3.
To run these games smoothly, you might need a powerful computer. If you're using a gaming laptop, pay particular attention to the GPU, power mode, and video connection to your headset (DisplayPort/USB-C Alt Mode or manufacturer-validated adapters).
Emerging technologies will see wireless VR with lower latency, even higher resolutions and refresh rates , and more sophisticated haptics. Beyond gaming, use cases are growing in education, healthcare (training, therapy, rehabilitation), and remote work with immersive meetings.
If you'd like more documentation on BIM/architecture environments, you can check out this resource: Download PDF . It can give you practical ideas if you work with complex models and need immersive presentations.
With a well-prepared PC, a secure environment, and the fine-tuning of Windows Mixed Reality (resolution, IPD, Hz, limits, and input), the Windows 11 experience is stable and configurable , and with the integration of Quest and Microsoft Mixed Reality Link, a powerful path to productivity opens up with virtual monitors and near-instant desktop connectivity.


Passionate writer about the world of bytes and technology in general. I love sharing my knowledge through writing, and that's what I'll do on this blog, show you all the most interesting things about gadgets, software, hardware, tech trends, and more. My goal is to help you navigate the digital world in a simple and entertaining way.