- Properly configuring sensors, PWM/DC modes, and headers in Smart Fan 5 is essential for accurately controlling the RPM of each fan.
- Good airflow combines positive pressure, logical fan placement, and curves that balance temperature and noise.
- Balanced, playful and quiet profiles allow the curves to be adapted to each use, fine-tuning slopes and temperature limits.
- Tools like FanControl or Argus Monitor complement the BIOS and they facilitate fine-tuning and testing without constant restarts.

Properly adjusting the fans on a Gigabyte motherboard with Smart Fan 5 can make the difference between a noisy PC constantly fluctuating in speed and a cool, quiet machine that's barely noticeable. Many people start by linking all the fans to the CPU temperature and end up with a constant "up and down" effect: any small temperature spike causes the fans to react abruptly, which is very annoying.
The idea behind this article is to help you optimize your fans for airflow, noise control, and logical fan curves using Smart Fan 5 profiles and options (and, if you want, external programs) without getting bogged down in terms like PWM, DC, hysteresis, sensors, or percentages that you don't really know what real RPM they correspond to.
What is a fan curve and why does it matter so much?
When we talk about the fan curve, we're referring to the relationship between a sensor's temperature and the fan speed , usually expressed as a percentage of PWM or voltage. This curve defines when the fan is running slowly, when it's speeding up, and when it's at maximum speed.
A well-designed fan curve allows you to keep the fans at very low speeds at idle , gradually increase them as the temperature rises, and reserve 100% speed only for when the system truly needs it. If the curve is poorly designed, you'll experience sudden noise spikes, insufficient cooling , or fans accelerating and decelerating every few seconds.
The default fan profiles in many BIOSes (including Gigabyte's) are often very generic: sometimes they're too conservative with temperatures or too aggressive with noise. That's why it's useful to know how to create a custom fan curve tailored to your case, fans, and PC usage.
Basic concepts of fan control: PWM, DC and sensors
Control Types: PWM vs DC
On a modern motherboard like the Aorus with Smart Fan 5, you can find two main ways to control a fan: PWM (pulse width modulation) and DC (voltage control) . Understanding the difference is key to avoiding problems when configuring the fan headers.
A 4-pin PWM fan uses a digital signal on the fourth pin to tell the motor what percentage of time it should be powered, allowing for very fine and stable RPM control, especially at low speeds. This results in very smooth curves, very low minimum speeds, and, in some models, even a true 0 RPM mode when the percentage is 0%.
A 3-pin fan operates in DC mode , meaning the motherboard modifies the voltage supplied to the fan. This also allows for speed adjustments, but less precisely and with a higher minimum RPM limit. Furthermore, some 3-pin fans will barely drop below a certain threshold before stopping.
In Smart Fan 5, you can specify for each header whether you want to use PWM or DC mode . It's important that a PWM fan is connected to a header configured as PWM, and that a 3-pin fan normally uses DC control. Mixing the wrong modes can result in unstable readings, fans that don't start , or strange noises.
Where do the temperatures come from: available sensors
Another critical point is the temperature at which you will link each fan. Current Gigabyte motherboards allow you to associate each fan curve with different temperature sources :
- CPU package temperature, ideal for the CPU fan curve or an AIO radiator.
- Motherboard or VRM temperatures, useful for controlling fans that help cool the power supply area.
- Ambient temperature of the box, sometimes measured by an internal sensor that better reflects the overall heat inside the chassis.
- GPU temperature If the external software allows it, it's very interesting for synchronizing the case fans with the graphics card when you're gaming.
Choosing the right sensor is key because it doesn't make sense for all the fans to respond only to the CPU . For example, the front and rear fans usually work better if they're guided by the case or GPU temperature, since those are the main drivers of overall heat while gaming.
Airflow: how many fans and where to place them
Before you start drawing curves, it's a good idea to check if your case has at least a minimally decent ventilation system . No matter how fine the curve is, if the airflow is poor, temperatures will still be high.
Ideally, you should maintain positive pressure in the case : slightly more air should be entering than exiting. This helps ensure that dust enters primarily through the filters, as the airflow is more organized. For this purpose, the following is typically installed:
- 2 or 3 front intake fans, preferably 140 mm and with a good flow rate (about 1500 RPM maximum is more than enough).
- 1 rear exhaust fan, with around 1200 RPM is usually enough to accompany the front lights.
- 1 or 2 top exhaust fans, which take advantage of the fact that hot air tends to rise.
As a general rule, the front and rear fans are the most important for overall airflow and it makes the most sense for their speed to follow a temperature-related curve. The top fans often work well at a relatively constant speed, since hot air rises and doesn't require a huge effort to expel it.
When setting RPM, a very reasonable approach is to run the front fans at maximum speed around 60-65°C , leaving them at minimum around 20°C. The rear fan can be run at a slightly lower maximum, for example, if it has a lower RPM. The upper fans are often left fixed between 60% and 75% of their speed, as long as the noise isn't bothersome.
Access Smart Fan 5 and other controls from the BIOS
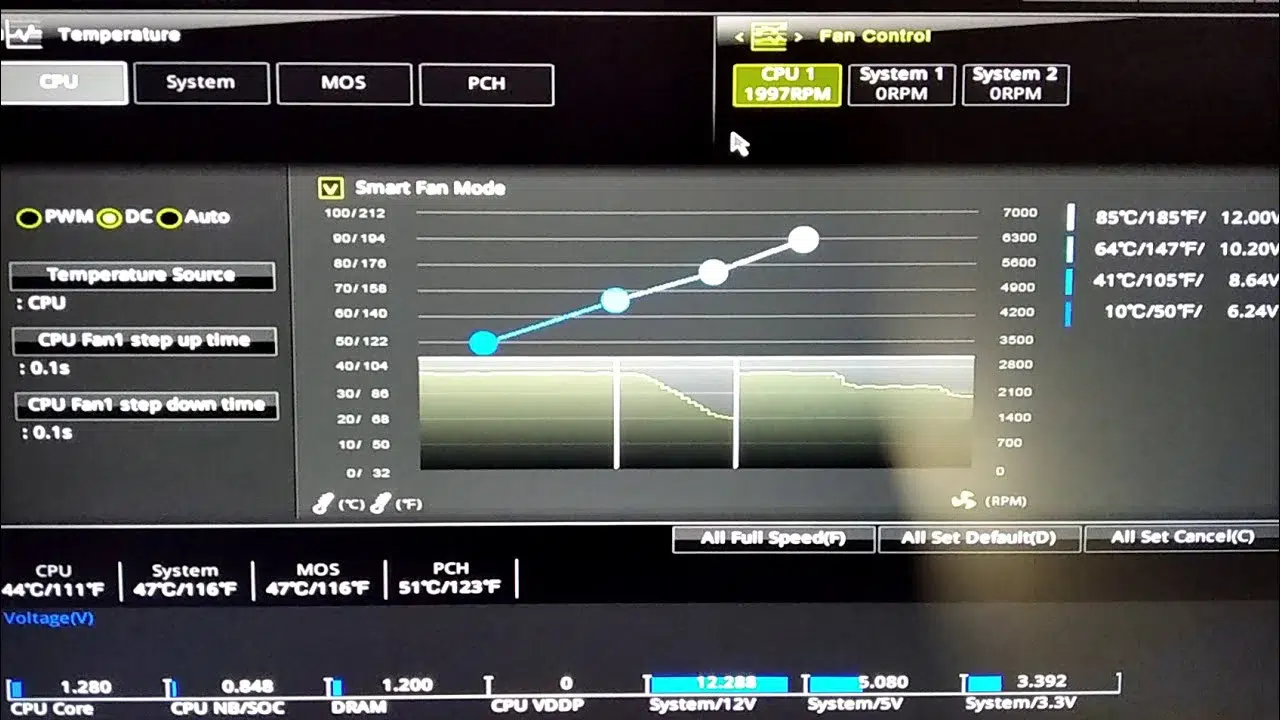
To adjust the fan curves on a Gigabyte Aorus motherboard, you need to enter the BIOS/UEFI of the motherboard and locate the Smart Fan 5 or Hardware Monitor section , where the CPU_FAN, SYS_FAN, PUMP, etc. headers are displayed.
The general steps for any modern motherboard are very similar: turn off your PC, hold down the DEL or F2 key , and turn the computer back on to boot into the BIOS. If you're having trouble finding the right key, in Windows 10/11 you can access the firmware through the advanced startup options without having to re-sync your keyboard.
Once in the BIOS, in Gigabyte's advanced menu you'll see a graphical window displaying the detected fans, their current RPM, and a graph showing the temperature versus speed percentage curve . From there you can select each fan and choose whether it's controlled in PWM or DC mode, as well as the reference sensor.
Predefined profiles versus manual mode
Smart Fan 5 typically offers several automatic profiles, such as Normal, Silent, Performance , and similar. These profiles adjust the fan curve in a general way: Silent mode delays the RPM increase and prioritizes noise reduction, while the default or performance profiles accelerate the fan speed to maintain slightly lower temperatures.
These profiles are a good starting point if you don't want to overcomplicate things, but if you really want your PC to behave exactly the way you want , you should switch to Manual mode and set the curve points to your liking. In that view, you can adjust each temperature/percentage marker for each connected fan.
Keep in mind that many users complain that the BIOS is cumbersome for experimenting with curves , because each change requires restarting and testing in Windows, going back into the BIOS, and so on. If you want to be faster, we'll later look at software tools that work on top of what the motherboard does and allow you to fine-tune without so many restarts.
Switch from PWM percentage to RPM logic
One of the most confusing things about Smart Fan 5 is that the interface requires you to define the speed as a PWM percentage (for example, 50% or 100%) instead of allowing you to directly set specific RPMs. This makes it more difficult to find the exact point where the fan sounds good or becomes annoying.
The key is to perform a simple fan calibration beforehand . You can do this from the BIOS itself, where there's often an auto-adjustment option, or simply by writing it down:
- Which is the Minimum RPM at which the fan starts and remains stable (usually 20-30% of PWM).
- What RPM does it reach at 50% PWM and 100%, giving you a mental chart to know that, for example, your fan goes from 500 RPM to 1500 RPM.
With that data, you can already make the mental associations: 30% = X RPM, 50% = Y RPM, 100% = Z RPM . Although Smart Fan 5 doesn't let you directly set the RPM, you'll have a general idea of the range you're working in when you adjust each point on the curve.
If your fans have a range where they make a particularly unpleasant noise at certain low RPMs, you can avoid that specific range by not using the corresponding percentages. For example, if they sound strange at 600-800 RPM but work fine at 500-1000 RPM, you can design a curve that passes through that range more quickly or skips it altogether.
How to create a solid fan curve step by step
1. Calibrate minimum and maximum limits
Before drawing anything, it's advisable to accurately determine the minimum and maximum reliable RPMs for each fan. To do this, you can:
- Use the BIOS's own adjustment tools (Smart Fan 5, Q-Fan on ASUS, hardware monitor on MSI, etc.) to gradually lower the percentage until the fan safely stops spinning.
- Use software such as FanControl, Argus Monitor or SpeedFan in Windows to perform percentage sweeps and see in real time the RPM that each fan obtains.
- Note what percentage of PWM is equivalent to the minimum stable speed and which at a reasonable maximum speed where the noise is already high but acceptable.
This step prevents you from setting the speed too low, which would cause the fan to stop (or start and stop all the time), and ensures that the curve always maintains a continuous airflow.
2. Define consistent temperature steps
A good fan speed curve typically includes several key CPU or case temperature points , along with their corresponding speed percentages. A typical example for case fans based on CPU temperature might be:
- 20 ºC → 20% PWM (Minimal RPMs, practically inaudible).
- 35 ºC → 30% PWM, slight improvement over the minimum.
- 50 ºC → 50% PWMThe fan already pushes quite a lot of air but is still reasonably noisy.
- 65 ºC → 100% PWMThe fan is set to maximum speed to evacuate all the heat.
This scheme, very similar to 20% – 30% – 50% – 100% in steps of 0/35/50/65°C, is an excellent starting point. From there, you can modify temperatures or percentages to adapt it to your case and your noise tolerance.
3. Adjust the slope and avoid oscillations
When drawing the curve in Smart Fan 5 or any other graphic editor, try to make the slope smooth in the low/mid range (up to about 55-60°C) so that small changes in temperature do not generate large changes in RPM.
At higher temperatures, above 70°C for the CPU, a more aggressive cooling curve makes sense to react quickly to heat spikes and prevent the CPU from reaching its limit. This combination results in a system that is quiet during light tasks but responds strongly under stress.
Whenever the BIOS allows it, it's very useful to enable or adjust fan hysteresis : a temperature or time range that prevents the fans from changing speed for minimal variations. This way, if the temperature fluctuates by 1-2°C around a certain point, the fans won't go haywire, constantly increasing and decreasing their speed.
4. Specific curves for CPU, case, and GPU
The CPU fan curve is usually the most reactive and aggressive because the cores' temperatures rise and fall very quickly. It's common practice to link the CPU cooler fan (CPU_FAN, CPU_OPT) to the CPU package temperature and allow it to go from minimum to maximum within a relatively short range.
Case fans, on the other hand, can follow a more relaxed curve based on case or GPU temperature . For example, front and rear fans linked to the graphics card temperature, increasing when you enter a game and decreasing when you're just browsing.
If you use external software capable of reading the GPU (such as FanControl or Argus Monitor, or export logs from GPU-Z ) you can create mixed profiles where the fans respond to the higher of two temperatures (CPU or GPU) or to a weighted combination, resulting in very fine behavior in any situation.
Software tools: FanControl, Argus Monitor, and SpeedFan
If you find the Smart Fan 5 interface in the BIOS cumbersome, you can disable the motherboard's automatic fan modes (leaving a fairly flat fan curve or a fixed speed) and let Windows software handle the delicate work. This is where utilities like FanControl, Argus Monitor, or the veteran SpeedFan come in handy.
FanControl (Rem0o's project) is one of the most interesting options available today: it allows you to build curves based on multiple sensors, linear and mixed profiles, ambient temperature compensation , and more, and it's frequently updated. It doesn't conflict with the motherboard if you leave it in simple mode; it simply takes control of the final value sent to the fan.
Argus Monitor, a paid but very lightweight program, offers a more polished interface, alerts, thermal data logging, and predefined profiles for silent, balanced, or performance modes. It's very useful if you want something easy to use yet powerful.
SpeedFan, although no longer updated, remains a good solution for older systems or advanced users familiar with older chipsets and manual sensor mapping. It allows for very detailed control of voltages and RPMs, but requires more patience to configure.
Practical examples of recommended fan profiles
Balanced profile for everyday use
Designed for PC users who primarily browse the web, do office work, and play some casual games, and don't want to constantly hear the fans. Here, the fans operate at low or medium RPMs most of the time , only increasing under heavy load.
A typical fan curve might keep the case fans at 20-30% below 35-40°C , increase to 50-60% around 55°C, and reserve 100% for 65-70°C. The CPU fan can be slightly more aggressive, starting earlier, but not reaching full speed until above 70°C.
Aggressive gaming profile
If you play games frequently and your priority is keeping your CPU and GPU cool even if it means a bit more noise, you'll want both your CPU and case fans to speed up quickly from average temperatures.
Here, the minimum fan speed is typically higher (30-40% even at idle if you don't mind some noise) and faster transitions to 80-100% when the CPU exceeds 60-65°C or the GPU surpasses 70°C. The idea is to have maximum airflow during a gaming session, sacrificing silence for thermal stability.
Silent or minimal noise profile
This is the right approach for office setups, HTPCs, or PCs used at night , where noise is a major concern and the CPU and GPU aren't under heavy load. Here, the priority is keeping the fans running at their lowest possible speed most of the time.
You can allow higher temperatures, as long as they remain within safe limits, and configure fan curves where the speed doesn't exceed 40-50% except in extreme situations . Some fans with a 0dB mode even allow you to configure 0% sections so they stop completely below a certain temperature, provided the motherboard and the fan itself can handle it.
Typical problems when adjusting curves and how to avoid them
Never set it to 0% unless the fan can handle it.
While it might be tempting, you shouldn't set a point on the fan curve to 0% speed unless you're absolutely certain that your fan and motherboard support a safe stop mode. Most fans require a minimum duty cycle (20-30%) to start reliably.
Setting fan speeds that stop the fan when it shouldn't can cause localized overheating or dead zones where heat accumulates. It's always best to set a small but realistic minimum speed, especially for CPU fans or radiators.
Incorrectly matched connectors and headers
Another common mistake is plugging any type of fan into any header without checking. Make sure that 4-pin PWM fans go into headers configured for PWM and 3-pin fans go into headers configured for DC mode. Also, respect the logical assignment of each connector:
- CPU_FAN for the main fan of the heatsink or AIO pump as recommended by the manufacturer.
- CPU_OPT for the second CPU cooler fan or tandem fans on a radiator.
- SYS_FAN / CHA_FAN for the front, rear, and top case fans.
Connecting a CPU fan to a case header, or vice versa, can cause the BIOS to not detect RPMs where it expects them and display errors , or cause an important fan to not be regulated correctly.
Maintenance and dust: the silent enemy
Even with a perfect fan curve, if dust accumulates on the case fans and filters, the result will be poorer airflow and higher temperatures with the same noise level . Furthermore, dust can cause sensors to provide less accurate readings.
It's a good idea to clean the inside of your PC, the heatsinks, and the fan blades every few months , especially if you have pets, smoke, or a lot of dust in the environment. This allows for proper airflow and ensures your curves maintain their shape over time.
ambient temperature and seasonal changes
Adjusting a fan curve in winter with a room temperature of 18°C is not the same as adjusting it in summer with a temperature of 30°C. Ambient temperature directly affects idle temperatures and how quickly they rise under load. If you notice that your PC runs hotter and the fans kick in faster in summer, you might want to tweak the fan curve slightly.
Increasing the percentages by one or two points in the higher sections , or slightly advancing the point at which the fans switch to medium speeds, can help you compensate for these variations without having to completely redo the profile.
By carefully working with Smart Fan 5 profiles and, if needed, using utilities like FanControl or Argus Monitor , you can have a PC with consistent airflow, case and CPU fans tailored to your hardware and noise tolerance, without annoying spikes or soaring temperatures when gaming or rendering. Once you understand the relationship between sensors, PWM, RPM, and fan placement, fine-tuning these details ceases to be a headache and becomes a fairly simple way to customize your system exactly to your liking.


Passionate writer about the world of bytes and technology in general. I love sharing my knowledge through writing, and that's what I'll do on this blog, show you all the most interesting things about gadgets, software, hardware, tech trends, and more. My goal is to help you navigate the digital world in a simple and entertaining way.