- Partitioning without formatting allows you to reorganize the disk while keeping your files intact.
- Disk management covers basic tasks, but has limitations when moving and extending partitions.
- Third-party partition managers offer advanced resizing and conversion between MBR, GPT, and dynamic disks.
- If something goes wrong during partitioning, data recovery tools can rescue much of the information.
Partitioning a hard drive in Windows without losing a single file is something that scares many people, especially when the operating system and all the data are stored on a single, enormous drive, as is the case with many older installations. Imagine having a 2 TB C drive full of programs, games, documents, photos, and so on, and wanting to isolate Windows into about 100 GB to clone it to a new M.2 drive without having to move terabytes of data or reinstall everything from scratch. It sounds complicated, but with a good understanding of Windows tools and some specialized software , it can be done in a fairly controlled manner.
This guide will show you how to partition your current hard drive and prepare a new one for Windows to boot from, without formatting the entire disk and keeping your data safe. You'll learn methods using the native Disk Management tool and advanced third-party partition managers, the limitations of each option, the risks involved (such as converting a basic disk to dynamic or exceeding the maximum number of partitions), and how to handle typical situations in Windows 11, 10, 8.1, 8, 7, and even older systems like XP or Vista.
What does it really mean to partition a hard drive without deleting anything?
Partitioning a hard drive involves physically dividing the drive into several logical areas (partitions) that Windows will treat as independent disks: C:, D:, E:, etc. As Wikipedia defines it, it's about creating several areas on a physical drive and managing them separately. This can be done on both traditional hard drives (HDDs) and SSDs and M.2 NVMe drives.
When we focus on partitioning without formatting , we aim to change the size or structure of partitions (for example, shrinking C: to create a new partition with the remaining space) without deleting existing data. This involves operations such as resizing, moving, splitting, or merging partitions, and in some cases, converting the partition type or even the disk type (MBR/GPT, basic/dynamic) with the least possible impact on files.
The most common reason for repartitioning is to separate the operating system from the data. Having Windows and system programs on one partition (for example, 100 GB) and your documents, games, downloads, and backups on another makes reinstalling much easier, simplifies selective backups, and helps keep everything more organized.
Furthermore, the system partition often needs adjustments over time : expanding it when it becomes too small, shrinking it if you have extra space, creating a new partition for another operating system (dual boot) or for data, changing drive letters, etc. All these tasks can be done with varying degrees of ease depending on the tool you use.
On brand-name (OEM) computers, the scenario is different : they usually come with several additional hidden partitions, such as a boot partition, a system partition, and a recovery partition. Windows 7, for example, also creates a small, hidden, reserved partition without a drive letter. This means that, out of the box, many computers already have 3 or even 4 partitions created on the main hard drive.
Partition types and partition limits in Windows
Before you start creating and shrinking partitions, it's important to understand what types of partitions exist and what limits Windows imposes, especially on disks with an MBR partition table (very common in older computers):
Primary partition : This is the classic partition where an operating system can be installed. On MBR disks, Windows allows up to four primary partitions. Each can contain an operating system or regular data, but only one will be the active boot partition in BIOS/MBR systems.
Extended partition : This is a special partition that doesn't directly contain an operating system, but instead acts as a container for multiple logical drives. Typically, a single extended partition is created, and within it, as many logical drives as needed. This allows you to overcome the limit of four primary partitions on MBR disks, since you can have, for example, three primary partitions and one extended partition with several logical drives inside.
Logical drives : These are "internal" partitions that reside within the extended partition. From Windows' perspective, they appear as normal drive letters (D:, E:, etc.). The advantage is that if one logical drive becomes corrupted, it should theoretically not affect the other logical drives within the same extended partition, nor the primary drives outside of it.
On modern OEM systems, it's very common for the manufacturer to almost reach the four-partition limit on MBR disks: one for boot, one for the operating system, one or more for recovery, and sometimes one for utilities. This means that when the user tries to create a fifth primary partition from Disk Management, Windows will suggest converting the basic disk to a dynamic partition.
Converting a basic disk to a dynamic disk has a critical consequence : if you do this on the disk where Windows is installed, the system may stop booting correctly, and you will no longer be able to manage certain boot operations in the same way. Therefore, if you see Windows offer to "convert to dynamic disk" when creating a new partition, it's advisable to stop and carefully review the partition structure before accepting anything.
Why partition a hard drive without formatting in Windows
The reasons for partitioning a new or existing disk without formatting it are usually quite similar for most users, both in Windows 11 and 10 as well as in older versions (8.1, 8, 7, XP or Vista):
Make better use of disk space : Dividing a large disk into several logical drives helps to better organize your data. For example, you can dedicate one partition to Windows and programs, another to games, another to documents, and another to backups. This way, everything isn't mixed together in a single, disorganized space.
Upgrading or changing the operating system : If you want to install another Windows installation alongside your existing one (dual boot) or even Linux, you need to create one or more additional partitions without overwriting your current installation. This involves shrinking an existing partition to free up unallocated space.
Changes in computer usage : Sometimes the way you use your computer changes over the years. Perhaps at first you only had documents and some multimedia, but now you play games a lot, edit video, or work with virtual machines. Partitioning your disk allows you to reallocate space according to your new needs.
Greater security for personal data : Many people prefer to keep their important data on a separate partition from the system. This way, if Windows needs to be formatted or reinstalled for any reason, the data partition remains intact. This doesn't replace an external backup, but it helps minimize the risk of data loss during routine reinstalls.
Regarding performance, it's worth clarifying something: Windows slowness is rarely caused by partition size or by programs and data being mixed together. The problem is usually too many third-party programs and services starting with the system, background processes consuming memory and CPU, or even old, fragmented hard drives. Partitioning can help declutter, but it's not a magic bullet for a slow PC.
Partitioning a new hard drive in Windows (with no data yet)
If you've just installed a new drive, such as a 4TB M.2 to use as a boot drive , the first step is to initialize it and then create the partitions you need. On an empty drive, the process is simpler because there's no data to protect.
Windows includes the Disk Management tool, which allows you to initialize and partition new disks. You can also use third-party partition managers that simplify some steps and add extra features, but on a newly installed disk, the Windows utility is usually sufficient.
The typical workflow for a new disk in Windows 10 and 11 is:
Initializing the disk : When Windows detects a new, uninitialized disk, a wizard appears asking you to choose between MBR (Master Boot Record) or GPT (GUID Partition Table). On large disks, especially those over 2 TB, GPT is usually recommended, particularly if your motherboard and boot configuration use UEFI.
To create new partitions : In the unallocated space of the new disk, right-click and choose "New Simple Volume." The wizard will ask you for the partition size, drive letter, and file system (usually NTFS). You can repeat this process several times to have, for example, a 100 GB partition for Windows and the rest for data or games.
If you prefer more advanced management (for example, defining alignments or directly creating system-reserved partitions), third-party software like EaseUS Partition Master can guide you step by step. These tools also allow you to convert the partition scheme or adjust the size later more flexibly than the built-in utility.
Partitioning an existing hard drive without formatting (keeping the data)
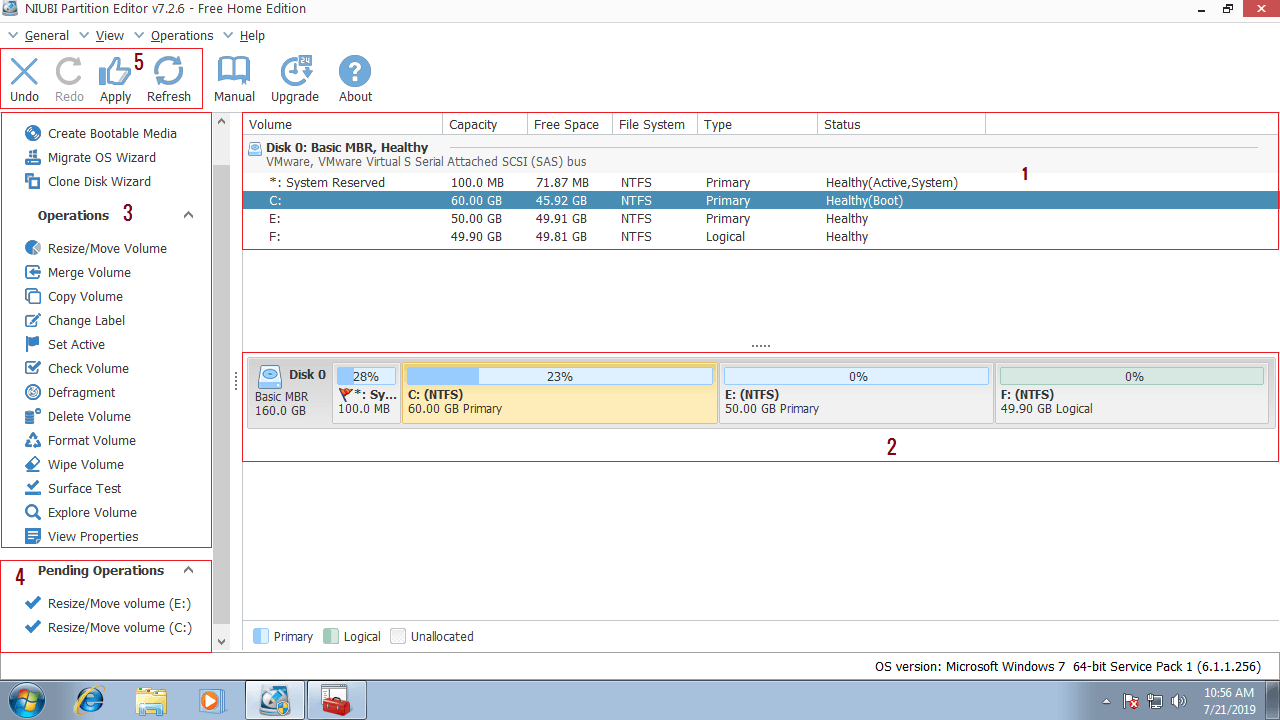
The most delicate situation arises when you want to modify the partition where Windows is already installed and where all your programs and files are located, such as a 2 TB C drive that has been your "everything drawer" for years. The goal might be to leave only the operating system in about 100 GB, create a new partition for data, or prepare the way to clone that part of the system to the new M.2 drive.
In this case, the general process involves shrinking the existing partition and creating new partitions with the freed space. Windows offers this possibility with Disk Management, but it has several important limitations: it cannot always shrink to the desired size, and it does not allow moving partitions or using unallocated space that is far from the partition you want to extend or modify.
The basic steps in Disk Management for a data disk are:
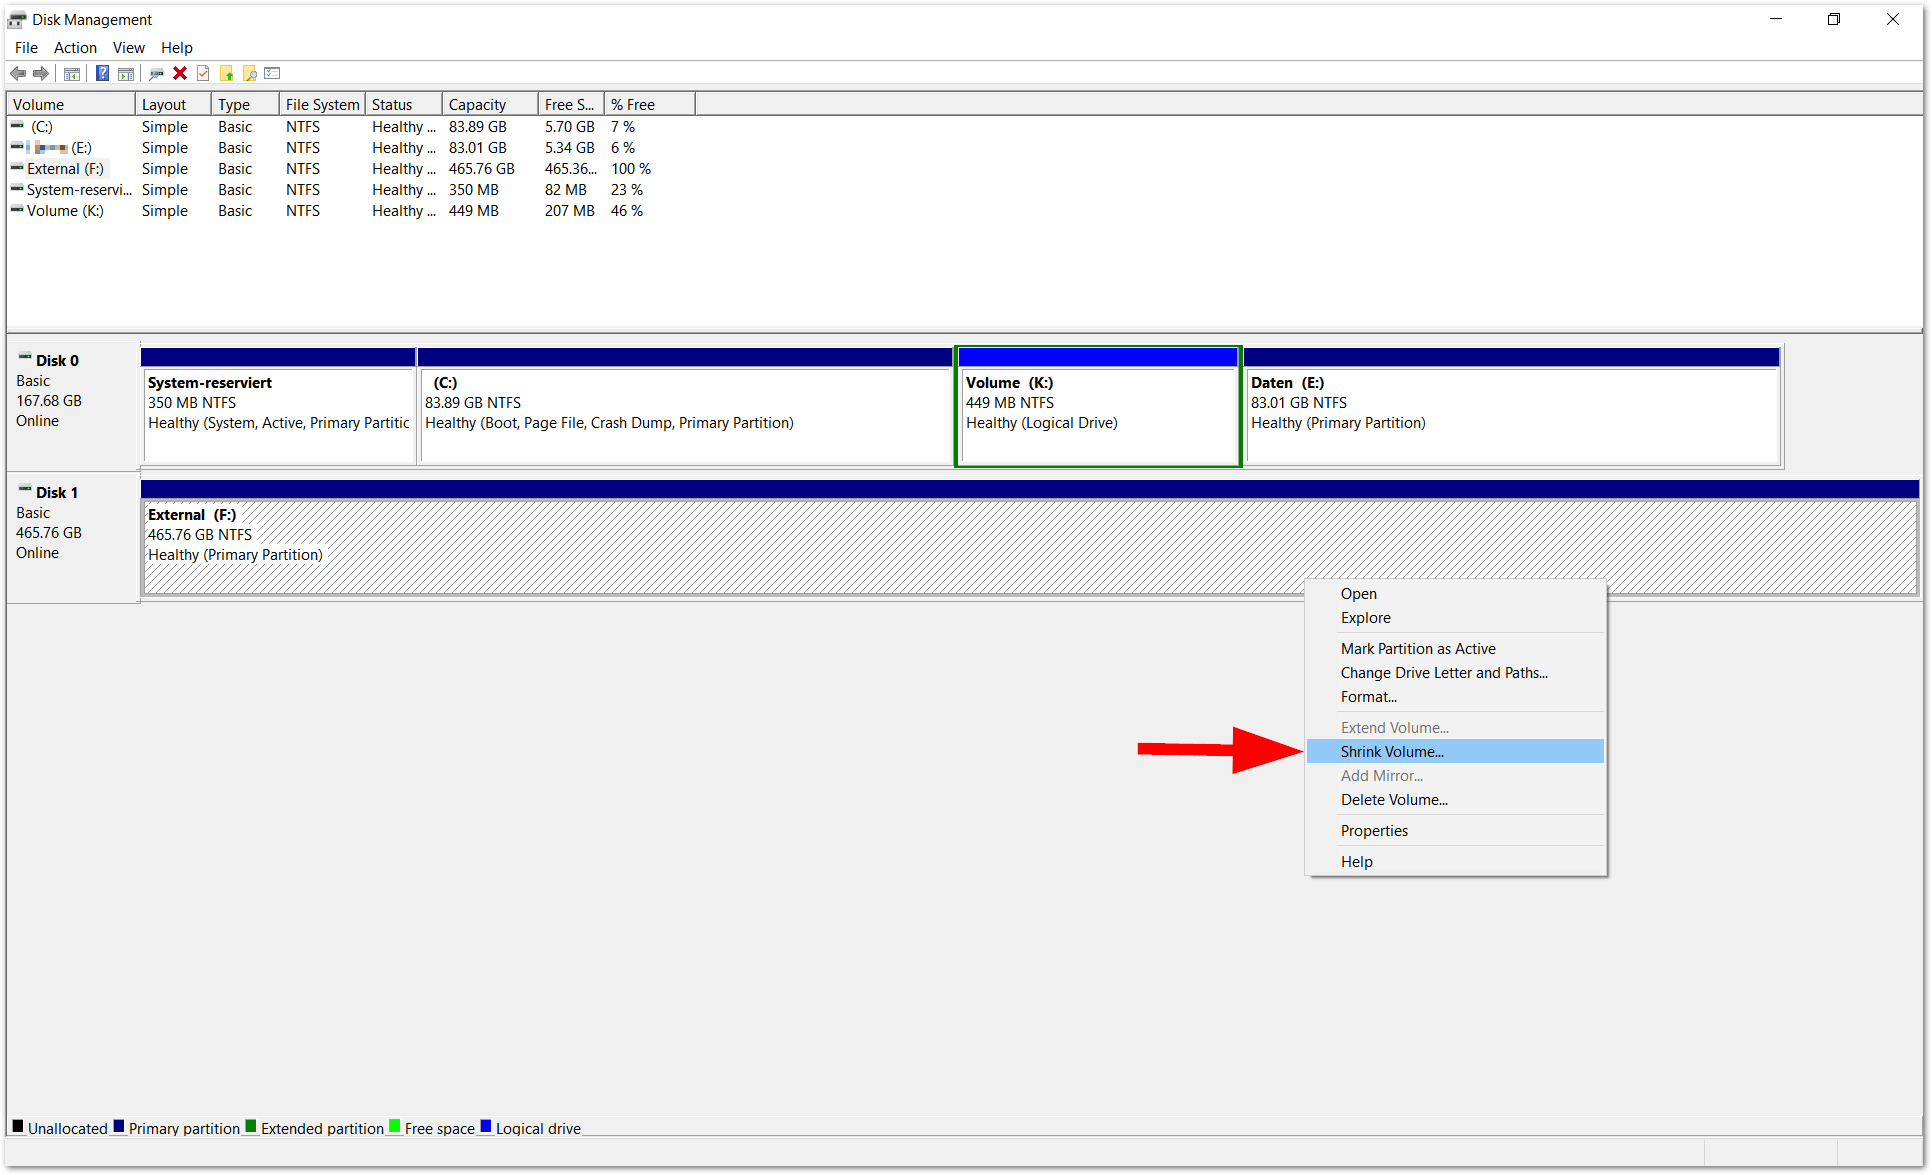
Open Disk Management : Just like before, right-click on “This PC/My Computer” → “Manage” → “Device Manager” → “Disk Management”, or by using the command diskmgmt.msc from the Run window.
Choose the partition to shrink : Locate the drive (for example, C:) that you want to shrink. Right-click on it and choose "Shrink Volume". Windows will analyze the partition to determine how much space can be freed.
Define the shrink size : In the box that appears, specify in MB how much you want to shrink. This is where problems often arise: due to immobile files (such as the page file, hibernation files, or certain system metadata), Windows may tell you that it can only shrink a portion of the partition, even if you seemingly have plenty of free space.
Create a new partition in the unallocated space : After shrinking, you'll see "unallocated" space to the right of the original partition. Right-click on that space and select "New Simple Volume" to create the new drive, assign it a drive letter, and format it as NTFS.
If your goal is to keep Windows and essential files in about 100 GB and then clone only that portion to the new M.2 drive, you'll need to ensure that everything you want to keep is within that reduced partition. This involves manually moving a lot of data to another partition or drive before you begin, which can be tedious if you have several terabytes of data.
What Disk Management can and cannot do
The native Windows tool is very useful for basic partition management tasks , especially in Windows 10, 8.1, 8, 7, Vista and Windows Server 2008, where it includes features such as:
Shrink and expand volume : Allows you to decrease the size of a partition to free up unallocated space, and expand a partition if it has contiguous unallocated space right behind it.
Create, delete, and format partitions : You can create new simple volumes, delete them, and format them in the file system of your choice (usually NTFS). It also allows you to assign or change drive letters.
However, in Windows 2000/XP and Windows Server 2003, Disk Management capabilities are much more limited: basically creating, deleting, and formatting partitions, and changing drive letters. There were no convenient options for shrinking or extending existing partitions, which almost always forced users to resort to third-party solutions.
Even in modern versions of Windows, Disk Management has significant shortcomings:
It does not allow moving partitions : if the unallocated space is not directly behind the partition you want to extend, you will not be able to use it. There is no "Move Partition" function to reposition that space next to the desired volume.
You cannot extend the system partition in many scenarios : if the unallocated space is not contiguous to C:, or if there are recovery partitions in between, the "Extend Volume" button will appear disabled.
You cannot convert disks between MBR and GPT without loss : changing a disk from MBR to GPT (or vice versa) usually involves deleting all partitions, unless you use specific tools or advanced commands. Disk Management does not offer a convenient non-destructive conversion.
It does not convert dynamic disks to basic disks without deleting them : If you have accidentally converted a basic disk to dynamic, reverting without losing partitions requires specialized software. The Windows tool forces you to delete volumes.
It is not the best option for thorough repartitioning : when you want to completely redo the partition structure of a full disk, reorganize the partition order, merge, split, move and precisely adjust sizes, its limitations become very apparent.
Advantages of a third-party partition manager (such as EaseUS Partition Master)
For more complex operations, the most practical solution is to use professional partition management software , such as EaseUS Partition Master Professional or equivalent alternatives. These programs are specifically designed to safely (and conveniently) handle the tasks that the Windows tool doesn't adequately address.
Among the most useful advanced features that these types of managers typically offer are:
Resize and move partitions : You can not only resize a partition, but also move it left or right on the disk. This allows you to utilize unallocated space that is not contiguous to the volume you want to expand, something impossible with Disk Management.
Splitting and merging partitions : You can take a large partition and split it in two without losing data, or merge two adjacent partitions into one. This is very useful for reorganizing space without having to manually copy everything from one place to another.
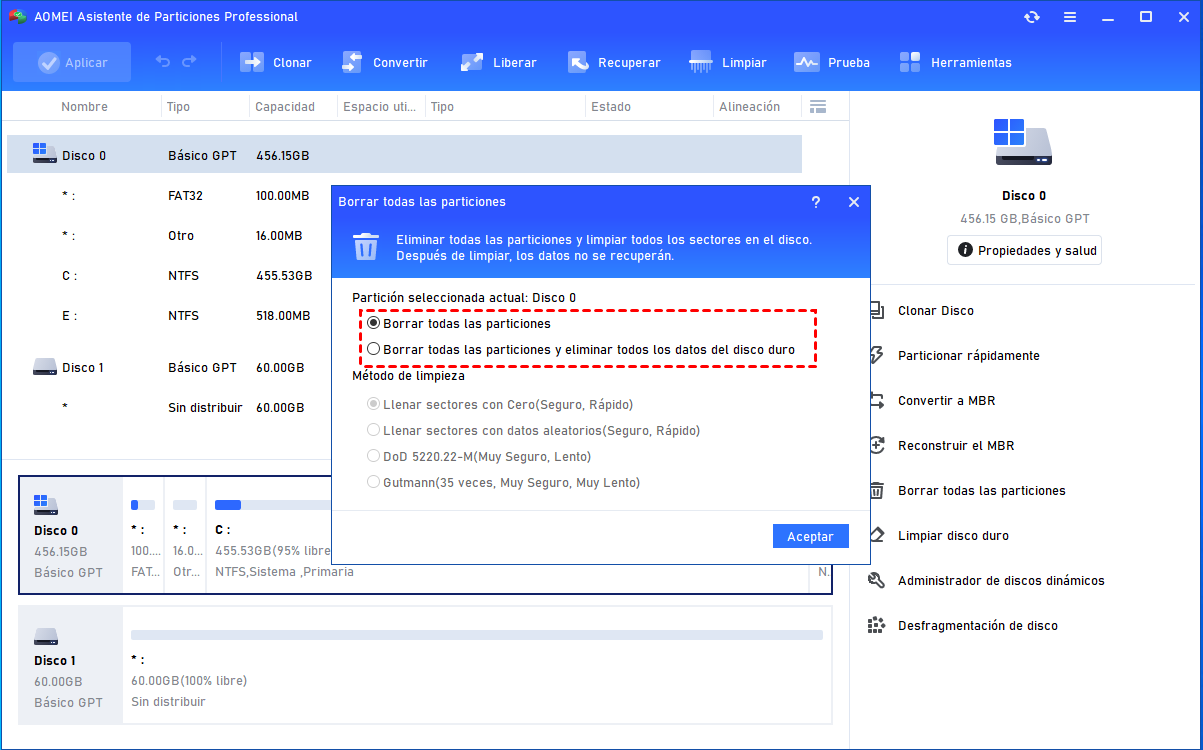
Working with dynamic disks, MBR and GPT : many partition managers allow you to resize dynamic disks, convert between MBR and GPT and even between dynamic and basic disks in some cases, keeping the data as long as the indicated steps are followed.
Extending partitions even when there's no free space immediately behind them : Because you can move partitions, you can bring unallocated space to the side of the partition you want to extend, and only then extend the volume. This is crucial when you have recovery partitions blocking the expansion of C: or another important drive.
In the specific context of partitioning a large C: drive to isolate Windows and then cloning only those 100 GB to an M.2 drive , a partition manager like this is almost essential if you don't want to spend hours manually reorganizing files. You can, for example, shrink C:, create a new partition for data, and move everything that isn't strictly system-related there, with more control and less risk of error.
Partitioning a hard drive with formatting using Disk Management
There are cases where partitioning with formatting isn't a problem , for example, on secondary disks that only contain minor data or on new disks where you haven't saved anything yet. In these cases, Disk Management is sufficient and the procedure is very straightforward.
To partition a new disk by formatting it from Windows 10 (also valid for Windows 11 and similar versions):
Open Disk Management : right-click on “This PC/My PC” → “Manage” → “Device Manager” → “Disk Manager”, or type diskmgmt.msc in the Run window.
Initialize if necessary : If the disk is not yet initialized, the wizard will appear asking you to choose MBR or GPT. Choose according to the disk size and your system's compatibility.
Create and format partitions : In the unallocated space, create a "New Simple Volume", specify its size, assign a drive letter, and choose a file system (NTFS, FAT32, exFAT, etc.). The wizard also allows you to label the volume (drive name) before formatting it.
If you're reorganizing an existing disk instead of installing a new one, and you plan to delete a partition , remember that all the contents of that partition will be lost when you delete or format it. Therefore, before doing anything to disks containing data, it's essential to have a backup on another storage device, even if it's just a temporary external drive.
Recovering data after a partitioning error (Wondershare Recoverit and similar)
Although the goal is to partition without losing data , there's always a chance of making a mistake: deleting the wrong partition, accidentally formatting a volume, or something going wrong during the process. In these situations, it's helpful to know about specialized data recovery tools like Wondershare Recoverit.
Programs of this type allow you to recover files from formatted disks, deleted or resized partitions , and even from drives in RAW state (when Windows no longer recognizes the file system). They are also usually compatible with multiple file systems: NTFS, FAT16, FAT32, HFS+, APFS, and others.
Some advanced recovery solutions incorporate deep scanning algorithms that analyze the internal structure of the disk sector by sector, searching for file fragments. This allows for the recovery of a very high percentage of data, even when the partition table has been manipulated. Products like Recoverit boast theoretical recovery rates of nearly 96% under optimal conditions.
The typical workflow with a recovery program after a partitioning problem is usually:
Select the affected disk or partition : Open the application (e.g., Recoverit), choose the disk or volume where the data disappeared during partitioning, and start the analysis.
Scan and preview files : The program scans the disk looking for deleted files or lost partition structures. In many cases, it allows you to preview documents, photos, or videos before recovering them to check that they are not corrupted.
Save the data to another disk : it is always advisable to restore recovered files to a different drive than the one you are trying to recover, so as not to overwrite sectors that may still contain useful information.
Although these types of tools are very powerful, they don't replace a prior backup . Ideally, you wouldn't need them; however, if something goes wrong during partitioning (especially when working without a backup, as sometimes happens due to budget constraints or lack of trust), they can be the only way to save your system.
In short, partitioning a hard drive in Windows without deleting anything requires a cool head, an understanding of how partitions work, and intelligent use of the available tools . Disk Management covers the basic needs of creating, shrinking, and formatting partitions in Windows 11/10/8.1/8/7, while third-party partition managers give you fine-grained control to resize, move, split, and merge partitions without formatting. This allows you to do things like isolate Windows in a 100GB area, clone only that portion to a new M.2 drive, or reorganize a full disk without losing data. And if something goes wrong, having reliable recovery software can save you from a monumental headache.

Passionate writer about the world of bytes and technology in general. I love sharing my knowledge through writing, and that's what I'll do on this blog, show you all the most interesting things about gadgets, software, hardware, tech trends, and more. My goal is to help you navigate the digital world in a simple and entertaining way.