- Premiere Pro allows you to transcribe the audio of your sequence and convert that transcription into independent, editable, and exportable subtitles.
- The combination of internal transcription and external SRT file import offers a flexible subtitling workflow adaptable to different projects.
- The SRT format facilitates corrections, multilingual versions, and the use of external services for subtitle design and translation.
- Premiere's built-in subtitling tool has limitations, so for complex projects it can be helpful to rely on specialized solutions.
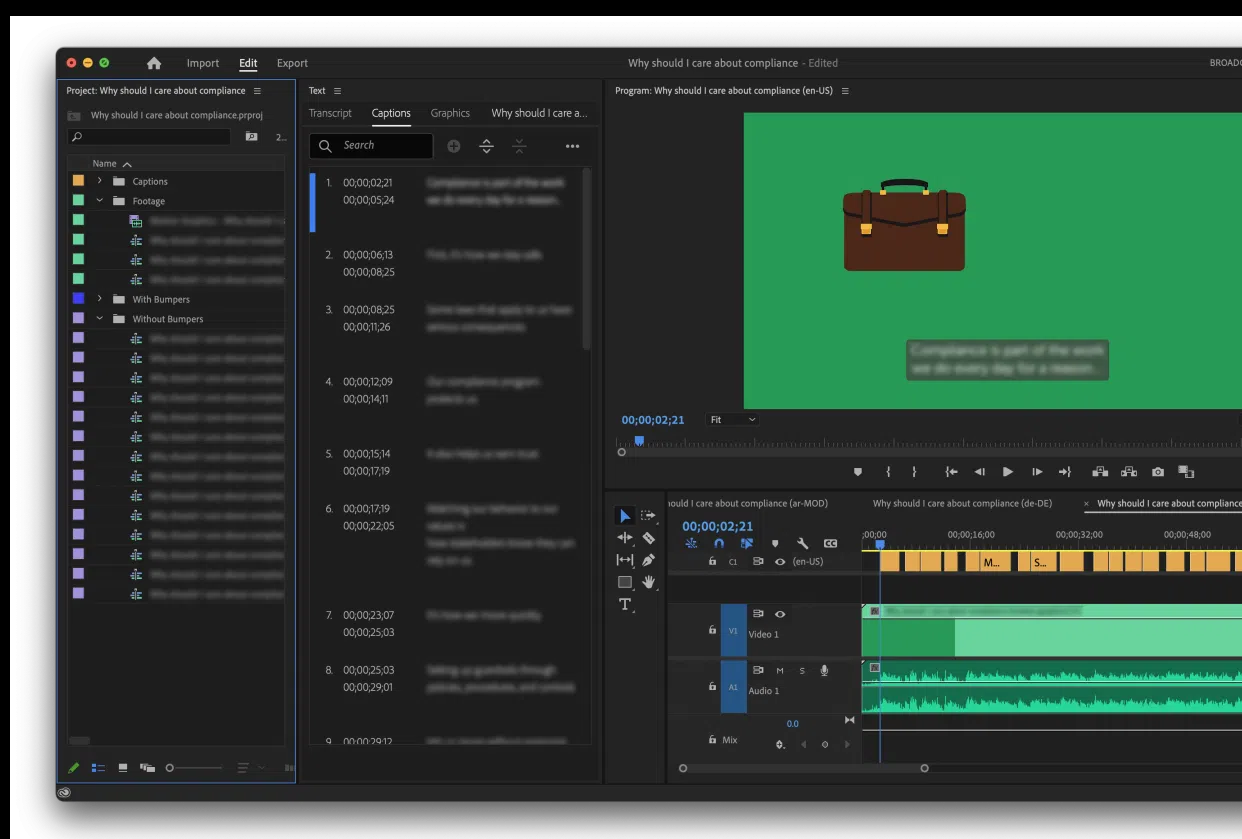
If you work with video, sooner or later you'll encounter the need to add professional subtitles to your projects . They not only improve accessibility but also increase the reach of your content on social media, video platforms, and even in corporate or educational settings. Adobe Premiere Pro includes a powerful subtitling tool that, combined with SRT files, allows for a fast and highly accurate workflow.
In the following lines, we'll see, step by step and in great detail, how to generate SRT subtitles from a transcript in Premiere Pro , how to import them from external tools like Capte, what limitations the system has, and what tricks you can apply to make the final result easy to read and manage. We'll do it in clear, straightforward language, without leaving out any important aspect of the process.
What are SRT subtitles and why should you care?
The subtitles you see at the bottom of the screen aren't just plain text: they actually come from files like the classic SRT (SubRip Subtitle) format . This type of file is basically a plain text document containing three key elements: the number of each subtitle, the in and out timecode, and the content of the phrase displayed on the screen.
Thanks to this timing information, the video player or editing application knows when each subtitle line should appear and for how long . An SRT file can be opened with any text editor, corrected on the fly, and easily saved again, making it a very flexible format both during editing and for later corrections.
In practice, subtitles serve a dual purpose: on the one hand, they facilitate access for deaf or hard-of-hearing people ; on the other, they allow you to watch videos in silence (something very common on social networks) and are a perfect support when the audio is in another language, the sound is mediocre or the viewing environment is noisy.
When we talk about Premiere Pro, we have two main ways to work with subtitles: generate them from an automatic transcription within the program itself , or import an SRT file already created with another external tool (such as Capte) to integrate it into the sequence and, if we want, customize its style.
How the workflow with transcription and subtitling works in Premiere Pro
Premiere Pro has included a fairly polished system for automatically transcribing audio and converting that transcription into subtitles for several versions now. It's important to understand two basic concepts: the transcription and the subtitles are separate entities, and the speech-to-text engine, while very good, isn't perfect, so you'll always need to double-check.
The standard process consists of three main stages: transcribing the audio from the sequence , editing and polishing the resulting text, and finally creating subtitles from that transcription. From there, you can refine them visually and temporally, and finally export them as "closed" subtitles (SRT sidecar) or as subtitles embedded within the video itself.
Keep in mind that Premiere Pro doesn't treat a transcript the same way it treats final subtitles. Once you generate subtitles from a transcript, any edits you make to the transcript won't be reflected in the subtitles , and vice versa. That's why it's crucial to thoroughly clean up your text before clicking the "Create Subtitles" button, unless you're certain you'll be working exclusively on the subtitle track afterward.
It's also worth noting that, starting with version 23.1, you can no longer select more than one audio track at a time for analysis . If your project has vocals spread across multiple tracks, the simplest solution is to mute the ones you don't need and use the "Mash" analysis option, which combines the remaining audio to generate the transcript.
Transcribe the dialogue from your sequence in Premiere Pro
The first real step in generating subtitles in Premiere Pro is to create a transcript of your audio sequence. It's recommended that the editing is already finished or nearly complete, because any significant changes to the timeline afterward can throw off the synchronization between the transcript and the video.
With the sequence active in the Timeline, open the Text panel (Window > Text) . Within this panel, you'll find a section specifically for the transcription process. Click the "Transcribe Sequence" button, and the settings window will open, where you can define how you want Premiere to analyze the audio.
In the "Create Transcript" window, you'll see an option called something like Audio Analysis , with several possibilities. Generally, you'll want these two: "Mix all clips in the timeline" (which mixes everything playing in the sequence) or "Specific audio track," if you know the voice is clear and concentrated on a single channel.
If your project has multiple audio tracks (for example, interviews, backing vocals, or dialogue effects), remember that recent versions of Premiere don't allow you to select multiple tracks simultaneously for analysis . The most practical workaround is to mute the tracks you don't need, leave only the main dialogue tracks active, and use the "Mix" option to have the program generate the transcript from the resulting mix.
If multiple people are speaking in your video, you can enable the option to have Premiere identify the different speakers . This way, the program will attempt to separate the text by speaker. In any case, you can always edit the names later and merge them or adjust them manually in the transcript itself.
Once you have those settings under control, click on "Transcribe." The time the process takes depends on the length of the video and the complexity of the audio, but as a general guideline, transcription usually takes about half the length of the footage : a two-minute video, for example, could be transcribed in around a minute.
Review and correct the transcript before generating subtitles
When Premiere finishes analyzing the audio, the result appears in the "Transcribe" tab within the Text panel . Here you'll see the complete text that the system has detected, divided into blocks associated with specific moments in the timeline. This transcription will be the basis for generating the subtitles, so you'll want to make it as clean as possible.
There's a crucial detail: for Premiere Pro, transcripts and subtitles are two separate data sources . When you convert the transcript to subtitles in the next step, there won't be a dynamic link between them. If you edit the text on one side later, the other won't automatically update. That's why it makes a lot of sense to invest time now in polishing the text before moving on to the subtitling phase.
Speech analysis is still an automated process that has to deal with accents, dialects, speech rhythms, unclear pronunciations, and background noise. It's perfectly normal for the transcript to contain punctuation errors, truncated sentences, misunderstood words, or capitalization issues. Manually adjusting all these details will be key to ensuring the resulting subtitles read smoothly.
One of the advantages of the Text panel is that, as you move the cursor through the transcript, the playhead in the timeline moves to the corresponding point in the video . And vice versa: if you play the sequence, you'll see the corresponding audio segment light up in the list. This greatly speeds up the proofreading process, because you can review phrase by phrase without getting lost in the timeline.
In this phase, focus on standardizing style (for example, accents, proper nouns, number formatting), correcting grammatical and spelling errors, and slightly adjusting sentence structure if you see that the AI has broken or joined sentences in an unusual way. The more refined the text is at this stage, the less work you'll have later tweaking individual subtitles one by one.
Create subtitles from the transcript
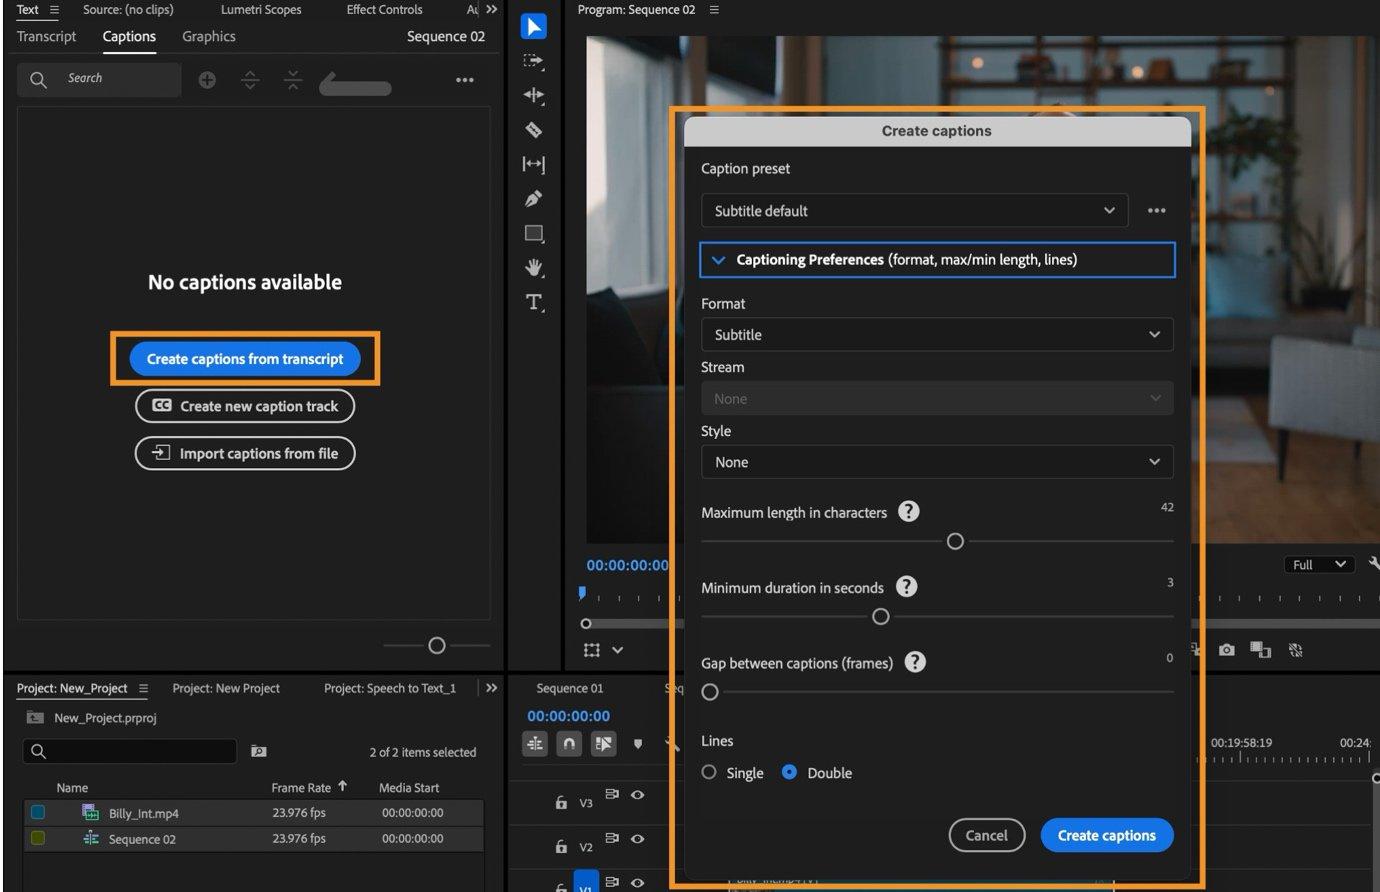
Once you're happy with the transcript, it's time to generate the subtitles. In the Text panel, on the Transcription tab, you'll see a button with a CC (subtitles) icon or an option like "Create subtitles." Click it, and a settings window will open where you can define how the subtitles will be created.
In this pop-up window, Premiere offers a default preset, usually labeled something like "Default Subtitles ." For most simple projects, it's recommended to leave this preset as is, since it comes with reasonable settings for duration, lines per subtitle, and other common parameters.
If you've previously configured a custom subtitle style (for example, a specific font, color, background, and size), you can select it from the "Style" dropdown menu. Remember that these styles must be imported and available within the project to appear in the list. This is a good way to maintain a consistent visual identity across all your videos.
Unless you have very specific needs (such as splitting the text into more lines or reducing the maximum duration of each block), at this point you can accept the default settings and click "OK" . Premiere will create a new subtitle track in the timeline and generate a subtitle clip that runs throughout the entire sequence with the text based on the transcript.
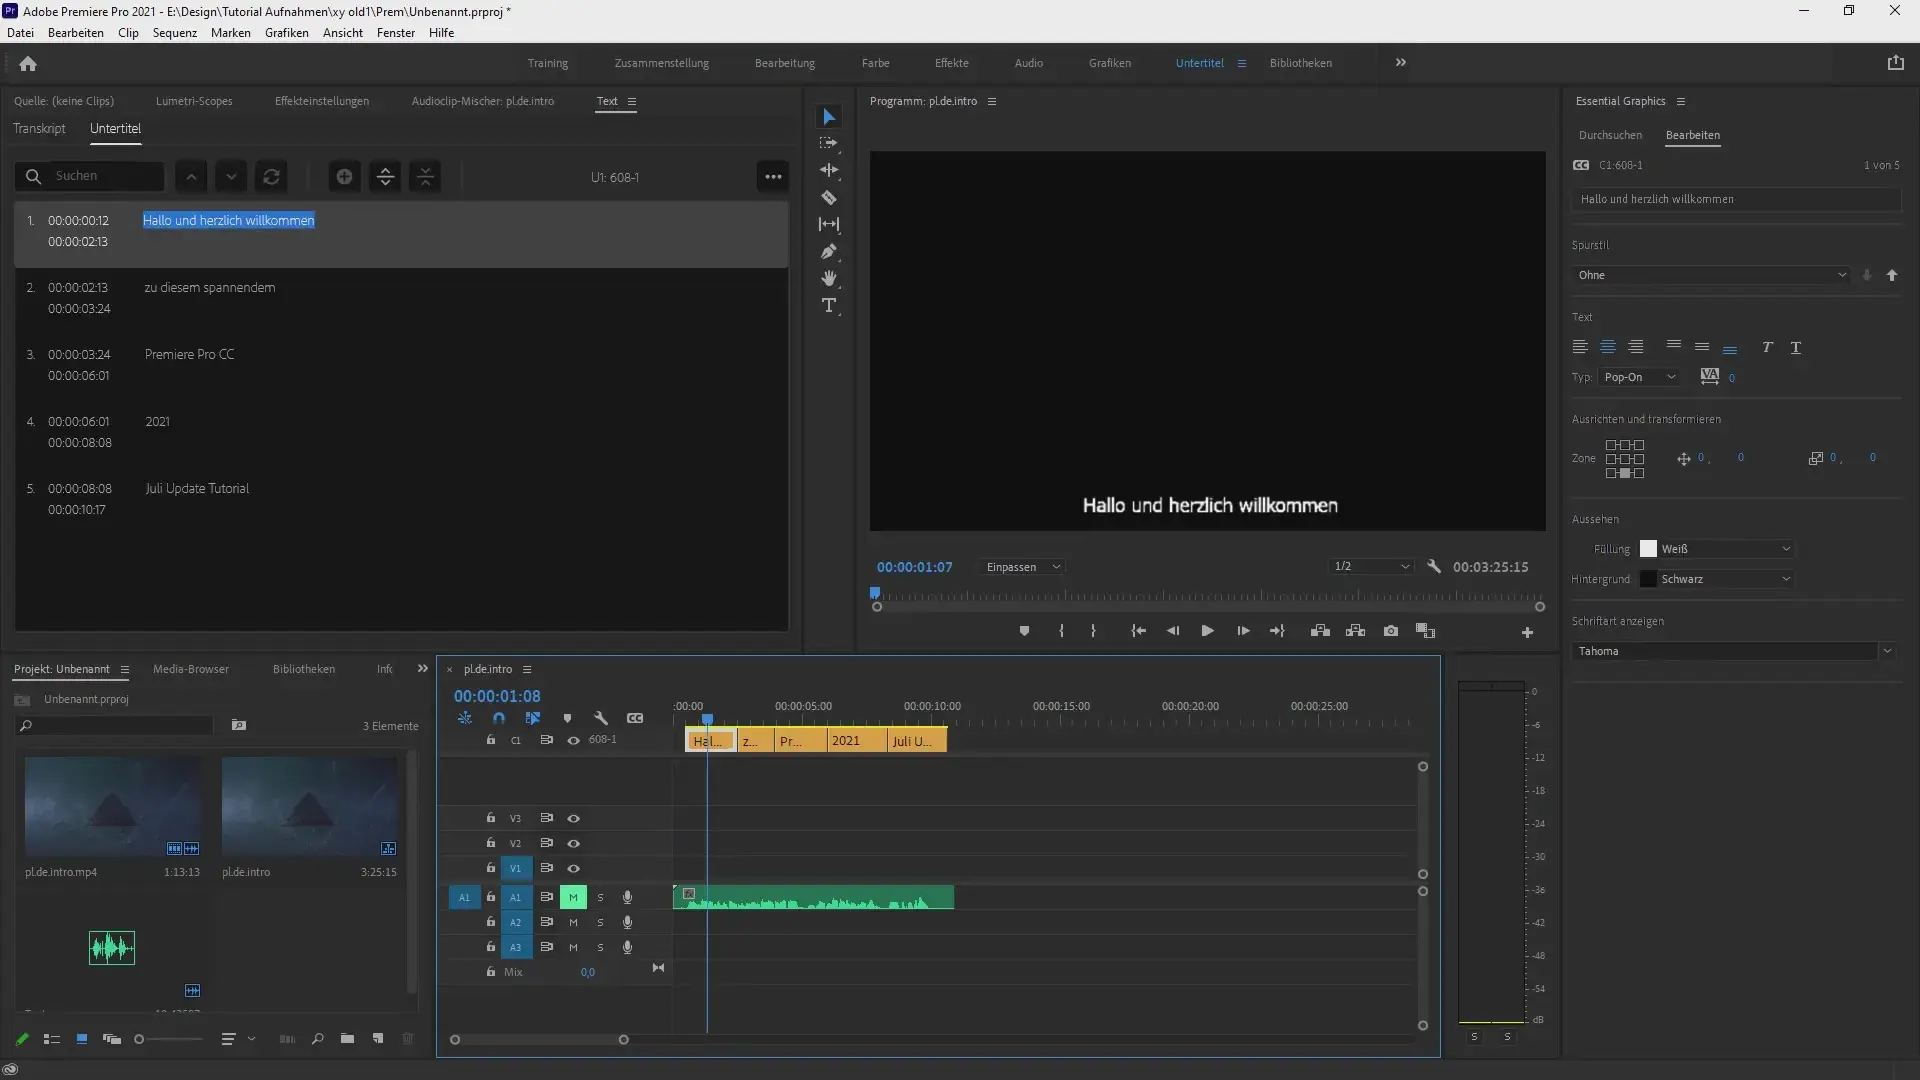
When you return to the Timeline, you'll see that track at the top of the sequence. Each block of text will be an independent subtitle clip, with its own start and end points, which you can move, trim, or adjust just like you would with a regular video or audio clip. This flexibility will allow you to fine-tune the timing later.
Fine-tuning: Cleaning and enhancing subtitles in Premiere Pro
With the subtitle track created, the "fine-tuning" phase begins. This is where you'll need to review, step by step, how those phrases are displayed on screen, whether they're properly timed, and whether the line and block divisions improve readability and comprehension . A subtitle that's too long or poorly structured can be difficult to follow, even if the text itself is perfect.
In the "Subtitles" tab of the Text panel, you can adjust line breaks within each subtitle , merge two blocks that are too short, split one that is too long, or edit the text directly in each element. Changes made here will only affect the subtitles, not the original transcript.
Remember, once you create the subtitles, any text changes here will no longer affect the transcript . This is important if you need to export a separate text file with the transcript that exactly matches what's displayed on screen. In that case, it's best to complete all essential adjustments before converting the transcript to subtitles.
In the timeline, you can modify the duration and the in and out points of each subtitle clip by dragging its edges, just like with any other clip . This allows you to better synchronize the moment the text appears with the start of the spoken sentence, and adjust the fade-out so the viewer has enough time to read, but without leaving the subtitle on longer than necessary.
Regarding the visual aspect (typography, size, text color, background color, outline, etc.), it's important to distinguish between "closed" and "open" subtitles. In most cases, when you generate an SRT sidecar file, the final style of the subtitles depends on the player or platform where the video is viewed, not Premiere. In other words, YouTube, VLC, or a television can apply their own style to the SRT text.
If you want complete control over the aesthetics because you need subtitles with a very specific design (for example, in the style of certain viral content, with color blocks, large fonts, or highlighted words), then you should work with open or "burned" subtitles . In this case, the text behaves like a graphic embedded in the image, just like a title or label, and the viewer cannot turn them on or off.
Export SRT subtitles or embedded subtitles from Premiere Pro
Once you have your subtitle track ready, it's time to export the result. In Premiere Pro's export window , you'll see a specific section for managing subtitles. It's important to check the corresponding box so that the subtitles are actually included in the final file , because if you uncheck it, they'll only remain within the project.
Within the subtitles section of that window, there are two main options. If you want to create an SRT sidecar file to upload alongside the video (for example, to YouTube, Vimeo, an e-learning platform, or a corporate player that supports closed captions), you should choose something like "Sidecar File Created." This way, Premiere will export the video separately from the SRT file containing the timestamps and corresponding text.
If, on the other hand, you prefer that the subtitles be integrated into the video itself and not depend on the user activating them, select the " Record subtitles in video" option . In this case, the program will render the text directly onto the image, resulting in a single video file with embedded subtitles. This is common for social media content, advertisements, or any piece where you want a very specific subtitle design.
The choice between a separate SRT file or embedded subtitles will depend on your needs. For platforms that require multiple languages or configurable accessibility, an SRT file is almost essential . For social media campaigns, where you want to ensure the message is readable even with the sound off and with a striking visual style, many creators choose to burn the subtitles directly into the video.
Import and use external SRT files (e.g., from Capte)
Instead of generating the transcript within Premiere Pro, you can also start with an SRT file created using an external service. Tools like Capte allow you to upload your video, automatically recognize speech, and download an SRT file with the subtitles already synchronized. This workflow is useful if you prefer to leave that part to a dedicated subtitling solution.
Once you have your SRT file ready, integrating it into your project is very simple. In Premiere Pro, go to File > Import and select the SRT file generated by the external tool. The file will appear in your project panel as just another element, just like a video or audio clip.
Next, drag that SRT file from the project window to the timeline and drop it onto the sequence. Premiere will automatically create a new subtitle track with the SRT's content , including the predefined timestamps. If you're using the same video clip you uploaded to the external tool, the subtitles should be synchronized from the start.
Once placed, you can select the subtitle track and apply styles within Premiere to change the font, size, color, or position, although always keeping in mind that if you then export as an SRT sidecar, the final style will depend on the platform where the file is played.
The SRT format has several important advantages: being plain text, it is easy to edit at any time (if you detect a last-minute typo, you can open it in a notepad, correct it and re-import it); it allows you to manage multiple subtitle tracks for different languages; and it facilitates collaboration with translators, accessibility departments or external agencies.
Advantages of working on style and translation with an SRT
One of the advantages of the SRT file format is the great freedom it offers when managing versions and styles . If you want to offer your video in multiple languages, you can create copies of the original SRT and translate each line, maintaining the same timecodes. Tools like Capte even offer automatic translation into several languages, so you can generate multilingual versions of your subtitles in just a few minutes.
Furthermore, SRT is a great fit for workflows where you need to experiment with subtitle design. Even though it's a simple text file, you can combine it with online tools that apply advanced styles (text color, backgrounds, special fonts, bold, italics, etc.) and then export the final video with those subtitles already embedded, without needing to go through Premiere.
If you're looking for a look similar to some digital media outlets that use highly visible subtitles with solid backgrounds and highlighted text (like the popular Brut videos), you can use these services: upload the SRT file, choose the style, adjust the on-screen position, and download the clip with the subtitles embedded in the video. This approach is especially convenient when you need a large volume of subtitled content for social media.
Therefore, nothing prevents you from combining both worlds: using Premiere Pro to assemble the video, Capte (or another similar tool) to quickly generate and translate the SRTs, and then deciding on a case-by-case basis whether to import them into Premiere to integrate them into a more complex edit or burn the subtitles directly into the external tool.
Limitations of Premiere Pro's subtitling tool
While very useful, Premiere Pro's built-in subtitling feature has certain limitations that are worth being aware of . For complex projects with multiple languages, strict accessibility requirements, or large volumes of footage, you may find it more efficient to use professional subtitling services.
The first limitation lies in the accuracy of automatic transcription itself. While Premiere does a good job, it's still an automated system prone to errors with proper names, technical terms, strong accents, or background noise. In contexts where text accuracy is critical (for example, legal or highly technical academic content), you might want to validate the transcription with a human translator.
Another restriction relates to advanced style management . As mentioned, if you're working with closed subtitles (SRT sidecar), the final visual style is determined by the player, not Premiere. This means you don't have complete control over how the end user will see these subtitles unless you choose to burn them into the video, which eliminates the ability to enable or disable them.
It's also worth noting that, starting with certain versions, it's not possible to select multiple audio tracks simultaneously for analysis , which can be a drawback in productions with dialogue spread across different channels. This can be worked around by muting and remixing, but it's still a somewhat manual solution if you have a very large project.
Finally, Premiere isn't designed as a massive subtitle manager for hundreds of videos with multiple language and format variations. In such situations, it's usually more efficient to rely on external subtitling platforms that offer automation, version control, approval workflows, and dedicated tools , and only integrate the final output (as SRT files or embedded subtitles) into your editing pipeline.
Even so, for most creators, small production companies, freelance professionals, and marketing teams, Premiere Pro's subtitling feature more than adequately covers day-to-day needs and integrates very naturally with the rest of the editing workflow.
By combining Premiere's internal transcription with external SRT files, services like Capte, and a little care in proofreading, it's possible to set up a fast, flexible, and high-quality subtitling system , capable of adapting to both simple videos for networks and more elaborate productions where you need to control the synchronization and presentation of each subtitle line in detail.


Passionate writer about the world of bytes and technology in general. I love sharing my knowledge through writing, and that's what I'll do on this blog, show you all the most interesting things about gadgets, software, hardware, tech trends, and more. My goal is to help you navigate the digital world in a simple and entertaining way.