- Docker allows you to run containers on remote servers, offloading the heavy lifting from your local machine and centralizing deployment.
- Docker Compose simplifies the orchestration of multiple services into a single file and makes it easy to update on servers. Linux and panels like Plesk.
- Tools like GitHub Actions, Portainer, Plesk, and Docker Desktop with WSL 2 help automate and manage remote containers more conveniently.
- It is possible to encapsulate even complete graphical applications in containers and access them via a browser using VNC/noVNC and web servers like Caddy.
If you're new to Docker and struggling with how to deploy your containers to a remote server , don't worry: it's a very common question. Between Docker, Docker Compose, SSH deployments , GitHub Actions, Plesk, Docker Desktop, Portainer… the sheer number of options can be overwhelming, especially if you're used to running everything manually with a few `docker run` commands on your local machine.
In this article, we'll walk you through, step by step, the different ways to run Docker containers on remote Linux or Windows servers , how to automate deployment with Docker Compose and CI/CD, and what alternatives you have if your computer is underpowered and you'd prefer to let the cloud handle all the processing. You'll also see complete examples with Node.js, web applications, and even remote graphical environments within a container accessible from a browser.
Basic concepts: local containers vs remote containers
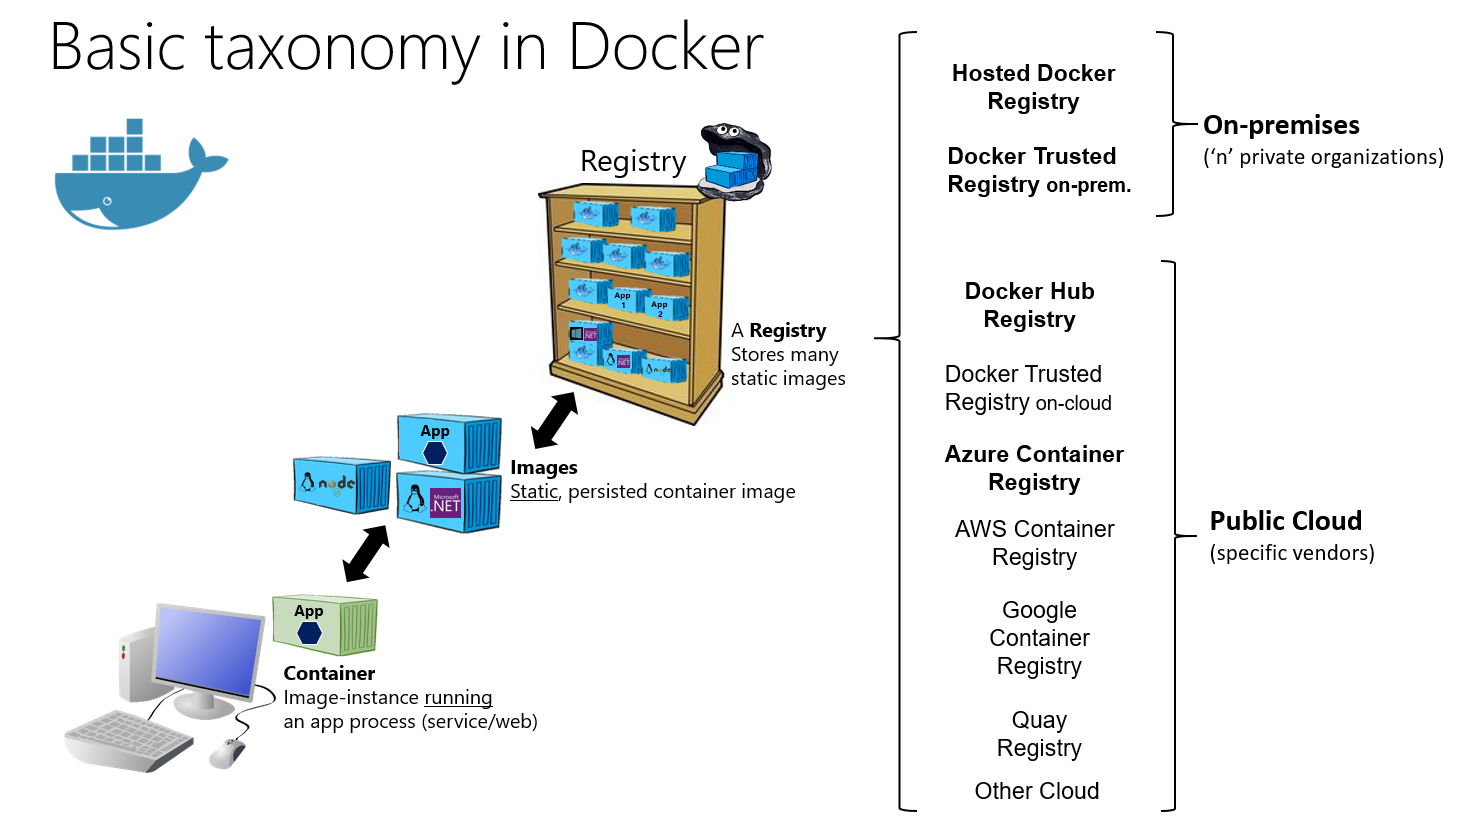
Before getting down to business, it's important to understand that a Docker container always runs where the Docker engine is located : if your remote server has Docker installed, your containers will run there; your laptop will only act as a client to send images and commands (via SSH, Docker API, or tools like GitHub Actions, Plesk, or Portainer).
From a resource perspective, this is exactly what you're looking for if you have a low-powered machine: you can develop lightweight code locally and run the "heavyweight" containers on a remote server , which provides the CPU, RAM, and disk space. Your machine only needs a Docker client, a browser, and, if you want, an editor like VS Code.
This diagram highlights a key element: how you connect to the remote Docker engine . There are several possibilities: accessing the server via SSH and running commands there, exposing Docker's TCP API (with TLS) for remote management, using dashboards like Plesk, using Portainer, or leveraging CI/CD workflows like GitHub Actions to initiate the deployment for you.
From docker run to Docker Compose on a remote server
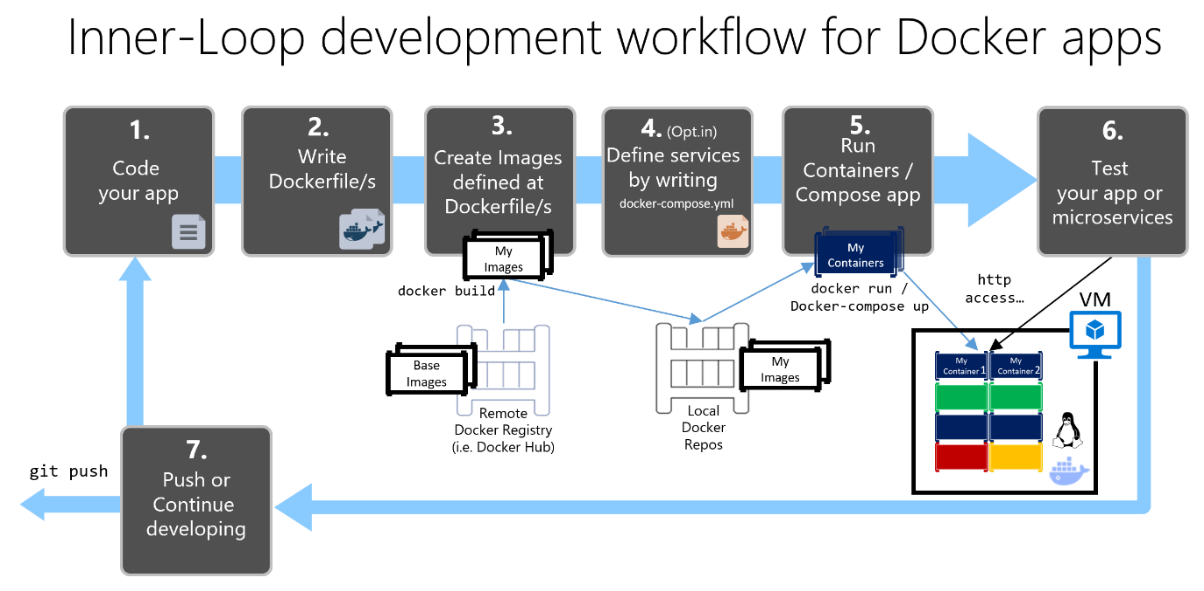
A very typical scenario is this: you have an app that you used to deploy with multiple `docker run` commands on a remote Ubuntu server, and now you've switched to Docker Compose to define all the services in a single file. The workflow is usually simple: every time you push to the development branch on GitHub, a GitHub Action is launched that connects via SSH to the server, cleans up the old containers, and starts the new ones.
The classic manual pattern is usually something like this: SSH connection to the server, downloading images from Docker Hub, stopping and removing old containers, and starting new containers with the appropriate ports for Nginx to proxy traffic. It works, but it becomes cumbersome as the application grows.
With Docker Compose the approach doesn't change that much, but it is simplified: ideally, the docker-compose.yml file live on the server (or clone the repo there) and, after doing cd to the project directory, launches docker compose pull y docker compose up -d --remove-orphansThis replaces the entire dance of dockerrun and ensures that the entire stack is recreated consistently.
To automate this with GitHub Actions, a very reasonable flow is for the workflow to make use of an action of Remote SSH (or configure a self-hosted runner on the server itself) and run the Compose commands there. If you have versioned both the code and the server itself. docker-compose.yml, all you need is one git pull on the server followed by the Compose commands to deploy the new version.
Create a remote server with Docker ready for deployment
The first step to working with remote containers is to have a server (physical, VPS, or cloud) with Docker installed . Many providers allow you to directly deploy images with Docker pre-installed, so in a few minutes you have a machine with the daemon ready to receive containers.
If you start with a clean VM, the usual process in Linux is to install the Docker engine and then, Install Docker Compose (In some distributions it's part of the package; in others you have to download the binary). On systems like Debian or Ubuntu you can use a curl to the official binary and give it execute permissions:
sudo curl -L 'https://github.com/docker/compose/releases/download/1.26.2/docker-compose-$(uname -s)-$(uname -m)' -o /usr/local/bin/docker-compose
sudo chmod + x / usr / local / bin / docker-compose
From here, with the Docker daemon running, you can clone your repository or upload the code via SCP/rsync and start running containers remotely. If your hosting provider has its own firewall (platform firewall), check that the ports your containers will expose are open.
Simple example: Dockerizing a Node.js app and deploying it
To see it more clearly, imagine a very basic application of Node.js with ExpressOn your development machine, create the project folder, and within it a subfolder. app, and that's where you start the project with npm init and install Express:
npm install express
The simplest code in a index.js It could be a "hello world" listening on port 3030. Locally, you start it with node index and you see the app in https://localhost:3030So far, nothing new.
The next step is create a Dockerfile in the app folder, where you define the base image (for example, node:12), the working directory, copy the code inside the container, install dependencies, and expose the port:
FROM node:12 · WORKDIR /usr/src/app · ADD . /usr/src/app · RUN npm install · EXPOSE 3030
It is also advisable to create a .dockerignore to prevent node_modules and other large directories are copied to the image. Once the image is defined, you can build and test it locally with docker build y docker run before you go to the remote server.
Orchestrating multiple services with Docker Compose
When your application is no longer just a Node backend, but includes frontend, API, database and perhaps auxiliary servicesNormally, they are all defined in one file. docker-compose.yml at the root of the project. Even if your actual example uses only one container, understanding Compose as an orchestration tool opens the door to more complete designs.
A minimal example of Compose for Express's "hello world" might look something like this: the version of Compose is specified, a service called Express that is built from the folder ./appThe internal port 3030 is mapped to the external port 3030, and the boot command is specified:
version: '3.8' · services: · express: · build: ./app · ports: – '3030:3030' · command: node index
This definition is transferred as is to the remote server. Once you have the project on the machine (cloned from Git or copied manually), simply install docker-compose, navigate to the project folder, and launch :
docker-compose-up
The first time will take longer because the base Node image and npm dependencies are downloaded. From then on, any future deployment is as simple as ` docker-compose up -d --build` to recreate the services without taking the app down for too long.
Exposing the application: ports, firewall, and Nginx
With the containers running on the remote server, you're still missing one important detail: ensuring that external traffic reaches the correct port . If your app listens on port 3030 and you don't have a reverse proxy, you need the server or cloud firewall to allow incoming connections to that port.
Many providers configure firewall policies at the control panel level (for example, in Cloudbuilder or Virtuozzo), where you create a rule to open port 3030/TCP and associate it with your server. On servers with a local firewall (ufw, firewalld, iptables), you will need to allow that specific port or, if you are using Nginx and only want to expose ports 80/443, configure Nginx as a reverse proxy to the container.
Once the port is open, you can access your app at https://SERVER_IP:3030 . In more complex environments, Nginx or Apache typically act as a reverse proxy on port 80/443 and redirect traffic to your internal containers (internally they may use high ports or even custom Docker networks).
If you manage the server with Plesk, some of this logic is integrated into the tool itself: proxy rules are defined in the domain's Nginx configuration, for example through directives in nginx.conf with /var/www/vhosts/system/$domain/conf/and Plesk takes care of that requests to the domain are passed to the correct container.
Manage remote containers with Portainer
For those who prefer a graphical interface, Portainer is a very interesting option. It's a web panel that runs in a container and connects to the Docker daemon (local or remote) to display containers, images, stacks, volumes, and so on, in a very visual way.
The basic installation on your server involves first creating a volume for the Portainer data and then running the container, exposing ports 8000 and 9000, and mounting the Docker socket:
docker volume create portainer_data
docker run -d -p 8000:8000 -p 9000:9000 –name=portainer –restart=always -v /var/run/docker.sock:/var/run/docker.sock -v portainer_data:/data portainer/portainer
After that, the panel becomes available on port 9000 of the server. You access it with your browser, create the administrator user for the first time, and then you can manage local containers or add remote nodes (using the Docker API or the Portainer Agent) to centralize the administration of multiple servers.
Once configured, you can see at a glance which containers are running, review logs , resources consumed, or create stacks using Docker Compose files without touching the command line.
Using Docker remotely with Plesk
If you use Plesk instead of managing the server directly, you have another way to manage Docker containers without leaving the control panel . Plesk supports Docker on several Linux distributions (CentOS 7, RHEL 7, Debian 10/11/12, Ubuntu 18.04/20.04/22.04/24.04, AlmaLinux 8/9, Rocky 8, etc.) and also supports remote Docker access from Plesk for Windows , provided you have the appropriate license.
From the Docker section of the panel, you can search for images both in the machine's local repository and in Docker Hub , select the specific version using tags, and launch containers with the configuration you need: environment variables, memory limits, port and volume assignments, restart policy, etc.
By default, Plesk can automatically assign ports , binding the container's internal port to a random port on the host (for example, 32768) and restricting access to localhost to keep it hidden from the internet. If you uncheck the "Port inaccessible from the internet" option, Docker exposes that port on all the host's interfaces, making the app accessible from outside.
The panel also allows you to mount server directories within the container (volumes) to achieve persistent storage that survives container recreations. Similarly, you can adjust environment variables, rename containers, recreate them with a different image version, save the current state as a new image, or even download a snapshot.
In addition to individual containers, Plesk supports Docker Compose stacks : you can go to Docker > Stacks > Add Stack, give it a project name, and choose whether to paste the contents of the Compose file, upload it from your computer, or select it from a domain's web space. From there, Plesk takes care of creating and managing the entire stack out of the box.
Remote Docker services and context switching with Plesk
Plesk not only starts containers on the server itself, but it can also connect to remote Docker engines . To do this, you must first configure the remote daemon according to the official Docker documentation, opening the TCP API and securing it with TLS certificates.
The typical process on the remote host involves creating a file /etc/docker/daemon.json with the right configuration, Generate .pem certificates for the server and the clientand modify the Docker service to start only after the network configuration is complete. Then export the certificates to the machine running Plesk.
On the Plesk server, go to Docker > Environments and add a new remote server by entering the connection details and certificates. You can mark it as active so that all Docker operations in the dashboard are performed on that node . Switching between Docker services is as simple as selecting it from the environment list and clicking "Set as active."
From the images section, Plesk lets you view all the local images of that remote Docker, filter them, see the available tags, the disk space used, and delete the ones you don't need With one click. It's a convenient way to clean without having to remember all the options. docker image prune and company.
Development with Docker Desktop, WSL 2 and remote containers
In modern Windows environments, it's very common to use Docker Desktop with WSL 2 to have a fully integrated Linux-based Docker engine. Docker Desktop allows you to run Windows and Linux containers on the same machine and enables integration with the various WSL distributions you have installed (Ubuntu, Debian, etc.).
After installing WSL 2 and Docker Desktop, in the configuration you activate the engine based on WSL 2 and you choose which distributions have Docker integration. From a terminal You can check the version with WSL. docker --version and test that everything works by launching the test image:
docker run hello world
This setup is ideal if you want to develop locally using VS Code and, at the same time, deploy to remote servers . Thanks to the WSL, Dev Containers, and Docker extensions for VS Code, you can open your project inside a development container, compile images, debug, and then push those images or Compose files to the remote server where they will run in production.
VS Code and remote development containers
With VS Code and the Dev Containers extension you can turn any project into a containerized development environmentThe usual workflow is: clone the repository (in your WSL distro, for example), open the folder with code . and choose “Reopen in container” so that VS Code generates a folder .devcontainer with its Dockerfile y devcontainer.json.
When the development container starts, VS Code connects to it, and all the tooling (IntelliSense, debugging, integrated terminal) runs inside that container. You can verify this with uname to see that you're still on Linux and with python3 --version or the runtime you use to check specific versions of the container.
From there you can configure execution and debugging profiles (for example, for a Django, Node, or any framework project) using a launch.json in the folder .vscodeBy pressing F5, the app starts up inside the development container and you see it in your browser, but that same code and Dockerfile can then be used to generate the image that you will deploy on your remote server.
The advantage of this approach is that you minimize the classic "it works on my machine" : if you develop inside a container and then deploy the same image (or a very similar one) on the server, the environment differences are reduced to a minimum.
Remote containers for graphical applications (noVNC, TigerVNC, Caddy)
So far we've discussed typical backend or web services, but it's also possible to run complete desktop applications within a container and access them from a browser on any device. A very illustrative example is packaging Mozilla Thunderbird inside a container that combines TigerVNC, noVNC, and the Caddy web server.
The idea is that the container includes an X11/VNC server (TigerVNC), a noVNC server to expose the VNC session as a WebSocket, and a process manager like supervisord that starts and monitors all components: the graphics server, the noVNC server, the window manager (OpenBox), and the main application (Thunderbird).
In settings supervisord.conf First, you define the global daemon block (so that it runs in the foreground and logs to stdout), and then individual programs: one for the X11 server with Xtigervnc, another for easy-novnc listening on port 8080 and connecting to VNC on 5900, another for Openbox as a window manager, and a final block to launch /usr/bin/thunderbird with the DISPLAY variable pointing to the display :0.
OpenBox uses its own root menu defined in menu.xmlThis is where you create entries to open Thunderbird, a terminal, and htop. This menu appears when you right-click on the desktop within the graphical session accessible via a browser.
Building the image: Multi-stage Dockerfile and graphical application
To make everything fit together, a multi-stage DockerfileIn the first phase, based on golang:1.14-busterThe easy-novnc binary is compiled from the GitHub repository, specifying a particular version to ensure deterministic builds. The second phase begins with debian:buster and install the necessary packages: openbox, tigervnc-standalone-server, supervisor, gosu and various utilities (terminal, nano, wget, openssh-client, rsync, ca-certificates, xdg-utils, htop, compression tools, etc.).
Then you install Thunderbird as the main applicationYou copy the easy-novnc binary from the first stage to the PATH and add the configuration files menu.xml y supervisord.conf to the image's file system. Port 8080 is exposed, which will be the HTTP entry point for the remote session.
To avoid running everything as rootThe Dockerfile creates a user app With UID and GID 1000, prepare the directory /data, marks it as VOLUME to persist the application configuration and defines a boot command CMD that adjusts permissions on /data y /dev/stdout and then run supervisord as the app user using gosu.
With this built, all that remains is to create the image with docker build -t thunderbird .a Docker network thunderbird-net, a volume thunderbird-data and launch the container with an always-on reboot policy, mounting the volume in /data and connecting it to that network. The container thunderbird-app It remains ready and running in the background.
Protect access and expose files with Caddy and WebDAV
To avoid leaving the noVNC interface exposed without any control, another container is created based on Caddy v2 with WebDAV moduleThis second container acts as a reverse proxy to thunderbird-app:8080, requests basic authentication, and also serves the content of /data via HTTP and WebDAV to access the application files.
Caddy's Dockerfile is also multi-stage: first, it compiles Caddy with the caddy-webdav module, and then it builds a minimalist Debian-based image that includes only gosu and the Caddy binary. A Caddyfile a /etc/CaddyfilePort 8080 is exposed and an app user similar to the one in the previous container is created, also sharing a volume /data.
El Caddyfile defines a server on port 8080 that proxy from the root to thunderbird-app:8080, exposes a file browser in /files and a WebDAV endpoint in /webdavBoth use the same shared data directory. Basic HTTP authentication uses a hashed username and password read from the APP_USERNAME and APP_PASSWORD_HASH environment variables.
To generate the password hash, a temporary thunderbird-caddy container is run with the command caddy hash-password -plaintext 'mypass'The output is copied and then the final thunderbird-web container is launched with docker run –env APP_USERNAME=»myuser» –env APP_PASSWORD_HASH=»mypass-hash», publishing port 8080 on the host.
Access from the browser and file management
With both containers running, you can now go to http://SERVER_IP:8080 in your browser , enter your username and password, and click "Connect" in the noVNC interface. You'll see a black desktop with the Openbox window manager; right-clicking will display the menu with Thunderbird, Terminal, and Htop.
The application window automatically resizes to fit the browser thanks to TigerVNC's remote resizing settings and easy-novnc. Performance is usually more than acceptable, even on modest devices like Chromebooks, because rendering is done directly on the server, not on your client.
If you visit http://SERVER_IP:8080/files/ you will see a list of files in the data directory, and if you mount http://SERVER_IP:8080/webdav/ on a compatible WebDAV client you can read and write directly to that folder. On Windows, to map it as a network drive you will need to add HTTPS using an external reverse proxy or adjust the registry to allow basic authentication over HTTP.
The beauty of this setup is that you can repeat the pattern with any Linux graphical application : GIMP , reverse engineering environments like Cutter, or even Wine to run Windows applications inside a Linux container with remote access. All of this leverages the power of a remote server, while on your own computer you only need a web browser.
With all of the above, the picture for deploying Docker containers on remote servers is quite clear: you can use simple SSH and Docker Compose, rely on panels like Plesk or Portainer, use CI/CD flows with GitHub Actions, or even encapsulate complete graphical applications accessible via the web, all while offloading the computing burden to remote machines and leaving your local machine free for what it does best: developing and orchestrating, without burning out its resources.

Passionate writer about the world of bytes and technology in general. I love sharing my knowledge through writing, and that's what I'll do on this blog, show you all the most interesting things about gadgets, software, hardware, tech trends, and more. My goal is to help you navigate the digital world in a simple and entertaining way.