- Most of the weight of Word and PowerPoint comes from images, videos, embedded fonts, and accumulated revision changes.
- Word and PowerPoint include built-in options to compress images, prevent embedded fonts, and clear change history without altering the content.
- The use of modern DOCX and PPTX formats, along with ZIP and multimedia compression, significantly reduces file size.
- External tools and compressors allow you to process many documents at once, although it is advisable to monitor the privacy of the files.
When a Word document or PowerPoint presentation gets too large, sharing it via email , educational platforms, or teamwork tools can become a real headache. Error messages, failed submissions, and interminable downloads are commonplace when the file size has grown excessively without us even noticing.
The good news is that you have plenty of different ways to reduce the size of Word and PowerPoint files without losing quality , both from Microsoft Office 's built-in options and with specialized online compression applications . Throughout this guide, we'll look at all these methods step by step, explaining exactly what each one does and when it's worth using them, so you can choose the combination that best suits your needs.
Why are your Word and PowerPoint documents so large?
Before you start compressing anything, it's helpful to understand what makes a file excessively large and difficult to manage . Not all documents take up the same amount of space, even if they seem similar at first glance.
In a Word file, the size skyrockets mainly due to the quantity and quality of embedded images, graphics, and tables , as well as less visible elements such as custom fonts, change history, comments, or hidden parts that accumulate over time.
In the case of PowerPoint, something similar happens with videos, audio, and complex animations that you add to your slides , in addition to images . A couple of high-resolution clips or good-quality music can multiply the file size without you even noticing.
The file format itself also has a significant impact. A document saved in older .doc or .ppt formats is larger than its equivalent in .docx or .pptx, because these newer formats function internally as a compressed package, similar to a .zip file, which makes better use of space.
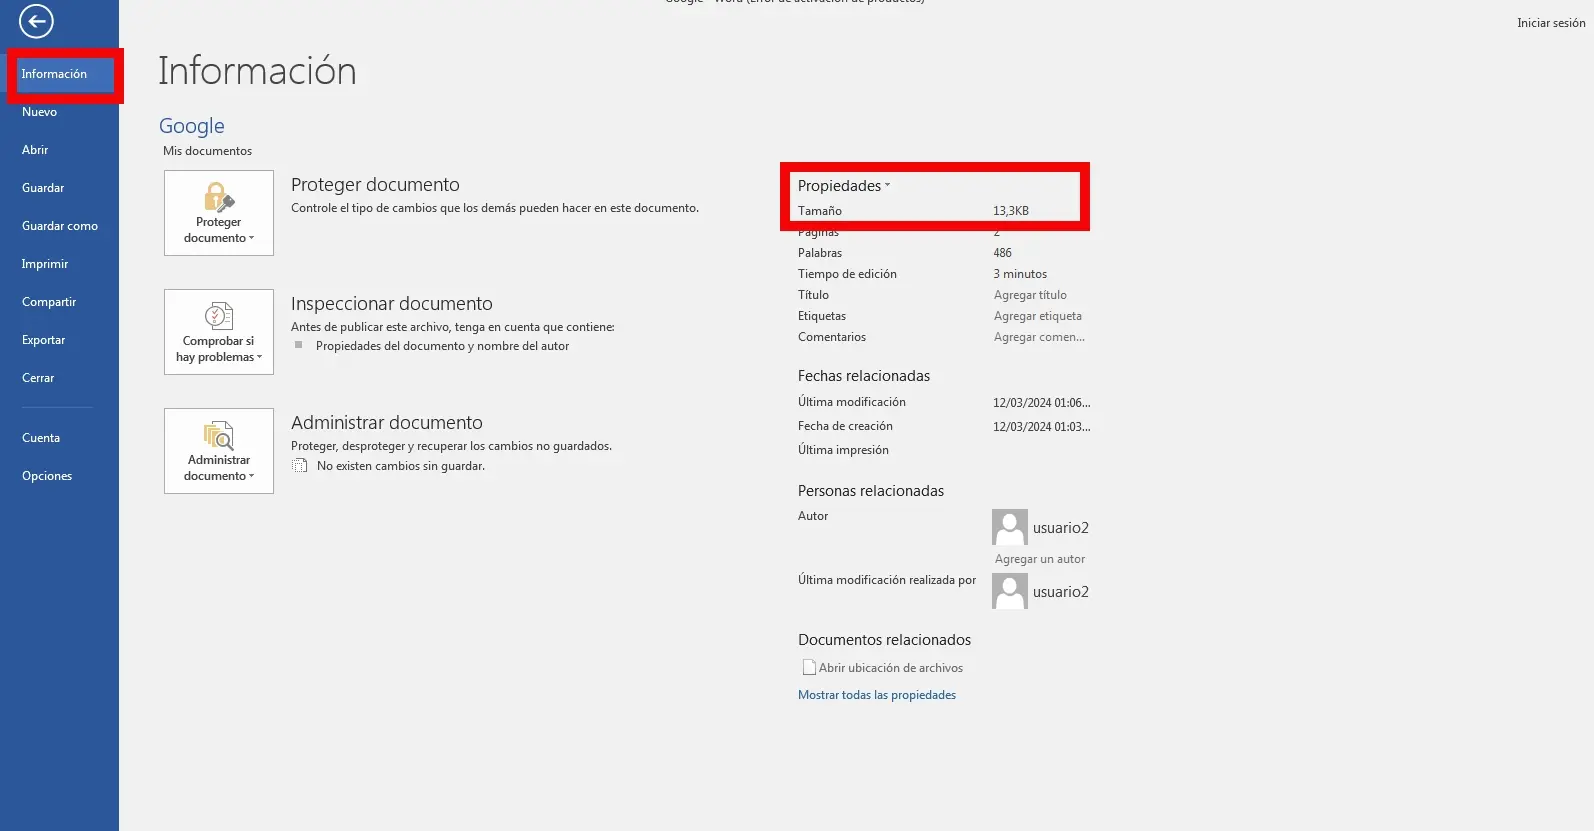
How to see the size of a Word or PowerPoint file before compressing it
The first step to making sound decisions is knowing exactly how many megabytes your document takes up . This will allow you to assess whether it really needs to be compressed or if you can leave it as is.
A quick way is to do it directly from within the Microsoft Office program itself. Open your Word or PowerPoint file on your computer and click on the "File" tab at the top of the window.
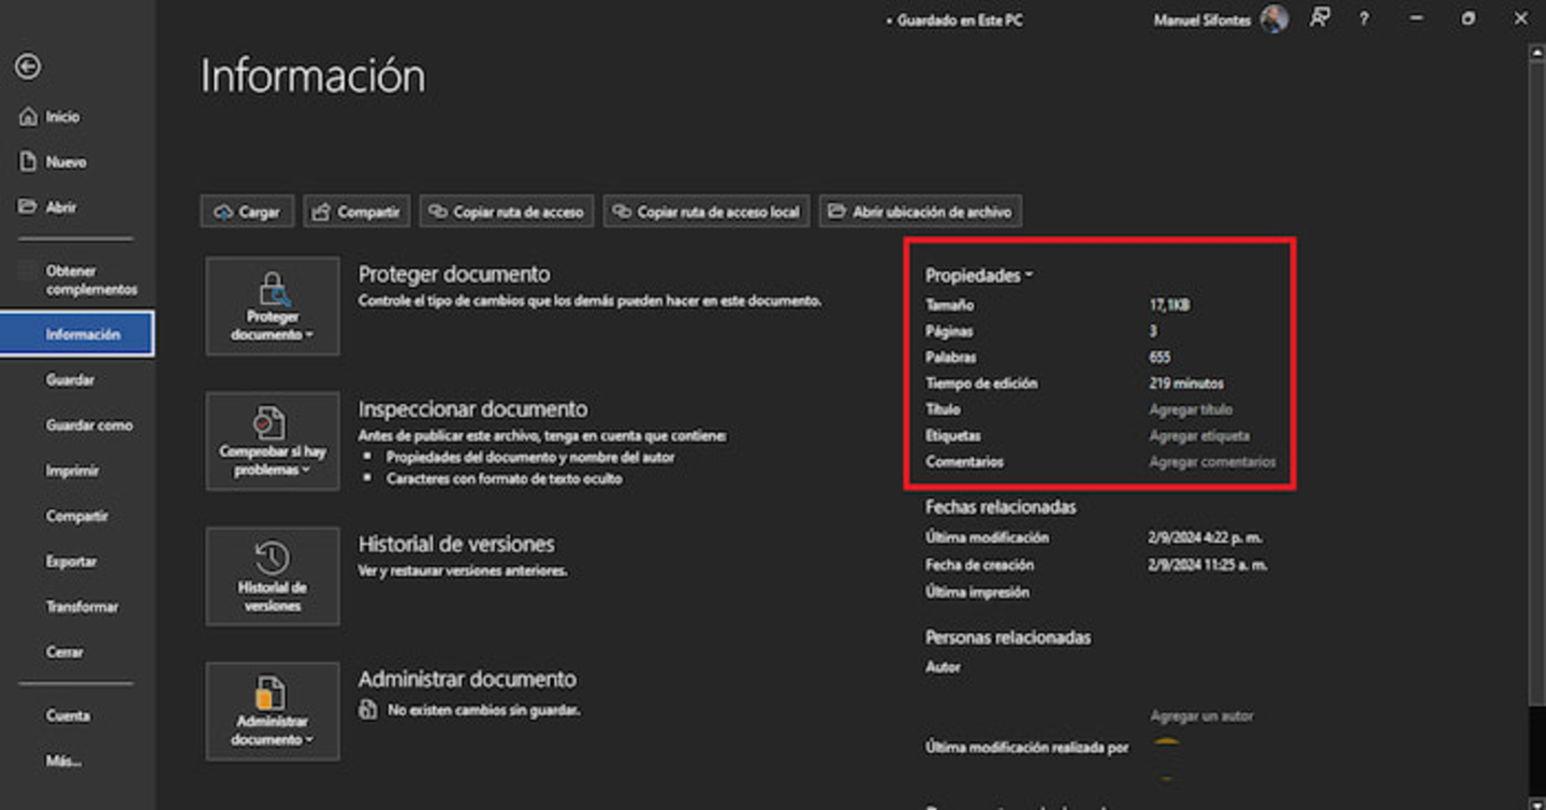
In the left-hand column, go to the "Information" section of the document . Once there, you'll see a block with the file details: name, author, number of pages or slides, and, most importantly, the disk space it occupies.
With this simple glance, you'll know instantly if you have plenty of margin or if the file size could cause problems when sending by email, uploading to a platform, or sharing with others who depend on slow connections or limited data plans.
It is advisable to repeat this check after applying the different compression techniques to ensure that you have actually managed to significantly reduce the file size and not just by a few kilobytes.
Use modern DOCX and PPTX formats to save space
One of the simplest changes, and one that often goes unnoticed, is to check if your document is saved in an older format like .doc or .ppt . These older formats are much less efficient than their successors.
Since Word 2007, Microsoft has incorporated the .docx format for text documents and .pptx for presentations . In addition to providing new features, internally they are compressed packages based on XML, very similar to a .zip file with all the elements organized and compacted.
To take advantage of this, open your document in Word and go to File > Save As . In the dialog box, expand the "Save as type" list and select "Word Document (*.docx)." Click "Save," and you'll have a modern version of the file.
In PowerPoint the process is identical: go to File > Save As , choose "PowerPoint Presentation (*.pptx)" as the file type, confirm and let the application create the new optimized presentation.
This simple format change can significantly reduce the size without affecting the content , so it's a good starting point before getting into more advanced settings.
Compress a Word document by reducing the size of images
In most documents, images are the main culprits behind the file size skyrocketing. Luckily, Word offers several built-in tools to compress images and lower their resolution without any noticeable loss of quality.
One option is to use the "Compress Images" function when saving the document . Open your file, press F12 to go directly to "Save As," and look for the "Tools" button that appears next to "Save."
In the menu for that button, choose the "Compress Images..." option . A window will open where you can check "Remove cropped areas from images," so that Word permanently deletes the parts you cropped and no longer need to keep.
In that same dialog box, you can select a resolution suited to the document's intended use . For example, the "Email (96 dpi)" option minimizes the size of images intended for sharing, while slightly higher resolutions like 150 dpi may be sufficient for documents that will be viewed on screen or printed without high requirements.
Once you select the resolution and accept, save the file again. When you check its properties again, you'll see that the overall document size has been significantly reduced , especially if it contained many photos or large graphics.
Adjust image settings in Word for smaller file sizes
If you want to go a step further and have Word always work with lighter images in your documents, you can modify the global size and quality options that the program uses to process them.
With any document open, go to File > Options and, in the window that opens, go to the "Advanced" section. Scroll down to the "Image size and quality" section, where the key settings are located.
First, check the "Discard editing data" box . This makes Word remove the extra information it saves to undo changes to images, reducing the file size. Keep in mind, however, that by doing this you will lose the ability to restore those photos to their original state later.
Next, make sure the "Do not compress images in file" option is unchecked . If it were checked, Word would always preserve images at their maximum quality and size, preventing any automatic compression.
Finally, in "Default Resolution," choose a value of 150 dpi or even lower if the document will only be viewed on screens. For most common uses, you don't need higher resolutions, and lowering them can save a significant amount of space.
Remove embedded fonts to lighten up Word and PowerPoint
Another important factor that often goes unnoticed is the fonts embedded within the file . Office allows you to save the fonts you've used directly in the document so that anyone will see it the same way, even if they don't have those fonts installed on their computer.
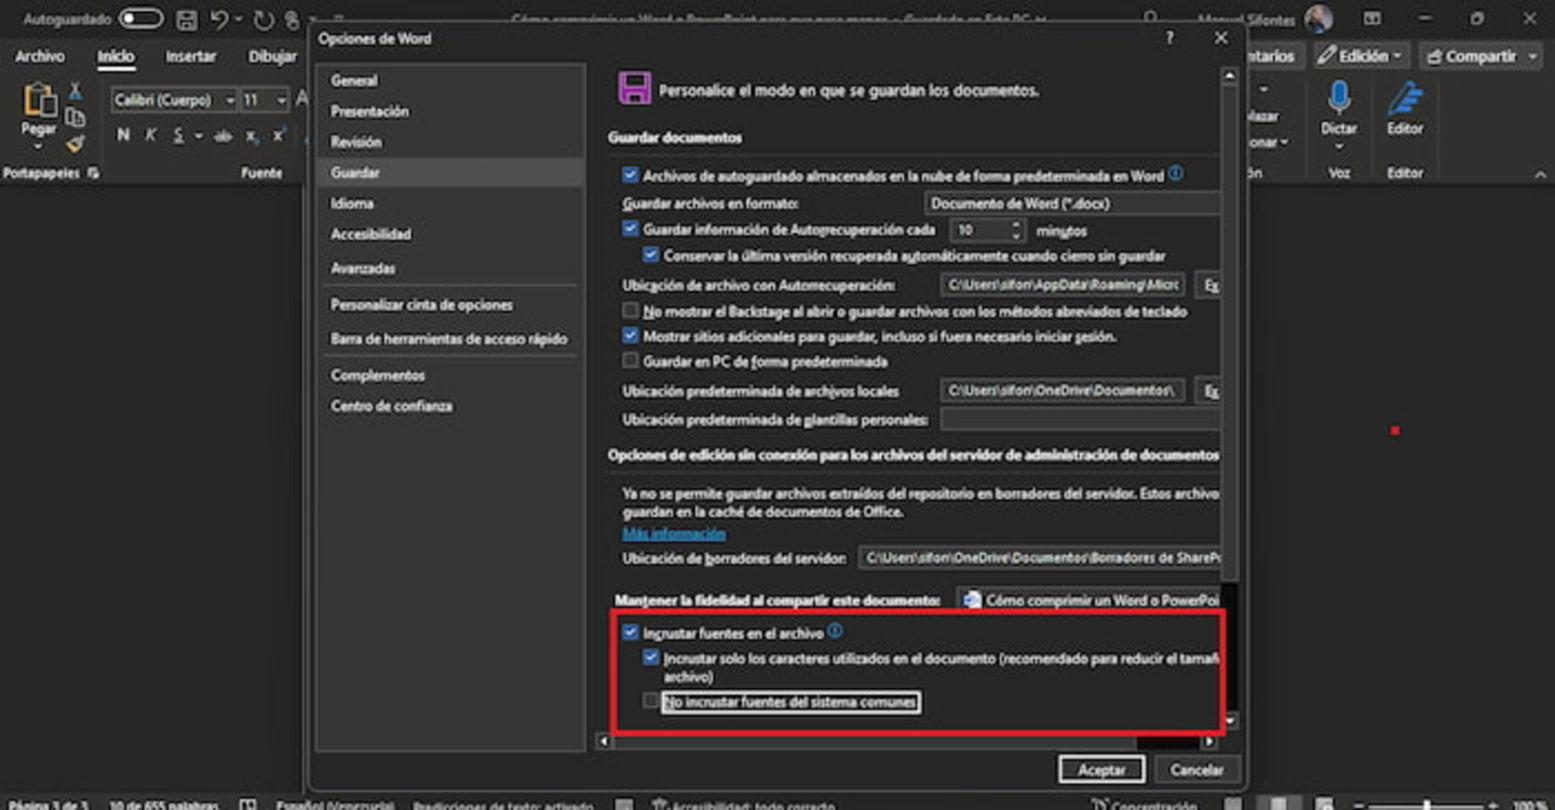
The problem is that including the entire fonts in the file can significantly increase the size, especially if you use several custom fonts. To check this in Word, go to File > Options and then to the "Save" category.
Within the "Maintain fidelity when saving this document" section, you'll see the "Embed fonts in the file" checkbox . If you want your document to take up less space, it's best to leave this unchecked. Uncheck it, and after saving again, you'll notice a reduction in size compared to the previous version.
If you still need to embed the font because it's essential that the formatting is respected on any computer, you can limit the impact by enabling "Insert only characters used in the document" and "Do not embed common system fonts." This way, the entire font is not included, but only the characters that are actually used.
In PowerPoint the logic is similar, since the option to insert fonts is also found in the application's saving preferences and can make a presentation with few slides weigh much more than expected.
Stop change tracking and clean up the document
When you're working with others on the same document, it's common to use change tracking and review comments to keep track of who has changed what. However, all that extra information ends up taking up a lot of space.
Once the content is approved and you no longer need to see every change, it's a good idea to turn off this feature. In Word, open the "Review" tab on the top ribbon and, in the "Tracking" section, click the "Track Changes" button to turn it off.
If you also want to apply all changes and delete the history, use the dropdown menu under "Accept" and choose "Accept all changes and stop tracking ." The document will still look the same, but without the hidden burden of intermediate versions.
Take this opportunity to also check for any embedded comments, hidden sections, or previous versions that you can remove. The less historical "junk" the archive accumulates, the smaller and cleaner it will be.
This cleansing of changes and revisions is especially noticeable in documents that have been extensively worked on by a team, where months of notes, cross-outs and modifications have accumulated that no longer make sense to keep.
Insert images correctly instead of copying and pasting
Something as simple as how images are placed in a document can make all the difference. When you copy and paste an image directly from another application or from your browser , Word tends to embed it in uncompressed formats like BMP or PNG, which take up much more space.
However, if you use the Insert > Pictures > This Device option and choose the original file from your hard drive, Word will respect the format and compression of that image, avoiding unnecessarily inflating the size.
Therefore, it's recommended that, whenever possible, you download the image to your computer in an efficient format like JPEG beforehand and then insert it from the application's menu. This preserves the original compression and keeps the file size manageable.
This same advice applies to PowerPoint: correctly inserting photos and graphics from well-optimized files greatly helps to keep the presentation lightweight without sacrificing good visual quality.
If you already have a document full of images pasted haphazardly, you could consider replacing the heaviest ones with newer versions inserted in more compressed formats , although it is a somewhat more manual task.
Compress a PowerPoint presentation in Windows using a ZIP file
When you simply need the file to be a little smaller for sending, without altering the internal content, you can always compress the presentation into a ZIP folder directly from Windows File Explorer.
To do this, open Explorer (in Windows 10 and 11 it's called "File Explorer" ) from the taskbar, the Start menu, or with the keyboard shortcut Windows + E. Navigate to the folder where you have saved the PowerPoint presentation.
When you see the .ppt or .pptx file, right-click on it and choose the path "Send to > Compressed (zipped) folder " . Windows will create a new .zip file in the same location with the same name, which will contain the compressed presentation.
This ZIP file is usually smaller than the original presentation, and it's the one you should attach to the email or share with whomever you want. The recipient will only need to double-click to open it and extract the presentation to their computer, without needing any special programs.
Keep in mind that this method doesn't change the presentation's internal size; it simply wraps it in a compressed file. It's useful for gaining some margin when sending , but if the presentation is still very large, it might be best to combine it with other techniques, such as image and video compression.
Reduce the size of videos and audio embedded in PowerPoint
If your presentation contains video clips or audio tracks, they are likely the main reason for the file size. PowerPoint includes tools to compress these media files and adjust their quality.
In modern versions of PowerPoint for Windows, you'll find options in the multimedia menu that allow you to optimize audio and video files to reduce their size without compromising their image or sound quality.
When compression is applied, the program re-encodes the content with settings more suitable for presentations, reducing the bitrate and resolution where possible. The result is a much lighter and more manageable presentation , especially useful when it contains many audiovisual resources.
Although the details of these buttons may vary depending on the version of Office, the idea is always the same: to let PowerPoint re-encode the embedded videos and audios to reduce megabytes without you having to edit the original files.
In any case, if you work with very long videos or videos in very high resolutions, you can also consider shortening, trimming, or converting them to more compressed formats before inserting them into the presentation.
Compress multiple Word or PowerPoint documents at once
When you have dozens of large documents, compressing them one by one can take forever. In those cases, online tools that allow you to compress multiple Word or PowerPoint files at once are very useful.
Some services, such as document compression programs like Smallpdf and similar ones, allow you to upload multiple Word, PPT, Excel, or even image files and process them in batches. After compression, they usually let you download a ZIP file containing all the compressed documents.
Many of these compression programs have a free basic mode and extra features like "hard compression" reserved for paid accounts or Pro versions. This advanced compression usually squeezes even more file size when standard methods fail to reduce it sufficiently.
In addition, these types of platforms usually also handle converting between compatible formats and optimizing each part of the file (images, fonts, etc.), so sometimes they achieve very good results without you having to touch anything within the document.
It's important to check the privacy and security policies of these services. The most reputable ones delete your documents from their servers after a short time, for example, an hour after processing them, and allow you to store them voluntarily or generate download links to share if needed.
Use compression programs specifically designed for Word and PowerPoint (WeCompress, UPDF, and others)
In addition to generic compressors, there are specialized tools that focus on aggressively optimizing Microsoft Office and PDF documents while maintaining the original appearance.
An example of this approach is WeCompress, which applies specific techniques to each component of the file: it re-encodes JPEG images more efficiently , reduces the number of colors in PNG, and uses lossless LZW compression in TIFF, all without altering the document structure or visible design.
Another interesting case is UPDF, which presents itself as a very complete PDF editor with advanced compression features. Its trick for reducing Word documents or presentations involves first converting the file to an optimized PDF and then applying different compression levels.
The typical workflow would be: save your Word document as a PDF, open it in UPDF, click "Save as Other," and choose the option to reduce file size by selecting from several quality levels . Then save the compressed PDF and convert it back to Word or PPT using the built-in conversion function.
This strategy of "convert to PDF, compress, and convert again" can achieve significant reductions when you need a balance between minimal size and good presentation , although it involves a few extra steps and reliance on an external tool.
When to use online compressors and what precautions to take
Online compression tools are especially useful when you're looking for a quick solution without installing anything, or when you're not familiar with the internal options of Word and PowerPoint and prefer another service to do the work for you in just a few clicks.
Basic usage is usually very simple: you choose a reliable compressor, upload your Word or PowerPoint file, select your preferred compression level (normal, strong, etc.), press the compress button, and when the process is complete, you download the new, lighter version.
However, it is important to keep in mind that uploading documents to an external server can pose privacy and confidentiality risks , especially if they contain sensitive data, business information, or content that you do not want to leave your work environment.
That's why it's advisable to use recognized platforms, review their terms of use and file deletion policies , and if in doubt, opt for the tools integrated into your computer or other local solutions that don't require uploading anything to the internet.
For particularly sensitive documents, it's almost always preferable to use the built-in Office options or desktop programs , even if it means investing a little more time configuring the compression process to your liking.
With all these methods and adjustments, you have a wide range of possibilities to make your Word documents and PowerPoint presentations much more manageable, take up less space , and send them without problems, combining Office's own tools with specialized compressors or online services as needed when it adds value.


Passionate writer about the world of bytes and technology in general. I love sharing my knowledge through writing, and that's what I'll do on this blog, show you all the most interesting things about gadgets, software, hardware, tech trends, and more. My goal is to help you navigate the digital world in a simple and entertaining way.