- Choose the format according to the use: APFS for Mac, HFS+ for legacy compatibility and ExFAT for Mac-Windows with no 4GB limit.
- Use GUID as default scheme; value MBR only if an older device or Windows demands it.
- Make a copy before erasing and remember that secure erase options only appear on certain drives.

Format an external disk or memory USB On a Mac, it doesn't have to be a hassle: with the system tools, it's a quick and secure process. Of course, it never hurts to review the key concepts and available formats to wisely choose the one that's best for us. The goal is to leave the unit ready for your real use, without any problems or incompatibilities..
If you're coming from Windows or this is your first time doing this on macOS, you'll see that the logic changes a bit, but everything is solved from Disk Utility. In just a few clicks you can erase, format, choose the partition scheme and leave the disk as new.Below is a comprehensive guide with recommendations, important warnings, and detailed steps.
Before you begin: backup and essential warnings
Before you touch anything, always keep in mind that formatting an external drive will delete all data on it. Make a backup beforehand if there is something you want to keep.If you no longer need those files, go ahead; if not, duplicate their contents to another drive or the cloud.
To save your data with Time Machine, you can use another empty drive. Connect the disk for backup, go to System Settings > General > Time Machine, tap Add Backup Disk and choose the drive. Then, select Configure Disk and let the backup begin. Time Machine automatically backs up everything, including connected external drives, unless you've excluded them in Options.
There are situations where formatting is especially useful: troubleshooting persistent drive errors, starting from scratch when changing computers, preparing a disk for backup, cleaning it before giving it away or selling it, or converting the format for use between Mac and Windows. If you detect data corruption, permission issues, or incompatibilities, a format can save you hours of frustration..
A note on secure erase: In Disk Utility, you'll see a Security Options button when erasing some devices. This feature allows you to overwrite data multiple times and only appears on certain types of drives; if you don't see it, it's not compatible with that drive.. Remember that in SSD Modern classic secure erase is usually disabled by design.
What is disk format and why does it matter?
The “format” defines how data is organized and indexed on the media and what features are available (encryption, snapshots, compatibility, etc.). Choosing the right file system is the difference between a drive that works with you without any problems and one that limits your daily life..
Supported formats on macOS: which one to choose and when
Several file systems coexist on the Mac, each with its pros and cons. Native formats are APFS and Mac OS Extended (HFS+); for mixed use with Windows, the usual recommendation is ExFAT.You'll avoid headaches if you base your decision on the actual use of the unit.
- APFS (Apple File System)Designed for SSDs and flash drives, it also works on mechanical drives. It offers modern features such as snapshots, efficient encryption, space sharing between volumes, and fast directory size calculation. It is the default option on current macOS and the best choice if you are only going to use the drive on Macs with High Sierra or later..
- Mac OS Extended (Journaled, HFS+): A legacy macOS system prior to APFS. Recommended if you need compatibility with older versions (below Sierra) or if you work with traditional hard drives and computers that don't recognize APFS. It is still valid when compatibility with older Macs is a priority..
- exFAT: can be read and written on both macOS and Windows with no practical file size limits (unlike FAT32). Ideal when you want to move large files between Mac and PC without installing additional software. This may cause problems on some older TVs or devices; please consult your manual.
- FAT/FAT32 (MS-DOS): Very compatible with older devices and many TVs, but with one key limitation: does not support files larger than 4 GB. Use it only if the target device specifically requires it.
- NTFS (Windows): macOS mounts it read-only by default (you won't be able to write without third-party software). It is not advisable to format in NTFS if you are going to work on the drive from macOS..
In advanced variants you will find case-sensitive formats and encrypted versions. Most users can ignore these options unless they really need to distinguish files by case or password protect content.If you enable encryption, you'll gain security in exchange for requiring a password when mounting the drive.
If you're debating between APFS and HFS+, keep in mind that APFS allows you to create containers that share space across volumes: They can grow or shrink as needed, which provides a lot of flexibility compared to the fixed size of HFS+ partitions.Additionally, APFS supports snapshots for point-in-time copies of the system state and modern, efficient encryption.
Quick tips according to your case: Use APFS if the drive is an SSD or USB flash drive and will only work on a Mac; use Mac OS Extended if you're looking for compatibility with older macOS; use ExFAT if you're switching between Mac and Windows or need to move very large files.. FAT/FAT32 only as a last resort for devices that do not accept anything else.
Partition Scheme: GUID, MBR, and What to Select
In addition to the format, you must choose a partition scheme. On macOS, “GUID Partition Map” (GPT) is typically used when the drive will be used on a Mac.If you plan to use the drive with very old Windows computers or certain devices, a Master Boot Record (MBR) or hybrid partitioning may be necessary in specific cases. For modern, general compatibility with ExFAT, GUID usually works fine.
Important detail in the app itself: You will see the “Scheme” menu only if you have selected the physical device (the root of the drive) and not a specific volumeIf that drop-down doesn't appear, change the view to View > Show all devices and select the top-level disk.
How to format an external drive on macOS step by step
The procedure is straightforward and, except for deep secure deletions, is usually completed in seconds. When you're done, the volume will be automatically mounted and appear in the Finder ready to use..
- Connect the external drive (HDD, SSD, or USB flash drive) to your Mac. Check that you are not using it for ongoing processes.
- Open Disk Utility: from Finder > Applications > Utilities > Disk Utility, or search for it with Spotlight. The app is in /Applications/Utilities.
- In the Display menu, click “Show all devices.” This way you can select the physical device and not just its volumes..
- In the sidebar, select the external device you want to erase (the top level of the disk). Avoid accidentally selecting an internal Mac volume.
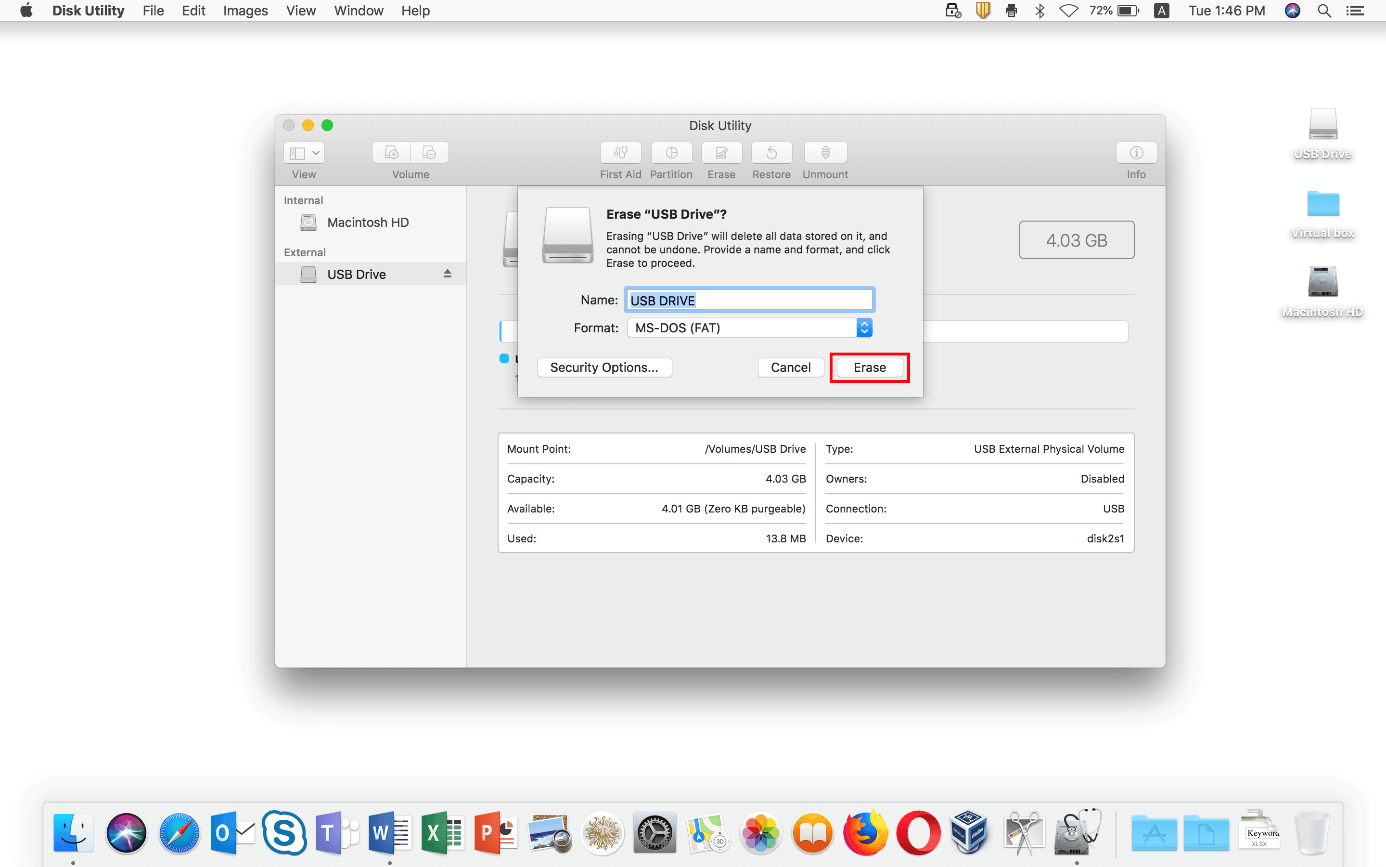
- Click Delete on the toolbar. The dialog box for assigning name, format and scheme will open..
- Choose a name for the volume. Note: In MS-DOS (FAT), the name may be limited to 11 characters. In APFS and HFS+ you won't have that practical restriction..
- Select the Format: APFS, Mac OS Extended (Journaled), or ExFAT as explained above. Avoid FAT/FAT32 if you are going to handle files larger than 4 GB.
- Choose the Scheme: generally, “GUID Partition Map”. For compatibility with older Windows devices, consider MBR if the manufacturer indicates it..
- Optional: Tap “Security Options” if it appears and adjust the overwrite slider. Remember that this is only available on some drives; on many SSDs you won't see this option..
- Confirm with Delete and wait for it to finish. The process usually takes less than a minute for standard formats..
If you make a mistake in choosing the format, it's okay: You can repeat the process and reformat as many times as you need.Just remember that each erase will remove the data from the drive.
Would you prefer a quick list from Finder? Another way to get there is to open Finder, go to Applications, go to Utilities, and open Disk Utility. Then, select the drive in the left column, press Erase, enter a name, choose Format, and confirm. If you find it necessary, you can use “First Aid” to check the drive after formatting..
Erase or format the Mac startup disk
If what you need is to erase the internal disk from which you boot the system (for example, to reinstall macOS from scratch), the path changes. You need to start your Mac in macOS Recovery, choose Disk Utility there, and from that session erase the disk. BootAfter erasing, you can reinstall macOS. Apple documents booting into recovery and the steps to follow in its official help.
Use with Windows, TVs and other devices
For broad Windows compatibility without sacrificing large files, the general recommendation is ExFAT. Format from Disk Utility choosing ExFAT and, in the scheme, preferably GUID for modern computersIf you need to work with very old Windows computers or devices that require MBR, select that scheme from the Scheme menu according to the manufacturer's instructions.
If you're connecting the unit to a TV or player, check the manual. Many TVs read FAT/FAT32 better than newer formats, although you will be limited to files up to 4GB.. When the device accepts ExFAT, it will be preferable for its flexibility.
APFS in detail: advantages over HFS+
APFS was born to modernize the storage on macOS and thus jump beyond the limitations of HFS+. Key features include snapshots, strong encryption, space sharing between volumes, and fast directory sizing.This translates into better data management and security, especially on SSDs.
The big practical difference compared to HFS+ is the flexibility of the containers. In APFS, multiple volumes can coexist sharing the same container and dynamically expand or shrink depending on what you store.In HFS+, partitions have a fixed size, so if you run out of space, you'll need to resize or move data.
Although APFS is optimized for SSDs, it can be used on traditional hard drives. If you're working with older Macs that don't support APFS, HFS+ (Journaled Mac OS Extended) is a good option.For everyone else, APFS is usually the ideal choice.
Practical tips and good practices
Before erasing, confirm three times which drive you are selecting. Activate “Show all devices” and make sure you choose the correct external drive to avoid any surprises with the internal one.. It is the most important step to avoid losing information by mistake.
If you are going to give a disk to a third party or sell it, consider a more thorough erase. On supported drives, use “Security Options” and add overwrite passesFor SSDs, it disables that idea: a standard erase and subsequent rewrite is the expected design.
If you intend to use the disk as a backup storage, formatting is also a good opportunity to rename it in a clear way (e.g., “iMac Backups”). This will avoid confusion if you manage several units in parallel..
If Time Machine doesn't recognize your newly connected drive, it may need to be formatted to APFS (or Mac OS Extended on older versions). Do this from Disk Utility and reselect the drive in System Preferences > General > Time Machine.
You have a complete map: formats, compatibility, partition scheme, and clear step-by-step instructions to leave your drive perfectly prepared for the use you need. Formatting on macOS is fast and reliable if you choose the right format (APFS, HFS+, or ExFAT), select the correct scheme (GUID in most cases), and remember that erasing means losing your data.With a pre-installed copy and the right decisions, the unit will be ready in a matter of seconds.

Passionate writer about the world of bytes and technology in general. I love sharing my knowledge through writing, and that's what I'll do on this blog, show you all the most interesting things about gadgets, software, hardware, tech trends, and more. My goal is to help you navigate the digital world in a simple and entertaining way.