Would you like to learn how to copy a VMware virtual machine to another PC ? This time, we've got a tutorial for you with different methods for cloning. Just follow the steps we'll show you, and you'll have two virtual machines with the same resources. Stay tuned!
4 Methods to Copy a Vmware Virtual Machine to Another PC
Now, we will show you the 4 methods to copy a Vmware virtual machine to another PC. Each of these ways has been tested to ensure that your backup is successful. Let's see which ones they are:
Method 1: Copy a Vmware virtual machine to another PC in Windows
- Step 1:: First of all, you need to download and install the OVFTOOL software. which you can find in this LINKThe installation package comes with the following features:
- Distribution: VMware OVF Tool 64-bit.
- Number of downloads: 8986756.
- Distribution date: April 17 from 2018.
Here you can learn about: 6 Best Virtual Machine Programs
- Step 2:: After downloading the software package, you must open the program and enter the IP of Vmware ESXi and go directly to your console
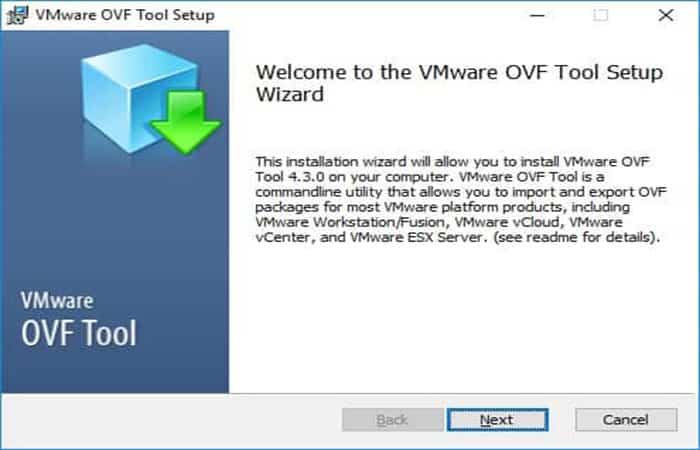
- Step 3:: Next, you need to note down the path where the OVFTOOL software was installed.
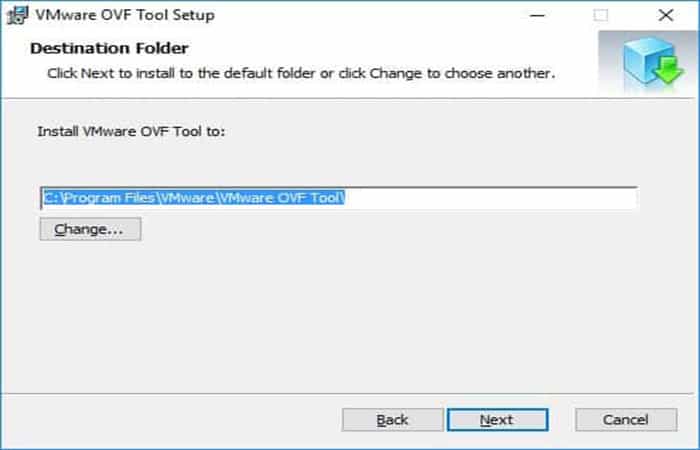
NOTE : For this tutorial, the installed OVFTOOL program directory is: C:\Program Files\VMware\VMware OVF Tool\
- Step 4:: After installing the OVFTOOL program package, you will need to open the (DOS) prompt to then locate the OVFTOOL path.
- Step 5:: This will allow you to have direct access to the path (C:\Program Files\VMware\VMware OVF Tool) This can also be opened from the VMware OVF Tool window. Command Prompt with the following instructions:
- C:
- cd%program files%
- cd vmware
- cd «VMware OVF Tool»
- Step 6:: Then, you need to use the following command instructions to do an UBUNTU installation on a virtual machine from the VMware ESXi servers.
- Origin: VMware ESXi server 192.168.0.50
- Destination: VMware ESXi server 192.168.0.100
- ovftool -ds=datastore1 vi://[email protected]/UBUNTU vi: //[email protected]
- Step 7:: Now, you should be able to access both servers and log in to Vmware from the root account.
- Step 8:: You will have to wait for the process to complete the copy.
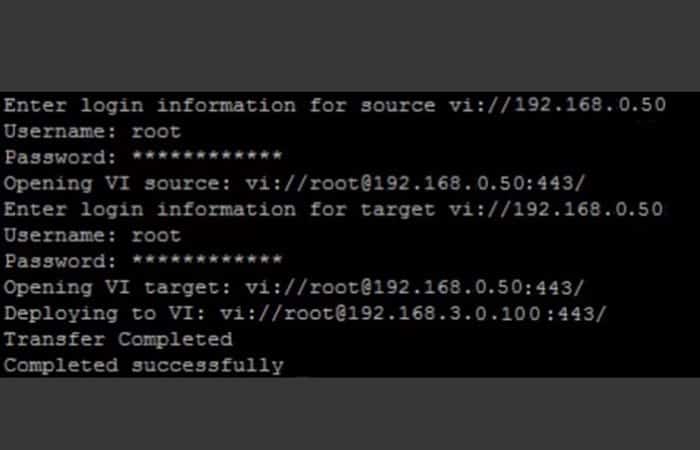
- Step 9:: Now you can access the target Vmware ESXi server and activate the virtual machine.
NOTE : Remember to shut down the virtual machine on the source VMware ESXi server.
- Step 10:: You have now copied a Vmware virtual machine between ESXi servers.
Method 2: Copy a Vmware virtual machine to another PC using VMware Tools
With VMware Workstation's tools, which are available for many types of operating systems , you can easily transfer folders and files from your physical computer to a virtual machine and vice versa.
To do this, you can use 2 techniques:
- drag and drop.
- VMware Workstation Folder Shares.
Please note that in both cases you will need VMware Tools in the guest OS and enable the corresponding option in your virtual machine settings. Let's see how you can copy a Vmware virtual machine to another PC using VMware Tools:
File Transfer in Windows
Drag and drop and copy/paste
- Step 1:: For starters, you can transfer files very easily from the physical PC to the virtual machine by just drag and drop. But you can also use copy/paste in both directions (physical machine to virtual machine and vice versa).
However, to do this, make sure these features are enabled in your virtual machine settings. By default, these options are enabled and available in the " Guest Isolation " section.
- Enable drag and drop
- Enable copy and paste
NOTE : If these options are disabled and grayed out, shut down the virtual machine to enable them.
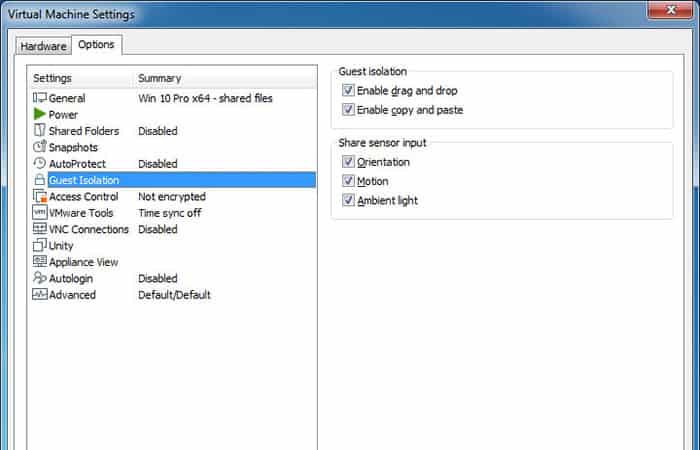
- Step 2:: To transfer a file from the physical computer to the virtual machine, you just need to drag and drop it into the virtual machine window (where the guest operating system is displayed). You can also right-click on the file. "Copy" on the physical computer and right click on "Paste" in the guest operating system.
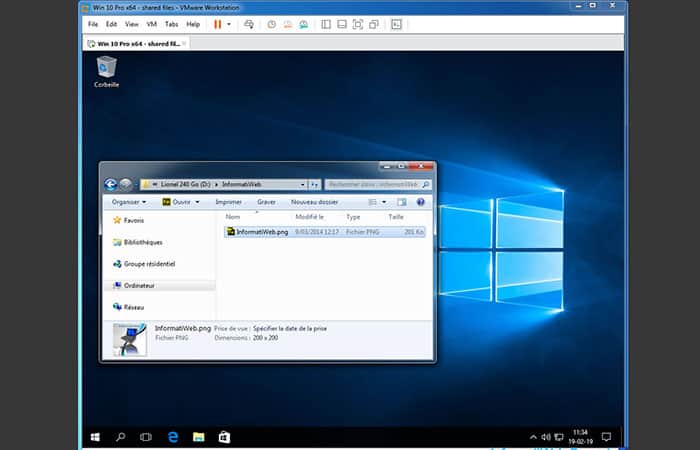
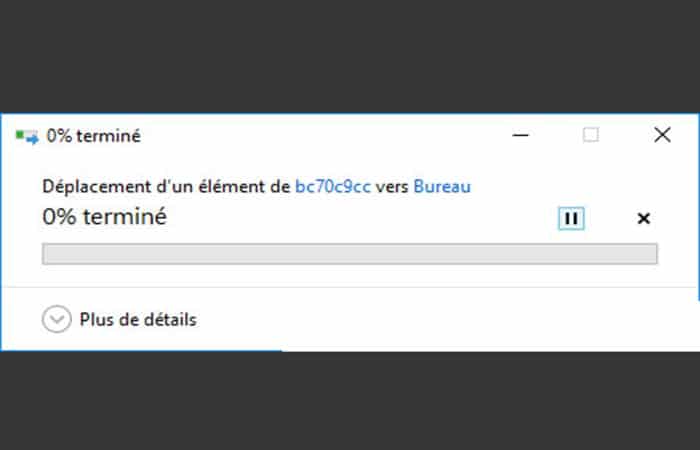
- Step 3:: A VMware transfer window will appear, then the guest OS will display another one. As you can see, the files or folders dragged / dropped will be copied by the guest operating system from a folder with a strange name.
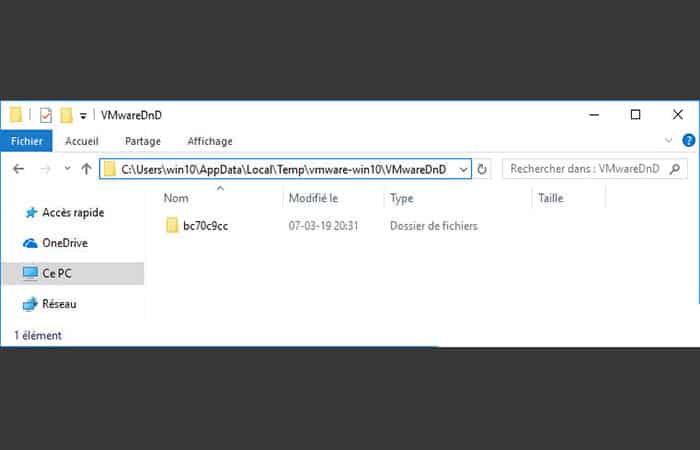
- Step 4:: When you use the drag and drop feature, VMware Tools temporarily copies the data to a subfolder «vmware-xxxx\VMwareDnD» from the guest operating system's temporary folder.
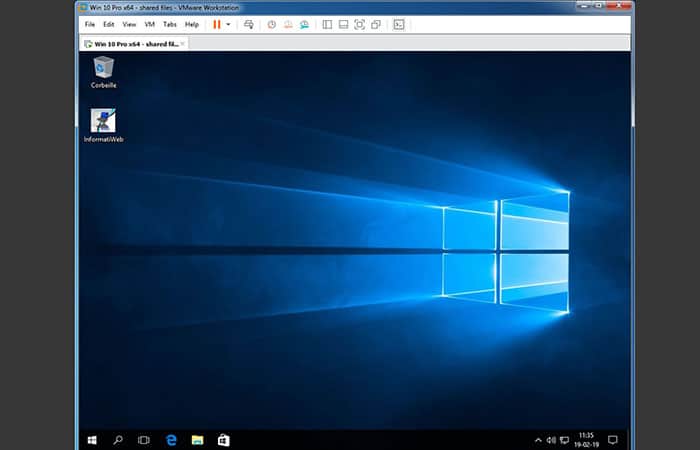
VMware File Shares on Windows
To share folders from your physical PC to make them read-only (for security) or read/write (if needed) by the virtual machine.
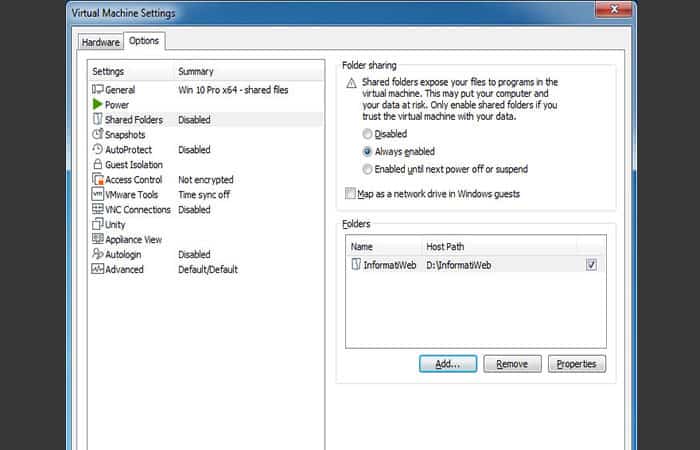
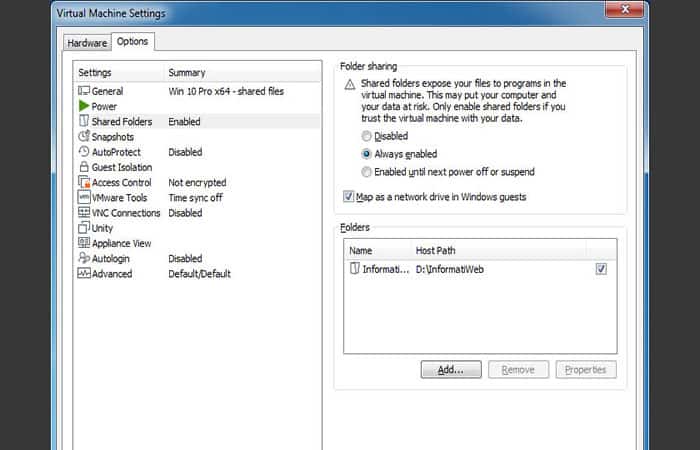
- Step 1:: To do this, open the virtual machine settings and go to the section «Shared folders» and select the option you need:
- Disabled: VMware file sharing disabled (default)
- Always enabled: always enabled (for this virtual machine)
- Enabled until next shutdown or sleep: enabled until the virtual machine is powered off or paused
- Map as a network drive in guests Windows: Automatically creates a network drive where you will find all the shares created here. This makes it easier to access these shares.
- Step 2:: Click Add to create a new share.
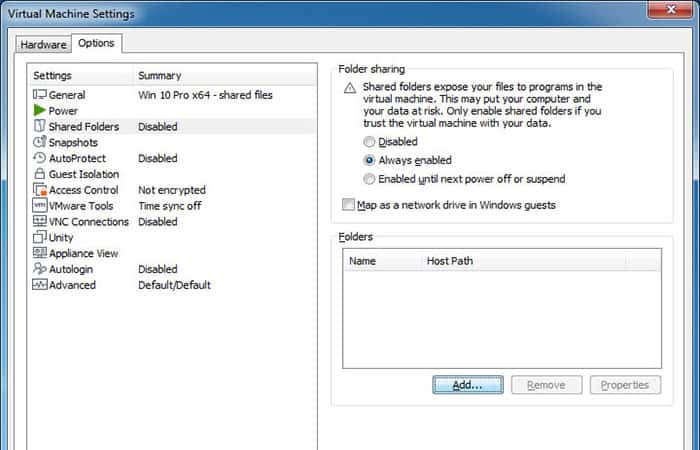
- Step 3:: The Add Share wizard appears.
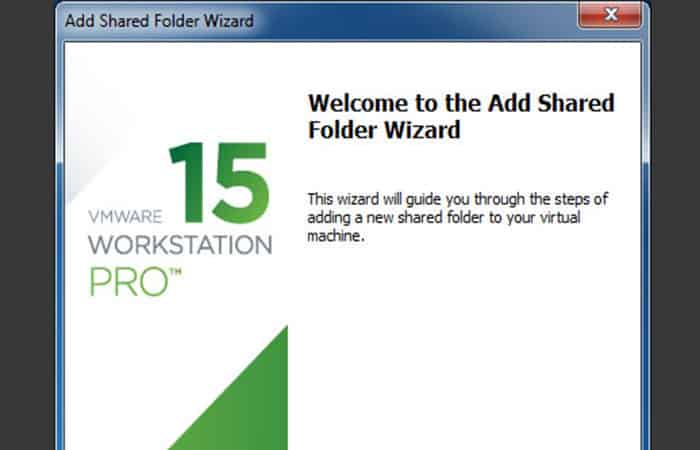
- Step 4:: Click Browse to select the folder you want to share and make it accessible to the virtual machine.
- Step 5:: Next, specify the name under which this share will appear in the guest operating system.
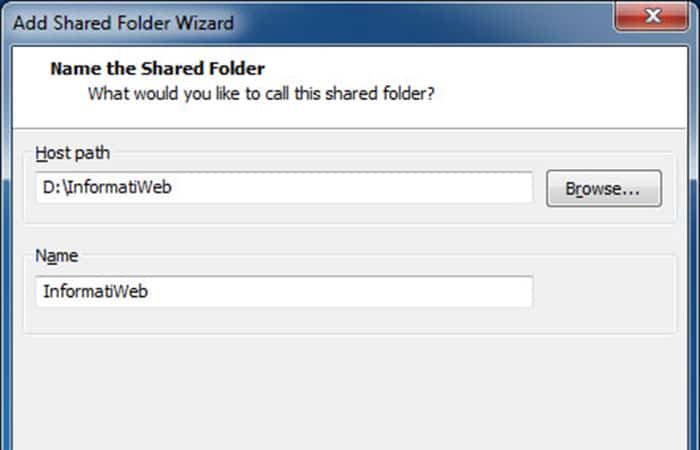
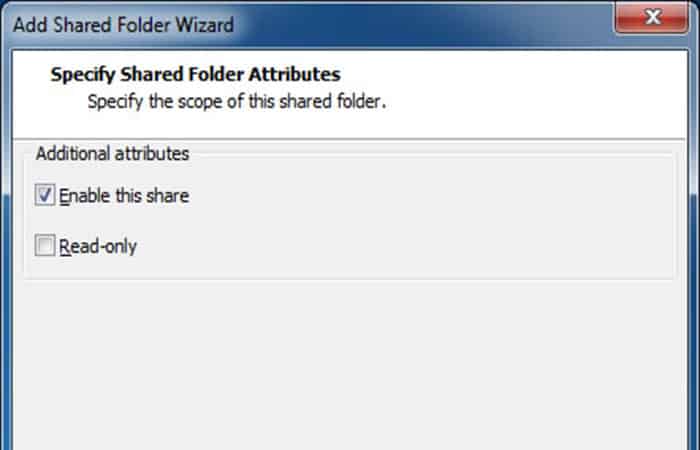
- Step 6:: Enable sharing by checking the box «Enable this share» and checking the box "Read only" if you want this share to be read-only.
- Step 7:: Save the settings and click Yes.
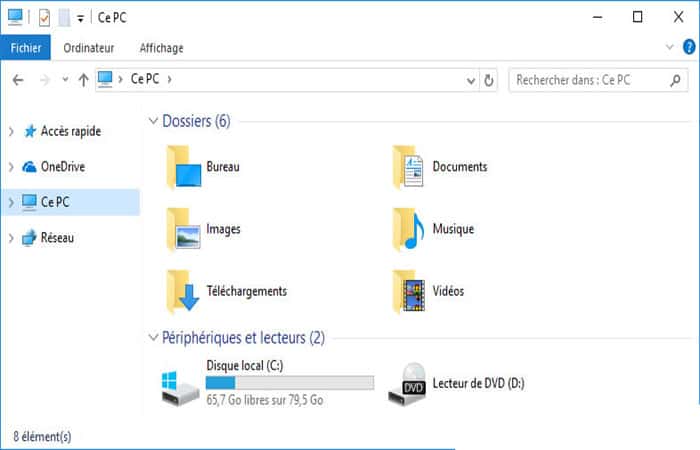
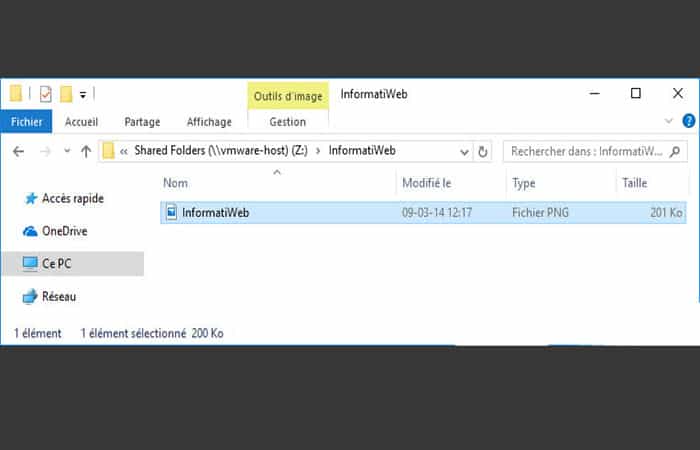
- Step 8:: If you do not check the box “Map as network drive…”, the share will not appear by default in Computer (or This PC).
- Step 9:: In order to access it, you will have to go through the network (but you will surely encounter a problem with network discovery disabled by default). To access it without problems, type: \\ vmware-host \ Shared Folders
NOTE : As you can see, the InformatiWeb shared resource appears.
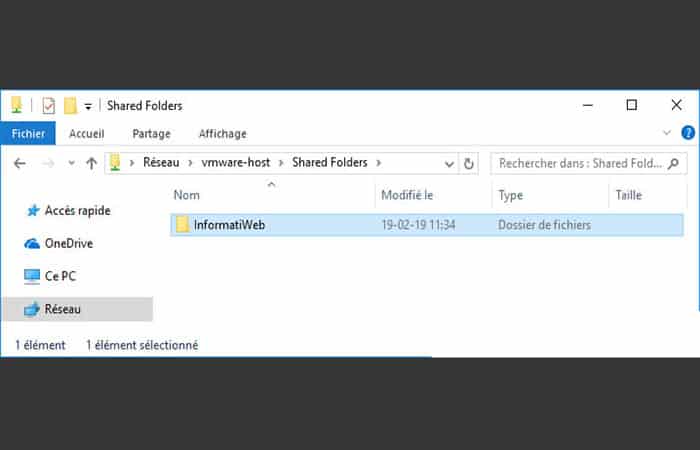
- Step 10:: In this folder, you will find the files in this shared folder.
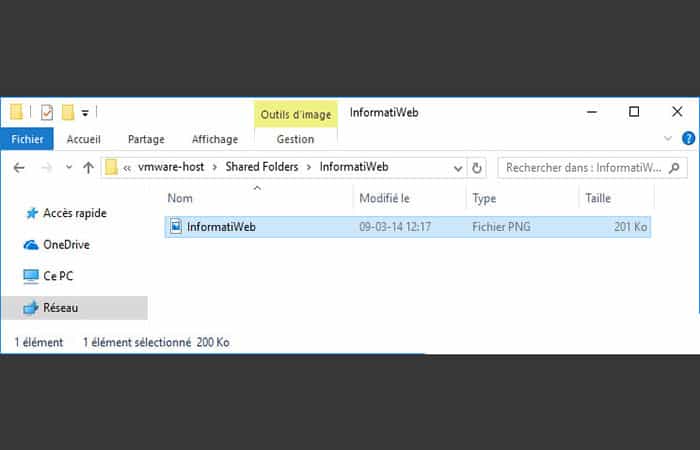
NOTE : To make things easier, we recommend that you check the box "Map as network drive in Windows guests" so that VMware Workstation automatically creates a network drive whose contents correspond to the list of shared folders here.
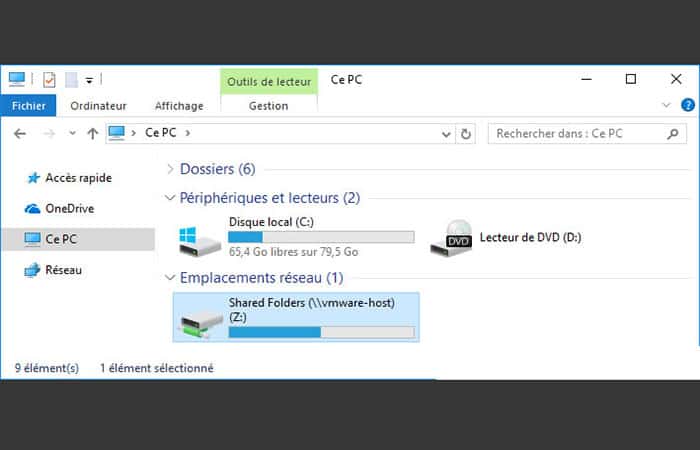
Step 11 : On Computer (or This PC), you will see a network drive " Shared Folders " that can be accessed with the letter Z and is assigned to \\ vmware-host \ Shared Folders.
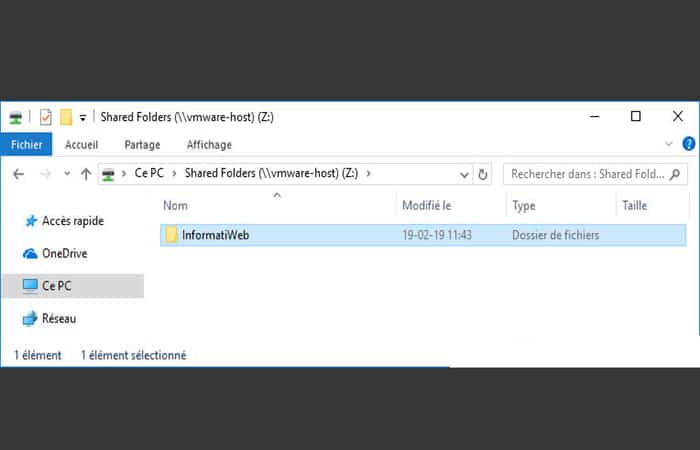
As expected, you will have access to the list of shares created in the virtual machine configuration.
Method 3: Copy a Vmware virtual machine to another PC by moving directories
VMware developers offer a range of virtual machine software for Windows, Mac OS X, and Linux . VMware creates virtual machines (VMs) that run guest operating systems within the host operating system running on the computer.
Each virtual machine has its own virtual hardware configuration and a VMDK file containing a virtual hard disk image of the operating system. You can transfer a VMware virtual machine from one computer to another by moving the directory containing these files, provided the virtual machine is powered off first.
- Step 1:: Shut down the virtual machine if it is on by clicking the “Virtual machine» from VMware, by hovering the mouse cursor over «On» and clicking «Delete«.
- Step 2:: Select the virtual machine by clicking on the name in the VMware window.
- Step 3:: Click on the menu «Virtual machine", Then in "Virtual machine configuration«.
- Step 4:: Click on the “ tabOptions» at the top of the settings window that appears.
- Step 5:: Read the directory in the « areaWorking directory» located in the lower right corner of the dashboard Options. This directory contains the virtual machine files.
- Step 6:: Click on «Home«, Click«Computer» and navigate to the virtual machine's working directory on your computer.
- Step 7:: Transfer the virtual machine's working directory to another computer using a flash drive USB, a recordable disc, or a network connection.
- Step 8:: Click on the menu «Archive» from VMware on the other computer, then click «Open virtual machine«.
- Step 9:: Go to the virtual machine's working directory and double-click the VMX file it contains.
Method 4: Copy a Vmware virtual machine to another PC by making a backup
VMware backup refers to the process of copying data to a virtual machine (VM) in a VMware environment to prevent data loss. VMware backup, and by extension, virtual server backup, is a common challenge for backup and storage administrators . Virtual server backup refers to copying data stored on a virtual server to prevent data loss.
Conventional backup software is a simple method for performing a VMware backup, but it can introduce resource contention; the additional resources you would need to perform a backup could compromise the performance of the virtual machine on the server being backed up.
VMware-specific backup products that can capture unique snapshots of your virtual machine's entire state can be used to resolve any resource conflicts that arise. This allows for a quick and complete recovery of virtual machines. However, you will typically need to restore the entire snapshot when a single file is corrupted or missing. New VMware-specific tools can handle file-level restoration.
How to Backup VMware Virtual Machines
To back up your virtual machine (including the operating system, application files, user data, and settings), you need a copy of the original folder where the virtual machine is stored. To do this, proceed as follows:
- Step 1:: Shut down your virtual machine. Leaving the virtual machine running while copying may result in a copy that refuses to start.
- Step 2:: Find the destination folder you want to copy.
- Step 3:: Right-click the folder, then click Copy or press Ctrl + C.
- Step 4:: Select the location of your choice.
- Step 5:: Press Ctrl + V or right click inside the folder and click paste. You will see a progress bar indicating that the process is in progress.
- Step 6:: Once the process is complete, start the copied virtual machine. The workstation prompts you to specify whether you copied or moved the virtual machine.
If you select "Moved virtual machine" to your local hard drive, all settings will be retained. However, the "Copied" option will generate a new MAC address and UUID to prevent network conflicts.
Three methods to copy a Vmware virtual machine to another PC by backing up and restoring data
VMware Backup has brought fundamental improvements to the world of data protection, such as the benefits of encapsulation and abstraction. However, challenges remain, including how to ensure data consistency and address the issue of excessive physical resource consumption by this technology.
It's tempting to think that backing up your server is as easy as backing up the underlying VMDK (Virtual Machine Disk) format files, because VMware includes the physical servers in a handful of those large hard disk image files.
Furthermore, backing up a running virtual machine doesn't guarantee that all movement activities will be fully captured. This means you risk inconsistent data and, therefore, inaccurate information, ultimately leading to an unsuccessful restore.
The challenge of excessive resource consumption is a side effect of virtualization. In fact, one of the main reasons you should virtualize your systems with VMware is to ensure that resource consumption is concentrated on a few physical servers, reducing the number of downtime cycles experienced by most server infrastructures. Unfortunately, you also have to contend with the inability to have enough resources for your data backups to run smoothly.
This topic is related to: How to Download Ubuntu in VirtualBox. Tutorial
You should also be aware that your backups are at their most vulnerable within VMware due to its limited capacity to handle excessive network or disk I/O . Your decision to virtualize a physical server often negatively impacts the amount of network or disk I/O present.
Despite these problems, there are suitable methods to address them and provide benefits that, in some cases, can be superior to a standard physical backup and restore. However, there is no single best-proven method for backing up or restoring VMware . For many administrators, the end justifies the means, and what works for one doesn't necessarily work for another.
Method 1: Local backup agent installed on each virtual machine
In this traditional approach, a backup software agent is installed on the virtual machine just as it would on a physical server. Data flows to the backup/recovery infrastructure, via the LAN , in the same way as if the agent were installed on a physical server.
The advantages of this method are as follows:
- No procedural changes or special skills are required, as the installation and configuration of the Backup Agent is similar to the process followed when using a physical server.
- The restore process is also unchanged from a file-level restore of the physical server.
- File level restore is possible.
- Full and incremental backups are possible.
- This method helps maintain application data consistency if you use application-aware backup agents such as Exchange or SQL.
Disadvantages include the following:
- It is easy to overload host resources since all backups are running on a single server.
- The backup agent does not recognize that your servers are encapsulated in large VMDK files, which means that from a disaster recovery perspective, the value is minimal.
Method 2: Backup Agent installed on ESX Service Console
In this method, you install the backup software agent on the designated ESX service console and back up the underlying set of VMDK files for each virtual machine.
The advantages are as follows:
- You only need one backup agent, as opposed to one agent per virtual machine.
- You can backup all your virtual machines by simply backing up the VMDK files.
- Fast image-level recovery is possible.
The disadvantages are the following:
- You need scripts to automate virtual machine shutdown, startup, and snapshots to ensure application consistency.
- A file-level restore or incremental backup is not possible.
- VMware plans to eventually remove the ESX Server Service Console.
Method 3: VMware Consolidated Backup
VMware Consolidated Backup (VCB) refers to a backup infrastructure that offloads virtual machine backups from the ESX server. This configuration removes backup traffic from the network and frees up ESX server resources for virtual machine performance. VCB includes other features, including:
- File-level full and incremental backups, plus full image backups.
- Support for Fiber Channel, NAS storage and local storage infrastructure or iSCSI.
- Manage backups from a central point.
However, VCB differs from your typical backup agent because it's essentially a command -line tool comprised of several Windows executable programs. When you add scripts, these programs can also provide a framework that other third-party products can use.
VCB has some limitations, including the need for a dedicated Windows proxy server and third-party backup software. With the release of vSphere 4, backup vendors are turning to the vStorage application programming interfaces (APIs), which have replaced VCB.
Benefits of VCB Proxy
- You can use a single backup agent for all your virtual machines.
- You can backup all your virtual machines by simply backing up the VMDK files.
- Fast image recovery is possible because the process involves transmitting one large image file instead of searching for many small files.
- Using VCB proxy server for backup process reduces the overhead of ESX server.
- This LAN-less approach with SAN should, in theory, provide a faster backup compared to a LAN-based method.
The disadvantages are the following:
- The automation and ease of use of the VCB proxy depends on the capabilities of your third-party backup software.
- This method is complex to implement, especially if you don't have a backup software integration option to simplify the process.
- You will need to install a backup software agent on your virtual machine if you want a direct file-level restore.
- When using Windows without VSS integration, the VCB image-level backup is consistent in the event of a failure.
- VCB does not provide a mechanism to support Windows system state backups. While you can achieve a successful full server restore, it is not guaranteed if your system was in transition during the virtual machine snapshot process.
What is VMware vSphere?
It is a server virtualization platform that debuted in 2009 as the successor to VMware's flagship infrastructure solution. It is a complete platform for deploying and managing a large-scale virtual machine infrastructure.
It is also commonly known as a virtualized data center platform or a cloud operating system. It has the ability to allow your IT department to efficiently place application workloads on a cost-effective computing resource.
The operation and architecture of a virtual environment differ from that of a traditional backup environment in that they require specific techniques. When it comes to backing up virtual machines on this platform, you need to utilize the strengths of virtualization if you want to maximize your backup capabilities and restore efficiency.
Additionally, you can't rely on the same principles you used in your traditional physical environment when you opt for a virtual environment. Here are eight appropriate backup practices to follow:
1. Do not backup your virtual machines in the guest operating system layer
With traditional servers, you typically install a backup agent on your guest operating system (OS) that your backup server contacts every time you need to back up data.
However, this method is ineffective in a virtual environment because it results in unnecessary consumption of virtual machine resources, affecting both its performance and that of other machines running on the host.
Instead, you should back up your data to the virtualization layer. Here, you'll use image-level backups for the large .vmdk file to avoid involving the guest operating system.
To do this, you need to use a backup application that is designed to run in the virtualization environment and can directly back up the machine's virtual disk without having to involve the host or guest operating system.
This allows you to eliminate unnecessary resource consumption while ensuring your virtual machines get the resources they need for their workloads.
2. Take advantage of vStorage APIs
The VStorage APIs were introduced with vSphere to replace VMware's consolidated backup infrastructure that was launched with VMware Infrastructure 3 to make it easier to offload backup processing from the host.
Not only do they allow easier access to a virtual machine's disk archive, but they also contain unique features that can dramatically improve backup speeds, for example, the modified block tracking feature.
Changed Block Tracking (CBT) refers to a feature that keeps track of all blocks changed since the last backup, so a backup application only needs to query the VMkernel for information.
Additionally, this operation means that the backup application no longer needs to track changed data, allowing for faster incremental backup. You should use applications that leverage vStorage APIs because of their efficiency.
3. Never skimp on virtual machine backup resources to copy a Vmware virtual machine to another PC
If you want to have the shortest backup window possible, make sure you get the right hardware and software for your backup server to avoid operational issues. You should have adequate network bandwidth, as well as enough memory and CPU resources.
Your backup server does more than simply move data from the source to the destination storage device. It also performs data reduplication and compression to reduce the size of your backup sets. All of these processes require significant memory and CPU resources to keep up with the data flow.
Always follow your provider's hardware recommendations for your server. Don't back up to your servers, as backups can slow down considerably if the server lacks adequate resources. Try the many third-party tools available to help with backups before selecting the right one.
4. Plan and test your backups carefully
Virtual environment backups can be very resource intensive due to the shared virtualization architecture. Therefore, you should set your backup schedule to avoid putting everything on a single resource.
- E.g.: Never back up multiple VMs to a single host or LUN simultaneously. Instead, try to balance your schedule to avoid overusing a resource.
While scheduling prevents slow and degraded performance, testing lets you know if you're ready to restore your backup. Testing is also important for troubleshooting, analyzing your tools, and deciding whether to switch products or not.
5. Learn how suspend and VSS work to copy a Vmware virtual machine to another PC
If your virtual machine backups include transactional applications such as databases and mail servers, you should suspend them to ensure they are in a suitable state for running. This type of backup is called application-consistent.
Before you start the backup, applications are suspended to ensure that all pending transactions and writes are written to disk.
This step ensures the server is functioning correctly and that no data is lost if a virtual machine restore is required. Pausing only works with applications that support pausing and writing pending data when needed.
VMware Tools has a driver that can work with Microsoft's Volume Shadow Copy Service (VSS) to suspend applications before performing a backup. This need has led other vendors to offer a similar driver to serve different operating systems.
Therefore, always make sure that you are using a supported driver and that your VSS service is enabled and configured to perform application-consistent backups.
6. Snapshots are not backups
Virtual machine snapshots, while useful, should never be used as a primary backup medium. Snapshots are fine for short-term backups of virtual machines, but be aware that you will incur penalties each time you use them.
After creating a snapshot , all disk writes from the virtual machine are redirected to a new delta disk file, making the original disk read-only.
As data is written to the file on the delta disk, it increases in 16 MB increments, and each increment causes a lock on the LUN where it resides, which can degrade performance. As a result, the more snapshots you take, the greater the performance impact.
Additionally, snapshots take up additional disk space, as each one can grow to the size of the original disk. If you run out of space on your datastores, you risk shutting down all of your virtual machines. Additionally, merging data from a snapshot back to its original version after deleting it is an I/O-heavy operation.
Snapshots create new virtual disks and point to the original; therefore, some functionality may be missing . This can cause a completely new allocation problem between the snapshots and the original disk. You should use snapshots sparingly and delete them when you no longer need them.
Consider fault-tolerant backup alternatives to copy a Vmware virtual machine to another PC
Most virtualization backup products with image-level backups use virtual machine snapshots to stop disk writes while backups are running.
The fault tolerance (FT) function uses two virtual machines (one primary and one secondary) that, although located on separate hosts, share the same virtual disk file.
Currently, the FT feature does not support snapshots . This makes backing up FT-compatible virtual machines more difficult, and you will need to find other backup methods.
One method is to temporarily disable the FT function during the backup process to allow snapshots to be taken. Disabling this function allows you to retain the second virtual machine. You can automate this process using PowerShell , as well as pre- and post-backup scripts.
Another method involves cloning the virtual machine using vCenter Converter or vCenter Server to create another copy. Once you've saved the new copy, you can delete the clone.
Back up the host and vCenter Server configurations.
You can easily rebuild a lost host or vCenter, but you will lose your configuration information. Therefore, it is a good idea to save the information periodically. With a backup host, you only back up the virtual machines and not the individual files that reside in your management console. Therefore, saving the configuration information makes it easier to rebuild the host later.
To save configuration information:
- For ESX hosts: use the command esxcfg-info from the service console. It will display a lot of configuration information in a single text file.
- For ESXi hosts: use the command vicfg-cfgbackup (part of vSphere CLI). Will display the configuration information in a text file.
- For vCenter Server: You should back up the database that contains server-specific configuration information including clusters, permissions, resource pools, performance data, alarms, and more. If this works, you can reinstall vCenter Server later, point it to the backup database, and resume operations. Remember to save the folder containing the Secure Sockets Layer (SSL) certificate located in the data directory. It contains the SSL certificates that vCenter uses to communicate with ESXi and ESX hosts, as well as clients.
You might be interested in reading about: How to Use Multiple Virtual Desktops in Windows 10
Conclusion
VMware has attempted to address the backup issues associated with virtualization servers. VMware vSphere 5.1 , for example, uses VMware vStorage API for Data Protection (VADP) which works with VMware's vSphere Data Protection (VDP) or other third-party backup tools.
VADP replaces VMware Consolidated Backup with an efficient agentless backup system based on virtual proxies and does not tax storage resources. In fact, it is equipped with change block tracking to allow saving only the data blocks that have changed since the previous backup. This reduces the workload of backup tools like VDP. This way you can copy a Vmware virtual machine to another PC by making a backup.

My name is Javier Chirinos and I am passionate about technology. Ever since I can remember, I have been interested in computers and video games, and that passion has turned into a job.
I have been publishing about technology and gadgets on the Internet for over 15 years, especially in mundobytes.com
I am also an expert in online marketing and communication and have knowledge in WordPress development.