- Syncthing allows you to synchronize folders between multiple devices using encrypted P2P connections, without the need for central servers.
- The configuration is based on linking devices by their Device ID and defining shared folders with bidirectional or unidirectional synchronization types.
- Features such as presenters, send-only/receive-only folders, and versioning allow you to create flexible clusters and protect data integrity.
- It is a private, multi-platform alternative to the commercial cloud, ideal for personal use, local backups, and small collaborative environments.
If you've ever tried to share a huge folder by first uploading it to the cloud, you know what it's like. wait hours while the files are uploaded and then downloaded...and praying you still have space left in your account. Now imagine transfer files between two PCs directly, without intermediaries, without artificial quota limits, and taking full advantage of available bandwidth. That's precisely the idea behind Configure Syncthing for P2P synchronization between PCs.
Syncthing has been one of the hidden gems of free software for years: a lightweight, cross-platform, and highly flexible tool that allows Sync folders between devices without the need for central servers. Works on Windows, Linux, macOS, Android It can even run on remote servers or NAS devices. In this article, you'll see, step by step and in detail, how to install it, how to connect it between multiple computers, how to create shared folders, and how to get the most out of it for both personal use and more advanced small P2P clusters.
What is Syncthing and how does P2P synchronization work?
Syncthing is a distributed file synchronization system which uses peer-to-peer (P2P) connections between devices. Instead of uploading your data to a cloud server, your computers, mobile devices, or servers form a cluster of devices that communicate directly with each other.
Each device runs a small service (daemon) that is responsible for Monitor shared folders, detect changes, and transfer files to the other nodes in the cluster. All traffic is encrypted using TLS and each machine has its own certificate and private key, automatically generated the first time Syncthing is started.
A key point is that Each device has a unique identifier or “Device ID”That ID is not linked to hardware Specifically, it's not the Syncthing certificate itself that's being migrated. That's why it's possible to migrate the entire configuration from one computer to another by copying its configuration folder, as long as you don't try to use the same identity in two places at the same time.
In practice, you decide which folders to share, with which devices, and in what way: you can have bidirectional sending and receiving folderssend-only or receive-only. And within the same cluster, some devices can act as "presenters," responsible for introduce new devices to the rest and spread the word about them to build more complex topologies than a simple link between two computers.
Furthermore, Syncthing is designed to be cross-platform and easily manageableIt has a very complete web interface and, on some systems, native frontends such as SyncTrayzor on Windows or syncthing-gtk on Linux, which simplify the Boot automatic and notifications.
Installing Syncthing on different systems
One of the great advantages of Syncthing is that you can mix OS without any problemWindows with Linux, Linux with macOS, PCs with Android phones, etc. The core of the program is the same; only the installation method and how it's integrated with the system change.
Windows: Syncthing + SyncTrayzor
On Windows, the official Syncthing binary works from the command line and, by default, leave a window open terminal while running, stores your data in AppData\Local and it doesn't integrate seamlessly with the login process. To smooth things out, the most convenient solution is to use SyncTrayzor, a container that is responsible for:
- Start Syncthing automatically when you log in.
- Minimize to the system tray and show icon and status indicators.
- Show Notifications about changes and connections of devices.
- Provide direct access to the integrated web interface.
SyncTrayzor can be downloaded from its GitHub repository in either an installable or portable version and requires the .NET Framework. Once installed, it's advisable to review its preferences to ensure... It starts with Windows, minimizes to the system tray, and doesn't flood the system with notifications. every time a device enters or exits.
macOS: Syncthing native app
There is no direct equivalent to SyncTrayzor on macOS, but there are a Syncthing package packaged as an app which integrates the binary with the system. It is downloaded from the official Syncthing repository for macOS and installed like any other system application.
After the initial setup, the administration interface remains the same website as always, accessible from your browser. From there you will be able to Configure automatic startup and the rest of the options from the system's own preferences or with third-party tools.
GNU/Linux: packages, repositories, and systemd services
On Linux, installation depends on the distribution. The Syncthing project maintains custom repositories for Debian and derivatives, while in systems like CentOS, Fedora or similar it is usually available through EPEL or other repositories.
Once the package is installed, the service is usually managed with systemd. The typical pattern for running it as a specific user is:
systemctl enable syncthing@usuario

systemctl start syncthing@usuario
Although technically you could run it as root, It is not recommended for safety reasonsIt only makes sense in highly controlled environments where you are the only user and the system is well secured.
It also exists in some distributions syncthing-gtk, a GTK-based graphical interface that provides a tray icon, easy daemon control, and direct access to the administration website.
Android: Official app and mobile synchronization
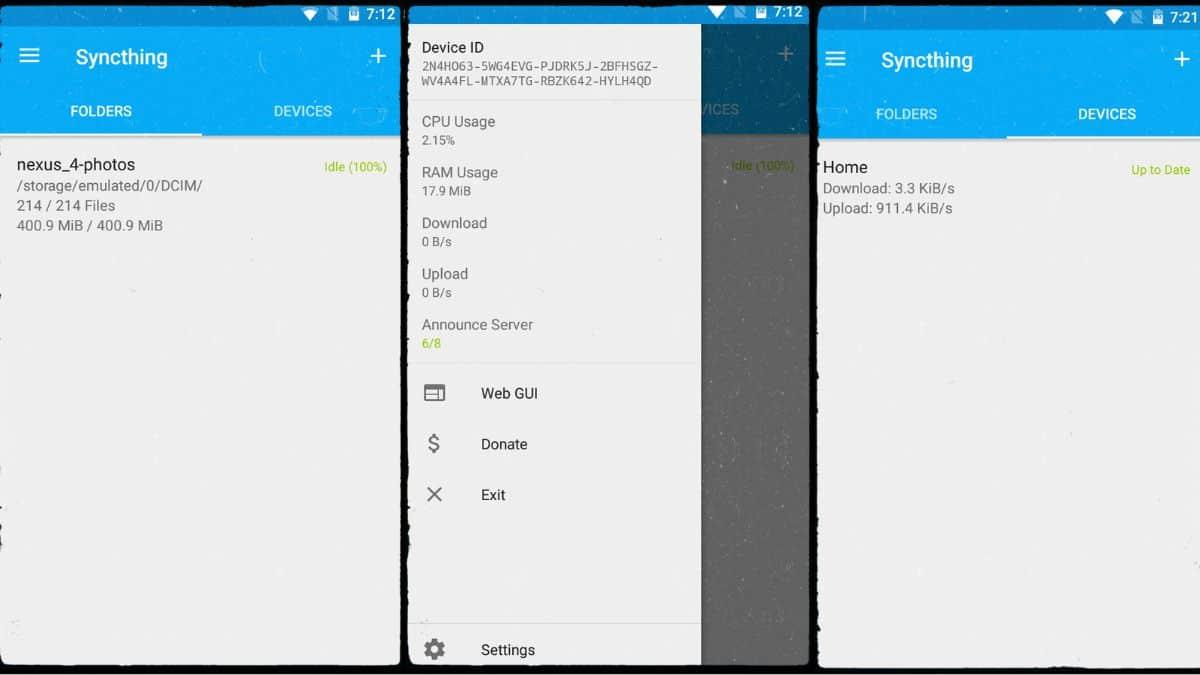
On Android you can install Syncthing from the Play Store or from F-DroidThe mobile application includes both the synchronization service and a touchscreen-adapted interface for managing devices, folders, and permissions.
A typical use is automatically sync the camera folder from your mobile phone to your PC or server, so that every photo you take is automatically copied to your desktop computer without going through Google Photos, iCloud, or similar services.
Manual startup with accessible web interface
On any system, you can launch Syncthing manually by specifying the web interface address with the option -gui-address. For example: uterine
syncthing -gui-address="0.0.0.0:8384"
This exposes the GUI on port 8384, making it accessible from any IP address. This is useful for initial configurations or remote administration, but It's not advisable to leave it open without protectionThe normal thing is to limit it to 127.0.0.1:8384 And if you need to enter from outside, use SSH with port forwarding or configure username and password for the GUI.
First contact with the web interface
Syncthing is primarily handled from a very clear and accessible web interfaceAlthough you can open it from SyncTrayzor or syncthing-gtk shortcuts, internally it is always the same: a page served by the daemon itself on the port you have configured (by default, 8384 on localhost).
This interface is organized into various sections:
- Main menu (Actions/Settings, Restart, etc.).
- Notifications area for notifications of new devices, errors, or statistics.
- Blocks from folders synchronized.
- Panel “This device"with information from the local node."
- List of other devices linked.
- Links to documentation, community, and other external resources.
- Windows of emerging dialogue that open at the bottom when you edit a folder, add a device, etc.
The first time you log in, Syncthing will most likely ask you if you want to send anonymous statistics To help with development: number of nodes, versions, operating systems… You can accept it or not, and change it later from the settings.
Configure username and password for the GUI
If you are going to expose the web interface beyond localhost, it's crucial protect it with authenticationTo do this, from the main menu go to Actions > Settings > GUI and define a username and password. You should repeat this configuration on all devices on your network.
Device identifier and node linking
The heart of the system is the Device IDThis long alphanumeric code uniquely identifies each instance of Syncthing and is used to authorize connections between cluster nodes.
How to view your device ID
To view your ID, in the web interface click on Actions > Show IDA window will open with:
- The complete text string of the identifier.
- Un unit’s QR code, very practical when you want to add a mobile phone by scanning from another device.
That ID is what you will need send privately to another person or note to add this team to the rest of your machines.
Change the device's display name
By default, Syncthing uses the operating system name as the human-readable device name, but you can change it to make it clearer. Actions > Settings > General You will find a field where you can edit this name.
It is recommended to choose an identifier unique and stable in the long term (for example, “PC-desktop”, “Laptop-work”, “Server-home”) to avoid confusion when you have multiple devices connected to the same network.
Add and accept remote devices
The link between devices is always mutualFor two nodes to connect, each must have the other's ID added and have accepted the relationship.
To add a remote device: Have your Device ID handy.
- On Team A, press on Add a device (or “Add remote device”).
- Paste the Device ID of Team B in the first field.
- Choose a human-readable name for that node, or let it use the one it comes from the remote.
- Optionally, on the “Sharing” tab, select which folders you want to share from now on.
- Save the changes.
Syncthing can Automatically discover other devices on the LANSo sometimes you won't even have to copy the ID; simply select the detected node and confirm that the identifier matches.
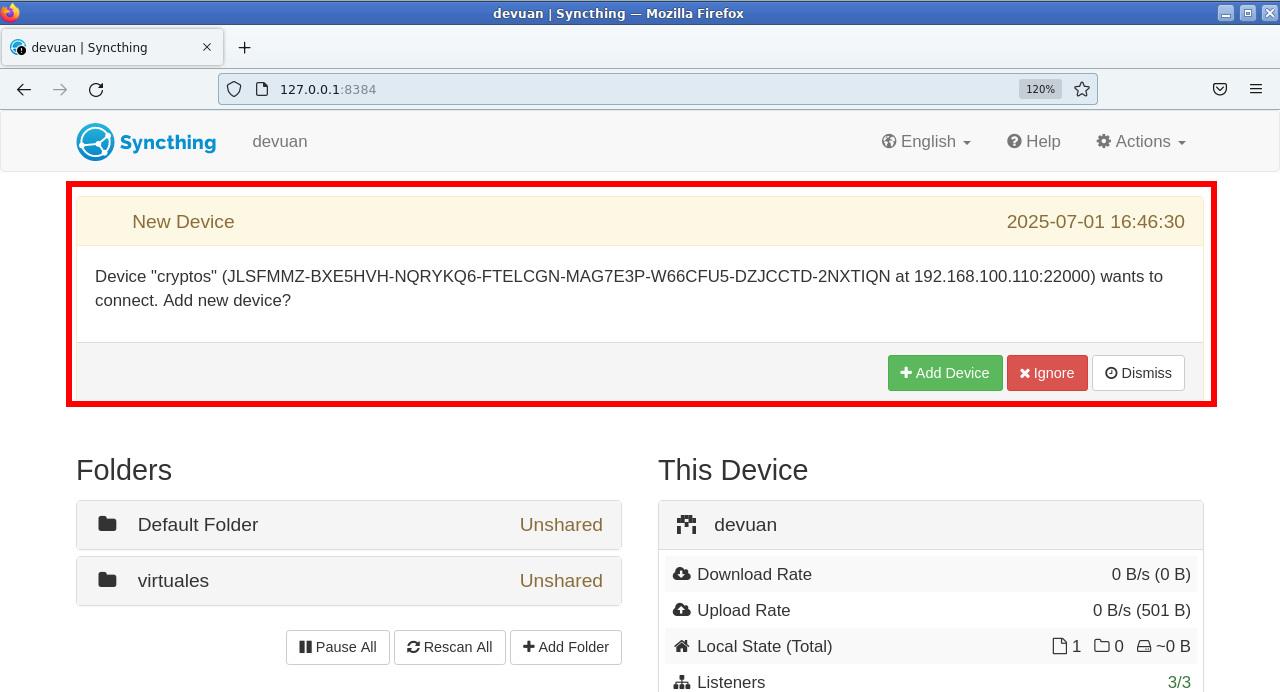
When team A adds B, a will appear in team B. notification asking to accept the new deviceUpon approval, you will see the same dialog box with the ID and name already filled in, ready to save. From that moment on, both nodes will be linked and will be able to share folders.
Creating and sharing synchronized folders
Once two or more devices are linked, it's time to create the first shared folderThe basic process is very simple: on one of the computers, you define a folder, choose its path in the file system, and select which devices it will be shared with. On the other nodes, you accept the invitation and assign the local path where it will be saved.
Define a new folder on a computer
On any device, press the button “Add folder”You will see a dialog box with several tabs, the main one being "General". There you will need to enter:
- Folder label: the name that the rest of the devices will see (for example, “Mobile-Photos”, “Projects”, “vm_share”…).
- Folder path: the absolute path in your file system, exactly as it appears in your file explorer (for example,
D:\Carpeta compartidaon Windows or~/syncthing/vm_shareon Linux).
It's a good idea to follow a logical and consistent structure And when you work in Windows, remember how share a single folder over a networkFor example, grouping all your Syncthing folders into a common directory (~/syncthing) instead of scattering them everywhere. This makes maintenance easier and reduces errors.
Next, switch to the tab “Sharing”There you'll see a list of all your linked devices; select the ones you want to include in this folder. When you tap Save, The folder will be created and the invitation sent. to those nodes.
Accept a shared folder on other devices
On remote computers, a notification will soon appear indicating that another device wants to share a folder with you. Upon accepting, the same folder settings dialog opens, where you can:
- Choose the local route where it will be stored (it doesn't have to be called the same as the source).
- Check the folder type (send/receive, send only, receive only).
- Configure advanced scanning options, space limits, versioning, etc.
If the path does not exist, Syncthing may automatically create the directoryFrom that moment on, any file you put in the folder on one of the computers will start to replicate and stay synchronized on the remaining assigned devices.
P2P synchronization between multiple devices: radial and mesh cluster
When you only have two devices, everything is very straightforward: The changes go from A to B and from B to A No further story.
Suppose you have three devices: A, B, and C. Initially, you might only connect C to A. This makes A sees B and C, but B and C do not know each otherAny data that needs to go from B to C will pass through A, which becomes a bottleneck and central point of failure.
To improve this, Syncthing introduces the concept of "presenter" (Introduce). A device marked as a presenter can propagate the existence of new nodes to the other devices with which it shares folders. That is, if A is a presenter and adds C, B will also automatically know about C.
To mark a device as a presenter: activates the introduction of new nodes.
- Expand the device in the list and tap on Edit.
- Go to the “Sharing” tab.
- Check the box "Presenter" (or “Introduce”).
- Check that the shared folders are marked correctly.
- Save the changes.
This way you can create a radial clusterA central node that presents the other devices to each other. The great advantage is that, even if the presenter turns off, The others will continue talking to each other and synchronizing dataFurthermore, when multiple computers have part of the files, the transfers are distributed: each node can download blocks from multiple sources, thus reducing the individual load.
There is also the possibility of setting up a mesh cluster In total, all devices mark each other as presenters. It's a very flexible option, but not advisable in most cases, because Information from devices tends to be recycled endlesslyIf someone unsubscribes and is deleted, their listing may reappear, forwarded by another node that still has it. The end result is usually a list full of phantom devices, and to make matters worse, Syncthing will display warnings when it detects reciprocal presenters.
Folder types: send and receive, send only, receive only
The default behavior of a folder in Syncthing is “Send and receive” (send & receive). This means that any of the devices participating in it can create, modify, or delete files, and these changes will spread in both directions until everyone is synchronized.
However, there are scenarios where this is not desirable. A typical example is when you want to synchronize unidirectionally from A to Bso that B receives all the changes but can never modify them back, not even by accident.
Configure a send-only or receive-only folder
Each device can decide independently, the synchronization mode of each folder:
- Send and receive: full bidirectional synchronization.
- Send onlyThe device acts as a data source and does not accept changes from the network.
- Receive onlyThe device downloads changes, but its local modifications are not propagated.
To change the folder type: Select 'Folder type' in Advanced.
- Click on the folder header to expand its panel.
- Press on Edit.
- Open section "Advanced" within the dialogue.
- Search the field “Folder type” and select the desired option.
- Save the changes.
It's important to understand that this configuration is done at each endFor example, you could have device A with the folder set to "Send only" and device B with it set to "Receive only". In that case, A will be the authoritative reference from the folder and B will simply replicate its contents.
If you modify files locally on a device configured to only receive, Syncthing will treat them as such. unwanted differencesThe web interface will show you the option to discard those changes to realign with the source. Other computers will see that the folder is not fully synchronized until this discrepancy is resolved.
Practical example: synchronization from A to B without return changes
Imagine you have two PCs, A and B, both running Windows, and you want to All changes you make in folder A will be reflected in folder B, but never vice versa.The behavior you described, where a folder deleted on one side is recreated from the other, is typical of a poorly aligned bidirectional configuration.
To achieve the exact flow A → B, do the following: configure opposite types at each end.
- On computer A, configure the folder as “Just send”.
- On computer B, configure the same folder as “Only receive”.
- Make sure both are pointing to the correct route and that the devices are online.
From there, Any file you delete, modify, or create in A will be applied to BHowever, changes made in B will not propagate back. If you create a subfolder in B, Syncthing will eventually offer you the option to remove that discrepancy and revert to the state imposed by A.
Privacy, security, and Syncthing network components
Although Syncthing's philosophy centers on keeping your data on your devices, it's important to know what information is shared and what auxiliary services are involved in the process.
Encryption and visibility between devices
Communication between nodes is always performed over end-to-end encrypted TLS connectionsusing locally generated key pairs and certificates. This prevents unauthorized third parties from reading or modifying your data in transit.
However, within the cluster itself, Each device sees some details about the others. with which it is linked: IP address, operating system, Syncthing version, connection status (connected, disconnected, synchronizing, etc.). That's why it's advisable limit connections to only trusted peopleespecially when it comes to personal devices that reveal your usage habits (times you connect, for example).
Auxiliary servers: discovery, relays, and statistics
In addition to direct P2P, Syncthing relies on a number of public services managed by the project:
- Global discovery server: allows two devices to locate each other using their Device ID, even if they are behind NAT and their IPs are unknown.
- Relays (repeaters)When it's not possible to open ports or use UPnP, some nodes resort to relay servers that act as a bridge, at the cost of losing speed.
- Relay list server: central catalog that indicates which relays are available.
- Update server: source from which Syncthing downloads new versions when auto-update is enabled.
- Statistics server: collects anonymous data if you agree to participate, to improve development and understand how the software is used.
All these components can replace or deactivate in the advanced settings to set up a completely private network or use methods to secure file sharing (For example, in an organization with its own discovery server and internal relays). However, if you don't have a specific need, it's usually best to leave the default configuration, which offers a very reasonable balance between convenience and control.
Advanced options useful in everyday life
Beyond the basics, Syncthing integrates advanced functions that allow you to fine-tune the synchronization and adapt it to more complex scenarios.
Folder parameters: scan, space, and metadata
When editing a folder and entering the tab "Advanced"You'll find options like:
- Scanning interval: how often changes to the file system are checked, in addition to real-time notifications.
- Disk space limits: minimum free percentage to avoid completely filling a partition.
- File verification order and scan priority.
- Synchronization permissions, owner, and other metadata depending on the operating system.
Ignore files, share with more devices, and versioning
In other tabs you have very practical tools for filter and preserve versions:
- Sharing: add or remove participating devices in an already created folder.
- Ignore Patterns: specify file or subfolder patterns that you don't want to sync (for example,
*.tmp, directories.git, etc.). - File VersioningConfigure how to save previous versions of modified or deleted files. Syncthing can keep multiple old copies to give you a buffer in case of errors.
Remote access to the GUI and configuration on servers
When you use Syncthing on a remote server or on a machine without a graphical environment, the web interface becomes even more important. The GUI allows you to manage everything remotely.. You may:
- Change the listening IP address of the GUI in Actions > Settings > GUI so that it accepts connections from the LAN or from a specific IP address.
- Manually edit the file
~/.config/syncthing/config.xmlto adjust the address if you cannot temporarily access the website. - Use a SSH tunnel to forward port 8384 from the server to your local machine and manage Syncthing as if you were sitting in front of it.
In systems with systemd, remember that if you modify the service unit (/etc/systemd/system/syncthing@usuario.service), you will need to run systemctl daemon-reload and restart the service for the changes to take effect.

Passionate writer about the world of bytes and technology in general. I love sharing my knowledge through writing, and that's what I'll do on this blog, show you all the most interesting things about gadgets, software, hardware, tech trends, and more. My goal is to help you navigate the digital world in a simple and entertaining way.