- In a SSD NVMe, a namespace is a logical set of blocks (LBA) that the host sees as an independent device, managed by commands of creation, deletion and association.
- Linux It exposes each namespace as /dev/nvmeXnY, on which partitions, file systems can be created or used as a raw block, managing permissions at the device level.
- Namespaces are also a kernel mechanism for isolating resources (PIDs, network, mounts, users, etc.), the basis of containers and sandboxes like Docker, Podman, or Flatpak.
- In Kubernetes, namespaces organize and isolate logical cluster resources, enabling multitenancy, RBAC access control, and resource quotas within the same physical cluster.
When you really start getting into storage modern, NVMe and LinuxIt's normal to feel a bit overwhelmed: namespaces, partitions, LVM, containers, Kubernetes… It seems like everything uses the same word, but it doesn't always mean the same thing. Here we're going to focus on what they are. namespaces on an NVMe SSDWe'll see how they look from Linux and, since the term is reused, we'll also see how namespaces fit into the Linux kernel and Kubernetes so you don't confuse them anymore.
The idea is to build a complete picture: from what physically happens inside a NVMe SSDs with logical namespaces, including how they are exposed as /dev/nvme0n1 devices in Linux, and how they are managed with tools such as nvme-cliAnd finally, we'll cover the concept of namespaces at the system level (IPC, PID, network, etc.) and in orchestrators like Kubernetes. All of this will be presented with a practical, approachable style, and above all, without leaving any loose ends.
What exactly is a namespace on an NVMe SSD?
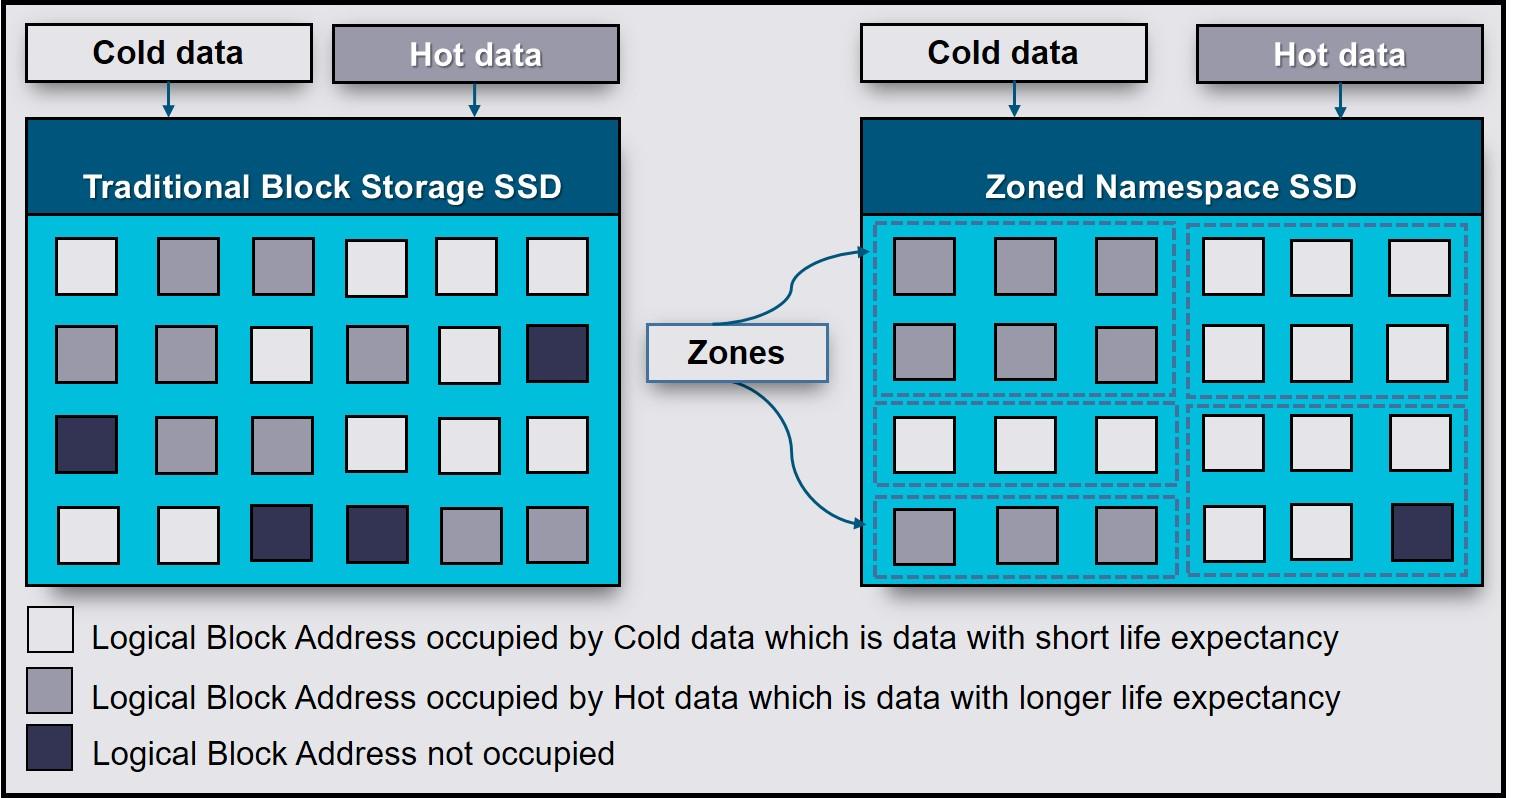
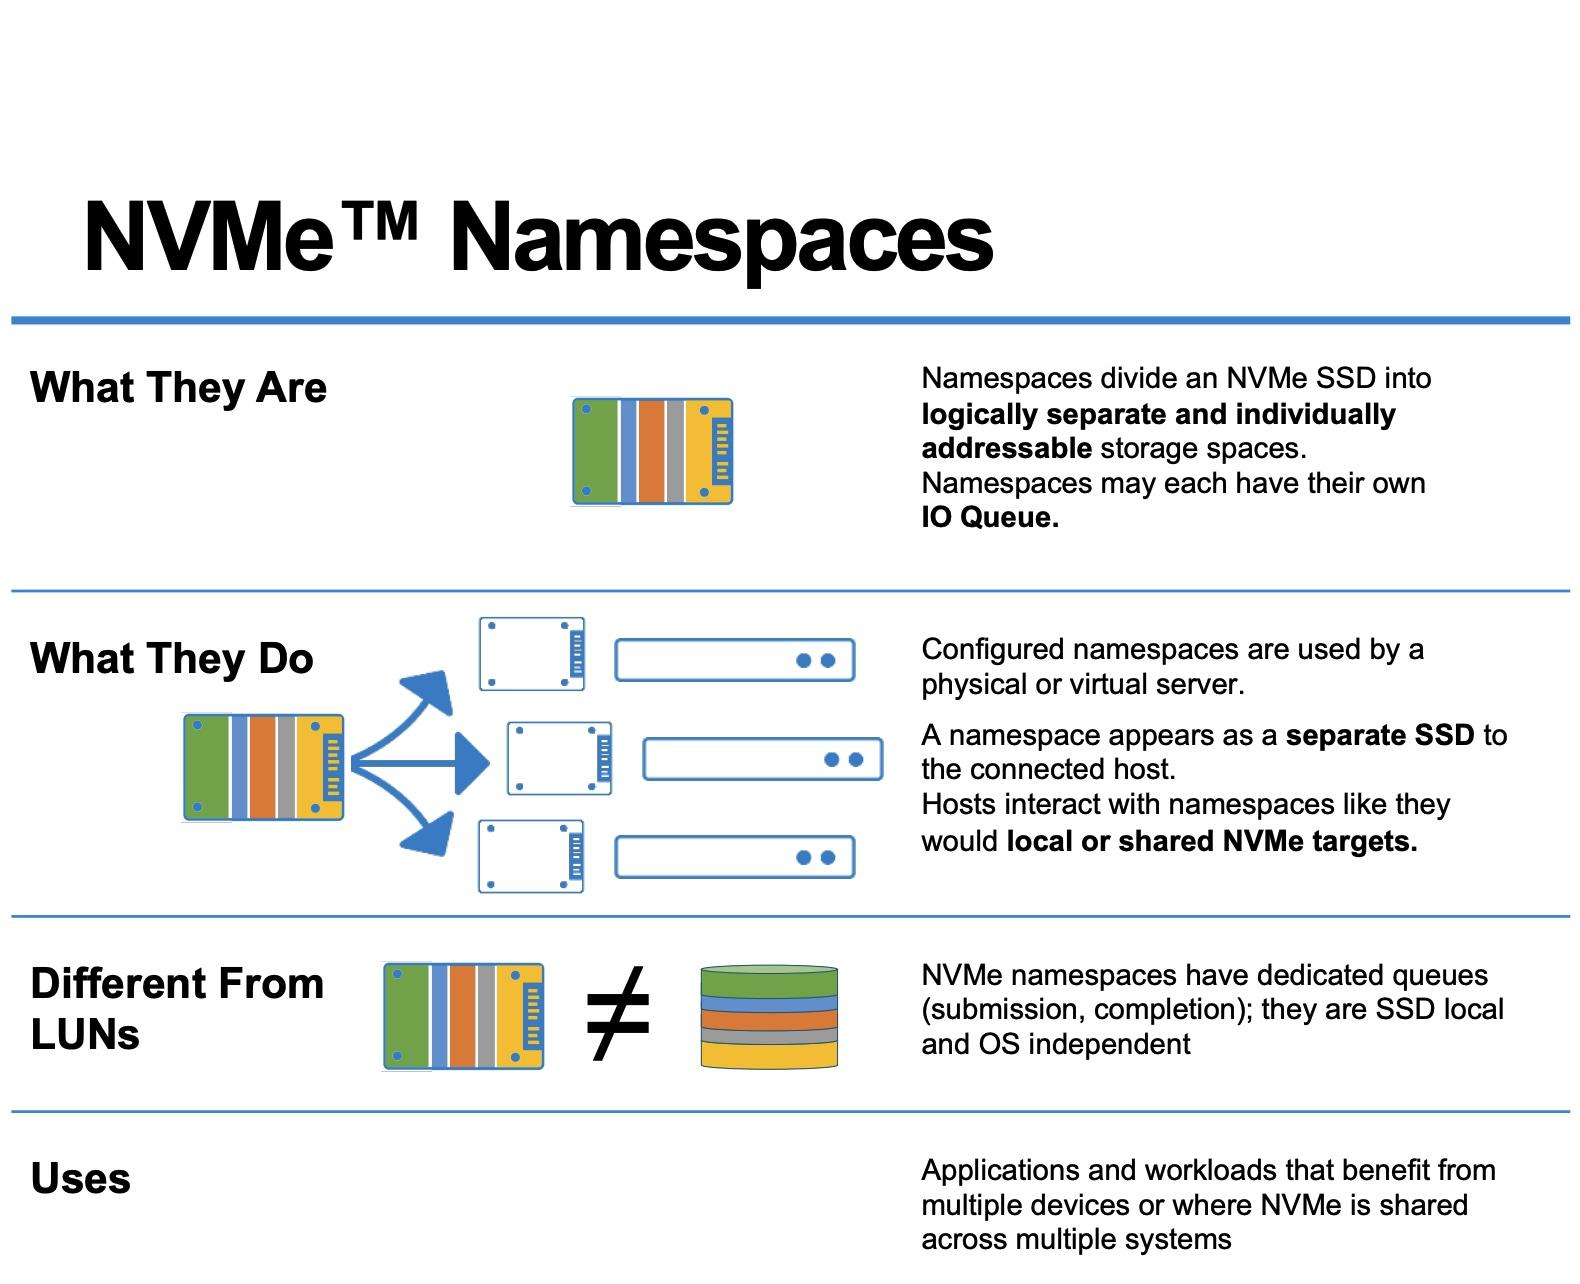
In NVMe technology, a namespace is, literally, a set of logical block addresses. (LBA, Logical Block Addresses) that the operating system can see as if it were an independent block device. It is not a separate physical piece of NAND, but a separation logic inside the SSD.
When the manufacturer configures the disk, the NVMe controller organizes the flash memory into one or more namespaces. Each is identified by a NSID (Namespace ID) The controller is responsible for exposing these namespaces to the host system. Each namespace is presented to the system as an independent destination, allowing a single SSD to appear to the system as several different "disks."
In Linux, each namespace appears as a block device of type /dev/nvmeXnYwhere X is the controller index (for example, 0) and Y is the namespace ID (for example, 1). Thus, /dev/nvme0n1 It indicates “NVMe controller 0, namespace 1”. This device can treat it like any other discIt can be partitioned, forma tear, add to LVM, use as raw volume, etc.
An important detail is that, in most units, By default there is a single namespace whose size encompasses all usable capacity of the SSD. However, the NVMe standard allows you to delete that namespace and recreate several, each with its own size and certain particular properties, such as a specific LBA format or specific security policies.
Size, capacity, and usage of an NVMe namespace
The NVMe standard defines a structure called Identify Namespace which contains several critical metrics: size, capacity, and utilization of each namespace. You can access this information with tools such as nvme-cli using the command nvme id-ns and also with programs to diagnose hard drives and SSDs.
Within that structure, three key fields stand out: NSZE, NCAP and NUSEUnderstanding them well is fundamental to controlling how you are actually using the space within each namespace and how the unit responds to logical delete operations (TRIM or Deallocate).
Field Namespace Size (NSZE) It indicates the total number of logical blocks that make up the namespace, numbered from LBA 0 to LBA n-1. It is, so to speak, the nominal size of the namespace: the number of block addresses that the host sees as available, regardless of whether or not they are internally allocated.
Field Namespace Capacity (NCAP) This marks the maximum number of blocks that the device can actually have allocated at any given time. Although it may seem the same as NSZE, it doesn't necessarily coincide: the capacity can be less than the official namespace size, which opens the door to advanced space management techniques and internal over-provisioning.
Finally, the field Namespace Utilization (NUSE) This reflects how many logical blocks are currently allocated. After a full format, NUSE should be zero; as data is written, this value increases and only decreases again when the system sends block release commands (TRIM or Deallocate). This indicator is very useful for applications and systems that need to know if the device is correctly handling space release requests.
Block format and other namespace capabilities
In addition to size and usage, each namespace is described, through the command Identify, what LBA formats it supports, what block sizes are optimal, and whether it has additional features such as end-to-end protection or different security modes. This information is used by OS and the applications to adjust the size of read/write operations and take full advantage of the hardware.
A single SSD can accept one or more LBA formats (for example, 4 KiB, 8 KiB, etc.). In some models, all namespaces must share the same format; in others, each namespace may have a different block size. This is especially useful when combining diverse workloads, where one namespace is optimized for small file I/O and another for large sequential reads.
The identification structure also indicates whether the namespace supports protection information (Protection Information, PI), that is, additional metadata that allows verification of data integrity along the entire path, from the application to the NAND, reducing the probability of silent corruption.
It is worth emphasizing that A single namespace can be associated with one or more NVMe controllers within the same subsystem. If it is only linked to one controller, it is called a private namespace; if it is attached to several, it is called a shared namespace. This flexibility is essential in high-availability environments and NVMe-oF (NVMe over Fabrics) storage arrays.

Namespace management: creation, deletion, and association
The NVMe specification includes two large groups of commands for managing namespaces: Management y association (Attachment)With the first one you can create, modify and delete namespaces; with the second one, attach or detach them from one or more controllers of the subsystem.
The typical flow is as follows: first the host Create a namespace with the desired parameters (size, capacity, LBA format, etc.). At that point, the namespace is not yet visible as a block device to the operating system. To make it appear, a command must be executed. attachwhich links it to a specific controller or several. After a reset Whether from the controller or a rediscovery, the system will eventually expose it as a /dev/nvmeXnY device.
You can also follow the reverse path: unlink an existing namespace from its controllers to stop exposing it to the host and then completely delete it. This is what is usually done when you want to recreate the distribution of namespaces on a unit, for example, to change the over-provisioning percentage or to reorganize the allocation between different tenants.
In Linux, the reference tool for this is nvme-cliWith it you can list namespaces (nvme list), check details with Identify, create new namespaces (nvme create-ns), attach them (nvme attach-ns), separate them (nvme detach-ns) and delete them (nvme delete-nsThese operations typically require administrator privileges and must be carefully planned, as they involve significant changes to the unit's layout. Furthermore, it is advisable keep firmware up to date.
When working with multiple namespaces in the same drive, it is common to use private namespaces for isolated environments (for example, a specific host) and shared namespaces For more complex architectures, where multiple hosts coordinately access the same data through an NVMe-oF subsystem.
Why split an NVMe SSD into multiple namespaces?
It might seem that the simplest solution is to leave the SSD with a single namespace that occupies the entire capacity, but there are compelling reasons to create multiple namespaces. Among the most common are: logical customer separation, improved security, and fine-tuning of performance and durability.
In scenarios of multitenancyFor example, in cloud service providers or large platforms, a single physical SSD can host the data of multiple clients. Using namespaces, each tenant gets its own isolated "logical disk." This greatly simplifies management, billing, and SLA design, without requiring the physical partitioning of the NAND.
Another common reason is the security and encryption by namespaceMany OPAL-compatible NVMe drives allow you to define encryption policies on LBA ranges. If you work with a single namespace, you can configure multiple protected ranges within it; but if you create separate namespaces for different data sets, you can apply different keys and encryption rules per namespace, aligned with the sensitivity level of each data set.
There is also the case of the environments with very different performance requirements on the same machine. One namespace can be reserved for a critical database, with a high over-provisioning percentage to minimize latency and improve resilience, while another namespace serves for less I/O-intensive data. This separation helps prevent a noisy workload from degrading the experience of a more sensitive one.
In addition, namespaces allow apply read-only policies to important data, for example, an embedded operating system or an image of Boot in mobile products, high-security environments, or industrial systems. NVMe can mark a namespace as temporarily read-only (until the next power cycle), until the lock is removed and the drive is restarted, or even leave it permanently in read-only mode for the entire lifespan of the drive.
Over-provisioning and fine-tuning by namespace
SSDs always internally reserve a certain amount of flash memory not visible to the system, which is used as overprovisioning space for internal tasks such as garbage collection, wear leveling, and bad block management. However, by adjusting the size of the namespaces, the administrator can influence how much of the NAND remains unallocated to the host and is therefore available as an internal reserve.
If you create a namespace that is significantly smaller than the total amount of physical flash, you are leaving a larger fraction of memory unexposed to the host. The more over-provisioned the device is, the better the performance stability usually is. and greater resistance in writing cycles, something fundamental in intensive writing workloads.
For example, imagine a 7,68 TB SSD that is defined with a usable namespace of approximately 6,14 TBThe rest remains hidden from the host and is added to the over-provisioning buffer. With tools like nvme-cli It is possible to delete the previous namespaces, recreate them with the desired size, and reattach them to the controllers to achieve exactly that effect.
One of the challenges in this process is to properly adjust the namespace size and capacity granularityThe standard stipulates that both NSZE and NCAP are handled in units that don't necessarily have to exactly match the logical block size, which can result in small portions of unaddressable memory if the values aren't chosen carefully. The goal is to minimize this "wasted" space so that the namespace is as well-rounded as possible.
During the creation of the namespace, the following must be taken into account: device restrictions reported by the device itself. By adjusting the NSZE and NCAP values based on these factors, it is possible to ensure that almost all physical memory is properly utilized, either as space accessible by the host or as internal over-provisioning useful for the controller.
Namespaces, Linux partitions, LVM, and block shortcut
From a Linux perspective, each NVMe namespace appears as a base block device type /dev/nvme0n1From there, the administrator can decide how to use it: leave it unpartitioned for direct I/O, partition it like a classic disk, or integrate it into LVM or other volume management systems.
When partitions are created on that namespace, the kernel exposes them as /dev/nvme0n1p1, /dev/nvme0n1p2etc. The suffix “p” indicates that it is a partition of the namespace, just as /dev/sda1 is a partition of /dev/sda. File systems can be mounted on these partitions, and they can be used in LVM, software RAID, etc.
If what you are looking for is expose "raw" block storage When accessing a database or distributed storage system directly, it's common to work with the namespace device without partitions, or with a dedicated partition but without a file system on top of it. In these cases, the application usually communicates directly in terms of logical blocks and manages its own internal space.
It should be noted that Dividing a namespace that is already in use with partitions is not trivial. without affecting the data. To modify the namespace layout, the usual procedure is to back up the information, unmount, delete the namespace, and recreate it with the desired size, which requires careful planning in production environments.
Regarding permissions, a block device without a file system is controlled, like any other node in /dev, through owner, group and access modeIn addition to that, they can be used ACLs, udev rules and system access control mechanisms (e.g., special groups for disk access) to decide which users or services can read and write to a namespace or one of its partitions.
Linux kernel namespaces: system resource isolation
The word namespace is not only used in the context of NVMe. The Linux kernel offers a mechanism with the same name, but geared towards isolate system resources for processesThis functionality is the basis of technologies such as Docker containers, Podman, LXC, or Flatpak and bubblewrap sandboxes.
In this case, a namespace wraps a global resource (mount points, network stack, PIDs, users, hostname, clocks, etc.) in an abstraction that makes the processes living within it see its own isolated instance of that resource. Changes made from within that namespace are only visible to processes that share that same namespace.
Linux currently supports several types of namespaces: cgroup, ipc, mnt (mount), net, pid, user, uts and timeEach one isolates a specific aspect of the system. For example, the network namespace allows a container to have its own interfaces and routing tables, while the PID namespace gives it its own process numbering starting at 1.
To inspect which namespaces a specific process belongs to, simply look at the symbolic links in /proc/<PID>/ns/Each link points to a namespace identifier, which can be shared with other processes (if they are in the same space) or be different (if it has an isolated environment).
Tools like bubblewrap (bwrap)The methods used by Flatpak rely precisely on these mechanisms. Bwrap creates sandboxes by launching processes with separate namespaces for mount, PID, user, network, etc., so that the application runs in a confined environment where it only sees the resources that have been granted to it.
Practical experiments with unshare and nsenter
If you want to experiment with Linux namespaces without installing anything unusual, you have system commands at your disposal such as unshare y nsenterThey are very useful for understanding what's happening behind the scenes when you run containers or sandbox applications.
With unshare You can launch a new process with one or more isolated namespaces: for example, a shell that has its own set of PIDs and users. When running it with options like –user, –pid and –forkYou will obtain a session where the process running inside sees PID 1 as its own and, furthermore, runs with a different user (for example, nobody), which underlines that isolation.
In these environments, it is important to set up a /proc new and isolated using the option –mount-procIf this is not done, some utilities that depend on it will not be able to function properly. /proc/<PID>/exe They can fail because they try to view process information based on the host namespace, and the kernel blocks that access to maintain security isolation.
It should also be noted that, if unshare does not use –forkIt could execute the command within the same process and cause curious errors, such as the inability to mount /proc adequately or memory allocation failures, since the process does not assume the correct role of PID 1 within the new namespace.
On the other hand, nsenter It does the reverse: it allows you to "enter" the namespaces of an existing process. This is what's typically done to examine how a container or Flatpak application sees the world from the host. Once inside, you can inspect its network stack, mount points, internal process table, and so on, as if you were "inside" the container.
Namespaces and containers: from Flatpak to Podman and Docker
Once you understand kernel namespaces, it's easy to see how Containers are not magic, but a composition of several primitives: namespaces to isolate resources, cgroups to limit consumption, capabilities to control privileges, and layered file systems to package applications.
Flatpak uses bubble wrap to create isolated environments for desktop applications. Each application runs in a set of namespaces where the paths it can access, process visibility, network access, etc., are restricted. At the process level, it is clear that the PIDs, mount points, and often the user, differ from those of the host system.
Similarly, tools such as LXC, Docker or Podman They comprise different namespaces to build general-purpose containers. For example, a rootless container might use a user namespace to map internal IDs to unprivileged IDs on the host, and a network namespace to have dedicated virtual interfaces. Analyzing the container process ID on the host and entering with nsenterThis isolation can be verified firsthand.
For situations where you want to create "rootless" namespaces more easily, you can use tools such as rootlesskitwhich help configure all the necessary setup so that a user without privileges can create isolated environments without direct access to root, something increasingly in demand in modern multi-user environments.
Namespaces in Kubernetes: logical virtual clusters
The term namespace reappears in Kubernetes, but here it refers to a logical mechanism for segmenting resources within a single clusterIt has nothing to do with NVMe block addresses or kernel-level isolation, although conceptually it is also used for separation and organization.
In Kubernetes, a namespace is like a virtual cluster within the physical clusterIt is used to group resources (pods, services, deployments, etc.) so that they can be managed and isolated by teams, projects or environments (development, testing, production) without the need to set up several real clusters.
These namespaces allow resources to exist with the same name in different contextsFor example, you might have a service called my-service in the namespace development and another with the same name in production without conflict, because uniqueness is guaranteed only within each namespace.
Furthermore, Kubernetes namespaces are integrated with RBAC (role-based access control)It is possible to define permissions that limit which users or service accounts can create, modify, or read resources in a given namespace, which greatly facilitates secure delegation between different teams or organizations sharing infrastructure.
Another key piece is the resource quotasKubernetes allows you to restrict, by namespace, the amount of CPU, memory, objects (such as pods), and other resources that workloads can consume. This prevents a single project from consuming the entire cluster and promotes more predictable and equitable resource usage.
Practical operation of namespaces in Kubernetes
In a newly installed cluster, Kubernetes typically creates several namespaces by default: default, kube-system and kube-publicThe first is used for resources that do not specify a namespace; the second is intended for internal system components; the third, accessible even to unauthenticated users, is reserved for certain elements that need to be read publicly at the cluster level.
To see the available namespaces, you can use kubectl get namespaces or its abbreviation. From there, the administrator can create and delete namespaces as needed, usually following a project-based or environment-based organizational strategy (for example, giant, staging, prod).
When a command is launched with kubectlThe target namespace can be temporarily specified using the option –namespaceOr you can configure a default context that makes all operations point to a specific namespace, which saves errors and prevents you from having to type the option in each command.
Regarding DNS, Kubernetes registers services using a fully qualified domain name (FQDN) like this: . .svc.cluster.localWithin the same namespace, simply using the service name is sufficient, and DNS resolution will handle the rest. However, if you want to access a service in a different namespace from a pod in one namespace, you must use the fully qualified domain name (FQDN) or a partial name that includes at least the service and namespace.
Not all Kubernetes objects live within a namespace. The namespaces themselves, the nodes, or the persistent volumes These are cluster-level resources and are not encapsulated within a namespace. This is important for understanding which resources are logically segmented and which are considered global.
In general, it is recommended to start using namespaces when the The cluster already has a considerable number of users and applicationsor when you need clear isolation between teams. For less profound differences (such as application versions), it's usually better to use labels within the same namespace than to unnecessarily multiply the number of namespaces.
If we put all these pieces together—namespaces in NVMe SSDs to segment block addresses, kernel namespaces to isolate process resources, and namespaces in Kubernetes to logically organize cluster resources—we see that the same word is reused for related ideas: create separate domains within a shared spaceEach with its own vision and rules. Understanding which layer you're at at any given moment is what makes the difference between an orderly system and one that's impossible to maintain.

Passionate writer about the world of bytes and technology in general. I love sharing my knowledge through writing, and that's what I'll do on this blog, show you all the most interesting things about gadgets, software, hardware, tech trends, and more. My goal is to help you navigate the digital world in a simple and entertaining way.