- bootres.dll is the resource library of Boot containing the startup logo images.
- Its edition allows you to customize the logo in Windows 10 by extraction, modification and signature.
- In UEFI, the firmware's BGRT defines the logo; tools like HackBGRT or Aptio Change Logo are available.
- Common errors are corrected by restoring the file, verifying integrity, and undoing customizations.
If you have come this far it is because you are curious to know what exactly it is. bootres.dll and how to fix it without breaking anything. This file appears in many tutorials and forums when we want to change the Windows boot logo or when the system throws strange errors upon startup. In the following lines you will find a very complete guide, with approaches for BIOS legacy, UEFI with BGRT, and solutions to typical issues.
It's best to take it easy: we're talking about a component of the boot process. One false step and your computer might not boot. That's why here you'll find warnings, alternatives, and a well-explained step-by-step guide, as well as common error messages, routes, tools and commands concrete that other users have used (successfully) to customize or repair this file.
What is bootres.dll and what is it used for?
The file bootres.dll is part of the Microsoft Boot Resource Library. It is used during Windows startup and, among other things, stores graphical resources such as boot logo images. In Windows 10, this file typically resides in C:\Windows\Boot\Resources\bootres.dll and also has a corresponding system copy in WinSxS, the component store.
Inside you will find packaged resources (for example, an RCData entry with a .wim container) that include 24-bit BMP images of different sizesThis is precisely the avenue that personalization methods exploit: extracting, modifying, and re-injecting these images to see a different logo upon startup.
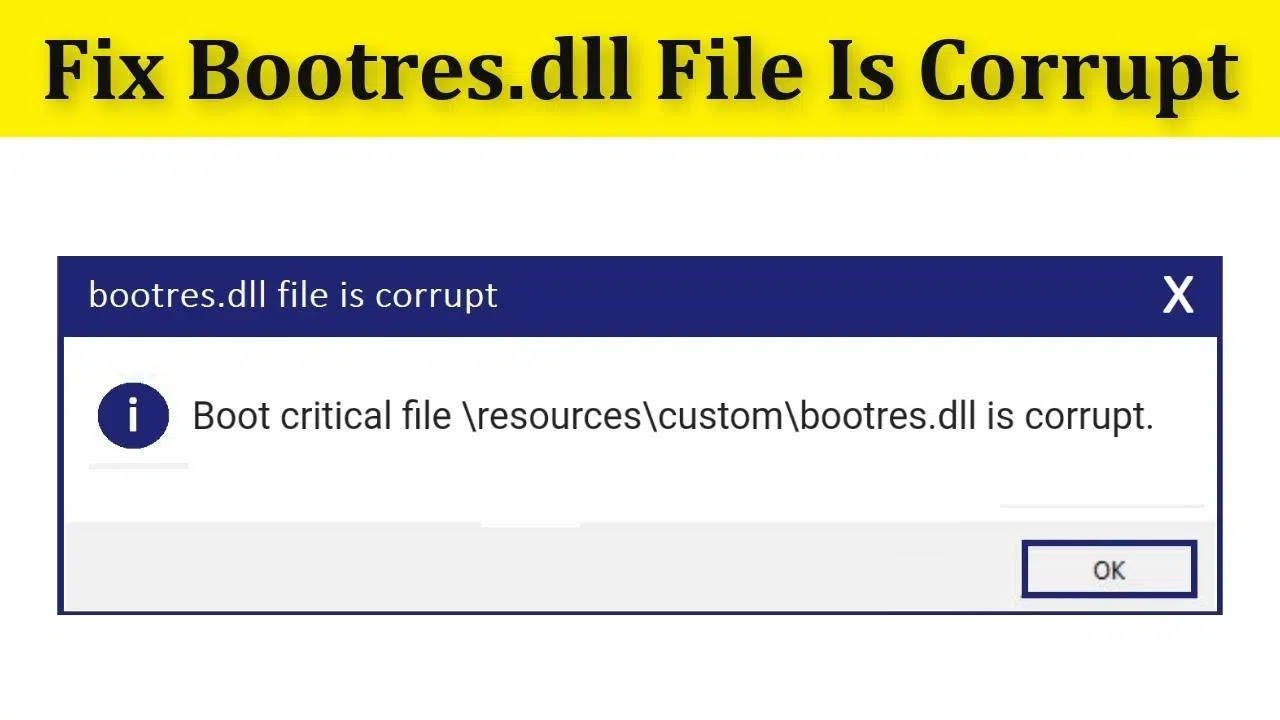
When something goes wrong, Windows may display warnings like: “The program can’t start because bootres.dll is missing”, “The specified module could not be found,” “Error loading bootres.dll,” “Code execution cannot proceed because bootres.dll was not found,” or “bootres.dll is either not designed to run on Windows or it contains an error.” In some cases, they appear as “load error,” “access violation,” or with references to paths like C:\Windows\Boot\Resources\.
Regarding versions, sizes and language, we have seen compilations like 32-bit 6.2.9200.16384 (17.7 KB), 32-bit 6.1.7601.17514 (2.1 MB), 64-bit 10.0.19041.1 (90.3 KB), 64-bit 10.0.14393.0 (26.3 KB), or 64-bit 10.0.10240.16384 (18.8 KB), usually in US English. For 10.0.19041.1, for example, hash sums such as MD5 3311f69d3894a7453fd23a505b5093d3 and SHA1 a9bbecda9ef5ad4ea7ce1058b783d90ad58799ac have been published, useful for verify integrity if you work with copies.
Modify the boot logo by editing bootres.dll in Windows 10 (manual method)
There is a classic procedure that consists of Extract the internal images of bootres.dll, edit them, and re-sign the file.. It's a powerful method, although it requires patience and precision. Broadly speaking, it uses utilities such as Restorator (a resource editor), 7-Zip (to open the .wim file), and a signing tool ("Signer") to validate the resulting DLL.
First of all, make a backup. Seriously: un backup It can save you from a very bad scare. Create a working folder (for example, C:\newboot) and set up all your tools there. You'll also need administrator privileges.
- Take ownership and permissions of the file. Open a console (Symbol of the system) “Run as administrator” and take ownership of the folders and files involved.
takeown /f C:\Windows\Boot\Resources /R /DN attrib -r C:\Windows\Boot\Resources\*.* /s takeown /f C:\Windows\Boot\Resources\bootres.dll icacls C:\Windows\Boot\Resources\bootres.dll /grant yourUser:f
On WinSxS systems, locate the specific path of the component. In some builds, something like this has been seen. C:\\Windows\\WinSxS\\amd64_microsoft-windows-bootres_31bf3856ad364e35_10.0.9926.0_none_19f8c913393a8b5d. Adapt to your case and repeat the operation:
takeown /f C:\Windows\WinSxS\amd64_microsoft-windows-bootres_... /R /DN attrib -r C:\Windows\WinSxS\amd64_microsoft-windows-bootres_...\*.* /s takeown /f C:\Windows\WinSxS\amd64_microsoft-windows-bootres_...\bootres.dll icacls C:\Windows\WinSxS\amd64_microsoft-windows-bootres_...\bootres.dll /grant yourUser:f
Where it says yourUser Replace it with your Windows username (the one you use to log in). Removing read-only protection is key to being able to manipulate files.
- Prepare the work folder. Copy the main bootres.dll to C:\\newboot and create a subfolder called Logos to organize the images.
mkdir C:\newboot\Logos copy C:\Windows\Boot\Resources\bootres.dll C:\newboot\
Working in a separate environment will help you avoid errors on hot file system and have everything at hand.
- Extract the RCData resource with Restorator. Open C:\newboot\bootres.dll and locate the RCData folder. Inside you'll see an item (for example, “1”). Right-click on that item and choose Extract → Extract as… and save as RCDATA_1.wim in C:\newboot. Don't close Restorator yet; we'll use it again to re-inject the content once it has been modified.
- Edit the BMP. Open the RCDATA_1.wim file with 7-Zip (right click → 7-Zip → Open compressed). You will see six .BMP files. Extract those BMPs to C:\\nuevoboot\\Logos, edit them with your favorite editor, and drag them back to 7-Zip to replace them when prompted. Be careful to respect the format and color depth. In the classic method, you worked with 24-bit BMP and scale-specific sizes. Do not close 7-Zip until you confirm the replacements are complete.
- Reassign and save. Return to Restorator, right-click on the resource (e.g., “1”) → Assign → Assign to… and select the newly modified RCData_1.wim. Save the changes to bootres.dll. If Restorator asks, choose to overwrite. It is essential that the resource is correctly injected into bootres.dll for the system to use at boot.
- Sign the DLL. Open an administrator console in C:\newboot and use the Signer tool to sign the file. When you run it, it may ask you to install a certificate; answer yes.
signer / sign sign bootres.dll
This step ensures that Windows accepts the file as valid. If it doesn't, the system will normally reject the modified library at startup.
- Replace with backup. Rename the original bootres.dll in the system paths to leave a copy, and then copy the new one.
ren C:\Windows\Boot\Resources\bootres.dll bootres.dl_ ren C:\Windows\WinSxS\amd64_microsoft-windows-bootres_...\bootres.dll bootres.dl_ copy C:\newboot\bootres.dll C:\Windows\Boot\Resources\bootres.dll copy C:\newboot\bootres.dll C:\Windows\WinSxS\amd64_microsoft-windows-bootres_...\bootres.dll
Having the original on hand allows you to quickly reverse if any problems arise. Don't forget to adjust the path of the WinSxS component to your computer.
- Test mode if necessaryIf you don't see the logo or something doesn't match up when you restart, you can enable test signing mode and restart:
Bcdedit.exe -set TESTSIGNING ON
This option is especially useful when the system blocks binaries that are not signed by a trusted entity. Remember to disable it later if you don't need it.
There are third-party utilities to change the logo that do not work in Windows 10. Therefore, although the manual method is somewhat longer, gives you full control over the process and resources, knowing exactly what changes and where.
UEFI, BGRT, and alternatives: HackBGRT, AMI Aptio Change Logo, and Intel ITK
On modern UEFI computers, the boot logo may come from the firmware, not Windows. ACPI 5.0 introduced the BGRT (Boot Graphics Resource Table), a table that the firmware uses to tell the operating system which image to display at boot and in what position.
Manufacturers integrate their own logo into the UEFI and publish it via BGRT. Changing it involves modifying the firmware or intercepting how Windows consumes it. In the former case, tools such as Intel Integrator Toolkit (ITK) allow you to replace the logo image on Intel products such as the series WALNUT (see official documentation in the ITK 4→5 migration guides).
If your board uses AMI, there is Aptio Change Logo, available on the American Megatrends (AMI) website. There's no universal procedure because the location of the image in the firmware varies, so each BIOS/board requires its own approach.
For a provider-independent route, you can consider HackBGRT, an open-source utility that replaces the image exposed by BGRT. It's a UEFI Shell application, and its GitHub repository includes a README with instructions. Because it operates at the UEFI level, rather than the system level, it's compatible with many motherboards regardless of the OEM.
Important: Touching the firmware is always risky. One careless attempt and you can brick the motherboard. If you're not prepared for this, stick with system options (bootres.dll) or the classic method in legacy environments.
Options for legacy BIOS and older systems (XP and similar)
On computers with legacy BIOS (without UEFI) and older versions of Windows, the approach changes. Methods such as disabling the boot GUI or using small utilities became popular, although many are not compatible with Windows 10.
A basic option is to disable the boot logo: Start → Run → msconfig → BOOT.INI tab and select NOGUIBOOT. The advantage is simplicity, but You won't see any information if something gets stuck. during startup.
As an alternative, for years it was popular BootSkin (WinCustomize), which changed the Windows XP boot screen to designs from its library. It was fast and didn't touch critical files. This is software designed for XP, though.
To go further, it was modified ntoskrnl.exe with Resource Hacker. The process was to prepare a 16-color (not 16-bit) BMP image of 215x147 pixels, copy ntoskrnl.exe to System32 (e.g., newntoskrnl.exe), open the binary in Resource Hacker, go to Bitmap → 5 → (corresponding ID, e.g., 3082), select Replace Resource… and replace it with your BMP. After saving, it would boot into Safe Mode to copy the edited file to System32.
These types of customizations worked back in the day, but in Windows 10 many older tools (like 8oot Logo Changer, which was for Win8/8.1) are no longer useful. If your Windows 10 is in UEFI mode, focus on editing bootres.dll described above.
Common errors with bootres.dll and how to solve them
Problems with DLLs can be caused by many things: deleted or moved files, corruption by malware, failed installations/uninstalls that overwrite one version with an older one, or bad disk sectors. With bootres.dll, the typical symptom is that the computer doesn't display the logo correctly or doesn't boot normally.
Repeated messages include “bootres.dll not found”, “Could not load bootres.dll”, “Cannot register bootres.dll”, “The application failed to start because bootres.dll was not found” or “Access Violation at the address: bootres.dll”. In games and apps The DLL may be required to be in the installation folder or in the system folder, which is why some manuals suggest reinstalling the application or placing the file in that path.
An actual case of Advanced Onset diagnosis cited: “e:\boot\resources\custom\bootres.dll is corrupted”, with error 0x2 (file repair failure) and 0x490 (system file integrity). Safe Mode was accessible on that computer, but on the normal desktop, the screen flickered black and barely let me run anything.
What can you try? First, if you've recently customized the boot, undo changes: rename your modified bootres.dll (for example to bootres.dl_) and restore the original from the backup or from WinSxS. Make sure the paths and permissions are in order and that there are no read-only attributes blocking it.
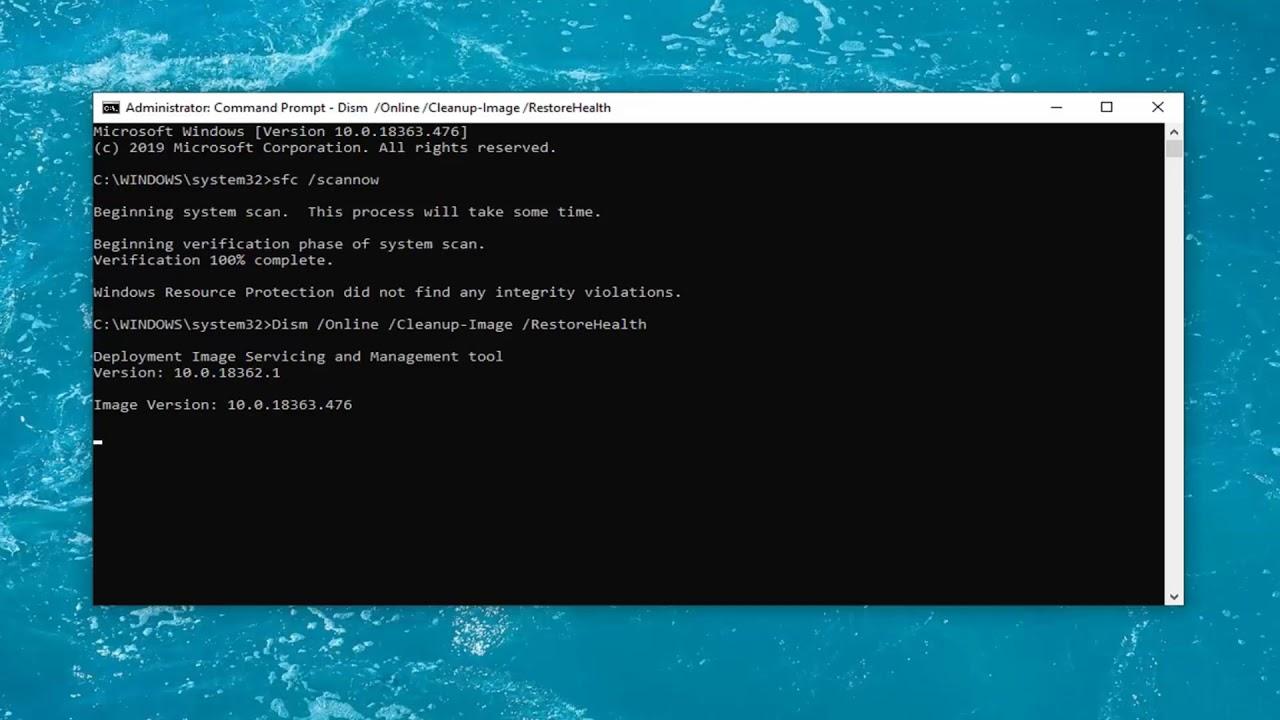
The system itself can help repair boot files, but as you can see in the logs, it sometimes fails. If the problem started after editing resources, temporarily enable TESTSIGNING to accept test signatures and verify that it starts. Then, it signs the DLL correctly or reverts to the original.
There are sites that recommend downloading the loose file or using “DLL Fix Tools” (for example, you'll see references to Outbyte with its EULA and privacy policy, or repositories like WikiDll.com). Use them with caution, read the terms carefully, and if you decide to go that route, verify versions, architecture (32/64 bits) and sums when available.
Also, run an updated antivirus if you suspect an infection, because a shared DLL can be corrupted by malware. Ignoring the error can result in crashes or a slower-than-normal PC, so the sooner you stop it, the better.
Best practices when customizing or repairing bootres.dll
Whenever you are going to touch boot files, create a system image or at least backup copies of the original binaries in a safe location. Renaming to .dl_ before replacing is an easy way to preserve the rollback.
Work from an account with administrator privileges and document what you change. Keep a record of paths, tools, and versions (e.g., 10.0.19041.1 x64) will help you if you have to undo steps.
If you're editing resources, respect formats and sizes. In the case of the RCData container (.wim), the BMPs must match in color depth and dimensions; otherwise, the system may not render the logo or even fail to start.
In UEFI environments, consider HackBGRT or manufacturer-specific utilities (ITK for NUC, Aptio Change Logo for AMI). Changing firmware carries risks; if in doubt, stick to the operating system and avoid “bricking” the motherboard.
Finally, if a “DLL fixer” or external download seems like a quick way out, read the EULA, privacy policy, and check for integrity with MD5/SHA1 when possibleAnd remember: reinstalling the app that's causing the error is sometimes the best way to go.
Understanding what bootres.dll is and why it might fail allows you to choose the best strategy: from editing the resource to customize the logo in Windows 10, to relying on BGRT with UEFI or returning to the original file to stabilize the bootBy doing it wisely, with the right tools and backup, you can customize your PC's startup or resolve those annoying error messages without turning the process into a risky venture.
Passionate writer about the world of bytes and technology in general. I love sharing my knowledge through writing, and that's what I'll do on this blog, show you all the most interesting things about gadgets, software, hardware, tech trends, and more. My goal is to help you navigate the digital world in a simple and entertaining way.