- Word Use a single DPI for the entire document when creating the PDFThis can reduce image sharpness if the print quality is not properly adjusted.
- Configure page size, margins, fonts, and images correctly to 300 dpi in Word is key to obtaining a print-ready PDF.
- Options such as Save as PDF, Export, or Print to PDF should be set to standard or high quality mode, with embedded fonts.
- Reviewing the final PDF (image resolution, fonts, page size and bleed) avoids surprises and problems when sending it to the printer.

When you export a Word document to PDF and the images lose sharpnessThe result can be a real disappointment: pixelated photos, blurry graphics, and embedded text that looks much worse than on screen. This is especially critical if you're going to send the file to a printer for a thesis, catalog, manual, or any corporate material where appearance matters.
The good news is that Word and PDF creation tools do allow you to obtain professional-quality PDFs.However, it's essential to understand how they handle dots per inch (DPI), how they process images during printing, and which settings to select before converting the file. Furthermore, it's crucial to properly prepare the document in Word and know when to use advanced features like printing to PDF with [unclear - possibly "PDF" or "PDF"]. Adobe Acrobat or even play the Registry Windows in older versions.
1. Understand why images lose quality when converting from Word to PDF
One of the most common problems is that the images look perfect in Word but degrade when generating the PDF.This happens because the program doesn't send the original resolution of each image to the PDF as is, but instead decides on a single DPI value for each. All the document at the time of "printing" to PDF.
In versions like Word 2010 and Word 2013, when printing to a PDF printer (Adobe Acrobat, PDF Creator, etc.)The program calculates the output DPI based on the capabilities of that virtual printer. In other words, even if your images are at 300 or 600 dpi, if Word decides to lower the overall print resolution, you'll notice that the photos look softer or even pixelated in the final PDF.
Word uses a single DPI for the entire document when generating the PDF.It doesn't matter if one image is at 72 dpi and another at 600 dpi in the original file: when printing, Word adapts each image to a common output resolution value, which is determined by the quality mode (Low, Medium or High) and the maximum limit of the PDF printer.
Imagine that your PDF printer is recognized with a maximum DPI of 600Word then works with three possible resolution ranges: High quality uses 600 DPI; Medium quality uses half that (300 DPI); and Low quality uses only a quarter of that (150 DPI). This directly affects how the document's images are scaled and compressed when the PDF is generated.
In addition, Word analyzes each image by comparing the "window" (the page in Word) and the "printout window" (the page to be printed).If the document page size does not match the size set for printing or the PDF printer, the program scales the content; in that process, it may reduce the total number of printed pixels, which impacts the sharpness of the photos.
There is also a memory and page capacity limitation of the printer or PDF printerWhen the total number of pixels in an image exceeds what the device can handle in a single job, Word may decide to reduce the output resolution to make the file processable, especially if the printer does not support tile printing (dividing the job into blocks).
2. How Word decides print quality and DPI when creating a PDF
Word versions like 2010 and 2013 use a "default print quality" system. This directly affects the resolution at which images are sent to the PDF. These qualities are Low, Medium, and High, associated respectively with 1/4, 1/2, and the maximum DPI of the virtual printer.
For example, if the PDF printer has a resolution limit of 600 DPIThe three modes translate to these approximate values: Low quality prints at 150 DPI, Medium at 300 DPI, and High at 600 DPI. If you want the images to retain maximum detail, you need Word to always use High mode when printing the PDF.
It's important to note that Word 2013 and Word 2010 have different default settings.In Word 2013, the standard output quality is set to Medium, while in Word 2010 it is set to High. This explains why, sometimes, the same document appears sharper when printed from Word 2010 than from Word 2013 using the same PDF printer.
There is an additional behavior: if the printer (or PDF printer) can only handle one "icon" or quality profile at a timeWord may automatically force Low quality mode. In that case, no matter how good your images are, they will end up limited to a much lower effective resolution in the PDF.
This internal logic applies both when you choose Print as PDF in Windows 11This occurs when other system components internally act as if they are "printing" the document to generate the PDF. The key to improving the result is to control these quality settings and, in some scenarios, change the default behavior through the Windows Registry.
3. Adjust print quality by registration (Word 2010 and 2013)
If you work with Word 2010 or Word 2013 and use an external PDF printerYou can force the program to use a higher print quality by modifying the Windows Registry. This solution is intended for advanced users, but it's very useful when all your exports result in poor image quality despite being high resolution.
Before modifying the Registry, it is essential to make a backup.An incorrectly applied change can cause serious system or Office failures, so it's advisable to create a restore point and export the affected keys in case you need to revert. If you're not comfortable using the Registry Editor, it's best to have someone with experience do it.
In Word 2013, the relevant key is in the path HKEY_CURRENT_USER\Software\Microsoft\Office\15.0\Word\Options. There you can create (if it doesn't exist) a REG_DWORD value with the name PrintHighQualityDefault and assign it the value 1. With this setting, you tell Word that the default print quality should be High when printing to PDF.
In Word 2010 the Registry path changes to HKEY_CURRENT_USER\Software\Microsoft\Office\14.0\Word\Options. In this case, the value you must add is also of type REG_DWORD, with the name PrintMediumQualityDefault and data 1; this value forces the default quality to be set to a more suitable level to better preserve the images.
To apply these changes you can use the Registry Editor or a .reg fileMicrosoft's official documentation explains how to create, modify, or delete registry subkeys and values using these files. Once the value is added and Word is restarted, the program should automatically begin using the selected print quality.
4. Prepare the document in Word to obtain a print-ready PDF
The quality of the PDF depends not only on the conversion, but also on how the document is formatted in Word.A file with incorrect settings for size, margins, image resolution, or fonts can cause problems even if you adjust the export settings to the highest level. If you plan to have it printed at a professional print shop, you should be especially careful.
The first step is to correctly define the page sizeIn Word, you must use the same final print size as the final document: A4, letter, half letter, a specific book size, etc. If you're going to use a spine binding, leave extra inner margins so the text isn't swallowed up by the binding. And if your design includes images or backgrounds that extend to the edge, you'll need to add bleed.
For documents with bleed, it is recommended to add at least 3 mm to each side.For example, if your final size is A4 (210 × 297 mm), the Word page could be set to 216 × 303 mm to allow for printing. In Word, you can adjust this under Page Layout (or Design) > Size > More Custom Paper Sizes, specifying the exact measurements.
The choice of fonts is also key for both display and printing.Although in theory you can use any font you want, it's recommended to use standard fonts or fonts with appropriate licenses that embed well in PDFs: Arial, Times New Roman, Calibri, Garamond, Palatino, Book Antiqua, Tahoma, Verdana, etc. Keeping the font combination simple (one for titles and another for body text) also helps to make the design look cleaner.
Pay attention to the font size to ensure readabilityFor body text, a font size between 11 and 12 points usually works well; for main headings, between 14 and 18 points, depending on the design and page size. If you use too little font, the book will be difficult to read on paper; if you use too much, the document will look unprofessional or childish.
Images should be prepared in high resolution before inserting them.For professional printing, the standard is 300 dpi at actual print size. It's best to avoid images copied directly from websites, which are typically 72 dpi and designed for screen viewing. Even if they look fine on a monitor, they often appear pixelated or blurry when printed.
Regarding the image file formatThe usual practice is to use High quality JPG PNG is suitable for graphics with transparency and flat colors. For complex illustrations or images with text that need to be very sharp, TIFF remains one of the most robust options for printing. The important thing is not to stretch the images in Word beyond their actual size at 300 dpi.
The use of color also deserves a commentWord works natively in RGB (the same color model used by screens), while printing presses operate in CMYK. This means that certain very bright or saturated colors may lose vibrancy when converted for printing. Although Word doesn't allow you to design directly in CMYK, it's a good idea to avoid excessively vivid colors and, if they are critical corporate colors, inform the printer so they can perform a controlled conversion.
5. Ways to convert from Word to PDF without losing quality

Once the document is correctly configured, it's time to generate the PDF.This is where many people simply choose the quickest option without checking the settings, and then are surprised to find that the images look much worse than in the original file. It's helpful to understand the differences between "Save As," "Export," and "Print to PDF."
In Windows, a simple way is to use File > Save As and select PDF as the file type. When you do this, you'll see an optimization option that typically offers two modes: "Minimum size (online publishing)" and "Standard (online publishing and printing)." For print jobs, you should always choose the standard option, which maintains higher image quality.
Within the "Options" box when saving as PDFYou can also enable additional settings, such as including crop marks if the file has bleed, or embedding all fonts. If your version of Word allows it, always select the option to prioritize quality over compression when printing.
Another way is to use the Export function available in modern versions of WordBy going to File > Export > Create PDF/XPS Document, you can also access advanced settings. Some versions of Word include a "Optimize for High Fidelity Printing" option or something similar; be sure to enable it to prevent the program from over-compressing images.
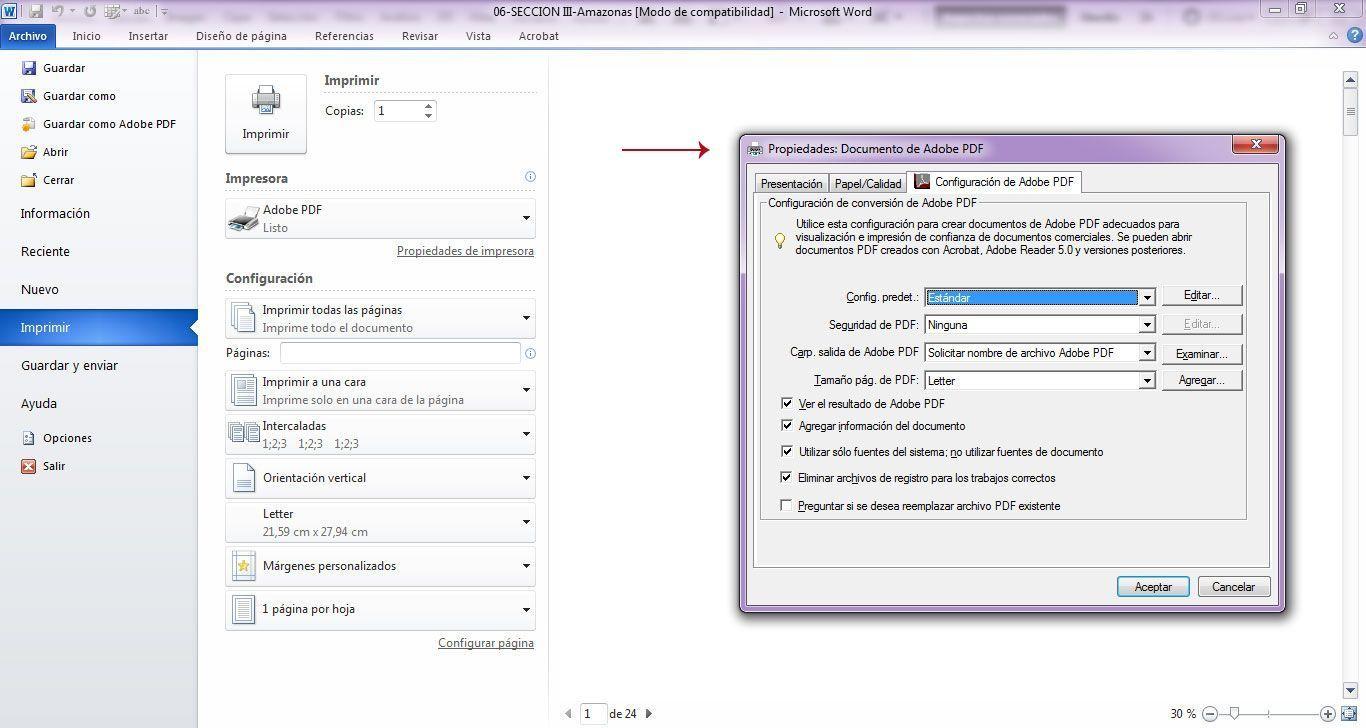
If you have Adobe Acrobat Pro or Adobe PDF as a virtual printerA common technique in professional settings is to "print" the Word document to a PDF using the Adobe PDF printer. From File > Print, select Adobe PDF, go to Properties or Preferences, and apply a job profile (Job Options) designed for printing, maintaining 300 dpi or higher for color and grayscale images, and embedding fonts.
In environments Mac There are two main pathsYou can either use File > Save As and select PDF (which relies on the system's Quartz engine) or print to PDF using Adobe Distiller or Acrobat with specific settings. Many printers recommend the second option because PDFs generated with Quartz can have compatibility issues or font problems at some printing companies.
On Mac you can also install and use custom PDF configurations. (Job Options) to meet the requirements of specific print-on-demand platforms. These profiles control image compression, PDF compatibility, font embedding, and other technical parameters to ensure the file is accepted without errors.
If you don't have professional software, some online conversion tools can help.However, these tools should be used with caution. Many prioritize file size reduction over quality, recompressing images below the recommended printing standards. If you choose an online converter, make sure it has a "high quality" or print-ready mode and carefully review the resulting PDF.
6. Page size, profiles, and preservation of format in PDF
Something that often goes unnoticed is that the page size of the PDF must match that of the Word document.If you don't configure it correctly, when converting to PDF the file may change to a default size (such as 21,59 × 27,94 cm, i.e., letter) and misalign margins, headers, or even the position of images.
In some versions of Word for Mac, if the page size is left as "Untitled" or "Custom" without saving the profileWhen exporting to PDF, the program tends to revert to the default size. It's recommended to create a custom paper size with a name, save that profile, and use it throughout the document before exporting.
This page size profile consistently establishes the dimensions that the final PDF will have.When you upload the file to a self-publishing tool or a printer's website, the page size will determine which book format options you can choose. If the PDF doesn't match the desired dimensions, you'll have to repeat the process.
Another important technical aspect is PDF compatibility and the PDF/A standard.In the options window when saving as PDF, many versions of Word allow you to check the box "Complies with ISO 19005-1 (PDF/A)." This format is designed for long-term archiving and requires embedding fonts and limiting certain features, which generally improves the file's stability for printing.
When opening the PDF in Adobe Reader or Acrobat ProYou can check if the fonts have been embedded correctly by going to File > Properties > Fonts tab. There you should see each font followed by the indication "Embedded subset" or something similar. If any font is not embedded, there is a risk that it will be substituted when printing or on the destination device.
Embedding fonts prevents the design from breaking if the printer or PDF viewer does not have the same fonts installed.Without this embedding, line breaks, spacing, and the overall appearance of the file can change drastically, which is highly undesirable if you're printing a book or a carefully designed corporate document.
7. Check the final PDF before sending it to print
Before sending the file to the printer, it is advisable to thoroughly review the generated PDF.It's not enough to just glance at the first page; you have to go through the entire document to confirm that the content is exactly as you want it to appear on paper.
Start by checking spelling and formatting.: that there are no typographical errors, that the page breaks are in the correct places, that the even and odd pages have the appropriate content (for example, odd pages on the right in books) and that the copyright or credits page is in the intended place.
Then check the margins and bleed.Check that important content (main text, page numbers, headers) doesn't extend too far to the edge and that images or backgrounds that should reach the trim actually extend beyond the final size (if you've used bleed). If you've included crop marks, make sure they are visible.
Examine the images closely.Zoom in to 100%, 150%, or 200% to check if the images look clean or if you notice excessive pixelation and compression artifacts. At that magnification level, you should be able to get a fairly accurate idea of how a 300 dpi photo will look on paper.
It is also useful to open the PDF on multiple devicesUse a desktop computer, laptop, tablet, or even a mobile phone to check for unusual rendering changes, font substitutions, or compatibility issues. While this doesn't exactly recreate the printed output, it helps detect problems before they escalate.
Finally, check the file sizeA print-ready PDF with 300 dpi images and many pages will normally be quite large. If the file is suspiciously small (for example, a few hundred KB for a document full of photos), it has probably been compressed too aggressively, and you should re-export it with less destructive settings.
Following all these guidelines, from preparing the document in Word to exporting and reviewing the PDFYour document will be much more likely to reach the printer with the expected image quality, maintaining the sharpness of the photographs, respecting page sizes and preserving intact the font design and layout that you see in the original file.

Passionate writer about the world of bytes and technology in general. I love sharing my knowledge through writing, and that's what I'll do on this blog, show you all the most interesting things about gadgets, software, hardware, tech trends, and more. My goal is to help you navigate the digital world in a simple and entertaining way.