As much as we acknowledge that Microsoft Office is a great suite of utility programs, it's not perfect. Users often struggle with glitches and errors that make it nearly unusable. That said, if you know what to do, you can get rid of any errors in no time. One of the problems users tend to struggle with is error code 3008826.
The error appears when you try to install Office updates, indicating a frustrating end to the process. Fixing the error involves different approaches. Many users solved the problem by applying the fixes on this page. Follow them one after the other and you should finish the update process.

What is error 30088 26 in Windows 10?
The full error message is usually as follows:
«Something went wrong. We're sorry, we ran into a problem. Error code 30088-26.»
The error message appears during a Microsoft Office update or repair. This can be due to internet connectivity issues, disk space limitations, Windows updates , or Office licensing problems.
How to fix Microsoft Office error code 30088 26
The solutions in this article resolve the issues that are triggering the error. Carefully apply each fix one after the other until you are able to successfully complete the update.
Repair Microsoft Office
Some Office installation files may be corrupted or missing. To find and replace them, you need to use the repair feature. You can go through the Settings app or Control Panel to repair your Office installation. We'll show you how to use both methods.
Going through Windows settings:
- Press the Windows logo and I keyboard buttons at the same time to launch Settings.
- Click the Apps icon after you see the Windows Settings home page.
- Go to the search box in Apps & features and type “Office.”
- Click on Office once it appears.
- Now, click on the Modify button in Microsoft Office.
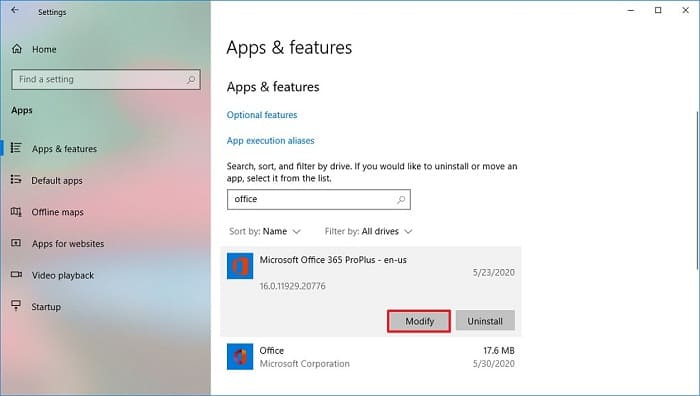
- Then, click on the Yes option once you see the User Account Control dialog box.
- You will now see the How would you like to repair your Office programs? dialog box with two repair options: Quick Repair and Online Repair.

- The Quick Repair option will scan for common Office installation errors and fix them offline on your computer. It only performs minor repairs, such as repairing corrupt files.
- Go to the Online Repair option if the Quick repair does not resolve the issue. Make sure your Internet connection is stable and reliable before running Online Repair. Please note that this process will take longer than the Quick Repair scan.
- If you are trying to upgrade an installation of Microsoft Office MSI-based, you should see the dialog box “Change your installation» instead. Click Repair if that is the case.
- Reboot your system after the repair process is complete and try updating the program again.
Going through the Control Panel:
This is just another way to do it. How would you like to repair your Office programs? In the dialog box:
- Press Win + WILL or click the magnifying glass icon next to the Start menu.
- After the search window appears, type «control Panel«.
- Choose Control panel in the results.
- After the Control Panel window opens, click on uninstall A program en Programs.
- The Programs and Features window will appear.
- Go to the Programs list, find Microsoft Office, click on it, and go to the top of the list to click Change.
- Click Yes in the User Account Control dialog box.
- You should now see the message How would you like to repair your Office programs? In the dialog box.
Uninstall the conflicting version of Office
If you are running an MSI-based Office suite, such as Microsoft Office 2013, you will encounter issues if you try to update it using the Click-to-Run installer.
Normally, you should receive an error notifying you that your current edition of Office is not compatible with the update you want to install. However, there are cases where error 30088-26 appears for the same issue.
If you want to switch to the Click-to-run edition, you must completely uninstall its Windows Installer (MSI) edition.
Follow these steps to remove the program:
- Press the logo of Windows and the buttons of the keyboard I at the same time to launch Settings.
- Click on the icon Applications after viewing the Windows Settings home page.
- Go to the search box in Apps & features and type “Office«.
- Click on Office once it appears.
- Now, click the button uninstall en Microsoft Office.
- Then click on the option Yes in the User Account Control dialog box.
- Follow the instructions in the setup wizard to remove the program.
- Restart your computer after uninstalling the application.
Make sure the Click-to-Run service is running
The Click-to-Run service is at the heart of Microsoft Office updates. It facilitates background updates while you use your Office applications.
The service should be active even when you don't have any Office programs running. Head to the Services app to make sure the service is turned on and set to Automatic.
Follow these steps:
- Press Win + WILL or click the magnifying glass icon next to the Start menu.
- After the search window appears, type «services«.
- Click Services in the search results.
- After the Services app appears, go to the Click-to-Run service. Microsoft Office and double click on it.
- When you see the dialog box Properties, go to the Startup type drop-down menu and select Automatic.
- Click on the Start to start the service.
- Select the button Accept.
Update Windows
Outdated system components can trigger the error. The Office Update Installer (Click-to-Run) may require updated system components to install Office updates. If you haven't updated your computer in a while, that explains the error.
Follow these steps to update your system:
- Press the logo of Windows and the buttons of the keyboard I at the same time to launch Settings.
- Click the Update & Security icon after viewing the home page. Configuring Windows.
- Once the interface opens, Windows Updateclick the button Search for updates if the client does not start the process automatically.
- If you have any pending optional updates, please download them.
- Click on the Restart now to allow the client to restart your PC and install the downloaded updates.
- Once the installation process is complete, your PC should boot normally.
- Now you can try to update Office.
Prevent your antivirus program from blocking Office
Your antivirus program might be interfering with the update process because it somehow suspects that your Office installation is a security threat. Turning off your antivirus program and running through the update process will help you figure out if that's the problem.
However, if you want to avoid such interference in the future without leaving your computer vulnerable, you will need to add Microsoft Office as an exception or exclusion in your antivirus program.
The following steps will show you how to do this in Windows Security:
- Press the logo of Windows and the buttons of the keyboard I at the same time to launch Settings.
- Click the Update & Security icon after viewing the Windows Settings home page.
- Now, click on Windows Security on the left pane of the Update & Security page.
- Go to the Windows Security tab and select Protection against viruses and threats in Protection Areas.
- Now go to the section Configuration Virus & threat protection once the Virus & threat protection window opens and click on Manage settings.
- Scroll down to Exclusions in the Virus & threat protection window and click “Add or remove exclusions«.
- Click “Add an exclusion” after the Exclusions interface appears.
- Then click Folder on the menu.
- After the Select Folder window appears, go to the installation folder of Microsoft Office and select it.
- Click the Select Folder button.
- You can now update Office.
Use the Install/Uninstall troubleshooter
Microsoft Install and Uninstall Troubleshooter helps you get rid of problems that prevent you from installing or uninstalling a program. It repairs system components that obstruct the installation process and removes problematic registry keys responsible for update data.
Go to the Microsoft website to download and run the tool.
Get rid of temporary files
Temporary files cause all sorts of problems when they grow too large or become corrupted. This could be the cause of the update error.
Delete your temporary files and check if the update process will run without interruptions.
Follow these steps to delete temporary files using Disk Cleanup:
- Right-click the Start button and click File Explorer or press the combo Win + E keyboard.
- After the File Explorer window opens, go to the left side and click the arrow next to This PC.
- Go to the hard drive that contains your operating system and click right click in it.
- Choose Properties once the context menu appears.
- After the Properties dialog box opens, click Liberator of disk space.
- The tool will now scan your system and display a list of temporary files.
- Check the categories you want to delete and click Accept.
- To delete temporary system files, such as Windows log files and Windows Update installation files, open the Disk Cleanup window again and click the “Remove” button.Clean system files» after normal temporary files are displayed.
- The tool will scan your computer again and show you a list of temporary system file categories.
- Now, check the boxes for the categories you want to get rid of and click the OK button.
- Here's how to delete temporary files using Windows Settings:
- Press the Windows logo and I keyboard buttons at the same time to start Configuration.
- Click the System icon after viewing the Windows Settings home page.
- Choose Storage in the left pane of the System page.
- Next, navigate to the center of the window (the Storage tab).
- Go to your main hard drive and click on Temporary Files under it.
- To delete temporary files on another drive or partition, go to «More storage configurations»And click«View storage usage on other drives«. Click on the drive on the next screen and then select Temporary Files.
- The operating system will now display your temporary files and separate them into categories.
- Select the categories you want to get rid of and click Delete Now.
- Now, reboot your device and run the update process.
If you don't want to go through the stress of using the Disk Cleanup utility or the Settings app to get rid of temporary files, you're better off using Auslogics BoostSpeed.
The program scans for temporary files that may be harmful to your system and automatically removes them. It also has a built-in registry cleaner that removes corrupt registry keys that could obstruct the update process.
Perform a clean boot
The clean boot technique is used to find startup programs and services that interrupt certain processes. Startup items are designed to start after Windows starts. While some startup applications stop running after executing certain instructions, others continue to run in the background.
If a startup program or service is responsible for the Microsoft Office update error, the guide below will show you how to find it.
Here's how to disable startup programs:
- Press the logo of Windows and the keyboard buttons I at the same time to start Configuration.
- Click the Apps icon after you see the Windows Settings home page.
- Go to the left side of the Apps page and click on Home.
- Once the Startup tab appears in the middle of the screen, turn off the switch for each program in the Startup Applications list.
- Reboot your system.
- Now, update Office.
If the error still appears, continue with the next guide.
If the update process runs as it should, then one of the startup programs you disabled is to blame.
Enable the first program on the list and reboot your system to check if the error appears again. If the first program does not trigger the error, move on to the second one and then check the other programs until you find the responsible program.
Here's how to disable startup services:
- Use the logo of Windows + R keyboard combination to open the dialog Run or right-click the Start button and click Run.
- After Run appears, type «msconfig» and click OK.
- After the System Configuration window appears, go to the Services tab.
- Check the box next to “Hide all Microsoft services«.
- Click on the Disable all.
- Then click Accept and restart your computer.
- Once the system boots, check to see if Office will update without any issues.
- If the error appears, enable the services one by one and restart your computer after enabling each service to check for the error.
Reinstall Office
If none of the above methods have resolved the issue, uninstall your current Office installation and install the latest version from scratch. This time, try installing Office from the Microsoft Store if you don't have that version.
Follow these steps to remove the program:
- Right-click the Windows logo on the taskbar and click Settings from the menu or tap Win + I to open Configuration.
- After the first Windows Setup screen appears, click Applications.
- Go to the search box in Apps & features and type “Microsoft Office«.
- After the program appears, click on it and select uninstall.
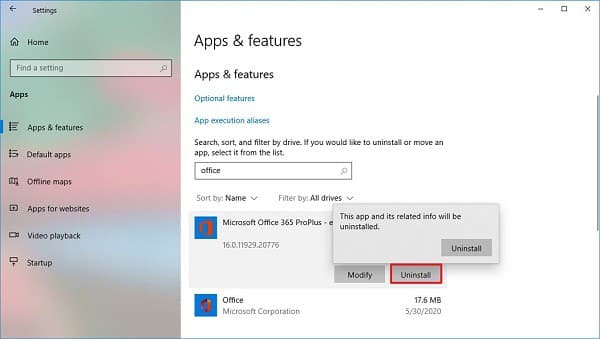
- Click on uninstall again in the confirmation pop-up window.
- Select Yes once you see the User Account Control dialog box.
- Follow the wizard's instructions to complete the process.
You can also use Microsoft's Office Uninstaller to completely remove the program. Go to Microsoft's website to download the uninstallation tool. Once your browser downloads its .exe file (SetupProd_OffScrub.exe), double-click it.
- Then click Run if a warning dialog box appears, and then click Yes in the User Account Control box.
- Once the settings open, select the version of Office you want to remove and click Next.
After that, follow the prompts on the next screens and reboot your system once the process is complete. The tool will perform the final steps after the computer boots up.
If you have the Microsoft Store version of Office, follow these steps to uninstall it using Windows PowerShell :
- Right-click the Start button or press the Windows logo and I keyboard buttons together.
- After the Power User menu opens, click Windows PowerShell (Admin).
- Now, click Yes after the User Account Control dialog box opens.
- Once Windows PowerShell appears, type or copy and paste the following command and click OK:
Get-AppxPackage -name “Microsoft.Office.Desktop” | Remove-AppxPackage
- Once the command completes, enter the following line in Windows PowerShell and click OK to confirm that you have successfully uninstalled Office:
Get-AppxPackage -name “Microsoft.Office.Desktop”
- If a window appears symbol of the system without information, the operation was successful.
- After you remove Office, go to the Microsoft Store, search for Microsoft Office, and then download the program. You can also go to the Microsoft website to download the Office installation file and complete the installation online.
Here's how to fix error 3008826 when updating Office on Windows 10. You can always share your experience or let us know what you think about these solutions in the comments section below. Thank you for always reading what we write for you; hopefully, we'll meet again in a future post. Until then.

My name is Javier Chirinos and I am passionate about technology. Ever since I can remember, I have been interested in computers and video games, and that passion has turned into a job.
I have been publishing about technology and gadgets on the Internet for over 15 years, especially in mundobytes.com
I am also an expert in online marketing and communication and have knowledge in WordPress development.
Table of Contents
- 1 What is error 30088 26 in Windows 10?
- 2 How to fix Microsoft Office error code 30088 26
- 2.1 Repair Microsoft Office
- 2.2 Uninstall the conflicting version of Office
- 2.3 Make sure the Click-to-Run service is running
- 2.4 Update Windows
- 2.5 Prevent your antivirus program from blocking Office
- 2.6 Use the Install/Uninstall troubleshooter
- 2.7 Get rid of temporary files
- 2.8 Perform a clean boot
- 2.9 Reinstall Office