More and more Windows 10 users are encountering Error 0x800700DF: File size exceeds allowed limit and cannot be saved when they try to copy or move certain folders to or from online backup storage .
It turns out that the problem is almost always related to a download limit imposed by a log file called FileSizeLimitinBytes, by the file system you are currently using, or by the fact that a key service is forcibly disabled.
Here is a short list of possible culprits:
- File size exceeds FileSizeLimitInBytes value: The most common cause of this problem is when you try to download or upload a file (to or from a cloud service such as SharePoint) exceeds the maximum allowed file size configured within the Registry Editor. In this case, you can resolve the issue by modifying the maximum accepted value via the FileSizeLimitInBytes registry file.
- Web client service is disabled: If you only have this type of problem when trying to upload a large file to SharePoint (or a similar service), the problem is likely due to a required service that is forcibly disabled (Web Client). In this case, you should be able to fix the problem by opening the Services screen and reconfiguring how the Web Client service works by default.
- The current file system is not equipped to support this file transfer.: In case you see this error when downloading files larger than 4 GB, the error is due to a file system limitation FAT32. In this case, the solution is to migrate the volume involved to NTFS formatting your drive.
– This is essentially a protection mechanism that ensures that no malicious application or process can trick your system into downloading files without your explicit consent.
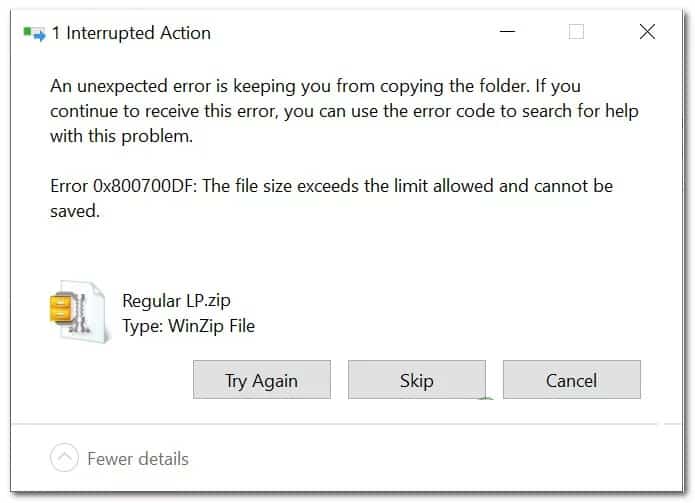
Methods to fix error 0x800700DF
Now that you know the root cause of this problem, here's how you can fix it and ensure that the Error 0x800700DF problem doesn't return in the future.
1.- Adjust the FileSizeLimitInBytes value through the Registry Editor
Since the root cause of this issue is the upload/download file size quota limitation, the first thing you should do is make sure that the file you are trying to upload to an online drive (or download from an online drive) is smaller than the maximum accepted file size limit specified within the web client settings.
To verify if this is the root cause of your problem, you will need to use the Registry Editor to navigate to the WebClient Parameters key and cross-reference the FileSizwLimitInBytes value with the actual size of the file you are trying to download or upload.
To make things easier for you, we've put together a series of step-by-step instructions that will guide you through the process of checking the current value of FileSizeLimitInBytes and modifying it to suit the file with which you are experiencing the 0x800700DF error :
- To start you are going to press the Windows key + R to open a dialog box Run. Then, inside the text box, you must write this command: regedit and press Ctrl + Shift + Enter to open the Editor of the Register with administrator access.
- When you are prompted for the message UAC(User account control), you have to make sure to click on Yes to grant administrator access.
- Once you are inside the Registry Editor screen, you need to use the menu on the left side to navigate to the following location: HKEY_LOCAL_MACHINE\SYSTEM\CurrentControlSet\Services\WebClient\Parameters.
Note: You can navigate here manually or you can paste the location directly into the navigation bar to get there instantly.
- After you reach the correct location, you have to go to the menu on the right side of the screen and double click on FleSizeLimitInBytes.
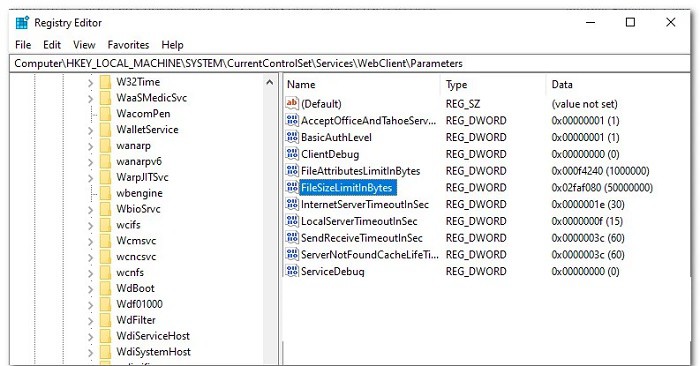
- Next, set the base in Decimal and compares the currently set data with the size of the file you are trying to download or upload.
Note : Keep in mind that the value data is in bytes; therefore, if the current base value data is 1000000000, the maximum allowed file size is only 1 GB.
- If the value data basis are below the size of the file you are trying to download or upload, you should be able to fix the problem by saving a higher value. So for example, if the file size is 4GB, you should set the value data to 4000000000 to allow the transfer to take place perform without the same error code.
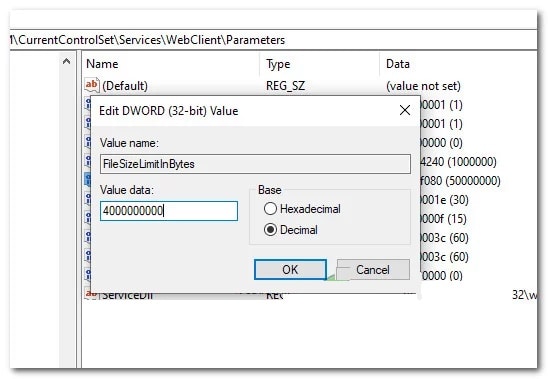
- Save the changes after you have made this modification, then go ahead and restart your computer and see if the problem is finally fixed.
If the issue is still not resolved or you are looking for a way to prevent this issue from occurring in the future, move on to the next potential solution outlined below.
2.- Enable the web client service (if necessary)
If you encounter this problem when trying to upload a large file to SharePoint or a similar cloud service, and you have previously ensured that the file size does not exceed the maximum size allowed by FileSizeLimitInBytes, the next thing to investigate is whether the service required to perform this operation is enabled.
The primary service used for data exchange between your local storage and SharePoint (or other software that uses WebDAV) is Web Client.
Several affected users who we previously encountered with error 0x800700DF have reported that the problem quickly disappeared after they opened the Services screen and ensured that the WebClient service could run and be configured to be called when needed.
Follow these simple instructions below to ensure that the web client service is enabled to resolve the 0x800700DF issue :
- To start, you will press the Windows key + R to open a dialog box Run. Then when prompted in the text box Run, you will write the following command: msc and press Log in to open the screen Services en Windows 10. XNUMX. En el In the UAC (User Account Request), make sure you click on the option that says Yes to grant administrator access.
- Inside the screen Services, move to the right section of the screen and locate the service name
- Once you see it, you have to right click on it and select the option that says Properties within the context menu that just appeared on your screen.
- After you are inside the Service Properties screen WebClient, go to the General tab and change the Startup Type to Manual, then you need to click the Start button to forcibly enable the service if it is currently disabled.
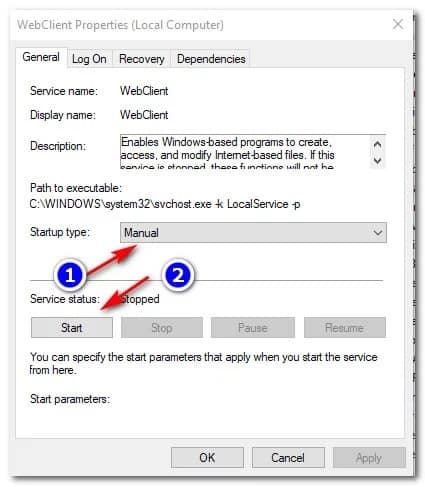
- After you have ensured that the web client service is enabled, repeat the action that was previously causing the 0x800700DF error and see if the issue is now resolved.
If the problem is still not resolved, you can try the next potential solution described below.
3.- Change the file system on your local storage
If you are only experiencing this issue while trying to download files that exceed 4GB on your local storage, you are clearly seeing the 0x800700DF error due to a limitation caused by your file system.
You are most likely trying to download the file to a drive that uses FAT32, which only supports files up to 4GB in size , unlike NTFS, which supports files up to 16TB.
If this scenario is applicable, the solution is clear: you will need to migrate to NTFS to facilitate the transfer of larger files.
This can be a bit tricky if you only have one request that also contains your operating system: in this case, you will need to back up your data before changing the file system and reinstalling your operating system.
But if you get this error when trying to download to a separate partition that doesn't contain your operating system, you can simply format the drive to a different file system. Here's a quick step-by-step guide on how to do this:
Important: This operation will effectively erase any data currently on the partition. Therefore, if you have important data that you cannot afford to lose, please take the time to back up your data before proceeding with the steps below.
- Open File Explorer and locate the drive you're having problems with.
- Then right click on it and select the option... in the context menu that just appeared.
- Under the Format Local Disk menu, set the file system to NTFS and the drive size allocation to default allocation size.
- Next, give your newly formatted volume a name before unchecking the box. Quick format and click on
- After confirming the formatting sequence on the new file system, wait patiently for NTFS to be applied. Depending on the size of the volume, expect this operation to take several hours.
- After successfully transitioning to the new file system, restart your PC, then repeat the operation that was previously causing the error 0x800700df to see if the problem is now solved.
If you follow each of these recommendations to the letter, you'll be able to successfully fix this error. If you know of another method that works, feel free to share it in our comments section below. Thanks for reading, and we'll see you in our next post.

My name is Javier Chirinos and I am passionate about technology. Ever since I can remember, I have been interested in computers and video games, and that passion has turned into a job.
I have been publishing about technology and gadgets on the Internet for over 15 years, especially in mundobytes.com
I am also an expert in online marketing and communication and have knowledge in WordPress development.