The problem Wi-Fi connection without Internet access It's common and frustrating. Being connected to a Wi-Fi network but not having Internet access can be confusing and frustrating. We've looked at this common problem and developed this guide to help you understand why you're connected to Wi-Fi but not having Internet access.
Use this post to improve your network and Wi-Fi performance and speed to eliminate one of the most frustrating problems you may encounter: being connected to a Wi-Fi network but not the Internet.
What causes the problem of Wi-Fi connection but no Internet access?
If you are using a Wi-Fi or wireless connection, you may encounter an error message that says connected to Wi-Fi but no Internet access. This message means that your device/computer is connected to your Internet source (router/modem) correctly, but it is not connecting to the Internet.
When this error occurs, you will see a small yellow warning triangle with a black exclamation mark on computers with WindowsIf you are using a mobile device, it will show a black exclamation mark.
In many cases, the problem is caused by changes in your operating system settings. The router is also one of the main culprits when you are connected to Wi-Fi but do not have access to the Internet. However, these causes may not always be so obvious.
Other apparent causes of the Wi-Fi connected but no Internet access issue include:
- Faulty Wifi adapters on the device.
- Faulty Internet router.
- The Internet service provider is not working.
- Your computer's IP address is incorrect.
- Security software prevents access (antivirus)
- Outdated wireless drivers.
- DNS server settings configured incorrectly.
- Corrupted DNS cache or DNS cache conflict
These different causes mean you'll have to try different solutions to identify the right one.
Wi-Fi connected but no internet access: Is it a device or the network?
Before you begin troubleshooting, you should know whether the no internet connection issue is only on your device or on the entire network. This will help you determine the likely cause and use the right method to resolve the problem.
If it's just a computer/device with a Wi-Fi connection but no internet access, you likely have faulty drivers or a Wi-Fi adapter. Alternatively, the problem could be misconfigured settings, DNS issues, or a problem with your IP address.
If all devices have a Wi-Fi connection but no Internet, it is likely that your Internet provider is down or you have a problem with your router/modem.
How to fix Wi-Fi connection without internet access in Windows 10
How do I fix my internet connection? Use this guide to troubleshoot Wi-Fi connection issues on your computer.
Nota: Before proceeding with the technical solutions, try disabling or removing AV software, firewall, or security software. Some security software can cause the internet connection errors issue on a PC. They block outgoing network traffic due to a glitch or configuration error.
1.- Use the Windows network troubleshooter
Windows 10 has a built-in network troubleshooter that can be helpful when you have internet connection issues. The Windows network troubleshooter can fix the problem automatically.
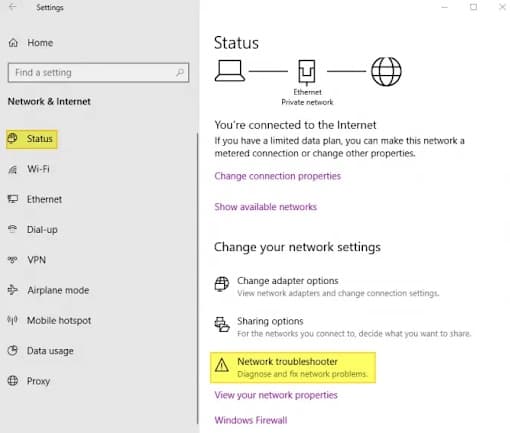
- To open Windows Settings: Press where it says Wins Key + I
- Then, you have to click on the option Network and Internet.
- In the left panel, click on the option State.
- After this, you must click on the option Network troubleshooter.
- Now, run the network troubleshooter to see if it resolves the issue.
2.- Clean the DNS (Domain Name System)
If your device's DNS cache gets corrupted, either by a technical error or malicious code, it can cause a mismatch/conflict in your IP address (IP address conflict or DNS cache conflict). This will prevent you from connecting to a particular internet even if you can connect to the Wi-Fi network successfully. The solution is to flush the DNS connection.
To flush your DNS follow these steps:
- Press the Wins key + S, then write cmd.
- At the symbol of the system, you must select the option that says Run as administrator.
- Now you have to make sure you write these down commands and press Enter after each one. ipconfig /flushdns [press Enter]. ipconfig /release [press Enter]. ipconfig /renew [press Enter].
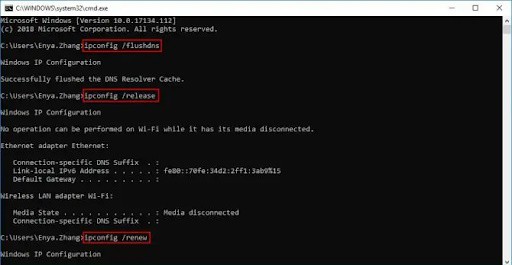
- Once this is done, close the command prompt and check if you now have an internet connection.
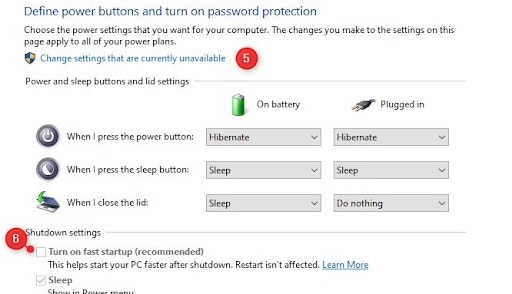
3.- Disable the first start in Windows 10
If quick start If your PC is enabled to turn off and on faster, it may be interfering with your Internet connection even when connected to Wi-Fi.
You may consider disabling First Startup to help resolve the issue. To disable First Startup, follow the steps below:
- You are going to press the Windows key + X to open the Quick access menu of
- In the list of items, select Energy options (third item in the list).
- Now select Additional power settings (located on the right side or bottom).
- Then, in the left panel, click on Choose what the power buttons do.
- After this, you must click on Change settings that are currently unavailable.
- Now, uncheck the box next to Disable fast startup.
- Finally, click on Save Changes, then restart your PC.
4.- Update the network adapter driver
Outdated drivers often cause common problems with computer functionality. If your network adapter driver is outdated, you may experience the problem of being connected to Wi-Fi but not accessing the Internet.
To update your driver, do the following:
- You are going to press the Windows key + X to open the Quick access menu of Windows.
- In the list of items, select Device administrator (sixth item on the list).
- Now, expand the Network adapters.
- Find a Wireless network adapter in the extended list.
- Click ’s relationship with the right button in the adapter > then select Update driver software.
- In the new window, select Automatically search for updated driver software.
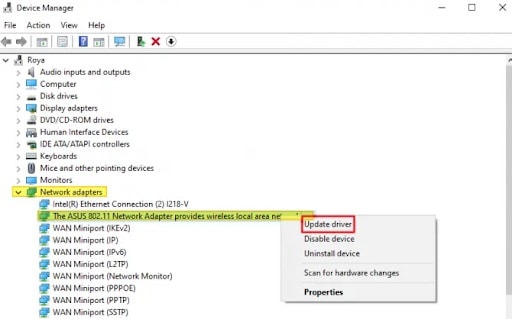
Allow Windows to search for a newer driver and install it. Once the process is complete, restart your PC, then reconnect to Wi-Fi and check if you still have the problem.
Nota: If Windows does not update the driver to the latest version automatically, you may need to install the correct one manually from your PC manufacturer or motherboard manufacturer.
5.- Disable IPv6 support on your computer or router
Although it is new, most new network devices support IPv6 for IP addressing. IPv6 works well for most devices, but it can also cause some network errors and issues.
The good news is that you can safely disable IPv6 on your home networks and use IPv4 because all devices support the older IPv4 protocol.
The best place to turn off IPv6 is on your router. While each router may be different, in general, you will just log into your router, look for Network Settings, DHCP, or LAN, and turn off IPv6.
Here's how to disable IPv6 on your computer:
- Click with el right button en Windows Start > select Network connections.
- Then select Change adapter options.
- double click at the WiFi adapter to open your Network adapter.
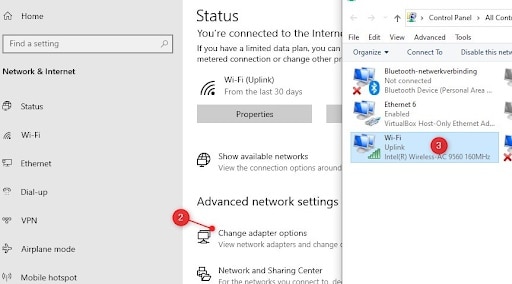
- Choose Properties.
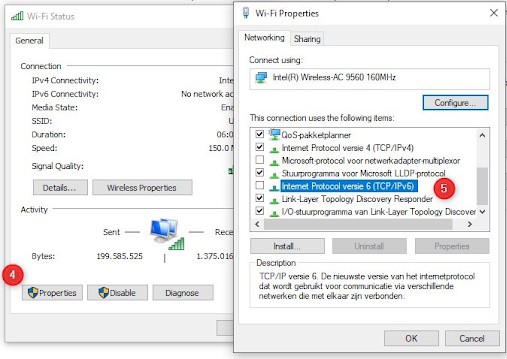
- Uncheck the box adjacent to Internet Protocol version 6 (TCP/IPv6) to deactivate it.
- Click on Accept and restart your computer.
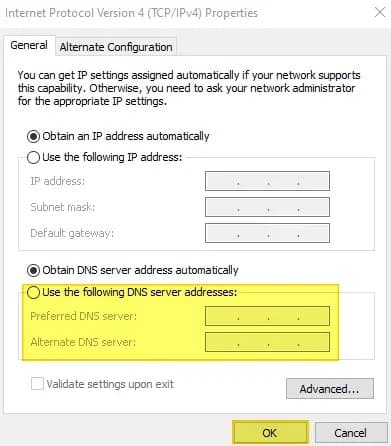
6.- Check the validity of your network and DNS server address
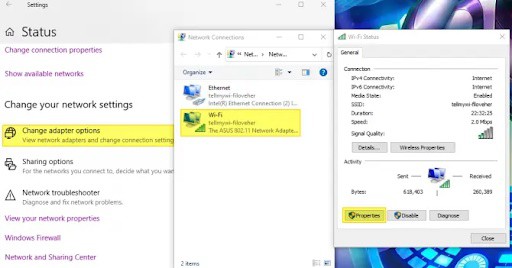
- Click with el right button en Start of Windows > select Network connections.
- Then select Change adapter options.
- double click at the WiFi adapter to open your Network adapter.
- Choose
- Search and Double click on the entry called Internet Protocol version 4 (TCP/IPv4)
- In the new window, check and make sure that both the IP address and DNS server addresses are set to work. automatically obtained.
-
- If so, do click en Accept and try connecting to the Internet again.
- Otherwise, set them to be obtained automatically, then do click en Accept and restart your computer, then try your Internet connection again.
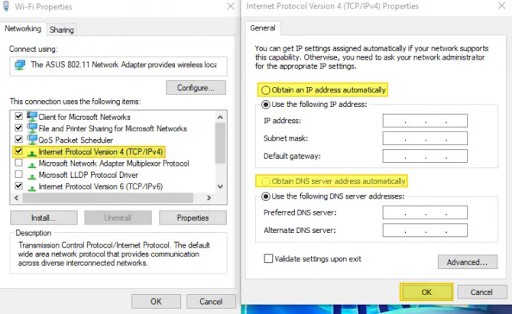
- If obtaining the IP address and DNS server address automatically still doesn't work, you can set them manually.
-
- Click on Use the following DNS server address and enter the preferred DNS server 8.8.8.8
- For alternate DNS server, enter 8.8.4.4
- Click OK and test your Internet again to see if this resolves the issue.
7.- Disable 5Ghz – Change wireless network standard
Nowadays, thanks to technological improvements, almost all computers portable and mobile phones support both 2.4Ghz and 5Ghz wireless networks. Although 5Ghz wireless networks are faster, they have a shorter range.
Many devices will always try to use the 5Ghz wireless networks, which can sometimes lead to disconnection Wi Fi no internet access. This could be due to a broken antenna, a driver error, or even an access point due to short range.
You can make your computer connect to the Internet at more than 2.4Ghz to see if 5Ghz is the problem:
- Click with el right button en Windows Start > select Network connections.
- Then select Change adapter options.
- double click at the WiFi adapter to open the Network adapter.
- Afterwards, you have to click on Properties > then Setup.
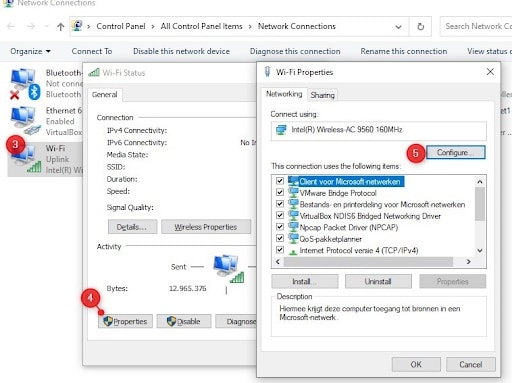
- Go to the tab Advanced > Select the 802.11n/ac wireless mode > switch it to off.
- This will allow your computer to connect via the 2.4Ghz channel.
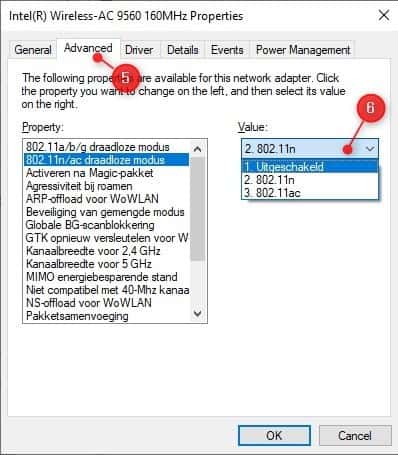
Nota: If this solution works, you can try setting the 802.11n/ac wireless mode to 802.11n. This will allow you to still use the faster 5Ghz bandwidth, but just with a slower protocol.
What if the Wi-Fi connection problem without internet access is on the entire network?
If you have an Internet connection problem across the entire network, it means that the problem is not with your computer. Then you can try the following solutions:
1.- Restart your router or modem
Restarting your router and modem may help resolve the issue. You can turn off the router, then unplug it from the power outlet and let it sit for a minute, then plug it back in and turn it on again. Once this is done, test the devices again to see if the problem is resolved.
2.- Check if your ISP is not working
The problem you are experiencing may also be due to your Internet Service Provider. If all of your devices connect to your wireless network, but you are unable to access the Internet, there may be an outage with your service provider.
You can use mobile data to look up your ISP's network through their website or social media pages or call your ISP to make inquiries.
3.- Restart your entire network
If, after all these solutions, you are still experiencing the Wi-Fi Connection No Internet Access error, you may need to reset your entire network. This way, you will reset all the network settings to their default state and also remove all the network adapters.
Here's how to reset the network:
- Press the Wins key + I to go to settings> select the option network and Internet.
- In the left panel, click on the option state.
- Search network troubleshooter> then search network reset.
- Click on reset network and follow the on-screen instructions.
Once you have successfully reset your network, you can reconnect to the Internet by clicking on the Internet taskbar icon. You may need to re-enter your networks' password and username for all devices.
My name is Javier Chirinos and I am passionate about technology. Ever since I can remember, I have been interested in computers and video games, and that passion has turned into a job.
I have been publishing about technology and gadgets on the Internet for over 15 years, especially in mundobytes.com
I am also an expert in online marketing and communication and have knowledge in WordPress development.