- Sysprep generalizes a Windows installation by removing the SID and computer-specific data to allow the creation of reusable images.
- The combination of Sysprep with WinPE and DISM allows capturing WIM images of the system and reliably deploying them to other devices.
- It is essential to respect Sysprep's limitations (domain, encryption, server roles, antivirus) to avoid errors during deployment.
- In large-scale environments, Sysprep integrates with Microsoft or third-party tools to automate the distribution of images over the network.
The Sysprep tool is essential when you want to clone, deploy, or standardize Windows installations across multiple computers without dealing with SID conflicts, driver issues, or activation problems. While it may intimidate some administrators, when used correctly, it allows you to create a master image ready to use on dozens or even hundreds of computers with minimal effort.
In this article, we will see step by step and in great detail how to use the System Preparation Tool (Sysprep) to capture disk images, what it does exactly, its advantages, limitations, most useful parameters, and how it fits into a complete workflow for capturing and deploying images with WinPE and DISM, as well as best practices and solutions to typical errors encountered in real-world environments.
What is Sysprep and what exactly is it used for?
Sysprep (System Preparation Tool) is a utility included in Windows that prepares an operating system installation for duplication, auditing, and eventual deployment to the end user. In other words, it transforms a pre-configured reference system into a generic image that can then be captured and deployed on other machines.
Sysprep's key feature is image generalization : it removes unique machine information, such as the machine's Security Identifier (SID), certain internal identifiers, activation data (depending on how it's run), and customizations tied to the original hardware. This prevents cloned machines with the same SID on the same network, which can cause conflicts with WSUS, domain services, and other management tools.
Upon completion of the process, you can decide how that Windows will boot next time : in Audit mode (to continue customizing and testing) or in the Welcome/OOBE (Out-Of-Box Experience) which is what a user sees when starting a computer for the first time after a new installation.
Sysprep is part of the Windows image itself and is run from the system you want to prepare, usually in audit mode, although it can also be launched from a normal session as long as its requirements are met (for example, that the computer is in a workgroup and not joined to a domain).
Main functions and key features of Sysprep
Sysprep offers several very specific capabilities that make it the go-to tool for creating master images in professional environments:
1. Generalization: removal of team-specific data
Sysprep can remove unique machine information from a Windows installation, including the computer's SID. This allows you to capture that installation and distribute it to other devices without identity conflicts on the network.
2. Controller Management
Although Sysprep uninstalls the specific drivers for the reference PC, It does not physically remove them from the imageThey remain available for Windows to use if it detects compatible hardware during the first boot on the new computer, which greatly simplifies support for various hardware models.
3. End-user preparation through OOBE
You can leave the reference machine in a state where, after deploying the image and booting, the Windows Out-of-Box Experience (OOBE) starts automatically: language selection, time zone, user creation, etc. This is the ideal workflow when the image is going to be delivered to clients or end users.
4. Use of unattended response files
Sysprep allows you to associate an answer file to automate the OOBE phase or minimal installation. This allows you to pre-configure options such as time zone, computer name, domain join, accounts, regional settings and much more, without manual intervention.
Common Sysprep use cases in deployments
In practice, Sysprep is used whenever you want to standardize equipment from a well-configured reference system. Some typical scenarios include:
– Managing multiple computers with a generic image
You prepare a Windows installation with corporate applications, configurations, Start menu customization, taskbar, local policies, etc., generalize it using Sysprep, and capture the image. This same image is then used on computers with different hardware designs (provided the drivers are adequately supported).
– Mass deployment with unique SIDs
Sysprep ensures that each deployed system will obtain a different SID during the initial boot phase, preventing duplication that causes problems with network services, WSUS, domain, NTFS permissions, and inventory tools.
– Advanced customization in Audit mode
Audit mode allows you to log in directly as an integrated administrator without going through OOBE, Add applications, languages, drivers, and run tests on an already running installation, before generalizing again.
– Improved reliability before delivering equipment to users
Many manufacturers and IT departments use audit mode to perform functional testing, stress testing, software and driver validation, and then seal the image with Sysprep for the end user.
New features and changes in Sysprep in modern versions of Windows
With Windows 10 and Windows 11, Microsoft has been adjusting the behavior of Sysprep in Windows 11 to adapt it to continuous update scenarios and modern service models:
Sysprep in updated installations (starting with Windows 10 1607)
Since Windows 10 version 1607, Sysprep can be used about images that have been updatedFor example, you can start with a computer running Windows 10 20H2, upgrade it to Windows 11, run sysprep /generalize, capture the new image, and deploy it to other devices. Prior to that version, using Sysprep on upgrade installations was not supported.
Obsolete graphical interface
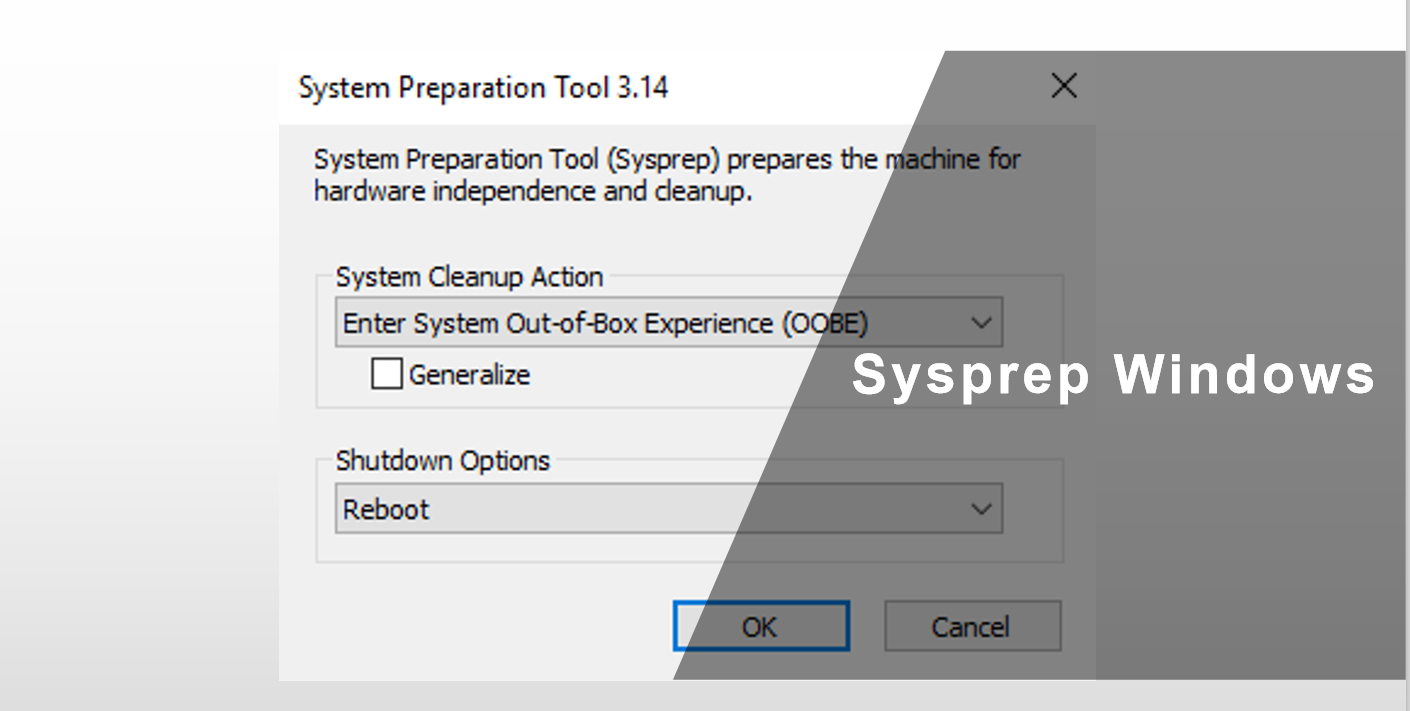
Starting with Windows 8.1, the Sysprep graphical user interface (GUI) is officially deprecated. Although it still appears when entering audit mode, Microsoft strongly recommends using the command line with the different options (generalize, oobe, audit, shutdown, etc.), since the graphical part could disappear in future versions.
Important requirements and dependencies before running Sysprep
Before launching Sysprep, it is essential to meet a series of conditions to avoid errors during the process or corrupted images:
– The team must be in a working group
The tool only runs correctly if the machine is not joined to a domain. If it is on a domain, Sysprep will remove it during the process, but it is recommended to remove it beforehand and always work in a workgroup on the master machine.
– Password policies and security directives
If the computer has been on a domain, legacy complex password policies may still be in place. This can lead to errors in the subsequent OOBE with messages such as “Windows cannot complete the installation”. It is advisable to review the local policies (for example with secpol.msc) and ensure that the computer is no longer receiving domain GPOs before running Sysprep.
– Antivirus and third-party software
Having a third-party antivirus active while Sysprep is running can lead to the error “Windows cannot complete system configuration”. The safest course of action is temporarily disable the antivirus engine (or any other highly intrusive protection) before launching the generalization, and reactivating it once the image has been deployed on the target computers.
– Contents of the Sysprep folder
All Sysprep-related files (sysprep.exe, setupcl.exe, and the Sysprep.inf answer file on older systems) must be in the same path, traditionally %SystemDrive%\Sysprep or %WINDIR%\System32\Sysprep. Having the answer file in a different folder may cause the process to ignore it.
Limitations and scenarios not supported by Sysprep
Sysprep is not a "one-size-fits-all" tool and has limitations that should be known to avoid getting into a dead end:
1. SID replacement only on the operating system volume
The system ID (SID) is only replaced on the partition where Windows is installed. If you have a multi-boot setup (multiple Windows installations on the same computer), you will need to run Sysprep. in each separate installation.
2. Problems with fixed drive letters in applications
Some custom applications store absolute paths using the system drive letter. If the system partition's drive letter changes after deployment (which can happen in certain scenarios), The maintenance or repair functions of these applications may fail.
3. Server roles are not always compatible
In Windows Server, not all roles support Sysprep. Generalizing an installation with certain server services configured can cause those roles to be incompatible. stop working correctly after cloning the imageMicrosoft maintains specific documentation on role compatibility with Sysprep.
4. Encrypted partitions in NTFS
Running Sysprep on an NTFS volume with encrypted files or folders (e.g., with EFS) is dangerous: the data may become completely unreadable and unrecoverable after preparation.
5. Irrecoverable errors in the same image
If Sysprep encounters a critical error during execution, You will not be able to run the tool again on that same image.In that case, you will have to reimplement the reference system from a previous copy or recreate the image from scratch.
6. Unsupported system account context execution
It is not possible to run Sysprep under the SYSTEM account using Task Scheduler, PSExec, or similar tools. It must always be run under a suitable user account (usually a local administrator).
7. Explicitly unsupported scenarios
It is not permitted to use Sysprep to "reconfigure" a Windows installation that has been in production for some time, move images between computers without having generalized them, run Sysprep of a different version than the system, automate it with certain RunSynchronous commands, or use virtual machine mode outside of a VM.
Most commonly used Sysprep parameters in modern Windows
In Windows 10 and 11, the usual method is via the command line , from the path C:\Windows\System32\Sysprep. Some practical examples:
Basic generalization and shutdown
sysprep /generalize /shutdown
This command removes specific equipment information (SID, etc.) and shuts down the machine once the process is complete, leaving it ready to be captured with your favorite tool.
Generalize and start in OOBE
sysprep /generalize /oobe /shutdown
Here you also specify that, when the image is deployed and the computer boots, the Windows Out-of-Boot (OOBE) experience should begin. This is the typical configuration for computers that will be delivered to end users.
Audit mode
sysprep /audit
This option ensures that, on the next restart, the system Enter Audit mode directlyallowing you to install more applications, drivers, language packs or run tests without going through OOBE.
Virtual machine mode
In virtual environments, a variant such as the following can be used:
sysprep /generalize /mode:vm
to indicate that you are preparing an image intended to run on virtual machines, optimizing certain internal aspects.
Quick access to the Sysprep GUI
If you prefer to use the graphical interface instead of just commands, simply type:
sysprep
From there you can choose “Start system out-of-box setup (OOBE)”, check or uncheck “Generalize” and select the shutdown action (Shut down or Restart).
Classic Sysprep parameters in Windows XP and the Sysprep.inf file
In Windows XP and earlier versions, Sysprep relied heavily on a response file called Sysprep.inf and a number of command-line parameters that are still interesting for understanding the origin of some current behaviors.
Key parameters in Windows XP
Some of the most important modifiers were:
- -activated: does not reset the activation grace period. It was used when the installation was already activated with the key shown on the equipment's COA label.
- -audit: Reboots in factory mode without generating new SIDs or processing the Winbom.ini section.
- -clean: deletes the mass storage device database used in the section .
- -factoryIt boots in factory mode, network-ready, without displaying the Windows welcome screen or minimal installation. Ideal for updating drivers, running tests, and customizing before sealing.
- -forceshutdown: Turns off the computer when Sysprep is finished, useful on computers with problematic ACPI BIOS.
- -mini: forced the use of the minimal installation instead of the Windows welcome screen.
- -noreboot: modifies registry keys without restarting, intended for laboratory testing, not recommended in production.
- -nosidgen: Runs Sysprep without regenerating SID, appropriate when the computer is not going to be cloned.
- -pnp: forces a full enumeration of legacy Plug and Play devices during minimal installation, significantly increasing first run time.
- -quiet: runs Sysprep without asking for confirmations, ideal for automations.
- -reboot: forces automatic restart to start the minimum installation, welcome or factory mode.
- -reseal: seals the installation, cleans the Event Viewer and leaves the system ready for the end customer.
Sysprep.inf file and supported sections
The Sysprep.inf file had to reside in the same folder as sysprep.exe and setupcl.exe, and stored the unattended configuration of the installation. Its sections were very similar to those of Unattend.txt, including:
- : options such as ExtendOemPartition, OemPnPDriversPath, OemSkipEula, UpdateHAL, etc.
- : administrator password, autologon, TimeZone, OEMSkipRegional, OEMSkipWelcome, etc.
- , , , , , , , : to customize users, license, first run scripts, resolution, regional settings, networks, and domain or workgroup membership.
- y They allowed generating entries so that the same image would work on computers with different storage controllers.
The classic recommendation after running Sysprep on the master machine was to disconnect it from the LAN where the images were to be deployed, to avoid NetBIOS name or domain membership conflicts while cloning.
Real-world example: preparing a reference machine with Sysprep on Windows 10/11
The typical workflow in Windows 10/11 for creating a master image is fairly straightforward . In simplified terms, the steps would be:
1. Configure the reference equipment
Install a clean, updated copy of Windows 10/11, add the necessary drivers, corporate applications, user settings, Start menu customization, taskbar, local policies, etc. Ideally, work in audit mode to avoid creating unnecessary accounts.
2. Ensure the equipment is outside the domain
Before running Sysprep, verify that the computer is not part of a domain and that local account policies are not overridden by domain GPOs. In environments using SCCM or similar systems, it is common practice to install a base image and then remove the computer from the domain before running Sysprep.
3. Run Sysprep from the official path
Open a command prompt as administrator and change to the working directory:
cd \Windows\System32\Sysprep
4. Launch the generalization with shutdown
For an image ready to deliver to users, you can use:
sysprep /generalize /oobe /shutdown
The system will remove the specific information from the equipment, prepare the OOBE, and automatically shut down when finished.
5. Do not turn the reference equipment back on.
Until you have everything ready to capture the image, avoid turning on the reference PC. An improper boot after Sysprep could generate new identifiers and force you to repeat the process.
Creating a bootable WinPE drive to capture the image
Once the reference machine is powered off, you need a capture environment . The most common way is to use Windows PE (WinPE), which is part of the Windows ADK and is designed to install, deploy, and repair Windows systems.
General steps on the technical PC (from which you create the capture medium):
1. Prepare the USB and tool environment
Connect a USB drive to the technical PC and open the "Imaging and Deployment Tools Environment" as administrator. This is the shell from which you will have access to the ADK and WinPE commands.
2. Initialize and partition the drive with Diskpart
Spear:
diskpart
List the disks, select the one corresponding to the USB and create two partitions: one active FAT32 for WinPE and another NTFS to store WIM images (for example with labels WINPE and Images).
3. Create the WinPE base files
Execute a command similar to:
copype amd64 C:\WinPE
This copies the necessary 64-bit WinPE files to the C:\WinPE folder.
4. Copy WinPE to USB
Uses:
makewinpemedia /ufd C:\WinPE P:
where P: is the drive letter of the WinPE partition on the USB drive. This command formats that partition and copies the WinPE boot files.
5. Move the USB to the reference computer
Remove the USB memory stick from the technical PC and insert it into the reference device you have sysprepped so you can capture the image from there.
WinPE VHD alternative in virtual machines
If you work in virtualized environments (for example with Hyper-V) , you can do without USB and create a virtual hard disk (VHD) with WinPE and another VHD to store the WIM image:
– Creating VHDs from the Hyper-V Manager
Add a new virtual hard disk to the SCSI controller and define a size of approximately 4 GB for the WinPE VHD. Create a second VHD for the images, for example, 8 GB.
– Mounting and formatting VHDs on the technical PC
Using diskmgmt.msc (Disk Management), attach the VHDs, initialize them, and create FAT32 volumes for WinPE and NTFS volumes for the images, with their corresponding drive letters.
– Copy the WinPE files to the VHD
From the deployment tools environment, run again:
copype amd64 C:\WinPE
and copy the contents of C:\WinPE\media to the WinPE VHD (e.g., P:) using a recursive xcopy.
– Remove the VHDs
Once the files have been copied, disconnect the VHDs from Disk Management and associate them with the virtual machine that will act as the reference machine.
Boot into WinPE and capture the WIM image with DISM
With the WinPE media ready (USB or VHD), the next step is to boot the reference machine from that lightweight environment and capture the system partition in a WIM file using DISM.
1. Boot from WinPE
Configure the boot order in your BIOS/UEFI so that the WinPE USB drive or VHD is the first boot device. Upon startup, you should see a WinPE prompt.
2. Identify disks and partitions with Diskpart
At the WinPE command prompt, run:
diskpart
then use list disk to locate the disk where Windows is installed (usually Disk 0), and list partition / list volume to view partitions and assigned drive letters.
3. Assign a letter to the system partition
Select the main partition where Windows is located (for example, Partition 3) and assign it a drive letter that is not in use, for example, W:
select disk 0

select partition 3

assign letter=W
4. Exit Diskpart
Once you see the Windows partition with the letter W in the volume list, run:
exit
to exit Diskpart and return to the WinPE command prompt.
5. Capture the image with DISM
Now use DISM to capture the W: partition in a WIM file located on the image partition (for example, D:):
Dism /capture-image /imagefile:D:\WindowsIoTEnterprise.wim /CaptureDir:W:\ /Name:"Windows IoT Enterprise"
This command creates a WIM of the sysprepped installation and saves it to drive D:.
6. Turn off the reference equipment
When DISM finishes, you can shut down the machine from WinPE with:
wpeutil shutdown
Implementation of the WIM image captured from WinPE
The WIM image you captured is your "master image" . You can use WinPE again to deploy it on one or more new machines, overwriting the system partition with the contents of the WIM (usually with DISM /apply-image) and then recreating the boot environment with tools like bcdboot.
In laboratory or production settings , it is common to capture different versions of the same image (base with only essential system and applications, another with more end-user software, etc.) during different phases of a project, in order to be able to quickly return to known states.
Combined use of Sysprep with third-party tools for mass deployment
Although Sysprep is essential for generalizing the image, it doesn't create copies or deploy them on its own . For bulk cloning and centralized management, the following are typically used:
– Microsoft suites such as SCCM/ConfigMgr
In enterprise environments with hundreds of machines, SCCM allows you to integrate Sysprep into workflows for image creation and deployment, update management, application inventory, and distribution. However, it is a complex solution with licensing costs.
– Third-party backup and deployment tools
Utilities such as AOMEI Backupper Technician offer features for creating WinPE bootable media, system backups, and Image Deploy to send the same image to an unlimited number of computers over the network, even taking advantage of capabilities such as universal restoration for different hardware.
The recommended workflow in these cases is very similar : first, Sysprep is run (generalizing and shutting down), then the system is booted using the WinPE media from the third-party tool, a full backup of the sysprepped system is made, and finally, a network deployment module (PXE, multicast, etc.) is used to restore that image to all target machines.
In local network deployments , it is important to have a functional DHCP server (or for the tool itself to simulate one), that all computers support PXE boot, and that they share a consistent numbering of physical disks, especially if the process is automated to always write to Disk 0.
Common problems with Sysprep and how to deal with them
In real-world environments, it's quite common to encounter errors when running Sysprep or when booting a deployed image for the first time. Some of the most frequent errors are:
– “Windows cannot complete the installation. To install Windows on this computer, restart the installation.”
This is often linked to password complexity policies imposed by the domain. If the master computer was on the domain or logged in with domain users before syspreping, local account policies may be "hijacked" by the GPO. In many cases, simply removing the computer from the domain is not enough. It's necessary to recreate the image from scratch without ever joining it to the domain. during preparation.
– “Windows cannot complete system setup. To attempt to resume, restart your computer.”
This is often caused by a third-party antivirus running when Sysprep is executed, or by some highly intrusive software that blocks system modifications. Ideally, these services should be completely disabled before launching Sysprep and then re-enabled after deployment on the final machines.
– Sysprep repeatedly fails on the same image
When Sysprep becomes corrupted in an installation, sometimes there's no clean way to "repair" it and run it again. Microsoft also imposes limits on the number of times a single image can be run (depending on the version, for example, up to 8 times in certain scenarios), so It is vital to work with intermediate backups of your master team in different phases.
– Problems with user accounts and administrator profile
In some environments, it is recommended to enable the built-in Administrator user (net user administrador /active:yes), remove temporary accounts used during preparation and always work with a clean profile before syspreping, to prevent the image from generating duplicate users or carrying over unwanted configurations.
When Sysprep is used following these best practices (outside of a domain, without active antivirus, with well-tested applications in audit mode, and without problematic encryption), it becomes a robust tool that radically simplifies image management in Windows, allowing both hardware flexibility and consistency in the end-user experience.


Passionate writer about the world of bytes and technology in general. I love sharing my knowledge through writing, and that's what I'll do on this blog, show you all the most interesting things about gadgets, software, hardware, tech trends, and more. My goal is to help you navigate the digital world in a simple and entertaining way.