- route print allows you to view and analyze the routing table of Windows, key to network traffic.
- The route command allows you to add, modify, or delete custom routes according to the needs of your environment.
- Advanced options and filters make it easy to manage and troubleshoot complex networks.
In today's networking world, managing traffic correctly between different devices is essential to ensure connectivity and the proper functioning of any system. Windows provides users with the `route print` command , a powerful tool that allows them to view and modify the system's IP routing table. While understanding how this command works or what it's used for might seem complicated at first, learning to use it can resolve many connectivity problems and open the door to advanced configurations.
The routing table is like a map that shows the path data should take to travel to and from your computer across the network. Mastering the use of `route print` will allow you to view, edit, and debug network routes, optimizing traffic according to the specific needs of each environment. Let's dive into its options and usage examples so you can get the most out of it, whether you're a system administrator or simply want to better understand how information moves on your computer.
What is the route command and what is it used for?
The `route` command in Windows and other operating systems like GNU/Linux is a utility used to manage and manipulate a computer's IP routing table . This table acts as a roadmap for data packets, indicating the path they should take to reach their destination within a local network or to external networks.
With `route print` , you can view all the active and persistent routes your computer uses. Additionally, the `route` command allows you to add new routes, modify existing ones, or delete them as needed. This is especially useful in enterprise environments, labs, or when you need to customize how your computer communicates with other devices or servers on the network.

Routing Table: What It Is and How It Works
The routing table is a set of records that links network destinations to their gateway, subnet mask, network interface, and associated metric. Whenever the system needs to send a packet, it consults this table to determine the best path for the data to take.
Each row in the table represents a different route. Some routes are created automatically when you configure the IP address, subnet mask, and gateway of an interface. Others can be added manually for specific needs, such as routing traffic from a specific network through a VPN or ensuring that data destined for a subnet exits through a particular adapter.
Route print command: Displaying the routing table
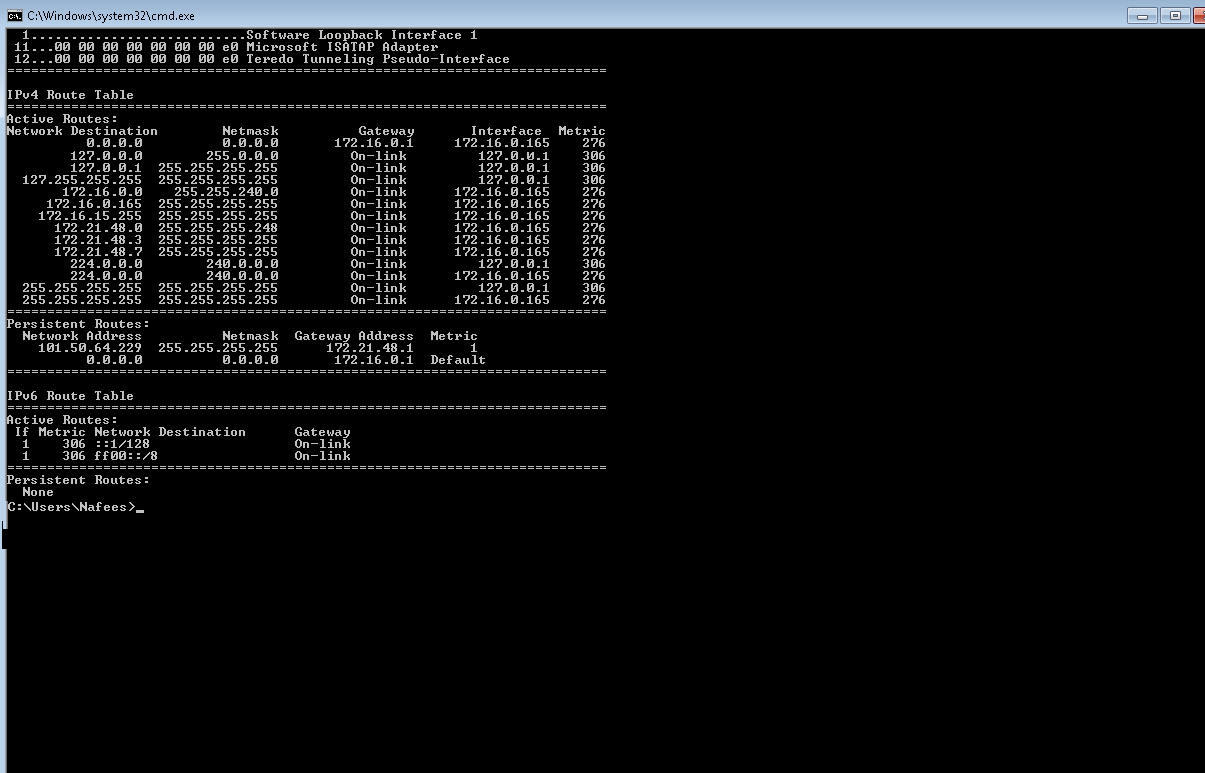
To check the current status of your Windows computer's routing table, you must open the symbol of the system and run:
route print
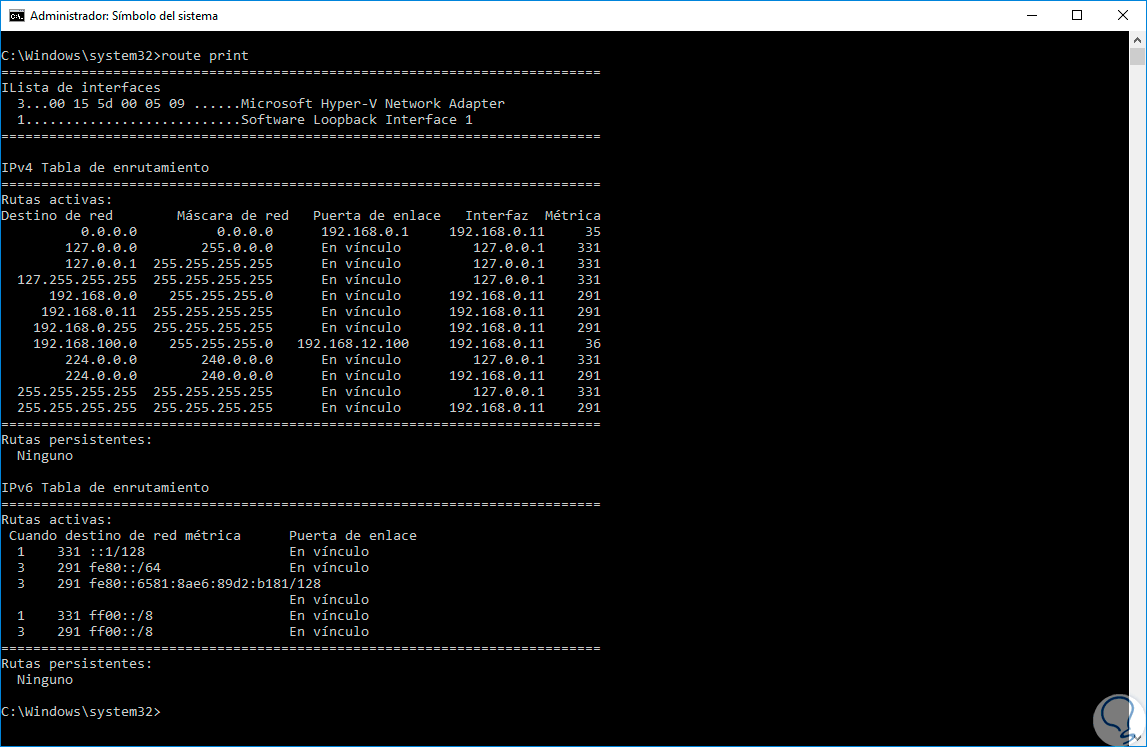
The output of the route print command is structured in several sections:
- List of interfaces: All available network adapters appear, indicating the address MAC and the interface number assigned to each one.
- IPv4 Route Table: Displays all known IPv4 routes, both locally generated and those added manually or automatically.
- IPv6 Route Table: Similarly, routes for IPv6 addresses are listed.
Each route in the table has several important fields:
- Network destination: Indicates which networks or devices information can be sent to.
- Netmask: Defined in IP format, it delimits which is the network part and which is the host part of the destination address.
- Gateway: This is the IP address to which the device forwards packets to reach networks other than its own. If the destination is directly accessible, it usually appears as "On Link."
- Interface: Identifies the address of the physical or virtual interface used to send the packet.
- Metric: Expresses the cost or preference of the route; the lowest is the primary route the system will take.
Route command syntax
The route command has several options and parameters for customizing route management. The basic syntax is:
route destino - Commandos Main:
- add: Add a new route to the table.
- delete: Deletes an existing route.
- change: Modify a route that is already configured.
- print: View all current routes.
- Additional options:
- /F: Deletes all non-host routes before executing the specified command.
- /p: Makes the added path persistent (remains after a reboot; only with add or print).
- Most frequent parameters:
- destination: Destination IP address or subnet.
- mask: Reserved word indicating that the next value is the subnet mask.
- gateway: Gateway or next hop IP.
- metric: Integer value that determines the priority of the route (lower value = higher preference).
- f: Numeric index of the network interface (can be queried with route print).
How to interpret the route print table?
By reading the output of `route print` , you can see multiple routes. Some of the most common ones are:
- 0.0.0.0 - 0.0.0.0: This is the default route; anything that doesn't fit into more specific routes will use the gateway specified here.
- Local routes: Addresses within the same subnet that are directly accessible.
- Persistent routes: Those that persist even after a reboot, indicating special situations or persistent manual network configurations.
On systems with multiple interfaces, it's common to see identical routes with different interfaces or metrics, indicating that the computer can reach the same destination via multiple paths. Windows will choose the one with the lowest metric.
Practical examples of using the route command
Display the routing table
If you only want to check the active and persistent routes, run:
route printTo filter the output and show only routes associated with a specific address, you can use:
route print 10.*Add a new route
Imagine you need all traffic destined for the 192.168.1.0/24 network to go out through the 192.168.0.1 gateway, you can run it like this:
route add 192.168.1.0 mask 255.255.255.0 192.168.0.1If you want to specify the interface and metric:
route add 192.168.1.0 mask 255.255.255.0 192.168.0.1 metric 10 if 2To create a persistent route that survives a PC reboot:
route -p add 10.41.0.0 mask 255.255.0.0 10.27.0.1Delete a route
If you need to delete a previously created route:
route delete 192.168.1.0 mask 255.255.255.0 192.168.0.1And if you want to remove all routes that start with a specific pattern:
route delete 192.*Modify an existing route
To change the gateway of a route, for example, from 192.168.0.1 to 192.168.0.2:
route change 192.168.1.0 mask 255.255.255.0 192.168.0.2Advanced interface and metrics management
If you have multiple network interfaces, you can view their indexes with:
netsh interface ipv4 show interfacesThis is important if you need to route traffic from a specific subnet through a specific adapter, ensuring the route follows the intended path. Remember that the metric is key: a low metric will cause that route to be preferred over alternative routes. If Windows automatically generates very large metrics, you can disable this option in the network adapter's advanced properties.
Wildcard and routes with wildcards
By using asterisks (*) or question marks (?) in the destination or gateway, route print or route delete will treat those values as wildcards, allowing you to show or delete routes that match that pattern.
For example, to display all routes starting with 10.x.1:
route print 10.*.1Common mistakes and technical considerations
One of the most common errors is when trying to add a route, the destination and subnet mask are not compatible, displaying a message like "Route: bad gateway address netmask." This usually occurs when the destination has bits set to 1 in positions where the mask is set to 0. It's a good idea to check both values in binary to avoid this problem.
Some routes may remain in the table even if they are no longer active. The persistent routes section simply reports entries stored in the Windows registry, but not necessarily in use. To identify which interface each route belongs to in detail, especially with Group File Objects (LBFO) configurations, it is recommended to supplement this with PowerShell using:
Get-NetRoute -AddressFamily IPv4 -PolicyStore PersistentStoreGet-NetRoute -AddressFamily IPv4 -PolicyStore ActiveStore
Querying and modifying the routing table in GNU/Linux
In GNU/Linux systems, the `route` command is also available and functions similarly, although the syntax changes slightly. To view the table, you can use:
route -nAdding or removing routes is done with the following structure:
sudo route add -net 192.168.0.0 netmask 255.255.255.0 gw 192.168.1.1 dev enp0s3sudo route del -net 192.168.0.0 netmask 255.255.255.0 gw 192.168.1.1 dev enp0s3The routing table in Linux uses similar fields: destination, gateway, mask, status indicator, metric, reference number, usage, and interface.
Additional options and advanced use cases
Route also allows the use of symbolic names for destinations and gateways, provided they exist in the network and hosts database files located in systemroot\System32\Drivers\. If you need to use names instead of IP addresses, make sure they can be resolved correctly using localhosts, DNS, or NetBIOS.
Another detail to keep in mind is that, by default, Windows XP and higher versions do not come with IP Routing (packet forwarding between networks) enabled. To activate this feature, you need to modify the system registry:
- Access the registry editor (regedit.exe).
- Navigate to HKEY_LOCAL_MACHINE\SYSTEM\CurrentControlSet\Services\Tcpip\Parameters.
- Change the value of IPEnableRouter to 1.
- Reboot the system to apply the changes.


Passionate writer about the world of bytes and technology in general. I love sharing my knowledge through writing, and that's what I'll do on this blog, show you all the most interesting things about gadgets, software, hardware, tech trends, and more. My goal is to help you navigate the digital world in a simple and entertaining way.
Table of Contents
- 1 What is the route command and what is it used for?
- 2 Routing Table: What It Is and How It Works
- 3 Route print command: Displaying the routing table
- 4 Route command syntax
- 5 How to interpret the route print table?
- 6 Practical examples of using the route command
- 7 Wildcard and routes with wildcards
- 8 Common mistakes and technical considerations
- 9 Querying and modifying the routing table in GNU/Linux
- 10 Additional options and advanced use cases