- Activate automatic detection and define profiles with realistic settings for each game, avoiding default values.
- Use the device gear for firmware, power, and non-profile-bound options.
- Take advantage of LIGHTSYNC/Dynamic Lighting and decide if it rules Windows or G HUB per device.
- Share and download presets with Logi ID; if G HUB fails in Windows 11, test process, admin and firewall.
Setting up game profiles in Logitech G HUB doesn't have to be a headache: with a few clear ideas and by taking advantage of what the software itself offers, you can tailor the behavior of your peripherals to each title like a glove. Automatic profiles, device-specific settings, and the community are the key elements to truly get the most out of it.
In the following lines, you'll find a complete and organized explanation based on the available information about G Hub: from how to activate and manage profiles that automatically switch when you open a game, to where to adjust the firmware or device power settings, including LIGHTSYNC/Dynamic Lighting and options for sharing or downloading other users' configurations. We've also included quick solutions if G Hub doesn't start or install correctly on Windows 11 , so you won't be left hanging.
What is a gaming profile on G Hub and why you might care
A game profile in G HUB is a set of settings applied to your Logitech G devices (mouse, keyboard, headset, etc.) when a specific game is detected or when you manually select it. The system's advantage lies in automating the change so that each game starts with your preferred sensitivity, macros, lighting, and audio options.
G HUB incorporates an automatic profile system capable of intelligently switching profiles when launching a compatible game. By default, this feature is disabled , so if you've never changed it, it's normal not to see any changes when opening your games.
There's an important distinction: if you enable the automatic profile system and launch a game whose automatic entry has no settings configured, G HUB will use the default values. This isn't a bug; it's the starting point for creating new profiles . The solution is simple: make sure each game you use has its own profile with the settings you need.
From that moment on, every time you launch the game, G HUB will apply that set of parameters automatically. You save time and avoid mistakes like accidentally entering a shooter with sensitivity settings designed for a MOBA.
Activate and manage automatic profiles
The first step to taking advantage of game detection is to activate the automatic profiling system. Although the interface evolves with each version, the logic remains the same: enable switching and review the profiles for each title. Once activated, G HUB "listens" to which executable is opened to load the associated configuration.
Once enabled, check the games that G HUB detects. If any appear without settings, edit them and define the basics (for example, DPI and mouse button assignments, or key combinations). If you leave a profile empty, the software will apply the default values , exactly as designed.
To avoid problems if multiple games share the same executable or launcher, it's worth checking that the profile is associated with the correct .exe file. This ensures that the profile activates when it should and doesn't remain in standby mode.
Once you have several profiles ready, you can individually disable automatic detection for those you don't want to apply it to. Some users prefer to manually activate certain "special" profiles , for example, for video editing or work.
Create, edit, and fine-tune your device profiles
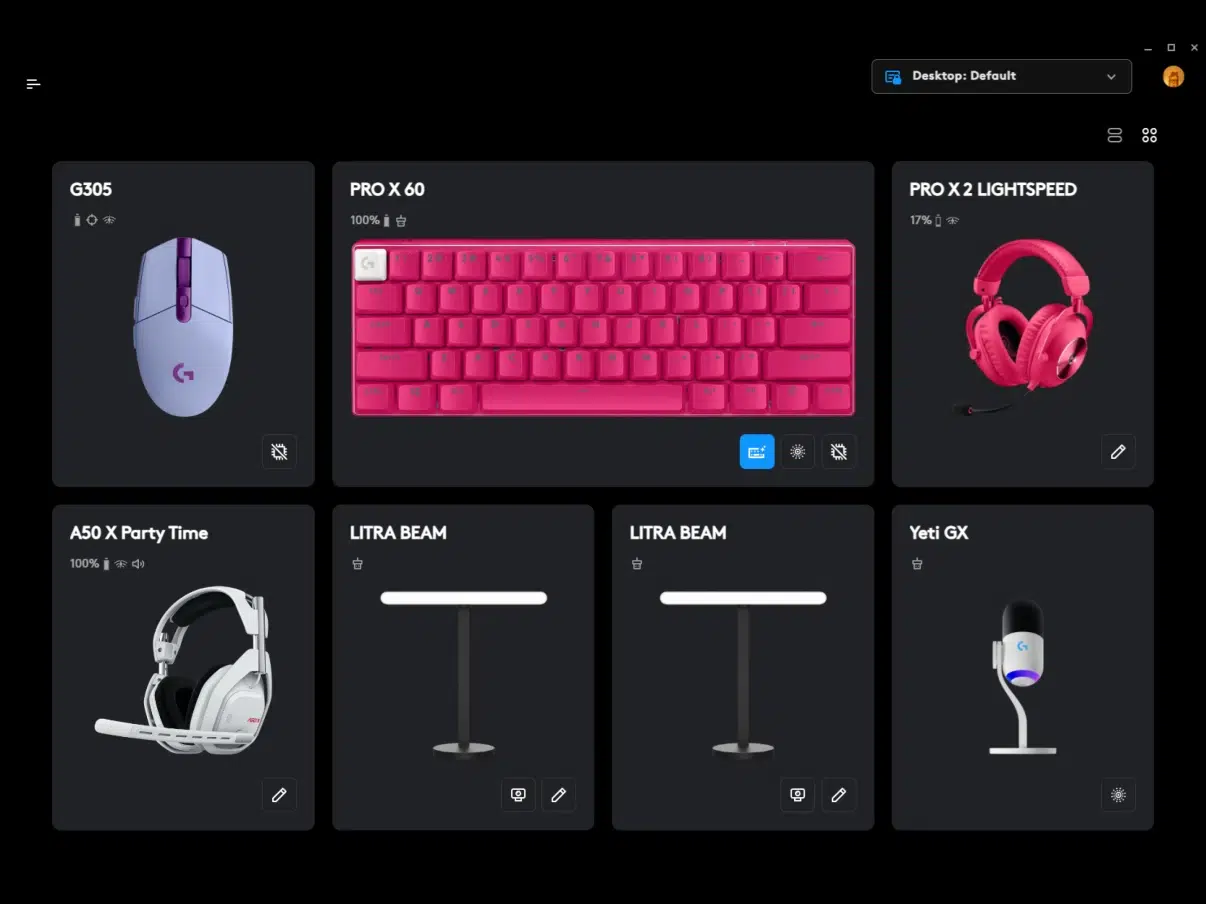
Each device's listing in G Hub is your control center. On that page, you'll see a settings gear icon in the bottom left corner of the interface. This icon opens the device's settings , separate from the profile-specific options.
From this menu, you can access settings such as firmware, power management, and other general parameters that are not profile-dependent. Updating the firmware maintains compatibility and fixes bugs , so it's a good idea to check it from time to time.
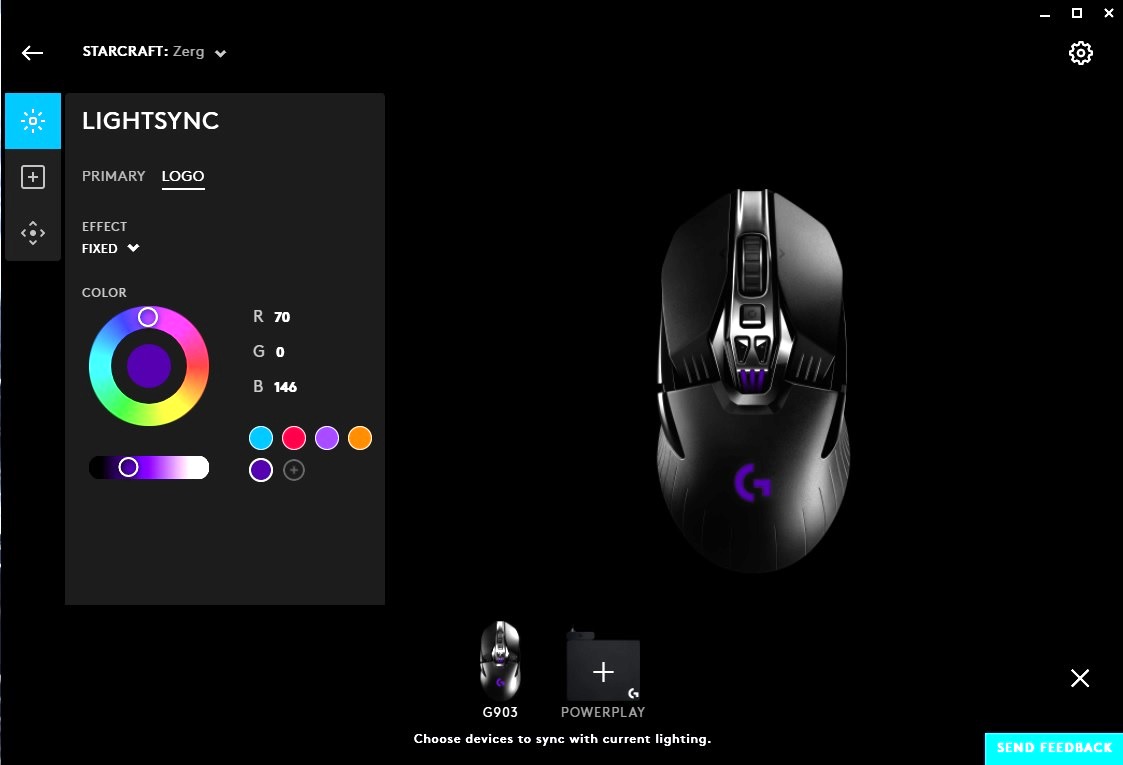
As for the profile-specific settings, this is where you adjust DPI, acceleration or deceleration, polling rate, button assignments, key layers, lighting zones, and macros. Think of a profile as a "capsule" of settings that are applied all at once when G HUB detects your game.
A simple trick is to create a base profile with common preferences (for example, dim lighting and media shortcuts) and duplicate it for your games, changing only the game-specific settings. This maintains consistency and saves time compared to starting from scratch each time.
Leveraging the community: shared presets and Logi ID
G HUB integrates a community portal where you can search for and upload configurations created by other players. This is especially useful for more complex features, such as BLUE VO!CE for audio or KEYCONTROL for advanced key control. The collective experience saves you from reinventing the wheel and gives you ready-to-use presets.
To participate in this exchange, you need a Logi ID and to be logged into G Hub. If you don't have one, you can create it by clicking on your profile picture, located in the upper right corner of the program window. Once logged in with your Logi ID, you can upload and download pre-configured files with just a couple of clicks.
When you import a community preset, take a minute to review it and adjust it to your liking. Every setup, game, and playstyle is different , so what works perfectly for someone else might need tweaking for you.
Advanced features: BLUE VO!CE and KEYCONTROL
If you use compatible microphones and headphones, BLUE VO!CE lets you apply powerful voice filters and adjustments for a clear and present sound. The learning curve can be steep , which is why the configurations shared by the community are invaluable for getting started.
With KEYCONTROL, supported keyboards can expand customization possibilities, from fine-tuning to complex combinations. Leveraging public profiles saves you hours of trial and error and lets you find inspiration from players with similar needs.
LIGHTSYNC and Dynamic Lighting (DL) with Windows control
Lighting is more than just aesthetics when it helps you see statuses or cooldowns, but it can also be purely for aesthetic reasons. To try Dynamic Lighting and manage how Windows interacts with your Logitech G devices, you can link directly to the system settings page. You can do this from the "DL" icon on the device card in the G HUB home screen or via the link in the LIGHTSYNC section within the device settings.
This access allows you to enable or disable Windows control over compatible peripherals. You can do this globally for all devices or disable specific ones and let G Hub control the rest. This granularity is ideal if you want a keyboard to sync with the system while the mouse maintains its own animation.
In terms of style, it's entirely up to you: you can choose a vibrant rainbow, a bold fuchsia animation, or a discreet taupe for longer sessions. G HUB and Logitech G gear offer enough flexibility to let you shine like a diamond, if you wish , or blend in completely.
If something doesn't look as expected, check the Windows control switch and the LIGHTSYNC status on the device itself. A conflict between the system and G HUB often explains unusual lighting behavior.
Device settings: where to change firmware, power, and more
Remember: the gear icon in the bottom left corner of each peripheral's page is your access point to that hardware 's general settings . From there you can update firmware, adjust power settings, and change options not linked to profiles that affect the device's basic operation.
In wireless devices, for example, power management is key to balancing battery life and performance. Increasing the polling rate on a wireless mouse impacts battery life , so you might prefer a high value only for specific gaming profiles and a more moderate one for everyday use.
Keeping your firmware up to date reduces incompatibilities and fixes bugs. When you see an update notification, apply the patch at a time when you won't be interrupting a game and let the process finish without disconnecting your device.
Privacy, cookies, and community notices
If you browse forums like Reddit for inspiration on profiles or tips , you'll see a privacy notice highlighting that they and their partners use cookies and similar technologies to provide a better service. This notice allows you to accept all cookies or reject non-essential ones ; however, even if you reject non-essential cookies, they may still keep some that are essential for the platform to function correctly.
They also explain that cookies are used to maintain and improve the site, personalize content and advertising, and measure the effectiveness of ads. You always have access to their Privacy Policy and Cookie Notice if you'd like to learn more.
Also keep in mind that some technical information about Google Hub may come from automatically translated answers in forums or help centers. These translations may include unusual phrasing or minor inaccuracies , so it's a good idea to compare them with the actual program interface.
If G HUB won't install or hangs on Windows 11
It's possible that after updating to Windows 11, the G Hub installer might not progress or the program might get stuck on the loading screen. Microsoft Community has documented common causes and practical solutions. The most common issues are that the process is already running in the background, there are compatibility problems, or the firewall is mistakenly blocking the software.
First, check if there's a newer version of G Hub on the manufacturer's website and, if possible, take a screenshot of the exact spot where the process gets stuck. This helps accurately diagnose whether the problem is with the installation, permissions, or network.
Quick fix 1: Close processes and disable startup
- Open the Task Manager with Ctrl + Shift + Esc.
- In the Processes, locate “Logitech Gaming” or G HUB processes and press “End Task”.
- In the Home, disable Logitech Gaming/G HUB to avoid conflicts when booting Windows.
After that, try starting or reinstalling Google Hub. If the problem was caused by a zombie process, this usually resolves it.
Quick fix 2: Run as administrator and compatibility
- Open Explorer and go to the installation folder, usually in C:\Program Files (x86)\Logitech Gaming Software (or the route where you have it).
- Right click on the G HUB executable and enter Properties.
- In the Compatibility, select “Run this program as an administrator.” Apply and Accept.
Reopen Google Hub. Insufficient permissions increase the likelihood of being blocked , and this setting corrects it in many cases.
Quick fix 3: Allow G HUB in Windows Firewall
- Press the Windows key, type Control panel and open it.
- Sign in System and Security > Firewall Windows Defender and click “Allow an app or feature through Windows Defender Firewall.”
- Balance “Change settings”, locate Logitech G HUB and select the “Private” and “Public” boxes. Save with OK.
If the firewall was blocking it due to confusion, allowing it in both network profiles should resolve the issue. Note: If you're using third-party firewalls, you'll need to replicate the permission there as well.
If the problems persist after these steps, please provide details (including a screenshot and the exact version of Google Hub) to the community or support team. Moderators like Khou Sol in Microsoft Community have specifically requested this information to refine the next steps.

Passionate writer about the world of bytes and technology in general. I love sharing my knowledge through writing, and that's what I'll do on this blog, show you all the most interesting things about gadgets, software, hardware, tech trends, and more. My goal is to help you navigate the digital world in a simple and entertaining way.