- CPU affinity allows limiting which cores each process can use to optimize or isolate specific workloads.
- Windows 10 and 11 handle the cores well by default, but affinity and priority help in special cases such as problematic games or very heavy processes.
- It is possible to automate affinity using scripts, shortcuts, or tools like Process Lasso instead of changing it manually each time.
- Misuse of affinity or priority can reduce overall performance or cause instability, so they should be applied sparingly.
If you use Windows for gaming, video editing, or working with many applications simultaneously, you've probably encountered situations where the processor is maxed out, the PC sluggishly slows down, and you're not quite sure what to do to get things running smoothly again. One of the most powerful (and least known) tools the system offers is CPU affinity, which allows you to manually decide which cores can be used by specific processes.
In this article, we'll take a step-by-step look at how all this works and how you can manage your CPU cores using process affinity from the Task Manager , when it makes sense to limit cores, how to combine it with process priority, in what cases it can improve the performance of games or heavy applications, and in what other cases it can even cause crashes if misused.
What is a multi-core processor and how does it use Windows cores?
Modern processors include multiple computing cores within the same chip . Each core is a processing unit capable of executing instructions independently, with its own logic and cache, while sharing other internal processor resources.
Since the late 90s, commercial processors with more than one core began to arrive on the market, and today it is completely normal to have CPUs with 2, 4, 8, 16 physical cores and even more , in addition to technologies such as Hyper-Threading or SMT, which allow each physical core to expose two logical threads to the operating system.
Having many cores doesn't mean all applications will benefit equally: software needs to be programmed to use multiple threads . Modern programs, recent game engines, and editing applications typically scale well with more cores, while older or simpler tools may still use only one or two.
Under normal conditions, Windows attempts to use all available cores automatically . The system scheduler distributes process threads among the different cores, taking into account priority, system load, power efficiency, and other factors. In Windows 10 and Windows 11 , this is highly refined, whereas in Windows 7 and 8, there were occasional instances where certain cores could be disabled or underutilized due to power settings or occasional errors.
When we notice a sharp drop in performance or see that a game doesn't scale well, or conversely, that a heavy task renders the PC unusable, it makes sense to consider adjusting CPU affinity or the priority of some processes to get a little more performance out of the system or to distribute the load more intelligently.
When does it make sense to tweak CPU affinity?
While the Windows scheduler usually does a good job, there are situations where manually adjusting which cores a particular application can use makes all the difference. This is known as setting a process's "processor affinity."
A very clear example is that of poorly programmed or very old games that get confused when they encounter too many logic cores . Real-world situations have occurred with high-end PCs, for example, systems with X99 motherboards, 128 GB of RAM, and Xeon processors with 14 physical cores and 28 threads with Hyper-Threading, where certain games simply wouldn't start or would freeze on a black screen when faced with so many threads.
Games like For Honor or Contagion have displayed errors such as "out of thread ids. Decrease the number of threads or increase MAX_THREADS_SUPPORTED" , forcing the user to reduce the number of active processors from msconfig (for example, limiting to 14 threads) for the game to work, with the drawback that this limitation affects the entire operating system until the changes are reversed and the computer is restarted.
In these cases, the ideal solution would be to limit the CPU cores to only that specific game and allow the other applications to continue utilizing the full CPU. This is achieved precisely through process affinity, or by combining it with special scripts and shortcuts that launch the game with a specific affinity mask.
Setting affinity also makes sense when you have very heavy tasks running in the background (for example, video compression or rendering) and you want to reserve part of the CPU so you can continue using the PC smoothly: you can lock that process into a few cores and leave the rest free for games or other interactive applications.
How multitasking and CPU resource sharing work in Windows

Modern operating systems , such as Windows 10 and Windows 11, are preemptive multitasking systems . This means that the operating system itself decides when to run each process and for how long, without letting applications manage hardware access among themselves.
In the past, cooperative multitasking models existed, where programs had to "cede" control to one another. When something went wrong, the system lost the ability to regain control, resulting in dreaded error screens or complete system crashes . To avoid these scenarios, modern systems reserve some resources and retain the final say on what runs at any given time.
For this reason, even if a game wants to use 100% of the CPU, Windows won't give it all the resources . There will always be background processes necessary for the system to function: services, antivirus, drivers, etc. The system also usually reserves a logical thread for its own internal tasks, especially on CPUs with many cores.
When a demanding game or application requires a lot of CPU, Windows negotiates how much to allocate to it without killing other essential processes. If we're not happy with the allocation, we can intervene using two main tools : process priority and CPU affinity.
Changing these options can improve performance in some scenarios, but if configured incorrectly they can cause instability, lag, or even complete system crashes , so it's important to know exactly what each one does before experimenting.
Process priority vs CPU affinity: what each one is
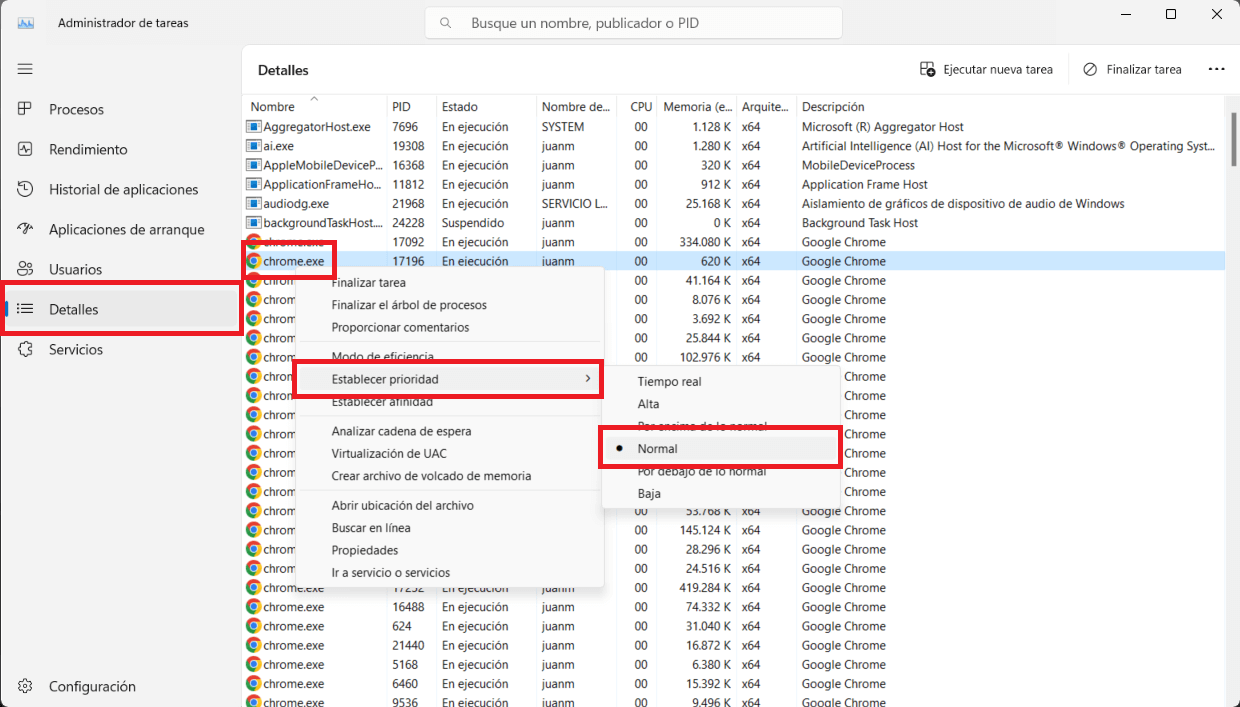
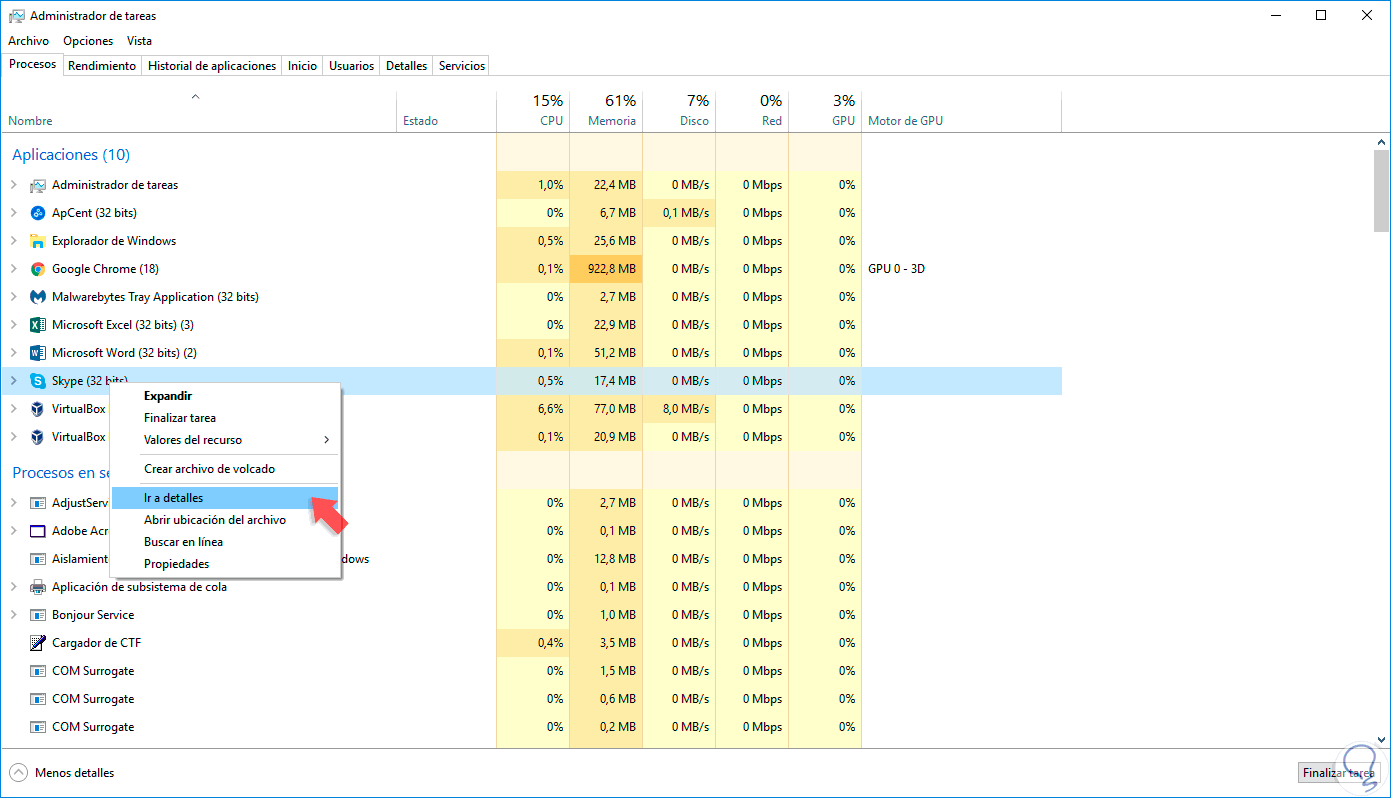
Within Task Manager, right-clicking on a process and selecting the Details tab reveals two important settings: Set priority and Set affinity . Although they are often used interchangeably in discussions, they are distinct concepts.
Process priority indicates how often a process receives CPU time . Windows offers several priority levels: Low, Below Normal, Normal, Above Normal, High, and Real-time.
Increasing the priority to "High" or "Above Normal" can help a time-sensitive game or program experience fewer interruptions from background processes . However, using "Real-time" is very risky on a home PC because it reserves virtually the entire CPU for that process, potentially crashing the system if something goes wrong.
CPU affinity, on the other hand, determines which specific processor cores a process is allowed to run on . By default, all processes have access to all cores, but we can restrict some processes to run only on a subset of logical CPUs.
By combining both things, it is possible, for example, to assign high priority to a game and limit to one or two cores the applications that use a lot of CPU in the background , thus ensuring that the game has more resources without having to close anything.
Hence the common recommendation to "not mess with game priority": used indiscriminately, it can create more problems than it solves . Adjusting it slightly up or down can have positive effects, but it's best to avoid extremes. For advanced priority management, tools like Process Hacker are available if you need finer rules and control.
Activate and check all processor cores in Windows
Before discussing process affinity, it's important to ensure that Windows has access to all the CPU cores . In Windows 10 and 11, if the BIOS/UEFI is properly configured, this is enabled by default and requires no adjustments.
In older versions like Windows 7 or 8, it was possible to manually limit the number of processors using the msconfig tool. Some users enabled this option thinking it would force Windows to use all cores, when in reality it imposed an artificial limit that could even worsen performance.
The classic method was: type msconfig in the search bar, go to the Boot tab , click on Advanced Options, and select "Number of processors" to choose how many to use. On computers with compatibility issues with certain games, this trick has been used to halve the number of available threads and allow the game to launch.
However, when you need to take full advantage of the CPU, it's best to uncheck the "Number of processors" box so that Windows can use all the cores when necessary, leaving the management to the system scheduler.
In Windows 10 and 11, although the compatibility setting still exists, it's not recommended to change it except in very specific diagnostic or compatibility cases . For most users, it's best to let the system use all available cores and adjust the load per process based on affinity and priority.
How to set CPU affinity from Task Manager
The quickest and most visual way to manage affinity is through the Task Manager itself. In Windows 8, 10, and 11, the workflow is very similar, with the difference that the relevant tab is called Details (in Windows 7, the Processes tab was used with the "Show processes from all users" option).
To change the affinity of a hot process, simply follow these basic steps, which are generally valid in modern versions of Windows:
- Open Task Manager with Ctrl + Shift + Esc, or by right-clicking on the taskbar / Start button and selecting it from the menu.
- Go to the tab Details and locate the process in the program or game that we want to adjust.
- Right-click on the process and select the option Set affinity.
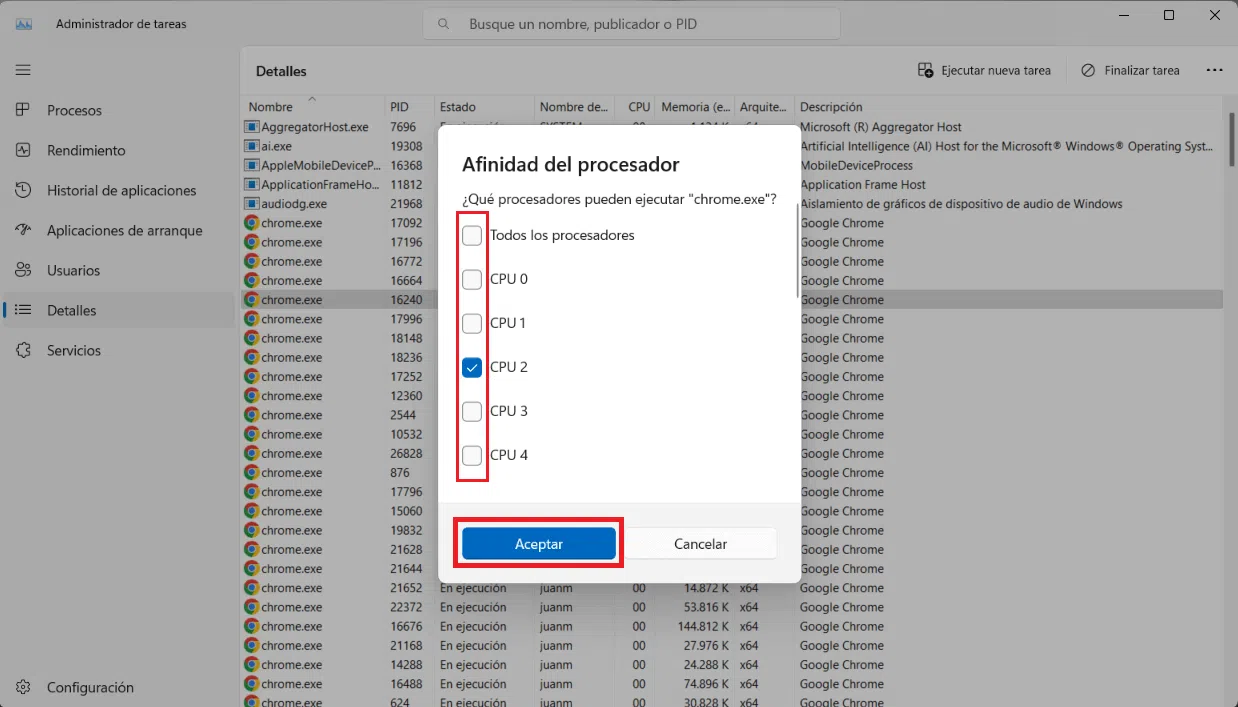
- A window will open with the list of CPUs (CPU 0, CPU 1, CPU 2, etc.) where we can to mark or unmark the cores that this process can use.
By deselecting some cores, we are "locking" that process into the cores that remain selected. For example, if we have a processor with eight logical threads and we leave only CPU 0 and CPU 1 selected for a compression task, that task will only be able to run on those two threads , and the others will be free for the rest of the applications.
In older games that run better with fewer threads, or in titles that crash when they encounter too many, you can try leaving only 4 or 8 logical threads active for that game . On machines with Hyper-Threading or SMT, it's sometimes preferable to use only the physical cores and avoid some logical threads, although this depends heavily on the specific architecture.
Keep in mind that affinity changes made through Task Manager are temporary : they are lost when you close the program, log off, or restart your computer. If you want to automate affinity for a specific application, you'll need a script , adjust the shortcut, or use third-party tools.
Additionally, some games use anti-cheat systems or protections that prevent modifying the affinity or priority of their processes . In these cases, it's normal for the option to appear disabled or for the changes to have no effect.
Setting process priority in Windows
From the same Details tab in Task Manager, you can also control a process's priority. The system offers several categories, which influence the amount of CPU time allocated to it relative to other processes.
To change it you have to:
- Open the Task Manager and go to the Details tab.
- Locate the desired process, right-click, and choose Set priority.
- Select one of the levels: Low, Below Normal, Normal, Above Normal, High, or Real Time.
In practice, it is reasonable to raise the maximum to "Above normal" or "High" for a game or application that we want to prioritize , and lower the maximum to "Below normal" or "Low" for utility processes that are consuming a lot of CPU but do not need an immediate response (compressors, encoders, etc.).
The "Real-time" priority is intended for very specific environments where certain tasks must be executed before everything else (industrial processes, real-time professional audio, etc.). If applied to a game or any program on a home PC, the system is quite likely to start behaving erratically or freeze, because Windows can barely allocate CPU resources to its own internal threads.
Hence the common recommendation to "not mess with game priority": used indiscriminately, it can create more problems than it solves . Adjusting it a point up or down thoughtfully can have positive effects, but it's best to avoid extremes.
Special cases: Windows Defender and MsMpEng.exe consuming CPU
A very typical example of a CPU-intensive process is Windows Defender , whose main executable is MsMpEng.exe . When the antivirus is performing a full scan or gets stuck on certain files, it can spike CPU and disk usage to 80-100% for quite some time.
If, when looking at tools like Task Manager or Process Explorer, we see that MsMpEng.exe is running rapidly, we can tackle the problem in several ways:
- Check that There is no other antivirus, antispyware, or antimalware installed.Having several at the same time is a bad idea: they overlap, detect each other, and can cause precisely that excessive consumption.
- Setup folder exclusions en Windows Defender so that it does not scan certain problematic paths (for example, its own installation folder or others with many small files that do not pose a risk).
- In extreme case, Disable Windows Defender using group policies (gpedit.msc) and replace it with another reliable antivirus, being very aware of the risk of leaving the computer unprotected.
Another useful technique is to limit the affinity of MsMpEng.exe to a specific number of cores so it doesn't hog the entire CPU. Again, from the Details tab of Task Manager, you can set the affinity and restrict it, for example, to only one core on a dual-core CPU or two threads on a quad-core CPU. This slows down the scanning process but frees up resources for the rest of the system.
As a general recommendation, for a balanced workload, you can limit MsMpEng.exe to approximately 50% of the total logical threads . This reduces the impact without completely disabling real-time protection.
Advanced affinity management: scripts, shortcuts, and CPU masks
Manually adjusting these settings every time you open a program can get tedious. That's why there are several ways to automate affinity and priority settings so they're applied every time you launch a particular application.
The most visually appealing option is to use third-party tools like Process Lasso , which allow you to define permanent rules for affinity, priority, disabling Hyper-Threading for a program, and more. These applications start with Windows and automatically reconfigure processes when they open.
If we prefer not to install anything additional, we can use batch scripts (.bat) and modified shortcuts . The basic idea is to start the program using the START command with affinity and priority parameters.
An example of a .bat file could be:
cd /d "C:\Path\to\game"
START /affinity FF Game.exe
In this case, the /affinity parameter is followed by a hexadecimal mask that indicates which logical threads the process can use (each bit activates or deactivates a logical CPU). For example, masks like 1, 2, 4, 8, 10, 20, etc., represent different combinations of cores. At this level, it's important to know how many logical threads the processor has and what combination we want.
Another option is to modify the application shortcut . In the Shortcut tab of the Properties, you can change the Target field so that instead of pointing directly to the executable, it first points to cmd.exe with the appropriate parameters, something like:
C:\Windows\System32\cmd.exe /C START «Program Name» /high /affinity 2 «C:\Path\Program.exe»
In this example, the program is launched with high priority and only on a specific kernel. When you click Apply, Windows will warn you that administrative permissions are needed to change the shortcut; accept the changes, and from then on, every time you use that icon, the same affinity and priority will apply.
Intel hybrid processors and the affinity between P-Cores and E-Cores
With the arrival of Intel 's hybrid architectures (Alder Lake, Raptor Lake and successors), where performance cores (P-Cores) and efficiency cores (E-Cores) coexist , the affinity game has gained another layer of complexity.
In these processors, the P-Cores are designed for demanding tasks that need maximum power per thread , such as modern games or content creation applications, while the E-Cores are geared towards background work and less latency-critical loads.
In theory, the Windows 11 scheduler, along with Intel's Thread Director technology, automatically decides which threads go to P-cores and which to E-cores . In practice, some games and applications may experience performance degradation if a significant portion of their work is executed on E-cores instead of P-cores.
In these cases, some users choose to force affinity so that the main games run only on P-Cores , leaving the E-Cores for services, browsers, Discord, etc. However, for this to work well, the affinity of many secondary processes would also need to be adjusted, not just the main game's executable.
This may be viable in CPUs with many E-Cores (for example, combinations of 8 P-Cores with 8, 16 or more E-Cores), where there is plenty of power for other tasks, but in processors with fewer efficiency cores it is easier to overload some of them if the load is not distributed properly.
Risks and limitations of playing with affinity and priority
Although it sounds very tempting to "tune" the CPU allocation, there are a number of drawbacks and risks that should be kept in mind before you start messing with affinity and priority like crazy.
If we assign an intensive process to a single core or very few cores, we can cause a noticeable drop in efficiency : that core will become saturated, the application's response latency will increase, and it may even feel like it's performing worse than before, even though the rest of the cores are almost unused.
On the other hand, if we distribute the workload poorly—for example, by concentrating too many processes on the same threads or leaving some cores unnecessarily idle— the system may become less stable . This can lead to crashes, unexpected game closures, or even system freezes that force a PC restart.
Another important aspect is that a fixed affinity setting reduces the flexibility of the Windows scheduler . If the process can only run on certain cores, it won't be able to take advantage of other idle logical threads, which can sometimes worsen performance under variable workloads where the ideal scenario is for the system to dynamically distribute resources.
From a security standpoint, it's rare but possible for malware to exploit affinity settings to try to hide from certain security tools or hinder its detection. It's not a typical attack vector, but it's advisable to avoid using unusual configurations in system or security processes without fully understanding what you're doing.
As a practical tip, forcing a game to bypass logical cores 0 and 1 (which Windows prioritizes) on a processor with few cores or moderate clock speeds can cause a significant performance drop or freeze . On modern CPUs with 8 cores/16 threads or more, the impact is less severe, but it's still something worth testing carefully.
When too many threads are limited in a demanding game, crashes, freezes, and forced restarts are relatively common . Therefore, if you want to experiment, it's advisable to do so gradually, changing one or two cores at a time and checking the behavior before proceeding.
In practice, tinkering with affinity, priority, and allocation between physical and logical cores can offer a lot of flexibility for fine-tuning performance or resolving unusual issues with certain games. However, provided it's done thoughtfully, the changes are documented, and temperatures, CPU usage, and system stability are monitored , the user has a powerful tool to get the most out of their hardware without relying solely on Windows' automatic decisions.


Passionate writer about the world of bytes and technology in general. I love sharing my knowledge through writing, and that's what I'll do on this blog, show you all the most interesting things about gadgets, software, hardware, tech trends, and more. My goal is to help you navigate the digital world in a simple and entertaining way.