- Encrypted P2P sync with full control: no external cloud and device approval.
- Cross-platform installation and per-user service; web GUI on port 8384.
- Folder modes (send/receive), ignore patterns, and versioning to fine-tune the flow.
- Secure LAN/Internet access with TLS, UFW, Nginx as proxy and tunnels SSH.
If you've been looking for a way to sync files between your devices without relying on the cloud, Syncthing is one of those tools that will change your routine. No third-party servers, end-to-end encryption, and complete control over where your data resides —that's exactly what this project offers.
We'll walk you through its installation and configuration step by step, from GNU/Linux (with clear instructions for Ubuntu/Debian, Fedora, and Arch/Manjaro) to its setup, device connectivity, and useful settings. The goal is for you to end up with stable, secure, and practical synchronization , whether on your LAN or over the internet, with extras like reverse proxying in Nginx, SSH tunnels, and firewall rules.
What is Syncthing and how does it work?
Syncthing is a cross-platform file synchronization solution that works in a distributed manner; that is, your computers connect to each other and transfer data directly without uploading anything to external servers. It originated as free software, is released under the Mozilla Public License 2.0, and is developed in Go.
The communication leverages its own Block Exchange Protocol, and all traffic is encrypted with TLS. Devices must explicitly approve each other before sharing data , adding a key layer of security in home and work environments.
In addition to interoperating with IPv4 and IPv6, Syncthing handles NAT environments well, offering retransmission mechanisms when direct connectivity is unavailable. In case of editing conflicts, it renames the oldest file with a suffix like "sync conflict" along with the date and time , allowing you to decide how to resolve the issue.
To be agile, it combines metadata or full data compression, reuses previously sent blocks, and performs lightweight scans when it detects local changes. The result is efficient and fairly transparent synchronization, even on modest networks.
On a daily basis, it's managed through its web interface (GUI), and on GNU/Linux it also has a desktop GTK GUI. The default web console listens on port 8384 on localhost , and can be exposed to the LAN or the Internet if needed.

Platforms and project philosophy
Syncthing is available for GNU/Linux, Windows , macOS, and even Android , and also includes Docker images. Its 100% open and cross-platform approach makes it ideal for mixed systems , desktops, laptops , and mobile devices.
The idea is that you test the hardware (BYO cloud) and the application does the rest: create a cluster of devices, choose which folders to share, and let it sync. You have complete control over where the data is stored , as the project itself emphasizes.
Installation on GNU/Linux
Let's start with the most common systems. I've included updated methods for Ubuntu/Debian, as well as alternatives for Fedora and Arch/Manjaro , so you can replicate the environment across all your machines.
Ubuntu, Debian and derivatives
First, install the necessary dependencies to work with third-party repositories. This step applies to Ubuntu, Debian, Linux Mint, MX Linux, and similar distributions.
sudo apt update
sudo apt install -y gnupg2 curl apt-transport-https
Now add the Syncthing release key and official repository . You have two options, depending on your version:
Modern option (recommended, Ubuntu 22.04+) :
curl -fsSL https://syncthing.net/release-key.txt | \
sudo gpg --dearmor -o /etc/apt/trusted.gpg.d/syncthing.gpg

echo 'deb https://apt.syncthing.net/ syncthing release' | \
sudo tee /etc/apt/sources.list.d/syncthing.list

sudo apt update
Legacy option (Ubuntu 20.04 and earlier) :
curl -s https://syncthing.net/release-key.txt | sudo apt-key add -
echo 'deb https://apt.syncthing.net/ syncthing release' | \
sudo tee /etc/apt/sources.list.d/syncthing.list

sudo apt update
Install Syncthing and check the version. This will give you the binary ready to use.
sudo apt install -y syncthing
syncthing --version
Fedora
In Fedora you'll find it in the official repositories. Installation is straightforward using DNF.
sudo dnf install -y syncthingArch Linux and Manjaro
On Arch and derivatives, you can install it from the official repositories. Syncthing-gtk may be available in repositories or the AUR depending on your distribution.
sudo pacman -S --needed syncthingStarting the service and GUI
The web interface listens by default on 127.0.0.1:8384. You can start Syncthing manually or as a service , preferably per user to avoid unnecessary privileges.
Per-user boot with systemd
The recommended way is to run Syncthing with your normal user account. Replace 'username' with your login name :
sudo systemctl start [email protected]
sudo systemctl enable [email protected]
sudo systemctl status [email protected]
One variant is systemd's user mode. Both approaches aim for the same goal: running the daemon without root privileges.
systemctl --user enable syncthing
systemctl --user start syncthing
systemctl --user status syncthing
Dedicated systemd unit (optional)
If you need a custom unit, you can create it in /etc/systemd/system. This is useful on servers or when you want to force startup parameters.
sudo nano /etc/systemd/system/[email protected][Unit]
Description=Syncthing - Open Source Continuous File Synchronization for %I
Documentation=man:syncthing(1)
After=network.target
[Service]
User=%i
ExecStart=/usr/bin/syncthing -no-browser -gui-address=0.0.0.0:8384 -no-restart -logflags=0
Restart=on-failure
SuccessExitStatus=3 4
RestartForceExitStatus=3 4
[Install]
WantedBy=multi-user.targetReload the services and start. This will give you access to the GUI on the configured IP address and port 8384.
sudo systemctl daemon-reload
sudo systemctl start syncthing@usuario
sudo systemctl status syncthing@usuario
Access to the web interface and basic security
Open your browser on the local machine and visit the console: http://127.0.0.1:8384/. The first time, it will ask you to define access authentication , which is highly recommended to avoid surprises.
Go to Actions > Settings > GUI tab and set a username and password. Save the changes and log back in with your credentials . Your dashboard is now ready.
Connecting devices: ID and mutual approval
Syncthing identifies each node with a unique alphanumeric ID. It's available in Actions > Show ID and comes with a QR code , which is very handy when one of the devices is an Android phone.
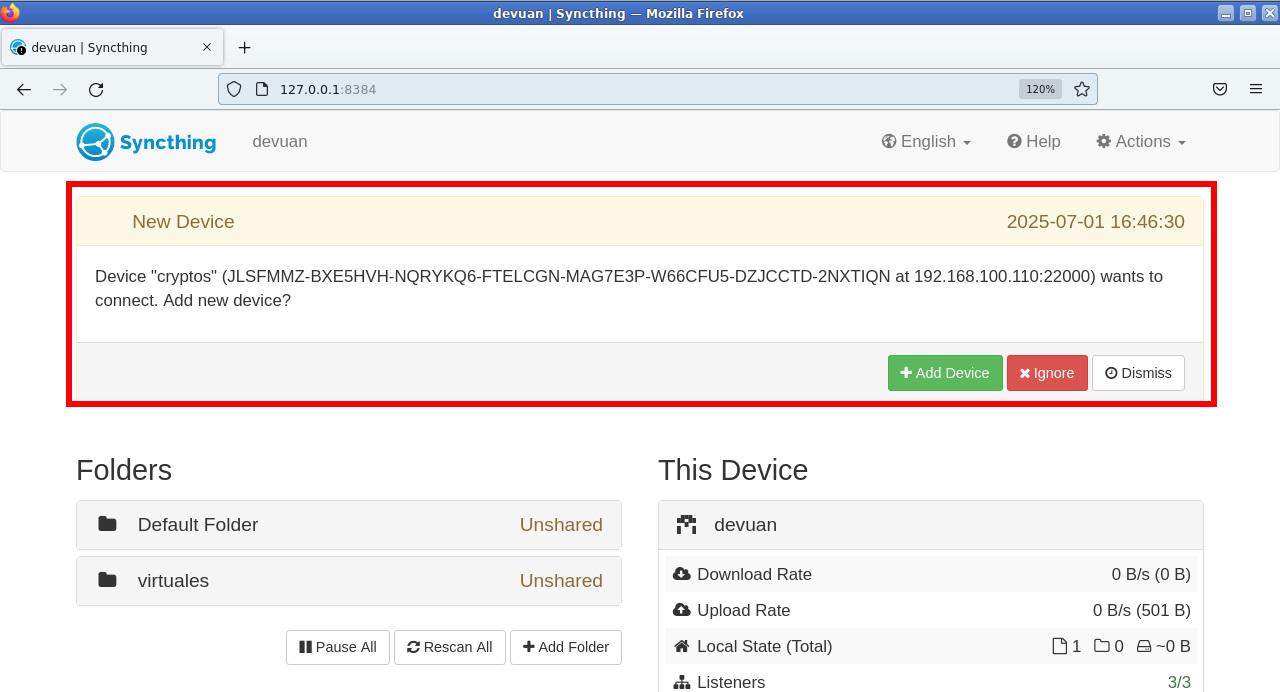
To add a new device, click Add Remote Device, paste its ID or select it from the discovery list on the LAN, and save. A notification will appear on the other end to accept the connection ; after both ends approve it, they will be connected.
When a group of devices shares folders with each other, it's called a "cluster." All members of the cluster must have Syncthing installed and mutually approve their connections.
Share folders and start syncing
The basic workflow is very simple: you create a local folder, add it to Syncthing, and share it with one or more devices. The recipient chooses the path to store that shared folder , and that's it—syncing begins.
From the panel, tap Add Folder, define a label and a path (for example, ~/syncthing/projects). On the Sharing tab, select the devices you want to sync with , and save.
On the remote computer, you'll see a prompt to "add" that folder. Choose the destination path (it can be different from the source path) , confirm, and wait for the first scan to start .
If you want to check that everything is working correctly, create some test files on computer A inside the shared folder: they should appear on computer B in a few seconds if both are online.
cd ~/Sync/
touch {1..20}.txt
Sync modes and advanced folder options
Syncthing offers three modes per folder to control the flow of changes: Send and Receive (default), Send Only, and Receive Only . These are ideal for scenarios such as "copying from mobile to PC" or "a central repository that should not be altered."
In Edit > Advanced you'll find useful settings such as the scan interval, verification policies, and metadata parameters (permissions, owner, etc.). You can also set a minimum free space threshold to avoid accidentally filling up disks.
The Ignore Patterns section lets you exclude specific files or paths (for example, '*.tmp' or cache subfolders). And in File Versioning, you can keep older versions of files to provide a buffer against overwrites or accidental deletions.
Android, desktop and other platforms
On Android, install Syncthing from F-Droid to get the free app and keep it updated. You can scan the QR code of your PC's device ID to connect them instantly. From there, sharing the DCIM/Camera folder in Send Only mode is a great way to back up your photos to your computer.
On Windows and macOS, the setup is similar: you start the daemon and access the web GUI. If you prefer a system tray with an icon and shortcuts, there are frontends like Syncthing-GTK on GNU/Linux (depending on the distribution).
Open the GUI to the LAN or Internet with HTTPS
The console is limited to localhost by default. To access the local network, edit the user configuration file (~/.config/syncthing/config.xml) and modify the <gui> section. You can enable TLS and set the listening IP:port.
nano ~/.config/syncthing/config.xml<gui enabled='true' tls='true' debugging='false' sendBasicAuthPrompt='false'>
<address>192.168.1.50:8384</address>
<apikey>API-KEY-GENERADA</apikey>
<theme>default</theme>
</gui>Restart the service and access the configured address using HTTPS. Remember to protect the GUI with a username and password if you expose it outside of localhost.
sudo systemctl restart [email protected]Publish the GUI behind Nginx (reverse proxy)
If you prefer to access your domain through port 80/443, add Nginx at the beginning and redirect it to the backend port 8384. This also makes it easier to add TLS with Let's Encrypt.
sudo apt install -y nginx
sudo nano /etc/nginx/conf.d/syncthing.conf
server {
listen 80;
server_name syncthing.example.com;
access_log /var/log/nginx/syncthing.access.log;
error_log /var/log/nginx/syncthing.error.log;
location / {
proxy_pass http://127.0.0.1:8384;
proxy_set_header X-Real-IP $remote_addr;
proxy_set_header X-Forwarded-For $proxy_add_x_forwarded_for;
proxy_set_header X-Forwarded-Proto $scheme;
}
}sudo nginx -t
sudo systemctl reload nginxThis will make your console accessible at http://syncthing.example.com/ (or even better, via HTTPS if you issue a certificate). It's a clean way to centralize access and logs.
Remote access with SSH tunnel
If you manage a server that you access via SSH, you can "bring" port 8384 to your machine using local port forwarding. It's convenient and avoids exposing the GUI to the internet.
ssh -L 8384:127.0.0.1:8384 usuario@servidor-remotoNext, open http://127.0.0.1:8384 in your browser and you'll be managing the remote instance. It's a simple, secure, and very useful technique in production.
UFW Firewall and Required Ports
In Ubuntu, you can enable predefined profiles for Syncthing in UFW. This unlocks the essentials for the GUI and synchronization.
sudo ufw allow syncthing
sudo ufw allow syncthing-gui
sudo ufw allow OpenSSH
sudo ufw enable
sudo ufw status verbose
Under the hood, Syncthing uses port 22000 (TCP/QUIC) by default for data exchange and 21027 (UDP) for local discovery. If you're using a different firewall, allow it according to your policies , and adjust the GUI port (8384) if you expose it.

Table of Contents
- 1 What is Syncthing and how does it work?
- 2 Platforms and project philosophy
- 3 Installation on GNU/Linux
- 4 Starting the service and GUI
- 5 Access to the web interface and basic security
- 6 Connecting devices: ID and mutual approval
- 7 Share folders and start syncing
- 8 Sync modes and advanced folder options
- 9 Android, desktop and other platforms
- 10 Open the GUI to the LAN or Internet with HTTPS
- 11 Publish the GUI behind Nginx (reverse proxy)
- 12 Remote access with SSH tunnel
- 13 UFW Firewall and Required Ports