- Canva lets you import images, videos, audio, fonts, and documents from your computer or the cloud to centralize all your resources.
- Uploading logos, fonts, and colors to the brand kit helps maintain a consistent visual identity across all designs.
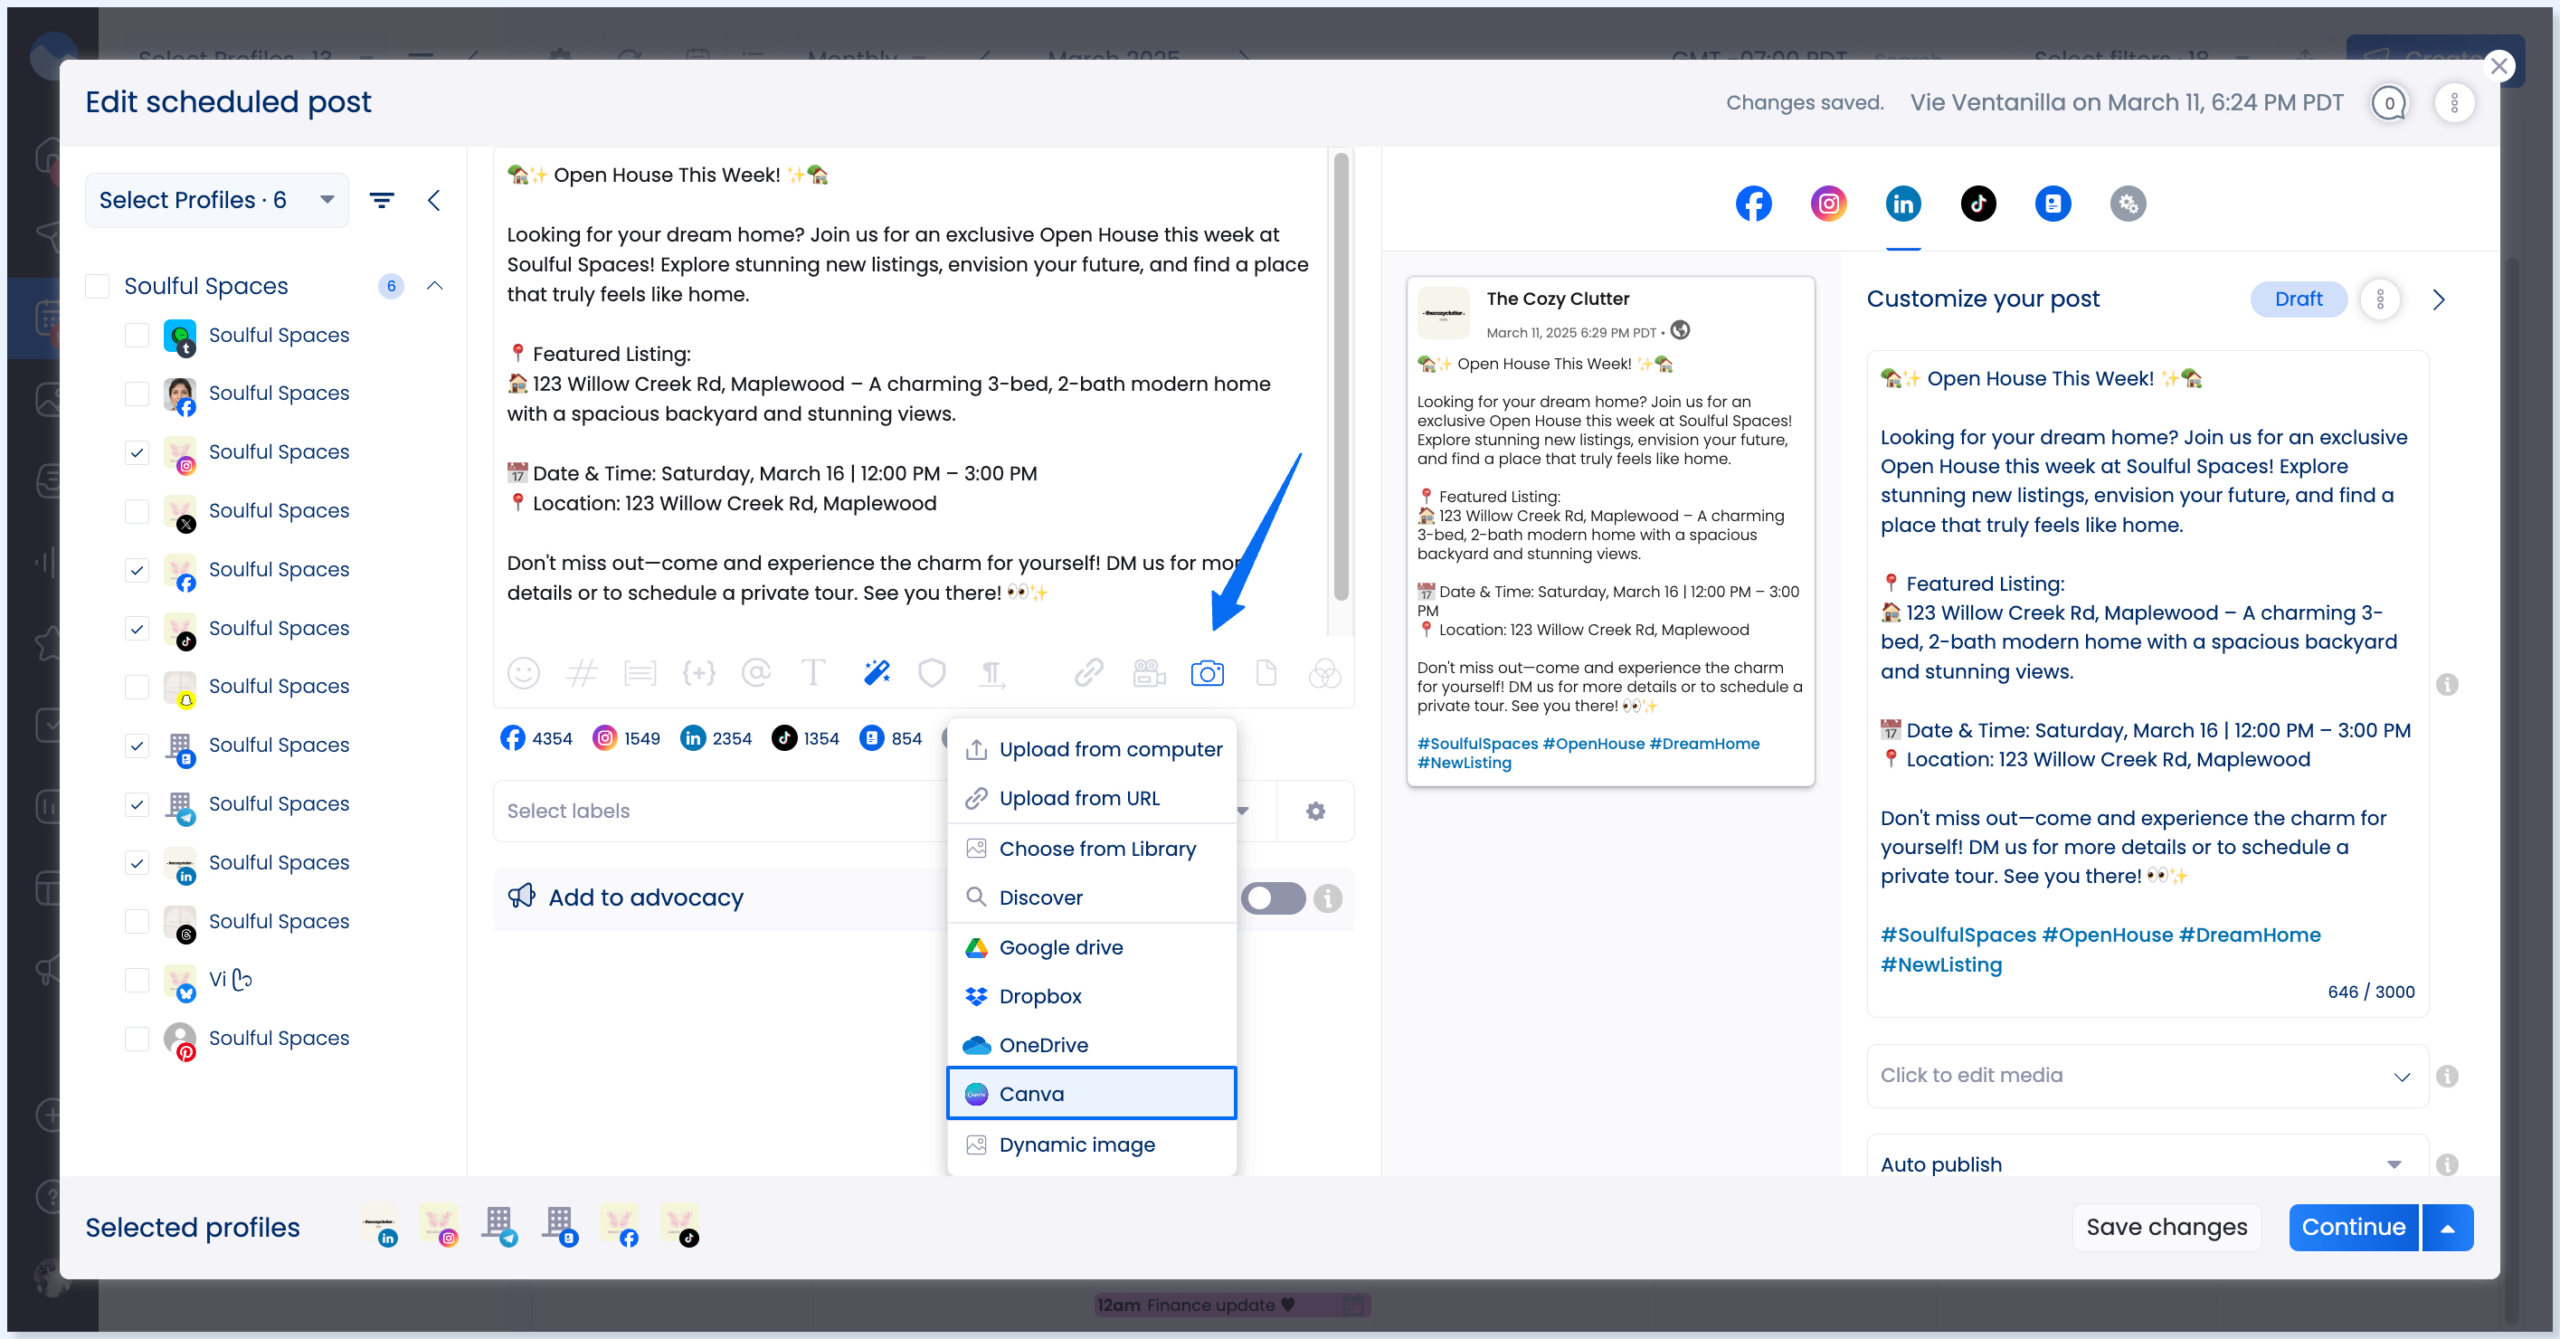
- Integrations with services such as Google Drive or Dropbox make it easy to reuse assets stored in the cloud without duplicating work.
- Good organization with folders and custom templates turns Canva into a personalized and efficient asset library.

If you work with Canva daily, sooner or later you'll encounter the same question: how to import your own resources, fonts, logos, and templates so you're not solely reliant on the library. The good news is that Canva is designed for this and allows you to easily integrate virtually any type of file, in both the free and paid versions.
Mastering this aspect saves you time and makes your designs much more personalized. Throughout this guide, you'll see all the ways to import assets into Canva : from images and videos to audio, custom fonts, and complete brand elements, as well as integration with external stock photo libraries, Google Drive, Dropbox, and more. The goal is for you to end up with a comprehensive and practical overview so you can build your own ecosystem within Canva.
What are assets in Canva and why import them?
When we talk about "assets" in Canva, we're referring to all the resources you use to create a design : images, icons, illustrations, videos, audio, fonts, logos, templates, graphics, stickers, and even documents that you then convert into designs. Canva offers a huge library, but if you want to maintain a consistent visual identity or reuse materials you already have, you'll need to upload your own assets.
Importing assets into Canva is essential for businesses, personal brands, agencies, and anyone who wants to unify the look of their designs across social media, presentations, or documents . Instead of recreating elements each time or relying on generic templates, you can reuse logos, colors, brand images, or videos you've already edited.
Furthermore, by centralizing everything in Canva, you have an online repository accessible from any device . You don't need to search for files in local folders or external drives: you upload it once and you can use it in all your projects, even sharing it with your team if you work collaboratively.
Another key advantage is that Canva integrates with many external sources: stock photo sites, cloud storage , and other applications . This means you can not only upload files from your computer, but also pull directly from Google Drive, Dropbox, Instagram , or even templates from other platforms, depending on the available integrations.
Types of files that can be imported into Canva
Canva accepts a wide range of formats, but it's important to understand what you can upload without problems and what the limitations are . Generally speaking, the assets you can import include images, videos, audio, fonts, and some document formats.
In the image section, Canva allows you to upload files in JPG, PNG, WEBP, HEIC, and some RAW formats depending on the device you're uploading from. The PNG format is ideal when you need to preserve background transparency, which is essential for logos or cut-out icons that you'll be layering over other elements.
Regarding video, the platform supports common formats such as MP4, MOV, and animated GIFs . It's important that the file size isn't excessively large, because although Canva compresses files, a very large video will significantly impact upload time and performance in the editor. For social media, it's best to upload the video at a reasonable resolution and duration.
Regarding audio, Canva accepts formats such as MP3 , WAV, M4A, and similar . This allows you to import voiceovers, licensed music, or sound effects you've already purchased, and then mix them with clips from Canva's own library to add your personal touch to animated designs or video presentations.
You can also upload custom fonts in TTF, OTF, and WOFF formats , although this is limited to certain plans (usually Canva Pro, Education, or Enterprise). This way, if you have a corporate or brand font, you can install it in your brand kit and use it exactly as if it were a native Canva font.
In the documents section, Canva allows you to import PDFs , presentations, and some multi-page image formats to transform them into editable projects. This is useful when you want to reuse a brochure, an old presentation, or a document from another tool and adapt it to Canva's visual environment without starting from scratch.
How to upload images and graphics from your computer
The most direct way to import assets into Canva is to upload files from your computer. The process is very simple: open a design or create a new one , and in the left sidebar go to the section that usually appears as “Uploads” or “Uploads,” depending on your language settings.
Within that panel, you'll see a clear button to upload files from your device . Clicking it opens your system's file explorer ( Windows , macOS, etc.), and you simply select the photos, logos, screenshots, or illustrations you want to include. You can select one or more at a time to save time.
Canva also allows drag and drop: you select the image directly from a folder on your computer and drag it onto the browser window where Canva is open . The file will automatically begin uploading and will appear in the imported files section of that project and your account.
Once uploaded, these files are saved in your personal library. From then on, you can insert them into any design with a simple click , duplicate them, crop them, or apply filters and adjustments. You don't need to re-upload the same logo or photo for each project, which greatly streamlines your workflow.
It's a good idea to be somewhat organized: although Canva displays all uploaded files in a single list, you can use folders and projects to maintain some order . For example, a folder for each client or each campaign, so your assets don't end up mixed together haphazardly.
Import video and audio for multimedia projects
If you create more elaborate content, such as reels, ads, or animated presentations, you'll want to know how to import your own videos and audio tracks into Canva. The process is similar to importing images, but there are a few nuances to keep in mind to ensure a smooth result.
In the uploaded files section, you can choose to upload videos or audio specifically . You select the clips from your computer or drag them into the Canva window, and the platform takes care of processing them. Depending on the length and size, the upload time will vary, but you'll see a progress bar indicating when they're ready to use.
Once inside the project, you can place the videos by dragging the file onto the page or frame you want . Canva allows you to trim the duration, mute the original sound, change the framing, and apply transitions. This way, you can combine several video clips you've previously recorded with graphic elements and text generated within the tool itself.
Audio works similarly: after uploading your files, you'll see them in the corresponding section and can drag them to the design timeline when working in a video or animated presentation. You can trim the start and end of the track, adjust its position to match scene changes, and combine it with other music from the library.
You also need to keep an eye on licenses: although Canva offers its own royalty-free music for use within the platform, when you import external audio, it's your responsibility to ensure you have permission to use it. This is especially important for paid campaigns or pieces that will be distributed widely.
Upload custom fonts and create a brand kit
One of the most powerful features for maintaining a professional image is the ability to import your own fonts . This allows you to use the same font as on your website, corporate documents, or printed campaigns, ensuring complete consistency across all materials.
To do this, you need access to the "Brand Kit" section, which is usually available in paid plans like Canva Pro , Education, or Business. From this panel, you can upload font files in TTF, OTF, or WOFF format , which will then be visible in the font picker when you edit text.
The process is simple: locate the fonts section within the brand kit, click on “Upload font,” and select the font from your computer . Canva may display a warning asking you to confirm that you have the rights to use that font, as many commercial fonts require explicit licensing for certain uses.
Once imported, custom fonts integrate seamlessly with the rest of Canva's fonts. You can define default fonts for titles, subtitles , and body text within the brand kit, so your designs automatically adjust to these preset combinations without you having to change them each time.
The brand kit also lets you import other essential assets: logos in PNG or SVG format, corporate color palettes, and text styles . All of this is associated with your account and, if you work as a team, also with the shared workspace, so that all members use the same elements without deviating from the visual guidelines.
Use cloud integrations and storage
In addition to uploading files from your computer, Canva offers integrations with external storage services and third-party applications . This makes it much easier to import assets that you have scattered across the cloud or other content platforms.
Common integrations include Google Drive, Dropbox, OneDrive, and Box . From Canva's sidebar, you can connect to these accounts, authorize access, and directly view your folders and files without having to download them to your computer first.
It works easily: with an active internet connection, you browse your external folders from within Canva, select the images, videos, or documents you need, and insert them directly into your design . In many cases, the file is copied to your Canva library, so it's also saved within the platform.
In addition to cloud services, Canva offers integrations with content platforms and social networks , which in some cases allow you to import previously published images and videos. Depending on the configuration and version, this can include connections with Instagram, Facebook , Google Photos, or similar services, streamlining the reuse of already published materials.
These integrations are especially useful for teams that work remotely or already have a well-organized folder structure in the cloud . Instead of duplicating everything in Canva, you simply connect your repository and pull in assets as needed, avoiding outdated versions or lost files.
Reuse templates and designs as assets
Another smart way to work with assets in Canva is to think of your own designs and templates as reusable resources . Whenever you create a design you particularly like, you can save it and duplicate it as many times as you want, using that structure as a foundation for new projects.
Instead of importing an external file, you treat the Canva design as an internal asset . For example, an Instagram post template with your header, brand colors, and fonts already defined. Each time you want to create a new post, you duplicate that design and change only the specific content, keeping the structure intact.
You can also share these templates with other members of your team or even create template links for third parties to use without modifying the original. It's a very effective way to standardize the design of documents, presentations, infographics, or creative assets for social media campaigns.
To stay organized, it's a good idea to create specific folders for master templates . This way, you can find them quickly and they don't get mixed up with the final designs you've already published or downloaded. The more organized these internal assets are, the less time you'll waste looking for the right template for each new project.
This preliminary work of creating and organizing your own templates turns Canva into a true personalized asset library , where you not only import external files, but also generate and preserve reusable structures that serve as a starting point in your daily work.
Management and organization of imported assets
As you upload more and more resources, it becomes essential to properly organize all imported assets to avoid ending up with a chaotic mess of hard-to-find files. While Canva isn't as advanced a digital asset manager as some others, it does offer sufficient basic tools to maintain a minimum level of organization.
The first step is to leverage folders and projects . You can create folders by client, campaign, content type (social media, presentations, internal documents), or format. The important thing is to follow a logical structure from the beginning that you can then maintain without getting overwhelmed by exceptions.
It also helps a lot to use descriptive filenames when uploading images, videos, or audio. Instead of leaving them as "IMG_1234" or "video_final_v3," it's more practical to rename them with something that tells you at a glance what they are: "main_logo_transparent_background," "product_reel_A_15s," etc. This affects Canva's internal search engine, which allows you to locate files by name.
Another option is to group assets directly within projects. For example, in a specific design, you can upload all the resources you know you'll use and make them available in the uploaded files section linked to that design . This way, when you return later, you'll have the key elements at hand without having to search through the entire library.
If you work in a team, it's advisable to define internal rules regarding how to upload and name assets , what types of resources are stored in shared folders, and which ones are kept more restricted. This prevents duplication, conflicting versions, or each person inadvertently using different logos or colors.
Finally, it's a good idea to dedicate some time now and then to "cleaning up": deleting files that are no longer needed, trial resources, or outdated versions . While it's not always a chore, having a cleaner library improves search speed and makes working within Canva more comfortable in the long run.
Importing assets into Canva isn't just about uploading a single file every now and then: it's more about building and maintaining a well-structured resource environment that allows you to design quickly, consistently, and professionally, leveraging both your own materials and the cloud integrations and collaborative tools that the platform offers.


Passionate writer about the world of bytes and technology in general. I love sharing my knowledge through writing, and that's what I'll do on this blog, show you all the most interesting things about gadgets, software, hardware, tech trends, and more. My goal is to help you navigate the digital world in a simple and entertaining way.
Table of Contents
- 1 What are assets in Canva and why import them?
- 2 Types of files that can be imported into Canva
- 3 How to upload images and graphics from your computer
- 4 Import video and audio for multimedia projects
- 5 Upload custom fonts and create a brand kit
- 6 Use cloud integrations and storage
- 7 Reuse templates and designs as assets
- 8 Management and organization of imported assets