- macOS allows you to mount network drives via SMB, AFP, FTP, and other protocols using Finder and the "Connect to Server" option.
- Frequent servers can be saved as recent, favorites, or shortcuts in the sidebar for reconnection in just a few clicks.
- AppleScript, startup items, and tools like Cyberduck or Microsoft Remote Desktop make it easy to automate and work with remote servers.
- Network locations and service priority (Wi-Fi, Ethernet, VPN) help adapt the Mac to different network environments and improve stability.
Accessing network drives on macOS can be a bit of a shock if you're coming from Windows and are used to "mapping" a drive letter that stays there permanently. On a Mac, you won't see the typical Z:, X:, or similar drive letters, but you can connect to shared resources, make them appear in the Finder, and, most importantly, automate their reconnection so you don't have to press Command + K every time you arrive at the office or return home.
In this article, you'll see all the practical ways to access and reconnect network drives in macOS : from the most basic method with Finder, through recent and favorite servers, to scripts, third-party tools, and tricks to ensure your SMB or AFP shares are always readily available. We'll also see how all of this fits with macOS network locations and how to prioritize Wi-Fi, Ethernet, and other services to avoid headaches.
Basics: How Network Drives Work in macOS
macOS doesn't "map drive letters" like Windows does ; instead, it "mounts network volumes" that are displayed on the desktop, in the Finder sidebar, and in the file system path. This change in mindset is important because many automation and reconnection options revolve around mounting these volumes.
By default, Macs use a single automatic network location that groups all detected services: Wi-Fi, Ethernet, VPN, etc. For most users, this is sufficient, and they never change this setting. However, when you want to work with multiple networks (home, work, campus, data centers, etc.) with different configurations, network locations and fine-tuning service management become essential.
The resources you connect to (SMB, AFP, FTP, SFTP, WebDAV servers, etc.) can be presented in Finder as if they were local folders. Once connected, the server appears in the "Shared" section of Finder, and you can drag and drop files, open documents directly from there, or add shortcuts so you don't have to search for it again.
It's important to understand that if you leave the network (for example, if you disconnect from your home Wi-Fi with your laptop), the volumes are unmounted because the server becomes inaccessible . When you rejoin the same network, macOS doesn't always remount them automatically, hence the common complaint of "I have to use Command + K again." Throughout this article, you'll see several ways to avoid or minimize this.
Connect to network drives with Finder
The most direct method to access a network drive on a Mac is to use the Finder itself and the "Connect to Server" option , which is something like the equivalent of "Connect to Network Drive" in Windows, but with more protocol flexibility.
To begin, open Finder from the Dock or using your usual method. Finder is macOS's file explorer , and in addition to displaying your local documents, it manages connections to servers and shared computers within your network or over the internet.
In the top menu bar, go to the "Go" menu and select "Connect to server..." . If you prefer a faster keyboard shortcut, you can use Command (⌘) + K. This will open a small window where you can type the server address or choose one you've used before.
In the “Server address” field, you must enter the URL of the resource you want to access . Depending on the type of server, the syntax changes slightly:
- SMB for Windows or NAS shares:
smb://direccion-del-servidor/carpeta - AFP for old Apple file servers:
afp://direccion-del-servidor/carpeta - FTP for file transfer servers:
ftp://direccion-del-servidor(generally read-only from Finder)
When you click "Connect," the system will likely ask for credentials. Here, you must enter the valid username and password for that server , which could be your domain credentials, credentials for a NAS, or credentials for another computer sharing folders. You can check the box to save the credentials to your macOS keychain so you don't have to type them each time.
Once authenticated, the volume will be mounted and the network drive will appear under the "Shared" section of the Finder sidebar . In many cases, you'll also see a volume icon on your desktop. From then on, you can open, move, and manage files just as if they were in a local folder, keeping in mind, however, that speed and reliability depend on your network.
Save servers and reconnect faster
When you work with the same shared folders every day, the last thing you want to do is manually type the server path each time . macOS offers several shortcuts for reconnecting to frequently used resources: Recent Servers, Favorites in the Connection window, and shortcuts in the Finder sidebar.
One option is to use your connection history. In the same "Connect to Server" window, you can click the drop-down icon to the right of the address field . A list of recently used servers will appear; simply choose one, re-enter the path, and click "Connect."
If you want to keep a server readily available, when you type the network address, use the "+" button to add it to your favorites list . From that moment on, it will be permanently saved in that list, even if you restart your Mac, and you can select it with two clicks without having to type anything again.
Another useful way to quickly access your files is to add the mounted server or volume to the Finder sidebar . Once connected, select it in the "Shared" section and go to the "File" menu > "Add to Sidebar." This way, it will always be visible alongside your other frequently used locations (Documents, Downloads, etc.).
In addition, macOS keeps a list of computers and servers you've recently connected to. From the Apple menu, under "Recent Items" > "Recent Servers ," you can see the last network resources you used and reconnect with a single click—useful if you frequently switch between multiple servers.
Practical examples of connecting to SMB resources
In work environments, universities, or computing centers, it's very common to have storage arrays dedicated to research projects and data . Access to these folders is usually via SMB, just like with a Windows file server or a NAS.
Imagine that in a research environment you have a central machine, referred to as the "IBM cabinet," where project folders and cluster home directories are stored . In this type of case, the procedure for accessing it is the same as you've already seen with Finder, simply changing the server address to the appropriate one.
For example, you could enter one of the following SMB paths in the "Connect to server" window:
- Project folders of a research group:
smb://smb1.s.upf.edu/Projects/grup_recerca - Cluster home directory:
smb://smb1.s.upf.edu/home
If you tap the "+" symbol when entering these addresses, the connection will be saved to your favorites list , so you won't have to remember the full path each time. Simply select it from the list and you'll have access to the same information again.
The philosophy is the same whether it's an enterprise data center, a home NAS, a colleague's computer sharing a folder, or a remote server on your network. The key is to carefully note the complete SMB path and save it as a favorite to make reconnecting as easy as possible.
Automatically reconnect: fixing the "I always have to press Command + K" problem
A very common complaint from those migrating from Windows is that network drives in macOS disappear when you leave the network and are not automatically remounted upon reconnection. In Windows, the drive letter remains and reconnects when the server is detected again, even if it is "disconnected" in the meantime.
On macOS, the behavior is different: when you lose the connection, the volume is completely unmounted . This is cleaner at the file system level, but it means that when you reconnect to the network, you have to re-establish the connection, either from Finder, recent servers, or automation systems.
The most basic way to streamline this is the one we've already seen: using the list of favorite or recent servers to reconnect with two clicks. However, if you want to go a step further and make the process almost seamless, it's a good idea to use AppleScript, Automator, or even third-party tools.
Another very useful intermediate option is to add the network drive to your user login items . Simply connect the volume, go to System Settings > Users and Groups > Login Items, and drag the mounted volume there. This way, every time you log in to your account, the system will automatically attempt to reconnect to that network drive, provided the server is accessible at that time.
It's not exactly the same as Windows drive letter persistence, but by combining favorite servers, startup items, and scripts , the practical result comes pretty close: when you turn on your Mac on your usual network or log in, the drives tend to mount themselves without you having to remember keyboard shortcuts.
Automate the connection with AppleScript
If you want finer control and a fully customized reconnection method, AppleScript is a powerful tool in macOS , especially for those who work with multiple network drives or manage complex IT infrastructures. With just a few commands, you can create a small script that mounts all your SMB drives at once.
To begin, open the Script Editor application from Applications > Utilities . This is the environment where you write and test AppleScript scripts, with syntax highlighting and a run button to check if everything works as expected.
The general idea is to use the command mount volume to set up a network resourceFor example, a very simple script could attempt to mount a specific SMB drive using an address like smb://direccion-del-servidor/carpetaYou can adapt the path to your specific case and, if you wish, include username and password or use the macOS keychain.
Once you've written the script logic, you can click the "Run" button in the Script Editor. If everything is configured correctly, the volume will mount and appear in Finder just as it would when you connected it manually. If something goes wrong (incorrect password, server unreachable, etc.), the Editor itself will display error messages so you can adjust the code.
Once your script is ready, save it from the File > Save menu with a descriptive name. From there, you can integrate it with Automator or launchd to run automatically when you log in, turn on your computer, or based on certain system events. Automator lets you create workflows where one of the steps is to run your AppleScript; launchd, on the other hand, is more geared toward scheduled tasks and system daemons.
Accessing servers with Cyberduck and other clients
Although Finder covers most needs, there are environments where you need a more specialized client to manage connections to servers , especially if you work with SFTP, WebDAV, or other protocols that go beyond the typical use of a network drive.
One of the best-known applications for this on macOS is Cyberduck , an open-source client that supports SFTP, FTP, WebDAV, and other popular services. You can download and install it from its official website (cyberduck.io), always choosing the version compatible with your macOS version.
When you open Cyberduck and click on “Open Connection,” a window appears where you choose the protocol type and enter the server details : address, username, password, and, if applicable, port and security options. Among the most common types you'll see are:
- SFTP (SSH File Transfer Protocol): for secure transfers, with URLs like
sftp://direccion-del-servidor. - FTP: standard transfer connections, with
ftp://direccion-del-servidor. - WebDAV: access to file systems via HTTP/HTTPS, with URLs such as
http://direccion-del-servidorohttps://direccion-del-servidor.
When you click “Connect”, Cyberduck establishes the session and shows you the server's contents in an interface very similar to Finder , but with features geared towards remote file management: uploading and downloading via drag and drop, bookmarks to save connections, folder synchronization, etc.
These types of clients don't exactly "mount" a network drive as such in the macOS file system, but they do offer very convenient management of remote files and can perfectly complement the use of traditional SMB and AFP volumes, especially if you often manage remote servers outside your LAN.
Full remote access with RDP and TSplus-type solutions
There are scenarios where you need more than just a network drive; you need to remotely control an entire Windows desktop or application server. In these cases, it makes sense to use Remote Desktop Protocol (RDP) or more comprehensive remote desktop solutions.
To use RDP from macOS, you can download Microsoft Remote Desktop from the Apple App Store . After installation, the first time you open it, it will ask you to grant some permissions, such as access to the clipboard, microphone, or camera, depending on how you want to work with remote sessions.
From the main window, click "Add PC" and enter the IP address or Windows server name , along with your assigned username and password. You can also configure the resolution, connection quality, redirection of local drives, printers, or other devices, and even gateway settings if you access through intermediary portals.
Double-clicking the icon of the machine you just created will open a full remote desktop session . From there, you can manage files on the server's local and remote drives, install software, perform administrative tasks, and generally work as if you were sitting in front of the physical computer.
In more advanced enterprise environments, platforms like TSplus Remote Access provide integrated solutions for publishing applications, centralizing remote desktops, and offering users a more polished remote work experience. These tools rely on technologies like RDP but extend them with web portals, gateways, and additional security and management options.
Manage network locations in macOS for different environments
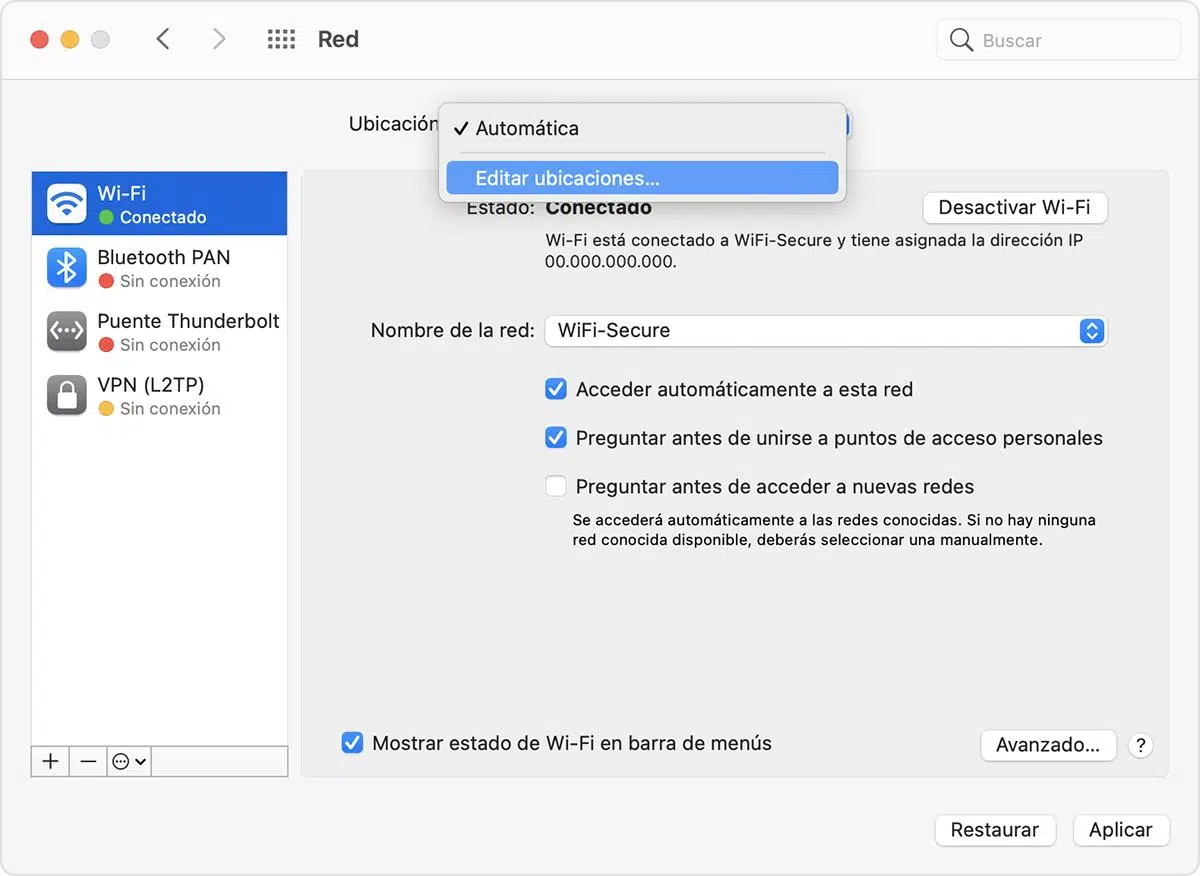
macOS network locations are a very useful feature when you use your Mac in very different environments with different networking needs : home, office, university, wired networks versus Wi-Fi, etc. They allow you to save multiple network configuration “profiles” and switch between them in a couple of clicks.
By default, the system creates a location called "Automatic" that includes all the network services the Mac detects (Wi-Fi, Ethernet, VPN, etc.). To keep things simple, it's usually best to keep only this location, but when you have networks with very different policies, adding specific locations helps isolate problems and control the order in which services connect.
Some typical situations where you might want to create additional locations would be:
- You use Ethernet both at home and at work However, because of how the corporate network is configured, your Mac can't automatically connect at home with the same settings.
- You can connect via both Wi-Fi and Ethernet And you want the cable to always take priority in the office, while at home you want it to connect to Wi-Fi first.
- You are diagnosing network problems and you prefer to create a "clean" location for testing without losing the current configuration or having to redo it later.
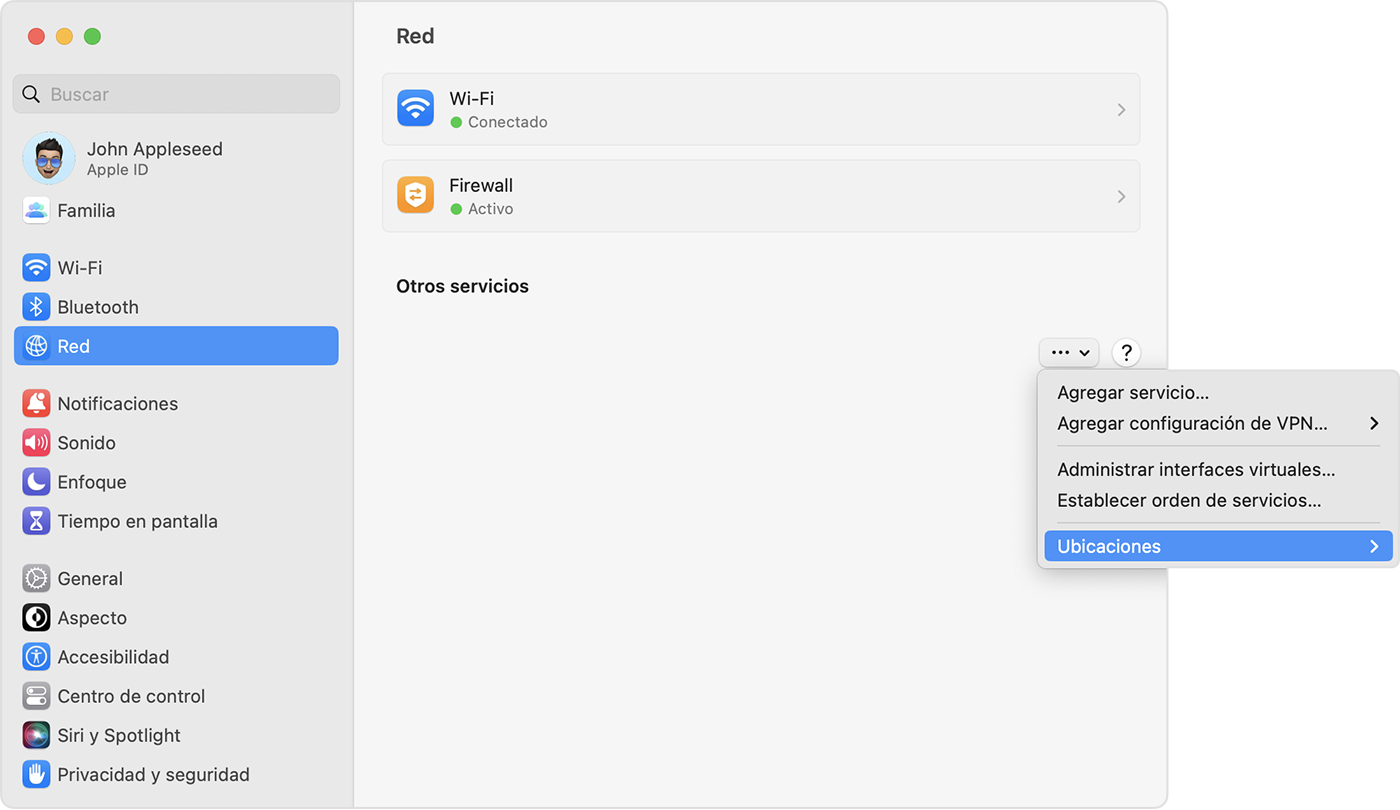
In modern versions of macOS (such as Ventura 13 and later), you can manage this from System Settings > Network . At the bottom of the list of services, you'll see a "More" or similar menu, from which you can go to "Locations" > "Edit Locations" to create, rename, or delete profiles.
When you add a new location (for example, "Work," "Home," or "Mobile"), any changes you make to Wi-Fi, Ethernet, or other services are saved only to that location . The other locations maintain their own settings, so you can switch between them without one overwriting the other. For the changes to take effect, in some versions of macOS you may need to click "OK" and then "Apply" before closing the network window.
Prioritize network services and disable those you don't need.
A common reason for using different locations is the need for a different priority order for services depending on where you are. For example, at work you might want your Mac to always use Ethernet first and only switch to Wi-Fi if the cable is disconnected, while when you're working remotely you might want the opposite.
From the Network pane of System Settings (or System Preferences in earlier versions), you can reorder services to change their priority within each location. This way, your Mac will attempt to use the service at the top of the list first, whenever it's available.
If there's a service you don't want used at all in a particular location, you can disable it instead of deleting it . In macOS Ventura and later, Control-click the active service you want to disable (for example, an Ethernet adapter you're not using) and choose "Disable Service" from the context menu.
In earlier versions of macOS, select the service from the list and use the action menu below the interface list to also choose "Disable Service." The service will still exist, but it won't be used in that location while it remains disabled.
All of this combines perfectly with access to network drives: if you ensure that your main connection is working and properly prioritized , the chances of your SMB, AFP, or similar volumes mounting and maintaining a stable connection are much higher.
Finally, if at any point you don't see the location, service priority, or deactivation options as described, it's a good idea to check that you have the latest macOS updates installed , as Apple has been gradually changing the Network interface between versions.
With all of the above, you now have a complete overview of how to access, pin, and automate network drives in macOS : from basic access via Finder and recent servers, through organizing them into network locations and prioritizing services, to automation tools like AppleScript or dedicated clients like Cyberduck and remote desktop solutions. By combining these elements, you can achieve behavior very similar to (or even more flexible than) classic drive letter mapping in Windows, but adapted to the philosophy and capabilities of the Mac ecosystem.

Passionate writer about the world of bytes and technology in general. I love sharing my knowledge through writing, and that's what I'll do on this blog, show you all the most interesting things about gadgets, software, hardware, tech trends, and more. My goal is to help you navigate the digital world in a simple and entertaining way.
Table of Contents
- 1 Basics: How Network Drives Work in macOS
- 2 Connect to network drives with Finder
- 3 Save servers and reconnect faster
- 4 Practical examples of connecting to SMB resources
- 5 Automatically reconnect: fixing the "I always have to press Command + K" problem
- 6 Automate the connection with AppleScript
- 7 Accessing servers with Cyberduck and other clients
- 8 Full remote access with RDP and TSplus-type solutions
- 9 Manage network locations in macOS for different environments
- 10 Prioritize network services and disable those you don't need.