- A lightweight HTTP server in PowerShell It allows testing websites and APIs in a local environment without deploying the full IIS or resorting to other languages.
- The core is based on System.Net.HttpListener, a routing table, and a server object with methods to start, stop, and serve static or dynamic content.
- Routing hooks, MIME detection, query and body parsing, and secure file reading bring flexibility and security to the server.
- For production, PowerShell integrates with IIS and Web Deploy to automate sites, databases and delegation rules, facilitating the leap from the local environment.
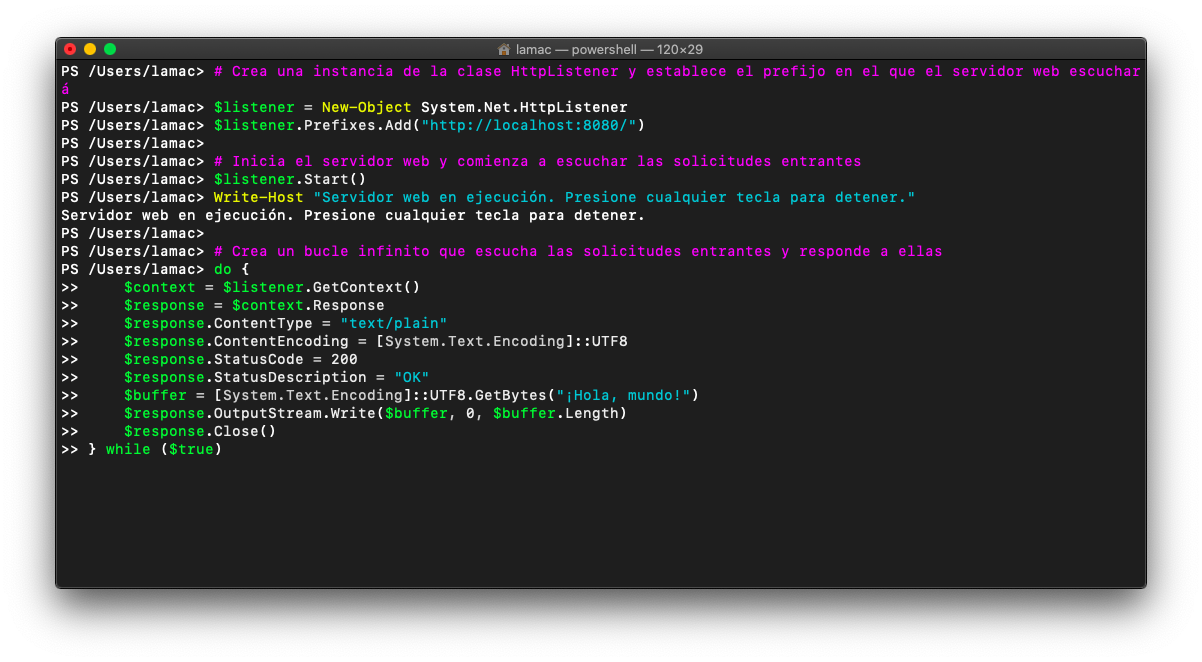
If you work with Windows and test web applications, APIs, or simply want to serve a few HTML and JavaScript files, having a lightweight HTTP server in PowerShell for local testing is incredibly convenient. You don't always want to set up a full IIS environment, or use Python , Node.js, or packages like XAMPP just for a quick test.
The good news is that with the tools already included in the system, it's possible to set up a very small, flexible, and easy-to-maintain server , ranging from the most basic (serving static files) to quite elaborate scenarios (API endpoints, form parsing, MIME control, basic security, etc.), all without leaving PowerShell.
Why use a lightweight HTTP server for local testing?
When you open an HTML file by double-clicking, the browser loads it using the file:// scheme instead of http:// or https:// . This usually works fine for very simple things, but it breaks down as soon as you get into anything more complex.
Many modern JavaScript examples use asynchronous requests (fetch, XHR, etc.) and several browsers, with Chrome leading the way, apply very strict security restrictions to resources served from file://, blocking AJAX calls or access to certain resources by CORS policies and the like.
Furthermore, once server-side code like PHP, Python, Node.js, or web frameworks comes into play , simply opening the file directly is no longer sufficient: you need a process that listens on a port, receives HTTP requests, and translates them into responses. That's where the local server comes in.
In other languages, starting a development server is almost instantaneous: `python3 -m http.server 8000` starts a basic Python server with a single line. In the .NET/Windows ecosystem, we can achieve something just as convenient using PowerShell and the ` System.Net.HttpListener` class.
This approach has an added advantage: if most of your infrastructure is Windows, sticking with PowerShell allows any administrator or colleague to understand, review, and maintain the server code without needing to master another language.
Basic concept: HTTP routing in PowerShell
Most web servers can be viewed as an HTTP router that listens on one or more ports and, each time a request arrives, decides what to do with it based on the method (GET, POST, etc.) and the route.
Those “HTTP commands” you see in logs or documentation—for example , GET /index.html or POST /api/usuarios —can be treated as text strings that include the method and the path. In practical terms, they are key to deciding which logic to execute.
In PowerShell, a very convenient model for implementing this behavior is a hash table (dictionary) where the key is the complete HTTP command (for example, "GET /index.html") and the value is what we are going to execute when that request arrives: it can be a scriptblock with ad hoc logic or a reference to a static file that we want to serve.
From this skeleton, you can add more extensibility : hooks before and after routing, a default route for when there is no exact match, MIME type inference by extension, automatic conversion of what the route returns into a response body, etc.
This allows you to define a "map" of routes where some inputs are dynamic endpoints (generating a response on the fly) and others are simply HTML, CSS or JS files that the server sends as is to the client.
More power can be added to that same skeleton: hooks before and after routing, a default route for when there is no exact match, MIME type inference by extension, automatic conversion of what the route returns into the response body, etc.
Server core: the HTTP listening loop

The core component of the lightweight server is a loop that uses System.Net.HttpListener . This .NET class allows you to listen for HTTP requests without setting up the entire IIS environment, in a very direct way.
The general pattern involves creating an HttpListener object , registering one or more prefixes (for example, "http://localhost:8080/"), starting the listener, and then entering a loop that waits for requests. When a request arrives, context is obtained, the request is parsed to construct the command ( method + path ), and control is passed to the router.
To avoid blocking the PowerShell thread, GetContextAsync() and a small, non-blocking wait loop with an asynchronous handler are typically used. This allows the server to continue running other tasks or to be stopped in a controlled manner without it hanging.
From the context, we extract the Request object (all the information of the incoming request: headers, query string, body, etc.) and the Response object , which is the one we will fill with the content we generate (HTTP status, headers, content type, body, etc.).
An important detail is that, once the routing logic is complete, the response must always be closed (Close) . Otherwise, the client will be left waiting. Therefore, it's common practice to wrap the handling of each request in try/finally blocks that guarantee closure.
Convert the server into a reusable object

Setting up the HttpListener "as is" is fine for a quick test, but if you're going to reuse this server in more than one script , it's worth encapsulating it in a PowerShell object with its properties and methods.
The usual way to do this is to create a factory function, for example New-Webserver , which returns a psobject with several properties: the binding (base URL like "http://localhost:8080/"), the routing table, the base directory from which files will be served, a descriptive server name, etc.
You can add script methods like Start() and Stop() to that same object . The Start method creates the HttpListener, registers the binding, and starts the listening loop; Stop stops the listener, closes the resources, and leaves the server in a clean state for future startups.
This "server as object" design fits very well with a semi-object-oriented style within PowerShell , makes the code more readable, and allows you to have multiple independent servers instantiated with different ports or base directories if needed.
In addition, you can store references to other helper methods (for example, to serve files, infer MIME, parse requests, etc.) in that same object, which makes the routing code quite elegant.
Advanced routing: hooks and default route

A more polished server needs some degree of dynamic routing . You won't always have an exact match for every HTTP command, nor do you want to duplicate logic across all routes for common tasks (logs, custom authentication, etc.).
For this purpose, it is very useful to extend the routing table with three types of hooks : a Before block , which is executed before dispatching the route; an After block , which is called once the request has been handled; and a Default route , which acts as a plan B when there is no exact match in the dictionary.
The key is that all valid HTTP commands contain at least one space (separating the method and path), while special keys like Before, After, or Default do not. This prevents collisions between hook names and actual commands.
The Before hook can simply perform auxiliary tasks (for example, logging each request), or it can return a boolean value indicating whether the routing process should continue. If it returns false, the handling of that request can be stopped directly in the listening loop.
The After hook is used to execute logic that should always go at the end (cleanup, telemetry, metrics, traces, etc.) regardless of how the specific route went, ideally also receiving context and command information.
Content management and MIME types
When working directly with HttpListener, you don't have automatic helpers like in IIS or Kestrel to infer the Content-Type , so you have to specify it manually. If you want your server to serve files correctly, it's essential to map file extensions to MIME types.
An elegant way to do this is to add to the server object a method like ConvertExtension that receives an extension (".html", ".css", ".js", etc.) and returns the corresponding MIME string, for example "text/html; charset=utf-8", "text/css; charset=utf-8" or "application/javascript; charset=utf-8".
In this way, any route that serves static or dynamic content can simply call ` $server.ConvertExtension(".html")` and assign the result to the response's `ContentType` . For other unknown extensions, it's common to use `application/octet-stream` as a wildcard.
It's also a good idea to set a default content type in the listener loop , especially if your server is more focused on APIs than full HTML web pages. A typical value would be "text/plain; charset=utf-8" or even "application/json; charset=utf-8" if almost everything you return is JSON.
This behavior can be complemented with standard headers such as Last-Modified or Server , which help debug from the browser since the client knows something more about the response and the origin server.
Automatic response generation
If you had to manually write to the stream, calculate the content length, set headers, etc., for each route, the server code would become filled with repetitive boilerplate . To avoid this, it's best to standardize how the result of each route is converted into an HTTP response.
A convenient strategy is for the routes to simply return a string . The central listener loop collects this value and, if it is neither null nor empty, transforms it into UTF-8 bytes, assigns ContentLength64 , fills in any missing basic headers, writes the body, and closes the response.
Around the route invocation, it's advisable to wrap the code in a try/catch block . If something goes wrong in the route logic, the server can catch the exception, set the HTTP status to 500, and return a standard message like "500 Internal Server Error" followed by the error details, which is useful during development.
This greatly reduces the code needed at each endpoint: in many cases it is enough for the route to generate a string with JSON, HTML or plain text and return it, knowing that the HTTP plumbing (length, encoding, closure) is already resolved by the base server.
In cases where a route decides to handle the response completely (for example, by writing directly to the stream and closing it), the core code must be tolerant of the response already being closed and not attempt to write again; hence the importance of capturing and silencing certain errors when closing.
Serving static files from a base directory
In many scenarios, what you need is simply to serve static files : HTML, CSS, JavaScript, images, etc. For this, a BaseDirectory property is usually defined in the server object , indicating the disk folder from which the contents will be read.
Using that directory as a reference, you can add a `Serve` method to the server that receives a filename and the `Response` object. The method reads the file with `Get-Content -Raw` , calculates the extension, infers the MIME type with `ConvertExtension`, assigns the content type, and returns the content to the central loop to be sent to the client.
If the file doesn't exist or there's a problem reading it, Serve can assign a 404 to the response and return a custom "404 Not Found" message. This greatly simplifies routes that only want to serve static content.
Another interesting trick is to allow the path table to not always contain a scriptblock. If you detect that the path points to a string representing a file , the listener loop can directly call ` $server.Serve()` with that path instead of executing code.
In this way, the route dictionary could have entries like "GET /" = "index.html", without having to write any further logic . And even the default route could be implemented as a small script block that derives the filename from the URL and delegates to the Serve function.
Advanced reading and protection against dangerous paths
When you start serving dynamically generated paths, it's important to carefully control which file system paths are accessible . You don't want someone to be able to perform a "../" path traversal attack and reach folders outside your BaseDirectory.
A flexible way to address this is to allow the server builder to accept an optional scriptblock Reader . If the user passes one, that will be responsible for "resolving" a logical path (the URL portion) to a physical disk path, applying whatever rules it deems appropriate.
If a custom reader is not provided, the server defines a default one that takes the path, removes leading slashes, merges it with the root directory, and then attempts to resolve the file using ` Resolve-Path` . If it cannot find the file directly, it tries alternatives such as adding ".html" or searching for an "index.html" file within the directory.
After that resolution, it's advisable to check three things: that the path is neither empty nor invalid, that the result points to a real file (not a directory) , and that it's located within the BaseDirectory (the latter can be validated with a simple "starts with the root path"). If any of these checks fail, an exception is thrown indicating an invalid path.
The Serve method relies on this Reader to obtain both the final physical path and the content. This allows you to clearly separate the security and path resolution aspects from the data delivery to the client.
Parsing requests: query string and body
If you're only going to serve static HTML, reading files is more than enough, but as soon as you set up an API or process forms, you need to easily access GET and POST parameters from the routes.
To do this, a ParseQuery method is usually added to the server object , which, starting from a Request object, takes advantage of System.Web.HttpUtility.ParseQueryString to convert the query string into a name-value collection that is very convenient to handle in PowerShell.
For request bodies (POST, PUT, etc.), another method like ParseBody is useful . This method first checks if the request actually has an entity (HasEntityBody) and if its size is greater than zero. If so, it opens the input stream, creates a StreamReader with the appropriate encoding, and reads the entire contents.
Then, depending on the Content-Type declared in the request, it is decided what to do with that body: if it is "application/x-www-form-urlencoded", it is parsed as if it were a query string; if it is "application/json", it is passed through ConvertFrom-Json ; if it is "text/xml", it is converted to an XML object; and if it does not match any of the known patterns, it is returned as a plain text string.
These methods allow your server's routes to focus on business logic , delegating to the server object the more mechanical work related to how data comes from the client.
PowerShell and IIS: When you need a complete server
The lightweight HTTP server in PowerShell is perfect for local testing and small internal services, but as soon as you want to seriously publish web applications to external users, it's time to talk about IIS and tools like Web Deploy.
In Windows Server environments (2008, 2012, 2016, 2019, 2022, etc.), you can use PowerShell to install the Web-Server role with commands such as Get-WindowsFeature and Install-WindowsFeature, also adding the necessary administrative tools. Once installed, you can check its status from Server Manager or by using another Get-WindowsFeature command.
After installation, accessing "http://127.0.0.1" from the server itself should display the default IIS page, confirming that everything is operational. From here, the PowerShell modules for managing IIS (IISAdministration) come into play , exposing cmdlets for creating sites, managing bindings, starting or stopping sites, and so on.
Scripts supplied with Web Deploy, such as SetupSiteForPublish.ps1 , allow you to automate the creation of a publishing site, non-administrator users with adjusted permissions, dedicated application pools, and the generation of .PublishSettings files that are then consumed by tools such as Visual Studio or WebMatrix.
PowerShell commands for managing IIS
Once you have the IIS server deployed, PowerShell becomes a very powerful ally for creating, testing, stopping, or deleting sites in a repeatable and scriptable way.
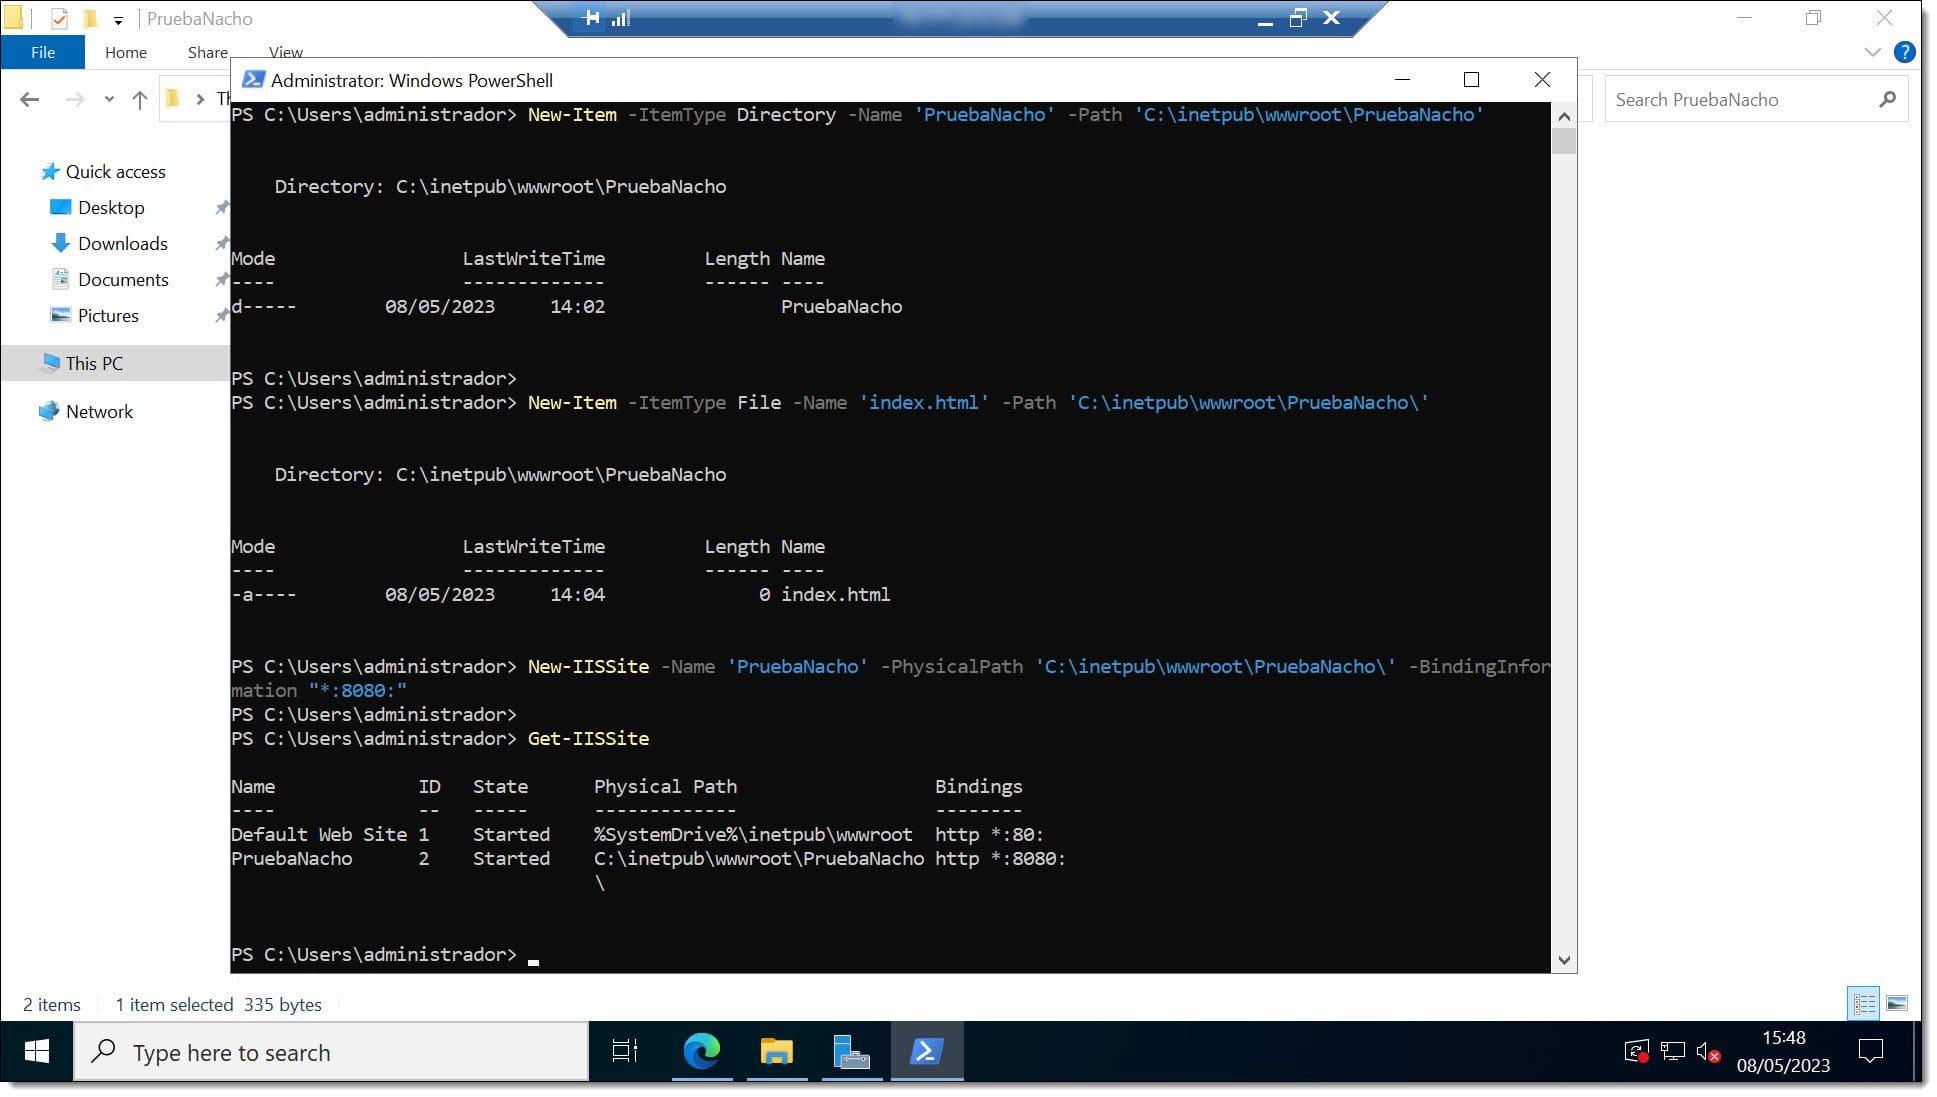
To create the physical folder for a new site, use `New-Item -ItemType Directory` , specifying the name and path. It's advisable to organize web content under paths like "C:\inetpub\wwwroot\SiteName" to maintain a well-organized structure.
The initial site file itself (for example, a simple index.html ) can also be created with New-Item -ItemType File, and then edited manually or using other cmdlets if you want to automate the generation.
The next step is to associate that directory with a new IIS site using `New-IISSite` , passing the site name, physical path, and binding information. For example, a binding of `*:8080:` indicates that the site will listen on port 8080 on all available IP addresses of the machine.
Once the site has been created, you can check that it responds correctly by accessing the corresponding URL from the browser (for example, "http://server:8080/") and verifying that the content of your index.html is displayed.
Starting, stopping, and deleting sites with PowerShell
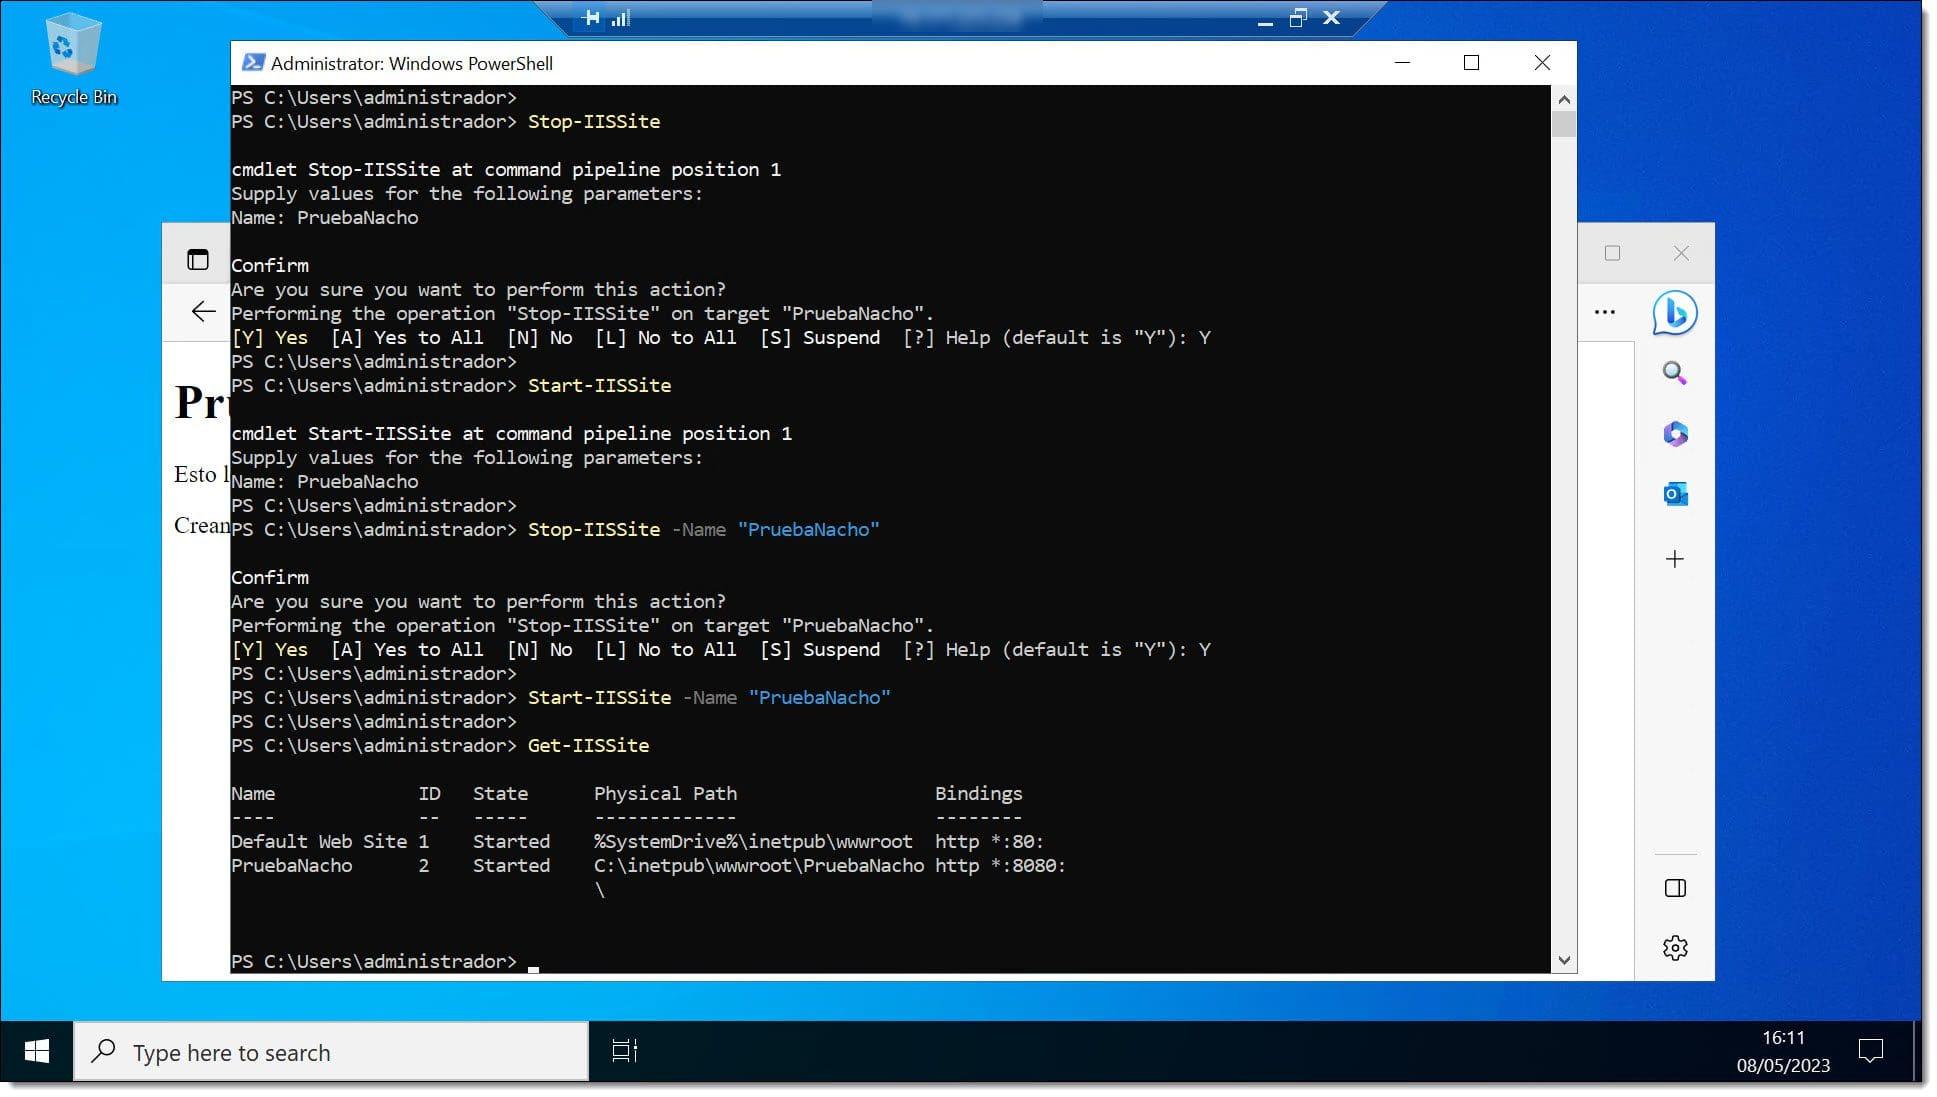
The lifecycle of a website under IIS is easily controlled from PowerShell with cmdlets such as Start-IISSite , Stop-IISSite and Remove-IISSite , plus Get-IISSite to check its current status.
For example, Stop-IISSite can be used interactively by asking for the site name, or passed directly with the -Name parameter to automate stopping without further questions, ideal in deployment or maintenance scripts.
Start-IISSite works the same way, and with Get-IISSite you can list all existing sites or filter by name to quickly see properties such as status (Started/Stopped) and configured bindings.
If you're interested in a specific property, such as the ports a site listens on, you can retrieve it from PowerShell by accessing the Bindings collection of the object returned by Get-IISSite, giving you a very clear view of how each site is published.
When it's time to remove a site that's no longer needed, Remove-IISSite -Name lets you do it directly, and the -WhatIf modifier is very useful for simulating the operation and seeing what would happen before making actual destructive changes.
Web Deploy, databases and delegation
The Web Deploy tool incorporates several PowerShell scripts designed to facilitate remote publishing of sites to IIS and the creation of associated resources such as SQL Server or MySQL databases, as well as the configuration of delegation rules.
Scripts like SetupSiteForPublish.ps1 automate everything from creating the site and application pool to assigning permissions to a specific deployment user, ensuring a model where that user can publish without being an administrator of the machine.
For SQL Server databases, there is the CreateSqlDatabase.ps1 script , which creates the database, a login, and a user with db_owner permissions on that database, and adds the resulting connection string to the associated PublishSettings file, ready for the developer to use from their tools.
Similarly, CreateMySqlDatabase.ps1 covers the case of MySQL, generating the database and a user with privileges over it, and also updating the publishing profiles. Here it is important to review the permissions (for example, if you want to allow access beyond localhost) by adjusting the corresponding GRANT command in the script itself.
Finally, AddDelegationRules.ps1 takes care of applying or repairing the necessary delegation rules in IIS for Web Deploy to function correctly, creating specific service accounts and giving them the right permissions over the configuration (applicationHost.config) and over certain administrative operations.
All-in-one local servers and migration to hosting
Beyond PowerShell and IIS, it's very common in the web ecosystem to set up local servers like WAMP, MAMP, LAMP, or XAMPP . These packages combine Apache, PHP, and MySQL into a single installer to facilitate testing CMSs like WordPress in a local environment.
The logic is similar: the local server exposes the site at http://127.0.0.1 or http://localhost , and the folder where you place the projects (for example, "C:\wamp\www\") acts as the document root. Each subfolder is usually a different web project, accessible via URLs like "http://localhost/mywebsite".
When you want to move a locally developed project to a real hosting service, the typical process involves exporting the database (usually from phpMyAdmin), compressing the web files, uploading them to the remote server using a file manager or FTP, and importing the database from the hosting control panel.
Then you need to adjust some details, such as the website URLs within the database (changing localhost to the actual domain) and the connection data in the CMS configuration files (for example, wp-config.php in WordPress, where the database name, user and password of the production environment are specified).
In all these scenarios, the pattern is repeated: having a well-configured local HTTP server, whether with a WAMP-type bundle or a lightweight server made in PowerShell , greatly speeds up development and testing before publishing anything externally.
Ultimately, combining a minimally sophisticated HTTP server in PowerShell—with routes, hooks, request parsing, and static file service—with the capabilities of IIS and Web Deploy for production gives you a very complete environment: lightweight for day-to-day local development and robust for final deployments , all while leveraging native Windows ecosystem tools without necessarily relying on external stacks.

Passionate writer about the world of bytes and technology in general. I love sharing my knowledge through writing, and that's what I'll do on this blog, show you all the most interesting things about gadgets, software, hardware, tech trends, and more. My goal is to help you navigate the digital world in a simple and entertaining way.