- The Hyper-V virtual switch offers external, internal, and private modes that determine the degree of isolation between hosts, VMs, and the Internet.
- Port isolation is reinforced with VLAN, PVLAN, ACL, internal NAT, and firewall. Windows, both on hosts and in containers and VMs.
- System Center VMM adds port profiles and classifications to enforce consistent performance and security policies across physical and virtual adapters.
- Best practices such as NIC teaming, jumbo frames, static IPs, and the use of synthetic adapters improve performance and security in Hyper-V networks.
If you work with virtualization on Windows, sooner or later you'll have to grapple with Hyper-V's virtual switch and port isolation . It's not just a matter of checking a couple of boxes: how you design your network determines whether your virtual machines are protected, perform well, and don't communicate with each other when they shouldn't.
In this article we're going to get down to brass tacks: we'll see how the network works in Hyper-V, the isolation options (ports, VLANs, PVLANs, ACLs, and NAT) , how all of that fits with System Center VMM, and what practical tricks you can apply to keep your environment clean, organized, and secure, whether on a home host or a serious cluster.
Network isolation and namespaces in Windows Server and Hyper-V
In modern Microsoft environments, much of the isolation is based on network namespaces and network compartments within the TCP/IP stack . Each endpoint (for example, a container or a VM adapter) can reside in its own compartment, keeping its view of the network separate from the rest.
The host and its management virtual network adapter are kept in the default network namespace , while each Windows Server container running with Hyper-V isolation has its own namespace where a virtual adapter specific to that container is installed.
"Classic" Windows Server containers use a virtual network adapter hosted on the host to connect to the Hyper-V virtual switch , while containers in Hyper-V isolation mode connect via a virtual machine synthetic adapter (not visible to the utility VM), thus reinforcing the separation between host, containers, and other workloads.
If you want to see what network compartments are on your system, you can use PowerShell to list everything with the Get-NetCompartment cmdlet , which is very useful when debugging unusual isolation or connectivity problems in containerized and NAT environments.
Network security and isolation using ACLs, firewalls, and VFP
Security and network isolation don't depend solely on Hyper-V; they also involve Windows Firewall, virtual switch port ACLs, and Azure Virtual Filtering Platform (VFP) , depending on the container type and network controller you use.
In Windows Server containers, the default policy combines the host firewall (with namespaces enabled) and rules in VFP . The output is typically "allow all," while the input allows unsolicited TCP, UDP, ICMP, and IGMP traffic and blocks all other protocols.
For containers running with Hyper-V isolation, each one runs its own instance of Windows Firewall within its isolated kernel, usually with a permissive (Allow All) default policy on both that internal firewall and VFP, leaving it up to you to harden the rules if the workload requires it.
In Kubernetes, the logic changes slightly: within a pod, an infrastructure container is first created, to which the network endpoint is connected, and all containers within the pod share the same network namespace , including IP address and port space. Isolation between pods is then handled by firewalls, network policies, and ACLs on the virtual switches.
If you need to modify the predefined port ACLs , you have to review the Host Networking Service configuration and adjust policies on the different network controllers (Transparent, NAT, L2Bridge, L2Tunnel, Overlay), knowing which component applies the rules in each case: Windows Firewall, VFP, or both.
What is the Hyper-V virtual switch and types of switches
The Hyper-V virtual switch is essentially a software-defined Layer 2 Ethernet switch . Its purpose is to connect your virtual machines to physical or logical networks and provide the necessary isolation, monitoring, and security tools in a virtualized environment.
It's available from the Hyper-V Manager itself , and with each version of Windows Server, it has gained strength: resource tracking, new protection measures against malicious VMs, advanced port traffic isolation options, PVLAN support, trunking, extended ACLs, etc.
By default, after installing the Hyper-V role, no switches are created. Until you configure one, your VMs cannot access the network. To manage them with a single click, open the Virtual Switch Manager from the host's Actions panel.
Hyper-V allows three types of virtual switch, each with direct implications for network isolation and how the switch ports behave:
- External switchIt links a physical NIC on the host to a virtual NIC, providing access to the physical network (and the Internet if the network allows it). VMs, the host, and the outside world share this connectivity.
- Internal switch: It offers a virtual network in which connected VMs and the host itself can communicate with each other, but without accessing external networks.
- Private switchboard: creates a completely isolated network in which VMs can only see each other; neither the host nor other networks can interact with this "sandbox".

Configuring a virtual switch and key isolation options
When you create an external switch, a wizard guides you through several options that affect security and port isolation . The first is selecting which physical adapter will be the vSwitch's uplink; if you have multiple NICs, this is where you decide which network traffic will originate.
Another important setting is the one that allows the management operating system to share the adapter . Enabled by default, it forces the host to use the same NIC for its own connectivity. If you uncheck it, you cut off the host's network connection through that path. This is very critical when working remotely, because you could lose access to the server with a single click.
The switch can also enable SR-IOV (Single Root I/O Virtualization) , a technology that, if supported by the hardware , redirects some traffic directly from the physical NIC to the VMs, bypassing much of the vSwitch's data plane and reducing latency and CPU usage. However, SR-IOV cannot be enabled retrofitted to an existing switch and requires compatibility with the BIOS , CPU (SLAT), and network card.
Finally, you can enable the VLAN ID option for the management operating system . This places host traffic in a specific VLAN, which is very useful if you want to strictly separate management traffic from the rest, both at the physical switch level and on the vSwitch's virtual ports.
After applying the changes, the host may lose connectivity for a few seconds while the physical NIC is powered down, it connects to the virtual switch, and everything is brought up again . This is normal, but it's good to be aware of it if you're operating remotely to avoid panicking.
Switch types and isolation between hosts, VMs, and the Internet
If you're concerned that certain VMs won't have visibility to the host or the internet, choosing the right virtual switch type is key to port isolation in Hyper-V.
With a private switch , virtual machines share an isolated network with each other, but they cannot see the host or external networks. The host also cannot see the VMs connected to it. This is ideal for testing environments or for highly sensitive workloads that only need to communicate with each other.
With an internal switch , VMs can communicate with other VMs and the host, but they still lack direct external access. You don't need to configure a gateway on the VMs' IP addresses here (it's not necessary), unless you implement a virtual router or NAT yourself.
With an external switch , the VMs, the host, and the physical network share the same link. This is the usual option when you need "real" connectivity, but it also provides the least isolation by default, so it typically requires more discipline with VLANs, port ACLs, and firewalls.
In addition to choosing the type of switch, you can experiment with multiple virtual NICs per VM, assigning each adapter to a different switch and, if desired, to different VLANs, thus combining logical isolation with detailed per-port control.
Internal NAT in Hyper-V: isolated network with external access
For years, if you wanted an isolated internal network to have internet access, you had to set up a VM to act as a router or firewall. With Windows Server 2016 and modern Windows 10, you can create an internal switch with NAT integrated into the operating system itself , without needing additional machines.
The process is simple: you create an internal switch, assign it an IP address on the host that will act as the gateway for that network, and then define a NAT network using PowerShell for that prefix . VMs connected to that switch, with IP addresses from that subnet and pointing to that gateway, will be able to access the external network, but the internal network will not be routed directly from the outside.
The basic steps are:
- Create the internal switch: New-VMSwitch -SwitchName “swNAT” -SwitchType Internal.
- Locate the adapter associated with the vSwitch and assign it the gateway IP address, for example: New-NetIPAddress -IPAddress 192.168.254.1 -PrefixLength 24 -InterfaceIndex.
- Create the NAT network: New-NetNat -Name netNAT -InternalIPInterfaceAddressPrefix 192.168.254.0/24.
The VMs connect to that switch, are assigned a static IP address within the subnet (for example, 192.168.254.2, 254.3…) with a gateway of 192.168.254.1 and external DNS servers , and that's it—they can now browse the internet. The host is aware of this internal network because it has an IP address within it, but from the outside, the subnet is not directly visible; only the host's IP address is exposed.
To publish services from an internal VM (for example, IIS on port 80) to the outside, you define static port mapping rules over the NAT network , like this: Add-NetNatStaticMapping -NatName "netNAT" -Protocol TCP -ExternalIPAddress 0.0.0.0 -InternalIPAddress 192.168.254.2 -ExternalPort 80 -InternalPort 80. Access is made against the host's IP address, not the internal IP address.
Isolate a VM from the host and the physical network using NAT and a firewall
A fairly typical scenario is wanting a "work" VM that can't see the host or the home network , but can communicate with the internet or a corporate VPN . With internal NAT and a firewall, you can get very close to that scenario, although there are important nuances.
If you configure an internal switch with NAT as in the example (network 172.168.100.0/24 or 192.168.254.0/24) and connect the VM there, the VM should not see the host's 192.168.xx network except for routes that exist in the system or permissive firewall rules.
If the VM can ping the 192.168.xx network, it means there are routes allowing forwarding between the internal NAT network and the physical network, or firewall rules that are too open . To tighten the isolation, you can:
- Check and clean routes on the host that allow forwarding between interfaces (Get-NetRoute and removal of suspicious static routes).
- Create Windows Firewall rules on the host to block traffic originating from the internal network (e.g., 172.168.100.0/24) to the physical network 192.168.0.0/16, except to the host itself if needed.
- Filter traffic on the VM, restricting everything that does not go to the VPN or to strictly necessary destinations, using firewall profiles and restricted outbound rules.
If you want the VM to not see the host by IP at all, a more radical alternative is to use a private switch instead of an internal one and provide internet access through an intermediate VM firewall/UTM that performs NAT, keeping the host completely disconnected from that segment.
Another very powerful isolation tool, especially when you share the same vSwitch for many VMs, is virtual switch port ACLs , which allow you to block traffic between VMs that share a network (east-west isolation) without changing the topology or using additional VLANs.
Port profiles and port classification in System Center VMM
When you manage Hyper-V with System Center Virtual Machine Manager (VMM) or Windows Admin Center , instead of configuring port by port, you can use port profiles and classifications that define reusable network policies.
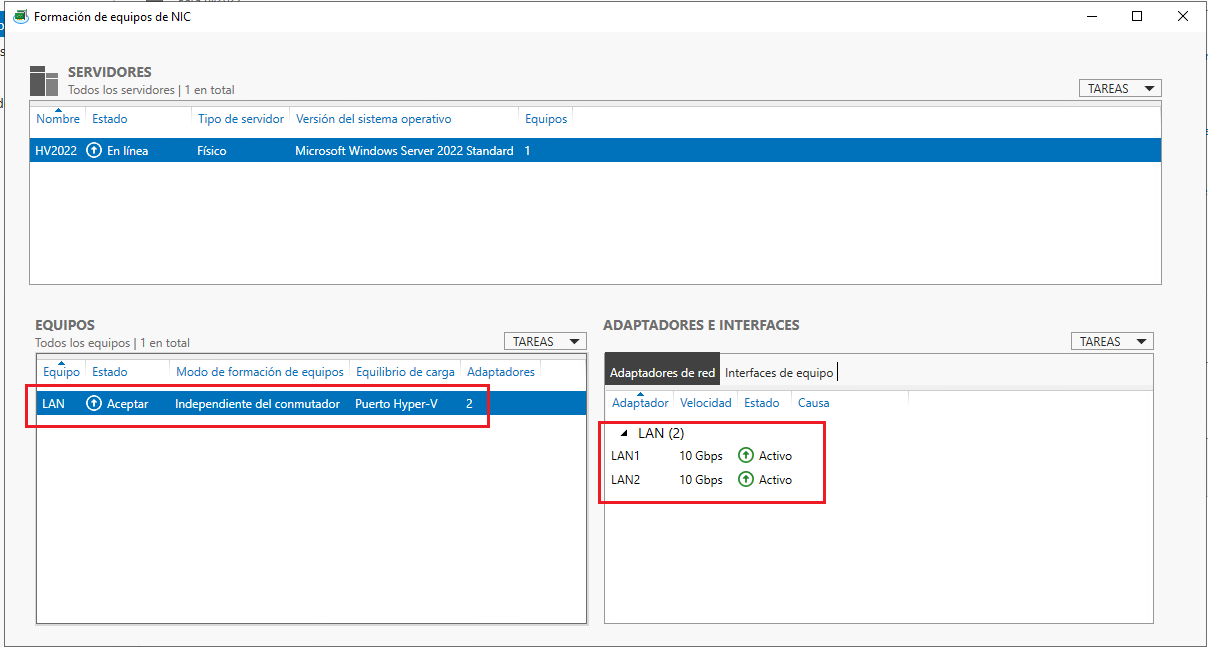
Uplink port profiles are applied to physical adapters when deploying logical switches. There you define the load balancing algorithm (based on Hyper-V ports, IPs, transport ports, MAC addresses , or dynamic balancing), as well as the teaming mode (Switch Independent, LACP, or static) and which logical networks and network sites are associated with the uplink.
To design them properly, it's advisable to have at least one uplink profile per physical network or location, each with its own VLANs and subnets . If you restrict logical networks to certain host groups, you'll need to create specific profiles for those groups, ensuring that the defined VLANs and subnets are valid and routable from the NICs to which they apply.
Virtual network adapter port profiles are applied to virtual NICs of VMs and allow defining capabilities such as minimum/maximum bandwidth, offloading tasks (VMQ, IPsec offload, SR-IOV) and security options (MAC spoofing, DHCP protection, router protection, IEEE 802.1p tagging, guest-managed IP addresses, guest teaming, etc.).
Port classifications are built upon these profiles . These classifications are user-friendly labels (e.g., FAST, SLOW, SR-IOV) associated with a specific port profile. When deploying a VM, administrators or tenants choose a classification, and VMM applies the appropriate profile to the virtual network adapter, thus standardizing port behavior without requiring users to remember all the parameters.
Creating uplink port profiles in VMM
To define an uplink port profile in VMM, navigate to Fabric > Networks > Port Profiles and launch the wizard to create a new Hyper-V port profile, selecting the uplink option.
Within the wizard, you choose the load balancing method : it can be the host default (Hyper-V Port or Dynamic, depending on the version) or you can force a specific one (Hyper-V port, IP addresses, transport ports, MAC address). Each option distributes traffic differently across the NIC team members, impacting how the load is distributed between ports.
Next, you select the teaming mode : Switch Independent (no specific configurations on the physical switch), LACP (dynamic negotiation), or static teaming (manual configuration on the host and switch). For many Hyper-V scenarios, Switch Independent is the recommended option due to its simplicity and robustness.
In the network configuration section, you associate one or more network sites with the uplink profile; each site connects to a different logical network. It is crucial that the sites share the same host group scope and that the VLANs and subnets are consistent with the actual physical infrastructure.
By applying that profile to a physical adapter on a host, you will be determining which logical networks and which VLAN and IP ranges will be available to VMs and services connected to the logical switch that uses that uplink.
Virtual network adapter port profiles and security options
Creating a port profile for virtual adapters in VMM involves, in addition to naming it, going through several configuration sections that directly affect the isolation and behavior of the VM ports.
In the traffic offloading section, you can enable VMQ (Virtual Machine Queue) so that packets destined for a virtual NIC are directed to a specific queue on the physical NIC, reduce copying between the host and the VM, allow IPsec Task Offload to offload cryptography to the NIC, and activate SR-IOV if your environment supports it and you have also activated it on the logical switch.
In the profile's security tab, you control critical aspects for isolation such as MAC spoofing , which you should only enable for very specific cases (load balancers, clustering scenarios); DHCP protection, which blocks malicious DHCP servers within a network of VMs; and router protection, which prevents unauthorized router advertisements.
You also decide whether to allow guest teaming (so that the guest operating system groups several virtual NICs), whether to authorize IEEE 802.1p priority tagging on outgoing packets, and whether to let the VM manage additional IP addresses on that adapter (something necessary in certain guest clusters on virtualized networks).
Finally, you configure the bandwidth: you can set minimum and maximum values in Mbps or relative weights so that the vSwitch prioritizes some virtual NICs over others in over-subscribed environments, another mechanism for controlling and isolating network usage per port.
Hyper-V network adapters: types, VLANs, and advanced options
Within each Hyper-V VM, the network adapter you see in the guest operating system is merely the visible part of a virtual network adapter connected to a port on the vSwitch . There are two main types: synthetic adapters and legacy adapters.
Synthetic adapters are recommended: they work with Hyper-V integration services, offer better performance, and support advanced features such as tagged VLANs or SR-IOV. They are the standard type in Generation 2 VMs and most modern operating systems.
Legacy adapters emulate an older NIC (like the Intel 21140) and are primarily used for PXE booting or installing systems that lack drivers for the synthetic adapter . Once the system and integration services are installed, the standard practice is to add a synthetic adapter and remove the legacy one.
To segment traffic, you can assign VLANs at the virtual network adapter level , either through the graphical interface or using PowerShell (Set-VMNetworkAdapter -VMName VM -VlanId ID). This allows each switch port to carry traffic from different VLANs, even when connected to the same vSwitch.
The adapter's advanced features include SR-IOV, VMQ, RSS, and various offloads (TCP checksum, segmentation, etc.), which help reduce the CPU load on the host and VMs in high-performance environments. As always, it's advisable to test their impact on your infrastructure before deploying them en masse.
Hyper-V network best practices for performance and isolation
To prevent this from descending into chaos, it's worth following some specific networking best practices in Hyper-V . The first is to always use the latest drivers for your physical NICs, preferably from the manufacturer, to take full advantage of all hardware features and avoid known bugs.
Another clear recommendation is to use static IP addresses on the network adapters of Hyper-V hosts (and also on VMs acting as servers) to ensure that you can always locate them and that DNS records or dependencies are not broken after a DHCP renewal.
In environments with more than one host, it's advisable to physically separate, or use VLANs to separate, the different types of traffic: management, live migration, storage (iSCSI or SMB 3.0), VM traffic, and cluster pulses (CSV/Heartbeat). Each network should have its own dedicated virtual switch or, at a minimum, a well-defined VLAN.
NIC teaming (whether classic LBFO or SET -Switch Embedded Teaming-) is another important pillar: grouping several cards allows traffic to be distributed and fault tolerance to be improved, as long as it is not iSCSI or SMB 3.0 storage networks where MPIO or other specific strategies are recommended.
For storage networks, Live Migration and CSV, it can be very interesting to enable jumbo frames (MTU 9000) on all involved devices (NICs, switches, routers) to reduce overhead and improve performance in large and sustained transfers.
In VMs, whenever the operating system allows it, use synthetic adapters, limit the use of legacy adapters to PXE boot scenarios , and don't forget to update the integration services or Linux Integration Services drivers to get the most out of them.
Finally, maintain a reasonable balance between available network bandwidth and shared storage capacity . A fast SAN with a slow network, or vice versa, a 10Gb network with slow drives, will both become equally troublesome bottlenecks.
By properly combining virtual switches (external, internal, and private), internal NAT, VLAN, PVLAN, port ACLs, port profiles and classifications in VMM, and host- and VM-level firewall options, you can build a Hyper-V environment where each virtual switch port clearly understands what it can see and where it can communicate, while maintaining solid performance and reasonable management without going crazy every time you add another machine.


Passionate writer about the world of bytes and technology in general. I love sharing my knowledge through writing, and that's what I'll do on this blog, show you all the most interesting things about gadgets, software, hardware, tech trends, and more. My goal is to help you navigate the digital world in a simple and entertaining way.