- Blender integrates a powerful physics simulation system that covers collisions, soft bodies, fabrics, fluids, and force fields.
- The Collision, Soft Body, Cloth, and Fluid tabs allow you to adjust key parameters such as friction, mass, stiffness, quality, and calculation ranges.
- Advanced features such as vertex weights, fabric pinning, and the use of the Game Engine for rigid bodies greatly expand the creative possibilities.
If you're interested in everything that can be done with the physics simulations in BlenderBut every time you open the physics panels, you get lost among tabs and strange parameters. Don't worry, you're not alone. Blender has such a comprehensive simulation module that it can be overwhelming at first, but once you understand the basic logic, it becomes a true Swiss Army knife for Swiss Army knife for animation.
In this article we will review in detail how they work most common Blender simulationsBasic collisions, soft bodies, fabric and fluid simulation. You'll see what each important tab does, which parameters to adjust when starting out, and how they relate to each other. The idea is that you end up with a solid foundation so you can continue exploring and get the most out of the entire physics system without getting overwhelmed.
Blender Physics Simulations Module: Overview
One of the most surprising things when teaching Blender to someone coming from other 3D packages is the power of the integrated physical simulation moduleMany people react with "but is this free software?" when they see what can be achieved with particles, soft bodies, fabrics or fluids without paying for proprietary licenses.
Within the object-related buttons, Blender groups its physics tools in the panel of Physical simulations of the objectFrom there you can activate and configure the main physical properties that affect each element of the scene, whether it's simple collisions or complex simulations for more advanced animations.
Several things can be distinguished on this panel. key simulation tabsThese are organized into groups. Broadly speaking, you'll have tabs for defining collisions, force fields, soft bodies, fabrics, and fluids. Each simulation type is managed from its corresponding group, although they are often combined (for example, a fabric that needs to collide with other objects).
It's important to understand that, although with practice you can do almost anything, Blender's physics system is deep enough to... easily fill an entire courseHere we will focus on the most important capabilities to start working with them, as a practical guide and commenting on the controls that are most used at the beginning.
For those who want to delve deeply into physics simulations with Blender, there is a well-known reference work: the book by Tony Mullen “Bounce, Tumble and Splash!”Published by Sybex (ISBN: 978-0-470-19280-1), this intermediate-to-advanced volume delves into topics such as particles, rigid and soft bodies, hair simulation, fabrics, and many other aspects that go far beyond a simple introduction.
Quickly set up a basic simulation in Blender
When you want to see results without complicating your life, Blender allows you to create basic simulation scenes or effects Starting with the selected objects. That is, you can select a few elements in the 3D viewer and, using the appropriate tools, let the program itself add what's missing.
These types of automatic tools are responsible for incorporating into the scene essential objects such as domains or particle emittersThey're already configured with default settings that work reasonably well. This way, as soon as you press play on the timeline, you'll see a clear result without having to understand all the parameters from the very first minute.
The goal of this approach is for you to be able to Test visual effects immediately: falling objects, bouncing particles, basic fluids… Then, when you see something that is close to what you want, it's time to refine the simulation by adjusting more precise values to control the quality, calculation time and the final appearance.
While presets are very helpful, it's important not to rely solely on them: the true power of the physics system comes from understanding how the elements combine. collisions, forces, and material properties (rigidity, friction, mass, etc.) which we will see in the following sections.
Collision button and force fields in Blender
In the left-hand area of the physical simulations group you will find the tab Collision, dedicated to collisionsActivating the main button on this tab for an object tells the physics engine to take it into account when calculating collisions with soft bodies, fabrics, or particle systems.
As soon as you indicate that an object participates in collisions, new, specific controls appear, designed to adjust the behavior of how Other elements are related to its surfaceThese options apply to both soft bodies and cloth, as well as to particles that impact or slide on it.
Among the most important parameters on this tab are the DampingThis determines the extent to which the impact energy is "absorbed." A very high value can make a bouncing body behave almost like a trampoline, while a lower value will result in drier collisions.
Another critical parameter is the Frictionfriction indicates how other bodies slide across the surface. Very low friction creates slippery effects, while high friction will cause fabrics or soft bodies to stick together upon collision.
You'll also find controls like Inner and OuterThese adjust the "collision volume" around the object's faces. Essentially, they enlarge or reduce a kind of safety zone so that the simulation treats the meshes as if they had a certain thickness, helping to prevent surfaces from intersecting each other due to calculation errors.
On another important tab, FieldsYou can define energy fields, such as the classic wind field. These fields influence particles, fabrics, or soft bodies, generating effects like gusts that move clothes, dust particles carried by the air, or any other behavior based on directional forces.
Soft bodies in Blender
The soft body simulator, or Blender Soft Body systemIt is used to recreate objects with a certain degree of elasticity. It is ideal for simulating cushions, gelatin, semi-rigid structures, or even for emulating rigid bodies with some flexibility if the appropriate parameters are used.
Any object you want to participate in the soft body simulation will need to have the button activated. Collision in the first collisions tabOnce marked, the engine takes that object into account both as a potential collider and, if configured so, as a deformable body subjected to the simulation.
In this settings area you can distinguish two groups of options: on the one hand, those that affect soft bodies and fabricsOn the other hand, those that apply to particle systemsAlthough they share certain parameters, the logic with which they act on each type of simulation may vary slightly, so it is a good idea to do tests with simple configurations before introducing very complex models.
Entering the tab Specific SoftBody You'll see many controls designed to define mass, elasticity, and how the mesh deforms under gravity or collisions. The interesting thing about the system is that you can go from very rubbery and exaggerated behavior to almost rigid, all depending on how you adjust the values of the "spring structure" between the vertices.
Main parameters of Soft Body
One of the first parameters to review is the Soft body friction, which in this context defines the friction of the object with the other elements that surround it. A value of 0 implies a total absence of friction, while values close to the maximum (for example, 50) make the object grip much more strongly to what it touches.
La Mass assigned to the vertices It controls how much each point of the mesh weighs. The greater the mass, the more inertia the vertices will have when moving, which influences how they deform and the feeling of "weight" of the soft object when it falls or collides with something.
Parameter Grav (gravity) Adjusts the influence of gravity on the soft body along the Z-axis. A negative value will typically cause the object to fall downwards. A positive or inverted value can create interesting effects, such as objects being launched upwards, simulating environments without conventional gravity.
The option Speed It allows you to control the apparent speed of the object's fall and movement, simulating its weight without directly adjusting the mass. However, if you increase the mass too much in combination with certain settings, you can cause problems such as objects interpenetrating each other, so it's advisable to experiment with Speed before increasing the mass.
The switch Use Goal It's a very powerful tool because, when activated, it allows the soft body to be combined with other animatable elements in the scene, such as animation curves (IPO or F-Curves). For it to work correctly, you need to define groups of vertices that will act as "target points." It's not essential for a basic introduction, but in the medium term, it becomes key for controlling parts of the mesh that need to follow a specific animation.
Another basic parameter is Use EdgesThis causes the object's edges to behave as if there were virtual springs stretched between the vertices. This gives the simulator an internal structure that maintains the object's shape and regulates how the mesh bends or stretches in response to external forces.
The option Stiff Quads It adds internal springs along the diagonals of the square faces. This increases the rigidity of the quads, making the object as a whole much more robust. It's a very useful trick for making a soft body behave more like a rigid body, but with a degree of controlled flexibility.
Parameters like CEdge and CFace These instructions tell the simulator to use edges and faces to calculate collisions more accurately internally. While this improves the quality of the contacts, it can also be very slow with meshes containing a large number of polygons, so it is usually left disabled for prototyping and only activated when the extra precision is truly necessary.
The values Pull, Push and Damp They regulate the stiffness of those virtual springs that maintain the body's shape. Low values create very elastic and soft objects, while high values result in firmer structures. By adjusting these parameters with some patience, you can achieve anything from jelly-like effects to semi-rigid objects that give just the right amount.
Parameter Plas (plasticity) It controls the extent to which deformations caused by impacts or collisions become permanent. If its value is greater than zero, the dents or deformations do not completely disappear when the force ceases, resulting in surfaces that remain marked.
Lastly, Be (curvature force) It is key to preventing the body from bending unnaturally along the edges. An appropriate Be value helps to make the transitions between faces smoother, maintaining the illusion of a flexible yet continuous object.
Use of soft bodies to simulate rigid bodies
An interesting application of the Soft Body system is to use it for emulate rigid bodies with some elasticityTaking advantage of options like Stiff Quads, the use of edges, and careful adjustment of Pull, Push, and Damp, the result is objects that appear hard but yield minimally in intense collisions, achieving a more believable look than a completely immovable solid.
When working with this type of simulation, it is common to start with simple scenes and low-resolution meshesThis simplifies initial adjustments, since mesh complexity greatly influences calculation time and simulation stability.
With denser meshes and several levels of subdivision, spectacular effects can be achieved, such as “jelly” or soft objects that vibrate after the impact. At the cost, however, of increasing computation time, so it is advisable to first try with a simple version of the model and only then increase the level of detail.
Rigid bodies and game engine
In addition to soft bodies, Blender includes a rigid body simulator integrated into its old Game EngineAlthough it is not designed to be directly integrated with the main animation system, it can still be used to generate collisions and complex dynamics between solid objects.
To use this feature, you need to go to the group of Game Engine logic buttonswhere the physical properties of objects were previously defined: body type, collisions, gravity, etc. The simulation runs as if a small real-time game were being played within Blender.
The interesting thing is that, once you have a rigid body simulation that convinces you, you can Convert the result to animation curvesThis is done using the main menu option Game > Record Game Physics to IPO (or its current equivalent), which records the movement generated by the game engine's physics as an editable animation.
Detailed handling of the Game Engine and its logic system is beyond the scope of an introduction focused on general physics simulations, but it is useful to know that this possibility exists when you need complex collisions between many rigid bodies and want to save time on manual animation.
Fabric simulation in Blender (Cloth)
The system Blender fabric simulation It shares the same philosophy as soft bodies, but it is especially optimized for open meshes such as flat surfaces, which are the basis for modeling clothing, flags, curtains, or tablecloths. This makes perfect sense, since in reality, garments are surfaces that don't enclose volume.
In the Cloth Simulator tab, you'll find a series of options designed to create fabrics with very different behaviors. Blender includes material presets accessible from a drop-down menu called Material Preset, where you can choose configurations of leather, denim, rubber, cotton or silk, among others.
These presets configure many stiffness, elasticity, and damping parameters for you, so with just a few clicks you get a fabric already reasonably credibleFrom there you can tweak the values to your liking to adapt them to the specific scene you are working on.
The overall quality of the simulation is regulated by the parameter QualityHigher quality means more calculation steps per frame and therefore better results, but also a significant increase in simulation time. It's typical to start with moderate quality while testing the animation and only increase it during the final bake.
Activating the button is highly recommended. Enable self-collisions within the Collision sub-tab of the Cloth group. This option allows the fabric to detect collisions with itself, that is, to take into account folds that collide with each other. Although it increases computation time, it is key to achieving realistic folds and wrinkles in blankets, clothes that swirl around, and fabrics that are folded several times.
Since the simulator works at the polygonal face level, it is essential that the fabric geometry has a sufficient but not excessive resolutionToo few polygons will result in very square and unnatural folds; too many will drastically increase calculation time. The usual practice is to subdivide the plane to a moderate size and only increase the number of polygons if more detail is truly needed.
Typical example of basic fabric simulation
A classic exercise to understand how Cloth works involves using a flat like fabric falling over an object with collision enabled, for example a rotating cube. First, the plane is subdivided to have enough polygons, the cloth simulation modifier is assigned, and Collision is enabled on the cube that will act as an obstacle.
If, when playing the animation, you notice that the fabric is too stiff or makes unrealistic folds, you can redo it. subdivide the mesh one more level, adjust the simulation quality or change the material preset to a more suitable one (for example, switch from leather to cotton or silk for a softer effect).
From here, you can create more advanced exercises, such as tablecloths falling onto tables, curtains moving when a window is opened, or flags that are distorted by the wind. The basic principle will always be the same: mesh with sufficient resolution, configured fabric, collisions properly enabled, and forces correctly oriented.
Use of vertex weights and Pinning of cloth
One of the most powerful and least intuitive features at first is the ability to control the influence of simulation using vertex weightsThis is done using the Weight Paint mode, which is selected in the header of the 3D window just like other painting modes.
In this mode, a new tab appears called Paint in the editing buttons, where the brush weight parameters are configured. The system uses a color code: red indicates weight 1 (maximum influence), blue weight 0 (no influence), and intermediate colors correspond to weight values between 0 and 1.
By activating the button Pinning of cloth in the Cloth tabBlender uses these weights to decide which parts of the canvas are fixed and which are free to move. For example, if you paint the corners of a plane with a weight of 1 and the rest with lower values, you can make those corners fixed, as if they were hanging from a string or held with clips.
This makes it easy to animate. flags, curtains, handkerchiefs, or any fabric that is attached at certain points while the rest hangs and ripples. If you forget to activate Pinning of Cloth, the cloth will behave as if there were no fixed vertices, and may fall to the ground even if you have a painted weight map.
Once the pinning is configured, it is common to add a wind-type force field using an Empty object. The Z-axis of the Empty object indicates the wind direction, so it is rotated to point towards the fabric. Then the Strength value is adjusted until a believable movement is achieved, avoiding both an overly rigid fabric and one that becomes uncontrollable.
In more elaborate exercises, you can even add objects that interact with the fabric, like colliding cubes with a flag as it waves in the wind. To control the portion of the timeline where the cloth simulation is calculated, you can modify the default bake interval (usually from frames 1 to 250) in the Collision tab or in the Cloth-specific settings.
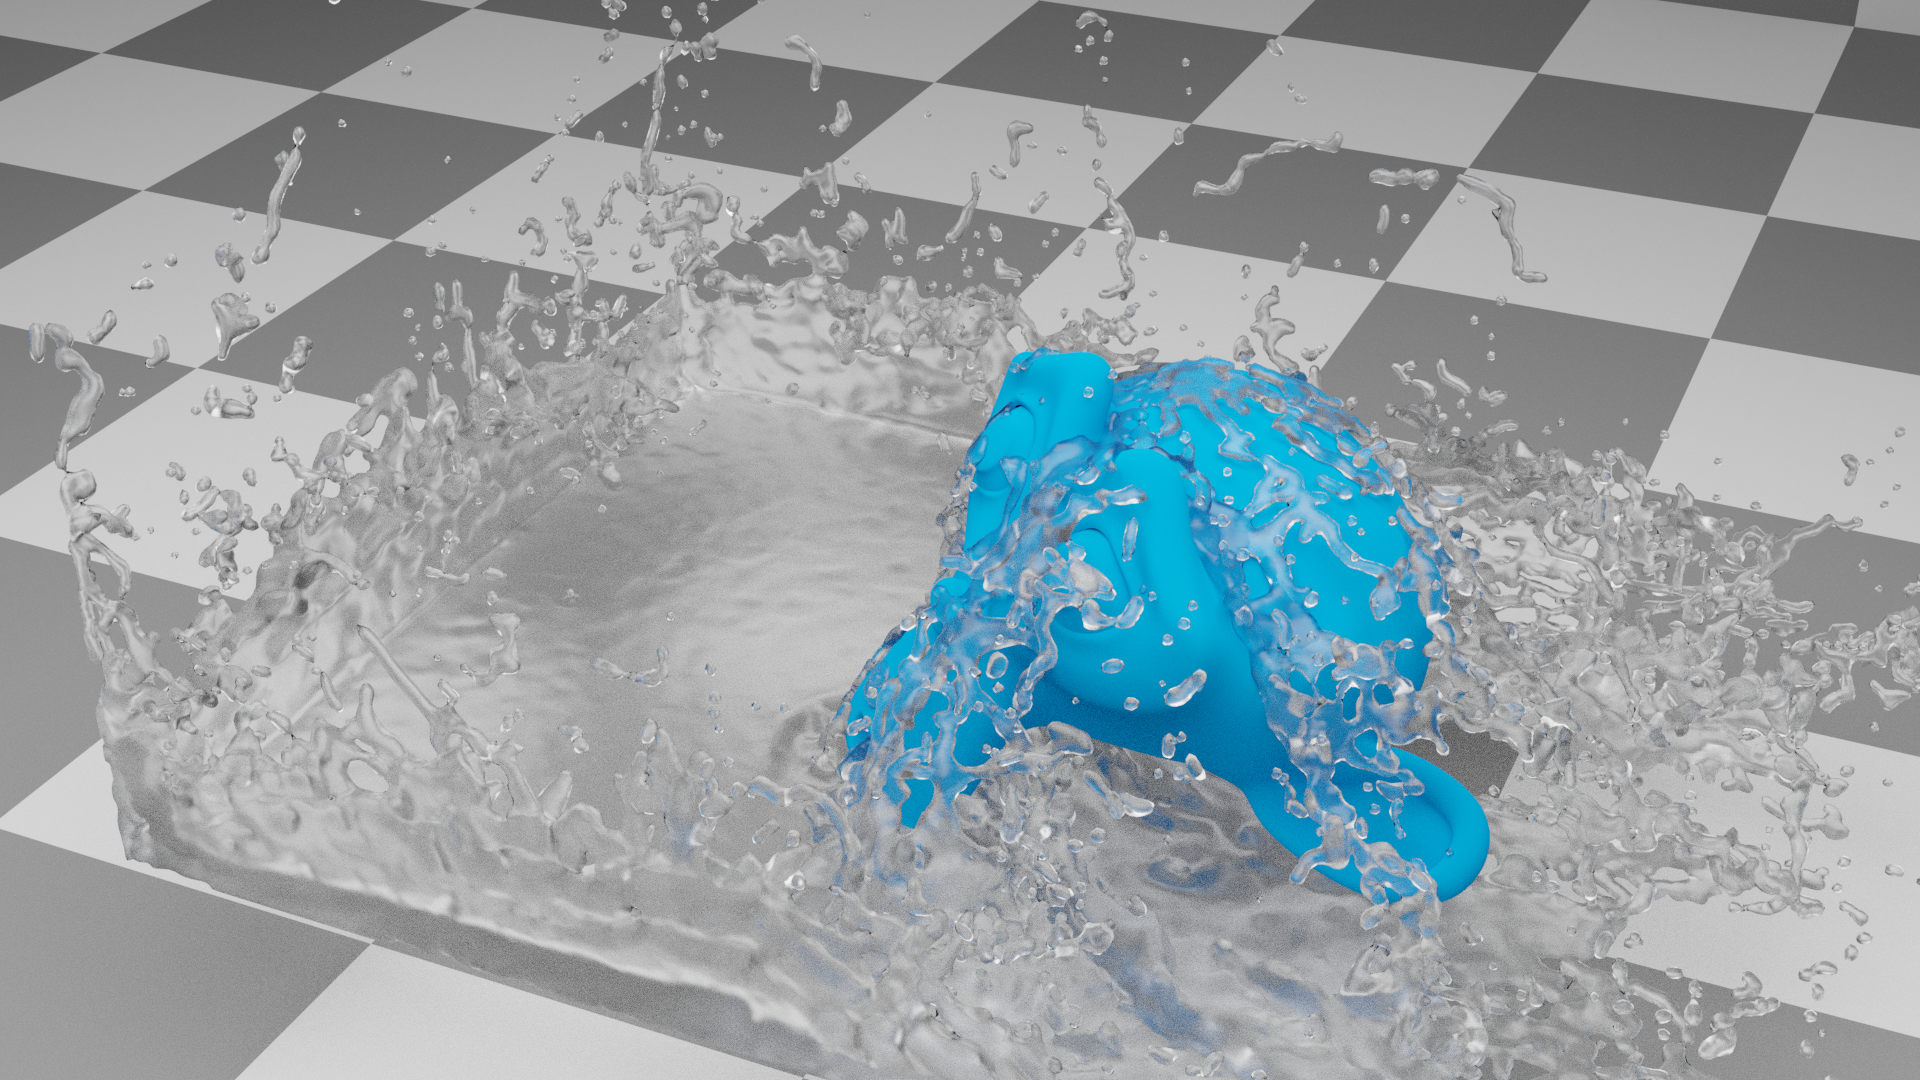
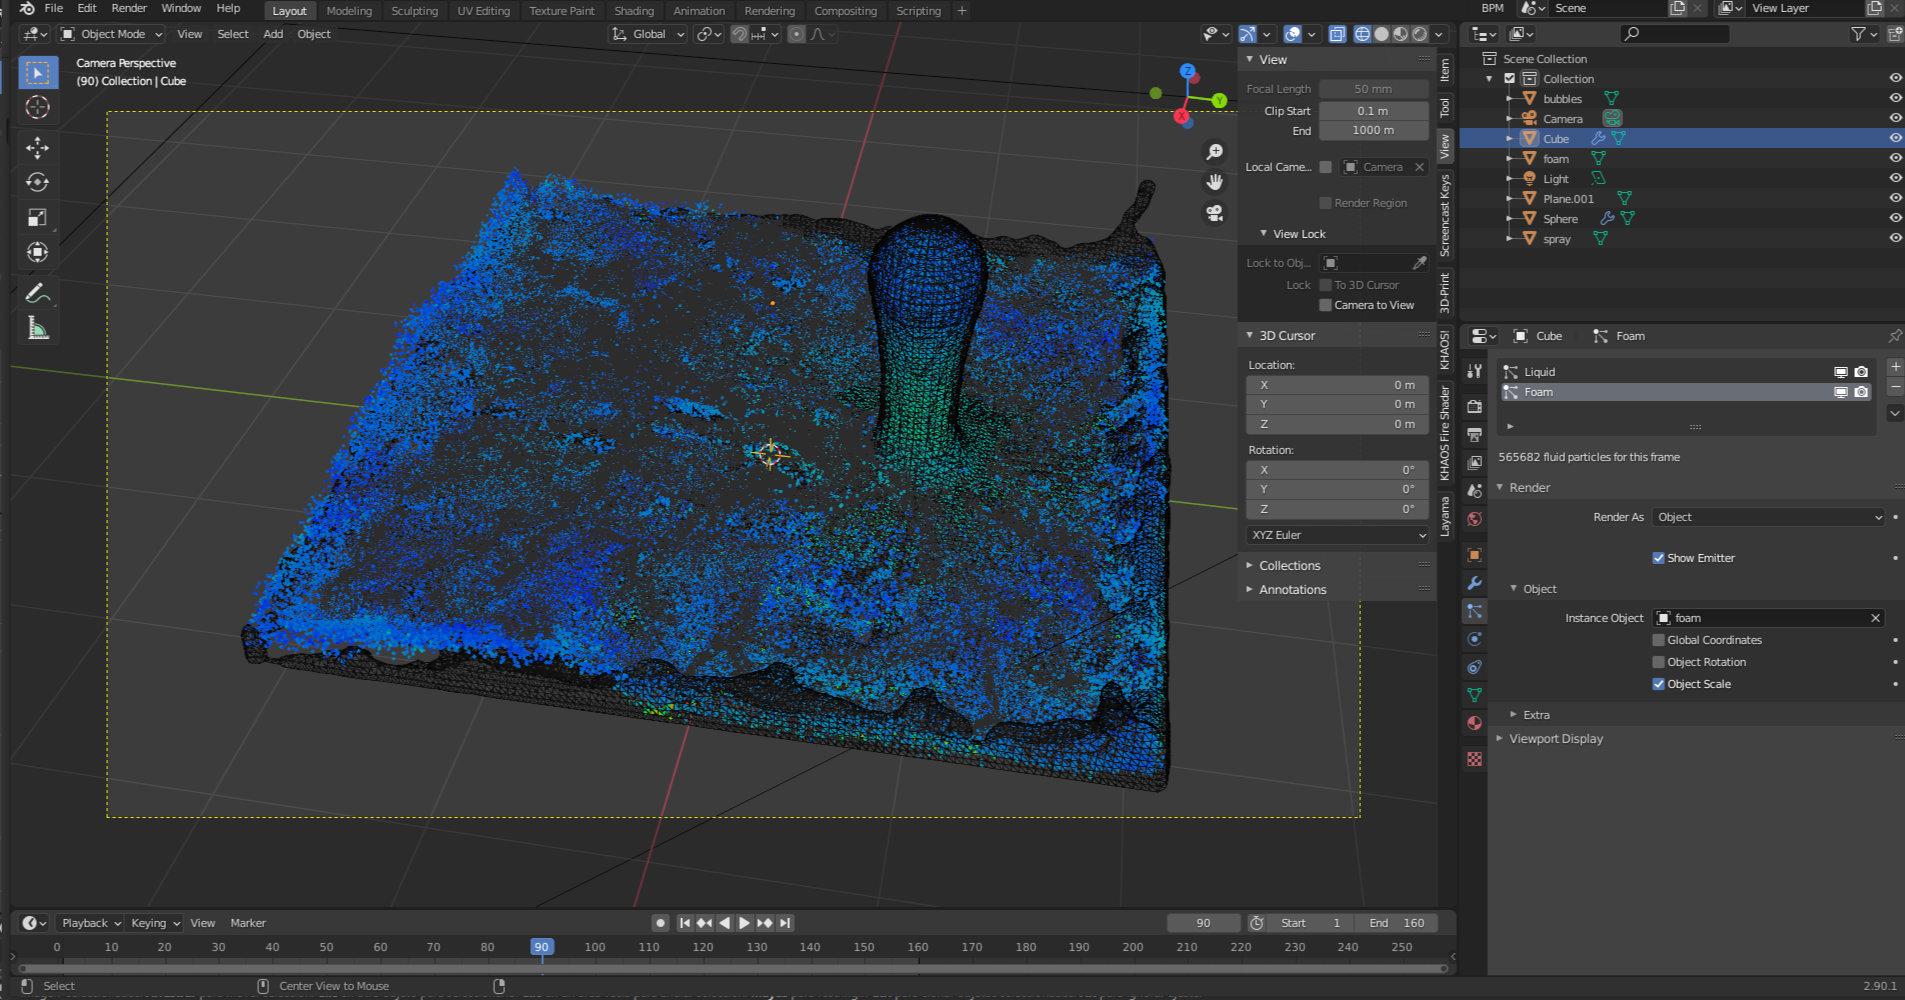
Fluid simulation in Blender
The fluid simulator is probably one of the most impressive features within the physics group, as it allows you to create liquids that behave quite realistically: water filling a glass, jets splashing, fluids colliding with obstacles, etc.
Technically, this module generates a different polygonal mesh for each frame of animation. That's why it's a very computationally demanding process, both in terms of time and memory. Before launching a serious bake, it's a good idea to plan the scene well and run low-resolution tests.
For a fluid simulation to work, a series of parameters must be correctly defined. core items In the scene: at least one domain (the overall container of the simulation), one or more fluid emitters, and, if necessary, obstacles that deflect or contain the fluid. Each of these objects is labeled with its specific role within the fluid system.
Once all the elements have been configured with the appropriate fluid type and the parameters are more or less adjusted, the button is pressed. BAKE on the Fluid panelFrom that moment on, Blender begins to calculate the evolution of the liquid along the timeline, generating the necessary data to be able to reproduce the animation without re-simulating.
Classic example: liquid filling a glass
A very common example for learning about fluids involves taking advantage of the initial cube of the scene as a fluid domain. It is usually set up in wireframe mode so that it doesn't interfere with modeling the other elements, since it actually acts as an invisible container for the simulation.
Then another cube is added, which is used to model a vessel by means of subdivision surfacesOnce the vessel has the desired shape, the subdivision modifier is applied so that the fluid simulator can correctly calculate collisions with a stable geometry, without topology changes during the process.
Next, a third object is introduced, another cube that will act as fluid producer or emitterIn its settings, an initial velocity is usually set on the Z-axis so that the liquid flows in a specific direction. It's easy to make mistakes here if you don't pay attention to whether the force is being applied in global or local coordinates.
For example, if you set a force in Z of 0.15 units but forget to activate the option to Local coordinates (Local Coords/Enable)It's possible that the fluid will shoot upwards along the global Z-axis, instead of in the direction relative to the object itself. In that case, you can undo the simulation (Ctrl+Z) and repeat the process by selecting the correct option.
Once the emitter is pointed in the correct direction and the domain, glass, and obstacles are well defined, the button is pressed again. BAKE to launch the simulation calculationDepending on the resolution set for the domain and the duration of the animation, this process may take quite a while, but it will return a sequence of fluid meshes that can be lit, shaded, and rendered like any other object.
In real-world projects, it's common to start with a low resolution value For mastering, test that the overall fluid movement works (it doesn't come out of the container, the direction is correct, etc.) and, when everything is fine-tuned, increase the resolution to get more detail in splashes and surfaces.
Playing with the shape of the domain, the position of the obstacles, and the initial speed of the emitter opens the door to a wide variety of effects: from water falling into a cup to more violent spills that hit walls or steps, to small puddles that slowly form.
This entire ecosystem of collisions, fabrics, soft bodies, and fluids makes Blender, despite being free software, a serious contender against proprietary physics simulation solutionsBy understanding step by step what each tab does and experimenting with the main settings, it is possible to build very rich scenes without needing to resort to additional software.

Passionate writer about the world of bytes and technology in general. I love sharing my knowledge through writing, and that's what I'll do on this blog, show you all the most interesting things about gadgets, software, hardware, tech trends, and more. My goal is to help you navigate the digital world in a simple and entertaining way.