- Mastery of geometric, colorimetric and sharpening correction tools to optimize digital images.
- Advanced layer and group management for a non-destructive and organized workflow.
- Techniques for cleaning artifacts and removing unwanted elements through cloning and sanitizing.
- Optimization of the final output by adjusting the resolution and exporting in appropriate formats.

If you've noticed that your photos don't always turn out as expected, don't worry, it's perfectly normal. Whether the lighting has played a trick on you or the framing is a little off, there are free and powerful solutions to make your images look perfect. GIMP is the ideal alternative for those seeking professional-level results without having to pay for expensive subscriptions, and it's compatible with Windows, Mac, and Linux.
To get the most out of this program, you don't need to be a computer whiz, but you do need curiosity and a willingness to experiment. The magic of GIMP lies in its ability to handle everything from basic adjustments, like simple cropping, to complex layer-based editing processes that give you complete control over every pixel of your work. Let's break down step by step how to transform a mediocre image into a stunning photograph.

First steps and environment setup
When you install GIMP from its official website, the first thing you'll notice is that its interface can seem a bit chaotic at first because it opens several windows. To avoid getting overwhelmed, it's best to go to the Windows menu and activate Single Window Mode ; this will centralize everything in one place.
The workspace is basically divided into three areas. On the left, you have the toolbox with all the editing options; on the right, the panels for managing layers, channels, and paths; and in the center, the canvas where the magic happens. A very useful trick is that if you don't know what an icon does, simply hover your cursor over it for a few seconds and the program will explain its function.

Composition and geometry adjustments

Sometimes, the most common mistake is not keeping the camera level. To fix those slanted lines, the Rotate tool is your best friend. You can use the shortcut Shift+R and drag the image until it's straight. Pro tip: In the tool's options, select the Backward (corrective) option to align the grid with the error, which is much more intuitive than trying to compensate for the angle by eye.
When we rotate a photo, triangular gaps often appear in the corners. To fix this, the cleanest solution is to crop the image. This is where the rule of thirds comes in , which suggests placing the point of interest at one-third of the image's width, both horizontally and vertically, for greater visual impact. To do this, use the Crop tool (Shift+C) and define the area you want to keep.

The art of color and the exhibition
If your photo is too dark (underexposed) or too bright (overexposed), GIMP offers a range of solutions. For quick adjustments, the Brightness and Contrast dialog is sufficient, but for finer control, it's better to use Levels or Curves. Curves is especially powerful because it allows you to map the input and output brightness levels with complete precision, surpassing any other lighting tool in versatility.
For those seeking a more advanced approach, you can create a new layer in Multiply mode to darken specific areas or in Divide mode to lighten them. This functions like a gain control layer , where you paint with gray tones to selectively adjust brightness. If you notice the photo has a color cast (it's too red or blue), the best solution is to adjust the red, green, and blue channels individually using the Levels tool.
To check if the colors are natural, you can use the eyedropper tool on an area you know should be white or gray. If the RGB values are the same, you're on the right track. On the other hand, if the image looks washed out, increasing the saturation in the Hue/Saturation tool will bring the colors back to life, being careful not to overdo it so they don't look artificial.

Image sharpness, noise, and clarity

A slightly blurry photo can be salvaged using the Unsharp Mask filter in the Enhance menu. It's crucial not to overdo the amount or radius, as excessive use will amplify digital noise and create strange edges. If you only need to sharpen a specific area, the Blur/Sharpen tool in 'Sharpen' mode allows you to paint sharpness where needed.
When shooting in low light, grain is common. To smooth it out, the Remove Grain filter is very effective, but the trick is to make a small selection around the grain instead of applying it to the entire photo. If you have unwanted elements, like a wire or a stain, the Clone tool is the solution; it basically copies a clean area and pastes it over the imperfection.
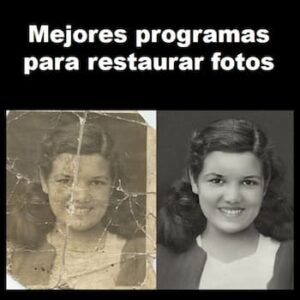
For more subtle retouching, such as removing wrinkles , the Healing Brush tool is superior to cloning because it integrates the surrounding colors into the target area. Additionally, GIMP includes a specific filter for removing red-eye; simply select the affected area and adjust the threshold to restore the iris's natural tone.
Professional management of layers and groups
The true power of GIMP lies in its layering system, which is like placing transparent sheets on top of each other. This allows you to edit one element without affecting the rest of the composition. Each layer has key properties: Mode (how it blends with the layer below), Opacity (how transparent it is), and Visibility. It's highly recommended to lock the pixels or position of completed layers to prevent accidentally deleting or moving them.
If your project becomes complex and you have dozens of layers, it's best to use Layer Groups. These allow you to organize your work into blocks (for example, one group for text and another for background retouching), making it easier to move, duplicate, or apply filters to the entire set at once.

Export and final departure

Before printing, it's vital to check the resolution in the Print menu. Remember that quality depends on pixel density, so you should adjust the output size and resolution to prevent the image from appearing pixelated on the paper. Don't forget to check the margins so the printer doesn't cut off important parts of your design.
Regarding saving, there's an important distinction: if you use 'Save As', the program will create an .XCF file (GIMP's native format, which preserves layers). To obtain a final image that you can upload to social media or send via email, you must use the 'Export As' option and choose formats like JPG or PNG. GIMP is able to retain the Exif data of the original photos, preserving the camera's technical information if the libexif library is enabled.
Mastering these tools allows you to go from amateur editing to a polished finish, controlling every aspect from geometry and color to non-destructive layer management. By combining artifact removal with precise level adjustments and proper export, any user can achieve professional-looking and appealing photographs.


Passionate writer about the world of bytes and technology in general. I love sharing my knowledge through writing, and that's what I'll do on this blog, show you all the most interesting things about gadgets, software, hardware, tech trends, and more. My goal is to help you navigate the digital world in a simple and entertaining way.