- Using H.264 in MP4 with resolution and fps consistent with the recording reduces artifacts after compression for YouTube and networks.
- Properly configuring the bitrate (preferably VBR with generous values) is key to avoiding pixelation and maintaining sharpness.
- Enabling hardware encoding speeds up exporting, while maximum depth and quality improve the image.
- Using AAC-LC at a good bitrate ensures clear and professional audio without increasing the file size.

If you've been uploading short videos, reels, or other short clips to social media for a while and you've noticed the quality drops significantly after posting, you're not alone. It's very common that when you export from Premiere Pro with the default settings, the video looks decent on your computer, but when you upload it to YouTube, Instagram, or TikTok, it appears with artifacts, pixelation, and an overall "meh" quality.
The good news is that, by fine-tuning the export settings, you can make your videos look much sharper, with less visible compression , and still export quite quickly. You don't need to be an editing expert or know every technical parameter down to the last detail: by understanding how codecs, bitrate, resolution, and a few key settings work, you can create a near-template configuration that will work for most of your projects.
Why do your videos lose quality when you upload them to social media?
The first thing to understand is that all platforms apply their own automatic compression when you upload a video . This means that even if you export something that looks perfect on your PC, YouTube, Instagram, or TikTok will re-compress it to save bandwidth and storage space. This extra compression can generate artifacts, pixelation, and noise , especially in areas with a lot of movement or smooth gradients.
If your exported file already has a very low bitrate or medium-to-low quality , the result will degrade significantly when the platform compresses it again. Therefore, one of the keys is to send them a file with more quality margin than seems necessary, so that the second compression doesn't ruin the image.
Recording in high resolutions (for example, 4K) and then working on a 1080p timeline also plays a role. That's fine and can actually help you gain sharpness as long as the export settings are correct. But if you export with low settings, all that potential from the original source is lost.
Another common problem is mixing different frame rates (fps) between recording and exporting. If you record at 30 fps and export at 24, or vice versa, you might experience stuttering, ghosting, or a strange sense of motion blur. Therefore, it's best to maintain the same frame rate from recording to final export.
Choose exactly which part of the video you are going to export
Before discussing codecs and bitrates, the first step is to determine which portion of the timeline you want to export . In Premiere Pro, you don't always have to export the entire edit; you can limit yourself to a specific section using the In (I) and Out (O) points in the sequence.
If you only need to export a short clip for social media from a longer project, clearly marking in and out prevents you from generating giant files, wasting rendering time, and also makes it easier to create different versions of the same project (for example, a vertical short for TikTok and a horizontal cut for YouTube).
If you want to export the entire sequence , simply leave off any specific in or out points, or use the option to export the entire sequence from the export panel. Even so, it's a good idea to review the workspace and make sure there are no muted sections or extra parts you don't want to upload.
This prior decision does not affect the quality as such, but it does affect the efficiency of the workflow : fewer minutes of video mean less coding time and fewer opportunities for something to go wrong or for an error to slip through.
Once the section to be exported has been defined, that's when the serious part begins: choosing the format, codec and parameters that allow you to export quickly and without artifacts.
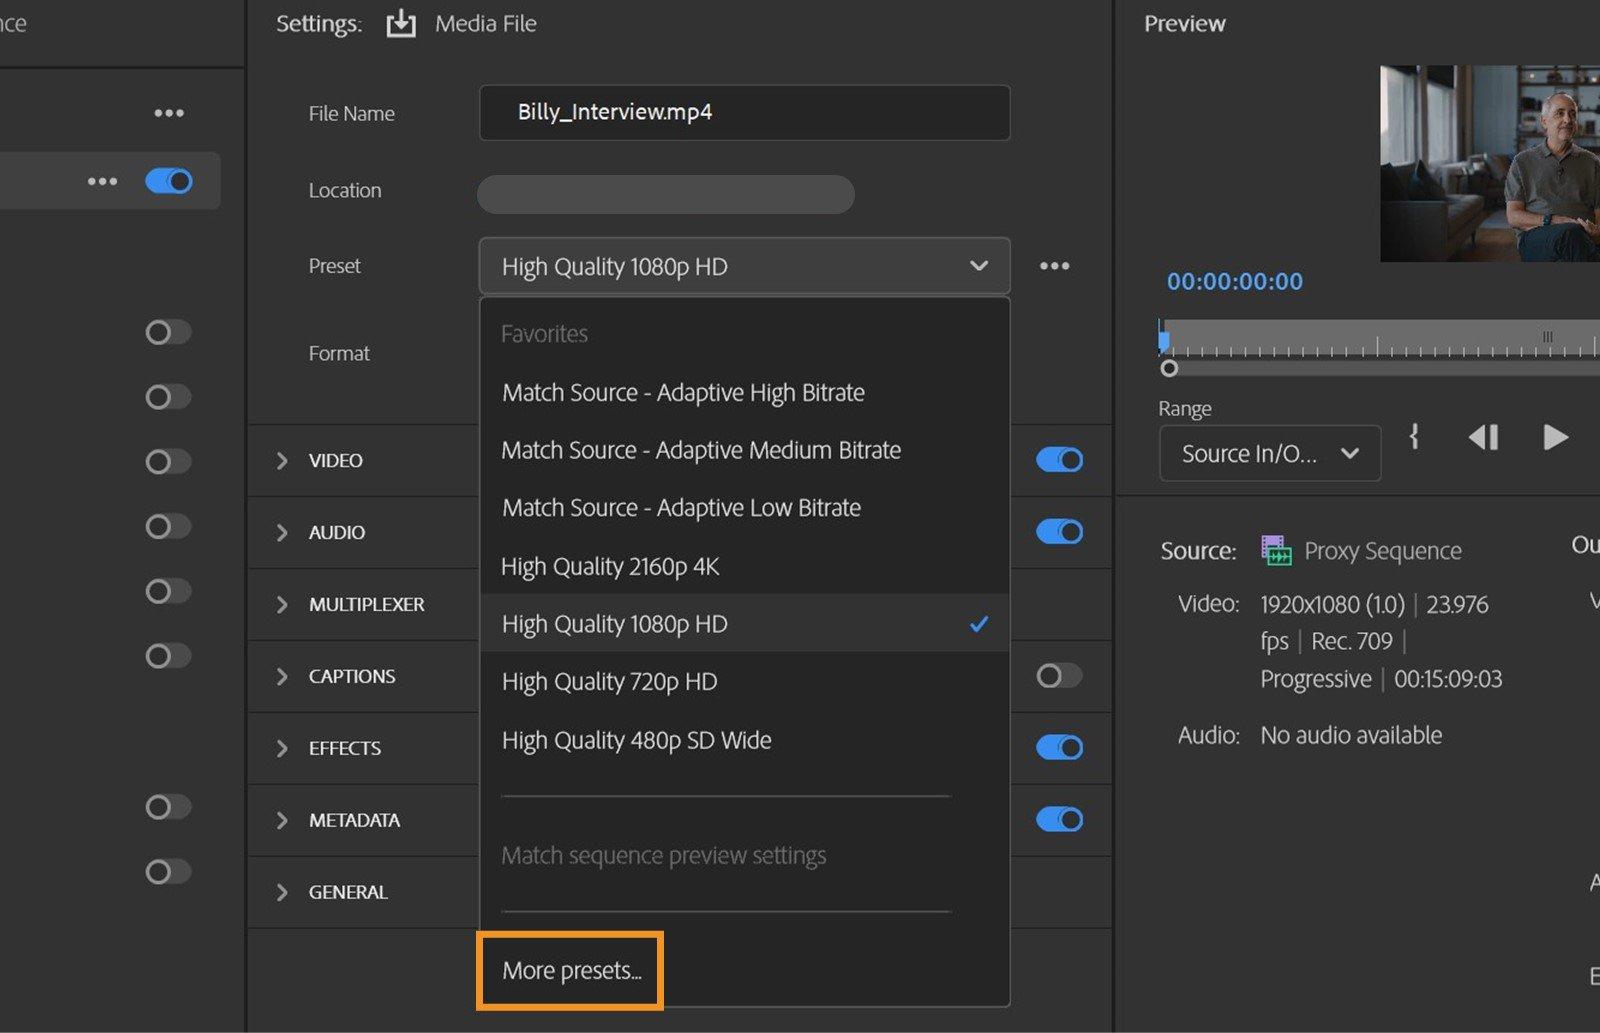
Recommended format and codec for YouTube and social media
For the vast majority of cases, the most practical format in Premiere Pro for uploading to YouTube and social media is H.264 in an MP4 container . This format offers a very good balance between quality and file size, and is the standard recommended by platforms like YouTube for HD and 4K videos.
When you open the Export window (File > Export > Media), select H.264 in the Format field . Premiere will then generate an MP4 file. This codec is optimized for streaming, maintains good clarity, and plays smoothly on mobile devices, computers, and Smart TVs.
While other formats are compatible with YouTube, such as MOV, MPEG-4, AVI, FLV, WebM, 3GP, and MPEG-PS , in practice they often result in larger files, longer upload times, or occasional compatibility issues. H.264 in MP4 format is the most balanced option for a streamlined workflow.
If for any reason you work with an uncommon camera or editing format and need to convert that file to a more standard one , you can use external tools. Programs like Wondershare UniConverter allow you to convert your clips to H.264, reduce file size, and even perform basic editing and add metadata before using Premiere, all without significant quality loss.
The ultimate goal is for the exported file to be easy to upload, compatible, and robust enough to withstand re-encoding by YouTube or the social network in question.
Resolution and relationship with final quality
The resolution you export at (1080p, 4K, etc.) significantly impacts the perceived quality. As a general rule, if your equipment supports it and you have high-quality source material, exporting at the highest resolution that makes sense for your content will give you more leeway against platform compression.
If you've recorded in 4K but are working on a 1080p timeline, you can enjoy certain advantages: you'll be able to reframe, zoom smoothly , and make small virtual camera movements without losing sharpness. In that case, it's normal to export at 1920×1080 (Full HD) , which remains the standard for most YouTube and social media videos.
When you want your videos to have a more cinematic look or offer ultra-high definition , you can edit and export in 4K (for example, 3840×2160). YouTube supports high resolutions without issue and often assigns a higher-quality codec to 4K videos, further reducing artifacts, albeit at the cost of larger file sizes.
In any case, the important thing is that the resolution of the sequence and the export resolution are aligned with the content type. For vertical shorts , set your sequence to 1080x1920 and export at that size so the platform doesn't have to rescale and add another layer of degradation.
It's also worth remembering that resolution alone isn't everything: if you combine it with a bitrate that's too low , you'll get a "fake" 4K image full of blockiness and noise. That's why you should always decide on the resolution in conjunction with the bitrate you're going to use.
Frames per second: Maintain the same recording and export speed
Frame rate (fps) defines how smooth the motion appears. Ideally, the export frame rate should match the recording frame rate and the frame rate in your Premiere sequence. If you record at 30 fps, export at 30 fps; if you record at 25 fps, export at 25 fps, and so on.
The most common frame rates are 24, 25, 30, 48, 50, and 60 fps . For YouTube videos with a more cinematic style, 24 fps is a good choice. For general content, vlogs, or educational videos, 25 or 30 fps work very well. If your content involves a lot of movement, such as video games or sports , 50 or 60 fps can provide smoother gameplay and a more responsive feel.
If you export at a different frame rate than your original footage, Premiere will have to apply some form of time interpolation to fill in or remove frames. Depending on the setting (Frame Sampling, Frame Merging, or Optical Time Remapping), you may end up with strange artifacts, ghosting, or slight jumps.
To avoid problems, the simplest solution is to create your sequence from scratch using the same frame rate as your clips . Then, in the export window, select the "Match Source" option for frame rate, and that's it: the motion you see in the preview will be the same as what you see on YouTube or the destination social network.
In the case of shorts and short videos, 30 or 60 fps are the most common on social media, because they give a cleaner and more modern feel, especially when people consume the content from their mobile phones.
Bitrate: the key to avoiding artifacts
The bitrate determines how much data per second is used to encode the video. In practical terms, a higher bitrate usually translates to better quality , although it also means larger files. This is where much of the battle against artifacts and pixelation takes place.
In Premiere Pro, when you choose H.264 as the format, you can select from several bitrate options: CBR (Constant Bit Rate), VBR 1-Pass, and VBR 2-Pass . Each has its advantages and disadvantages in terms of quality and export time.
With CBR , the bitrate remains constant throughout the video. This ensures a stable data flow and is often useful for certain types of streaming or when you need a predictable file size. However, it's not the most efficient option: in simple scenes, it uses more bits than necessary, and in very complex scenes, it may fall short.
The VBR 1-Pass (Variable Bit Rate) mode dynamically adjusts the bitrate based on the complexity of each video segment, but only performs a quick analysis. It's more efficient than CBR and exports faster, although in very demanding situations it can generate slightly more artifacts than the two-pass mode.
The VBR 2-Pass option first analyzes the video and then performs a second pass to optimize bitrate distribution. This offers superior quality for the same file size because it allocates more bits to areas with a lot of movement or detail, and fewer to static shots. The downside is that it takes longer to export.
If your top priority is minimizing artifacts and you primarily upload to YouTube, using VBR 2-Pass with a medium-to-high target bitrate is often the best option . If you're interested in exporting as quickly as possible, VBR 1-Pass with a slightly higher bitrate can be a good balance between speed and quality.
Regarding specific values, for a 1080p video intended for YouTube, it's generally recommended to set a target bitrate higher than the platform's minimum to compensate for the extra compression. It's better to err on the side of caution than to fall short and end up with blocky, noisy, and blurred details.
Encoding settings and GPU usage
Within the Encoding Settings section of Premiere Pro, you can choose whether to use hardware or software encoding . Hardware encoding leverages the GPU or processor hardware to accelerate export, while software encoding relies primarily on the CPU.
On most modern devices, hardware encoding allows for much faster exporting with virtually imperceptible quality loss for the intended use (YouTube, social media, etc.). It's perfect when you're uploading content daily, such as short videos or reels, and you don't want rendering to take forever.
In some very specific cases, software encoding can offer slightly more efficient compression , but at the cost of significantly longer export times. For a creator who publishes daily, it's usually more sensible to keep hardware encoding enabled and carefully adjust the bitrate and other parameters.
In many H.264 presets, you'll see options like Export Profile, Level, or Color Space grayed out when using hardware encoding, because Premiere automatically decides the appropriate values. This isn't a problem: as long as you maintain export settings consistent with your project, the quality will be more than sufficient for online platforms.
If you see parameters like HDR Graphics White (Nits) or references to HLG or PQ and you're working with standard definition (non-HDR) content, you can leave them at their default settings or disable any HDR options. Social media and YouTube still handle HDR somewhat inconsistently, so if you're not comfortable with HDR streaming, it's best to stick with traditional SDR.
Color depth and rendering quality
In the basic video settings, you'll find options like "Render at maximum depth" and "Use maximum rendering quality ." These settings can make a big difference if you're doing intensive color correction, working with high-end footage, or scaling between resolutions.
Enabling “Render at maximum depth” tells Premiere to use a greater color depth during internal processing , which helps avoid banding (those striped gradients) and small color jumps, especially in skies, gradient backgrounds, and soft lighting effects.
Meanwhile, “Use maximum rendering quality” improves image upscaling and processing algorithms , which can be very useful if you're downscaling 4K to 1080p or mixing clips with different resolutions on the same timeline. However, exporting takes slightly longer and uses more resources.
For short videos intended for social media, this increase in time is usually acceptable and can provide added precision in the image, reducing small defects that the platforms then amplify with their compression.
If you notice your computer struggling when these options are enabled (long export times, fan running at full speed, etc.), you can try unchecking them for less critical projects and keeping them enabled only when image quality is a priority.
Audio: Recommended codec and bitrate
Audio also undergoes compression when you upload your videos, and although the artifacts are less noticeable than in the image, a bad adjustment can cause muffled sound, clicks, or loss of definition in music and voices.
For YouTube and most platforms, it's recommended to set the export audio to AAC-LC (Low Complexity), which is the standard codec for MP4. Within AAC, it's advisable to use a generous bitrate, typically around 384 kbps for stereo, which offers very good quality without significantly increasing the final file size.
Maintaining a sampling rate of 48 kHz (the video standard) and using a stereo channel is usually sufficient for most content. There's little point in exporting audio at excessively high quality if the platform is just going to recompress it to its own standard.
Good, clear audio with a sufficient bitrate also helps your video look more professional, even if it's just a simple short film recorded at home. Often, people tolerate a certain level of visual compression , but turn off the video as soon as the sound becomes poor.
For creators who work daily, the ideal is to leave these parameters fixed in an export preset and forget about it, knowing that the audio will always come out with a quality suitable for online publication.
Paying attention to all these export details in Adobe Premiere Pro is what allows you to go from videos that look "half-finished" after uploading them to social media, to content that withstands the automatic compression of the platforms much better, with fewer artifacts, more sharpness and a more professional look , without needing to master every technical aspect of the program or invest extra hours in each render.


Passionate writer about the world of bytes and technology in general. I love sharing my knowledge through writing, and that's what I'll do on this blog, show you all the most interesting things about gadgets, software, hardware, tech trends, and more. My goal is to help you navigate the digital world in a simple and entertaining way.