- Explorer Home and the Recent folder serve different needs
- Office allows you to pin, clean up, and adjust the number of documents
- If nothing appears, check Privacy and refresh Explorer views.
Did you work on a document a while ago and now you can't remember where you saved it? In Windows 10, it was common to use the Recent Files tab , but in Windows 11, File Explorer has changed, and many users are confused. Don't worry: Windows still keeps a history of your recent activity, and there are several ways to view it, both from File Explorer itself and from Office applications.
Also, if the "Show recently used files" option is unchecked on its own or doesn't show anything , I'll tell you the common reasons and the most effective solutions so you can have your documents at hand again without having to search through folders endlessly.
How to view recently opened files in Windows 11 from Start (Quick Access)
In Windows 11, the old Quick Access view is now called Explorer Home (in version 22H2 and later). It's the Explorer home screen and lets you see your recent Office.com files and those stored locally or in the cloud at a glance.
To open File Explorer instantly, press WIN + E and you'll see the Start page with frequently accessed and recently accessed files. If you prefer a different view, you can change it, but first, it's helpful to understand what this view offers.
- Direct access to recent and favorites (including Office files linked to your account).
- An integrated search that find local and cloud content faster than entering folder by folder.
Keep in mind a common limitation: the Start Menu displays a limited number of items (historically 20 in the Recents panel). If you need a longer list, the Recent Items folder is more comprehensive.
“Recent Items” folder: the complete list of the last things you opened
Windows maintains a repository of shortcuts to recently opened files. This is the most reliable and comprehensive way to review your recent activity, regardless of the app used (documents, images, spreadsheets, etc.).
For quick access, open File Explorer (WIN + E) and paste this path into the address bar: %APPDATA%\Microsoft\Windows\Recent . You can also navigate manually to: C:\Users/ your_username \AppData\Roaming\Microsoft\Windows\Recent.
Inside you'll see shortcuts to everything you've recently opened. If you work a lot on your PC , it's normal to have hundreds of items; use Explorer's search box to filter by name, type, or date and find what you're looking for in seconds.
If you only need Office documents, consider the "Home" section of Word , Excel, or PowerPoint, as they also list recently opened files and show their exact location for easy access.
Enable the display of recent files and folders in Explorer
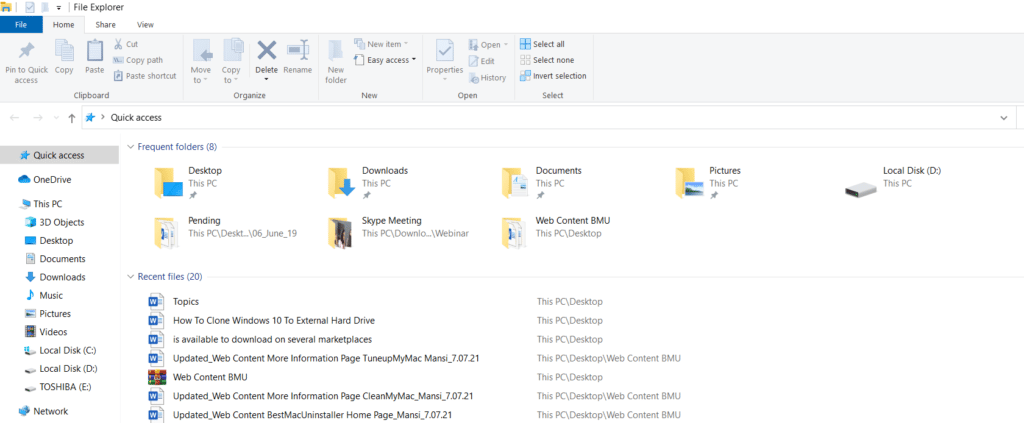
If you don't see anything in the Start menu, or if the option doesn't seem to save changes, first check your Explorer settings. This is the key step to getting your history working again.
- Open Explorer and click on See more > Options (the button with three dots).
- In the General, go down to the section Privacy policy.
- Check the boxes Show recently used files in Quick Access y Show frequently used folders in Quick Access.
- Click on Apply and then in Accept.
- Optional: Press the button Delete in that same section to clear history and restart the count.
If the left pane of Explorer isn't updating with recent items, try this little trick: right-click in an empty space in the navigation pane (left column) and toggle the available options (for example, "Expand to open folder" or "Show all folders"). Sometimes refreshing these views will cause the folders and recent items to automatically repopulate.
Pin your frequently used folders to always have them at hand
Beyond just files, it's a good idea to pin the folders you visit daily. This reduces clicks and prevents you from having to navigate through deep paths every time.
- Navigate to the folder you use often (work, projects, downloads, etc.).
- Right click on it and choose Pin to Quick Access.
From that moment on, you'll see it in the left panel of the Explorer and in the Save As boxes of countless applications, which greatly speeds up your daily workflow.
View, pin, and manage recent documents in Word, Excel, and PowerPoint
Microsoft 365 apps have their own list of recent documents. This is very useful when you remember the app but not the folder where the file was located.
- Open Word, Excel or PowerPoint and go to the tab Archive.
- Click on OPEN to display the list of recently used files.
- Hover over the document you want and select Pin this item to the list.
Pinned documents remain at the top of the list, ordered chronologically, with the most recent at the top. Perfect for your active projects that you don't want to lose track of.
- In File > Open, right-click any file.
- Choose Remove unpinned items and confirm with Yes.
You can also delete unwanted documents one by one: right-click on the unwanted document and select "Remove from list." This keeps your history under control without completely clearing it.
If the list seems too short or too long, go to File > Options > Advanced and in the Display section adjust the value for “Show this number of recent documents”. Controlling the volume helps you balance speed with visual clutter.
An important detail: Your Office recent files list syncs with your Microsoft account . If you connect an older laptop or share your computer with someone else using your account, "old" or unexpected files may appear. In that case, remove those items from the list or temporarily disable syncing if you prefer to keep your computers separate.
Choose what Explorer opens with: Start or “This PC”
By default, File Explorer opens in the Start menu , which is where recent files and favorites are best displayed. However, some users prefer "This PC" to go directly to root drives and folders.
- In Explorer, click See more > Options.
- On the General tab, in Open File Explorer in: choose Home o This team.
- Confirm with Apply y Accept.
If your priority is recent items, leave it on Home . If you manage a lot of storage and paths, "This PC" might be a better fit for your routine.
When “Show recently used files” is unchecked: Causes and solutions
Some users have noticed that they check "Show recently used files" and then, upon reopening Options, the box is unchecked. Several factors can cause this , and it's worth reviewing them in order.
- Refresh the view of the left panelRight-click on a space in the navigation pane and toggle options like "Expand to open folder" or "Show all folders." Sometimes the problem is with the display, not the history.
- Clear and reactivate history. Under See more > Options > General > Privacy, tap Delete, check the two boxes “Show recently used files/folders” again and confirm with OK.
- Check Explorer StartupIn Windows 11 22H2 and later, the Start page integrates local and Office.com recent items. If it's disabled as a landing page, some users experience a "no recent items" issue. Set the opening to Start and test.
- Check that Quick Access is enabledIf you disabled Quick Access, re-enable it using the checkboxes mentioned above. Without this feature, the history visible in Explorer loses its functionality.
If the selection still isn't saved after trying the above steps, there may be a privacy policy or setting blocking it. This isn't common on home computers , but in corporate environments, company policy may enforce this preference, and only the administrator can change it.
Two foolproof methods to locate a file that you can't remember where you saved it
In everyday practice, when you're in a hurry, there are two shortcuts that rarely fail. Choose the one that's fastest for you based on the clue you remember from the file.
- “Recent” folder + search. Go to %APPDATA%\Microsoft\Windows\Recent and use the Explorer search box. Filter by type (e.g., .docx, .xlsx, .pptx, .jpg) or by modification date. It's lightning fast for rescuing the last thing you touched.
- Recent OfficeOpen Word/Excel/PowerPoint, go to File > Open, and review the list. The full path appears under each name; open the document or navigate to its folder with a single click. For "live projects," pin critical documents so they don't move from the top.
If you share a computer, this check can also be used to audit what's been opened (within legal and respectful boundaries, of course). It's a quick way to check activity without activating advanced options.
Practical tips and limits of recent lists
It's helpful to be aware of some specific features to avoid frustration. This way, you'll make the most of each method according to its actual capabilities.
- Home/Quick Access has limited capacityIf you work with dozens of files a day, the oldest ones will disappear from that view. For a longer history, go directly to the "Recent" folder.
- Office syncs recents with your accountWhen you connect an old device or if someone else uses your session, unexpected files may slip through the net. Delete any unwanted files or temporarily disable syncing if you need to isolate devices.
- The “Delete” button does not delete your files.. It only clears your access history. Your documents remain in place; they simply no longer appear in recent lists.
- Pinning does not move filesPinning to Quick Access or the Office list only creates highlighted shortcuts. The actual location of the file doesn't change.
Small recommended workflow
For convenient everyday use, this combination usually works very well. It gives you speed without losing control of your desktop.
- Leave Explorer open in Home to see your recent and favorites at a glance.
- Anchor to Quick access the 6–8 folders you use each day.
- When you need more history, consult the folder Recent and filter by type/date.
- In Office, anchors current documents and clean the unanchored ones from time to time.
This minimizes manual searching and avoids the feeling of "where did I save it?" after an intense work session.
What to do if Start shows empty spaces and you only see “This PC”
Some users prefer "This PC" and then miss the latest features. It's easy to switch back to Home or toggle whenever you want.
- Opens See more > Options in the Explorer.
- Under General, change “Open File Explorer in:” to Home.
- Apply and close; next time you'll see recent and favorites without extra steps.
If your Home screen still appears empty, check the Privacy settings and tap "Clear" to force a refresh . Sometimes the history gets stuck, and clearing it resolves the issue.


Passionate writer about the world of bytes and technology in general. I love sharing my knowledge through writing, and that's what I'll do on this blog, show you all the most interesting things about gadgets, software, hardware, tech trends, and more. My goal is to help you navigate the digital world in a simple and entertaining way.