- Windows 11 allows you to create software RAID with Spaces storage.
- There are different levels of RAID depending on the balance between security and performance.
- It is essential to prepare and verify the disks before mounting the RAID from the system.
If you've ever considered adding extra security to your data or boosting the performance of your hard drives , you've probably heard of RAID systems. However, the setup process can seem more like a headache than anything else, especially when it comes to doing it from Windows 11 without resorting to expensive hardware drivers . Don't worry, it's much simpler than you think, and it will also allow you to make the most of your computer's resources.
In this article, I'll explain how to configure RAID in Windows 11 , covering all the software and hardware options, their differences, advantages, and disadvantages, the supported RAID types, and guiding you step-by-step so you won't have any questions. We'll use the most up-to-date and practical knowledge so you can proceed whether you're using a desktop PC, laptop, or even a workstation. Let's get started!
What is RAID and what are the benefits of setting it up in Windows 11?
RAID stands for Redundant Array of Independent Disks. In simpler terms, it's a technology that allows you to group multiple hard drives (or SSDs) to function as a single unit. What's the benefit? Essentially, it improves performance, storage capacity, and data security , depending on the RAID level you choose.
In Windows 11, you can configure RAID using either software or hardware. Software RAID allows you to create the array using the tools built into the operating system, while hardware RAID relies on the motherboard or special controllers. Software RAID is typically used for data storage , as Windows installation doesn't support RAID on the system drive unless configured in the BIOS before installing the operating system.
Among the main advantages of RAID we find:
- Increased levels of security throughout: You can have an automatic mirror copy of your data.
- superior performance: Combines the speed of multiple discs.
- Increased capacity: Take advantage of the space on all disks.
- Redundancy and fault tolerance: If a disk fails, the system may still function, depending on the RAID level.
RAID Types Supported by Windows 11
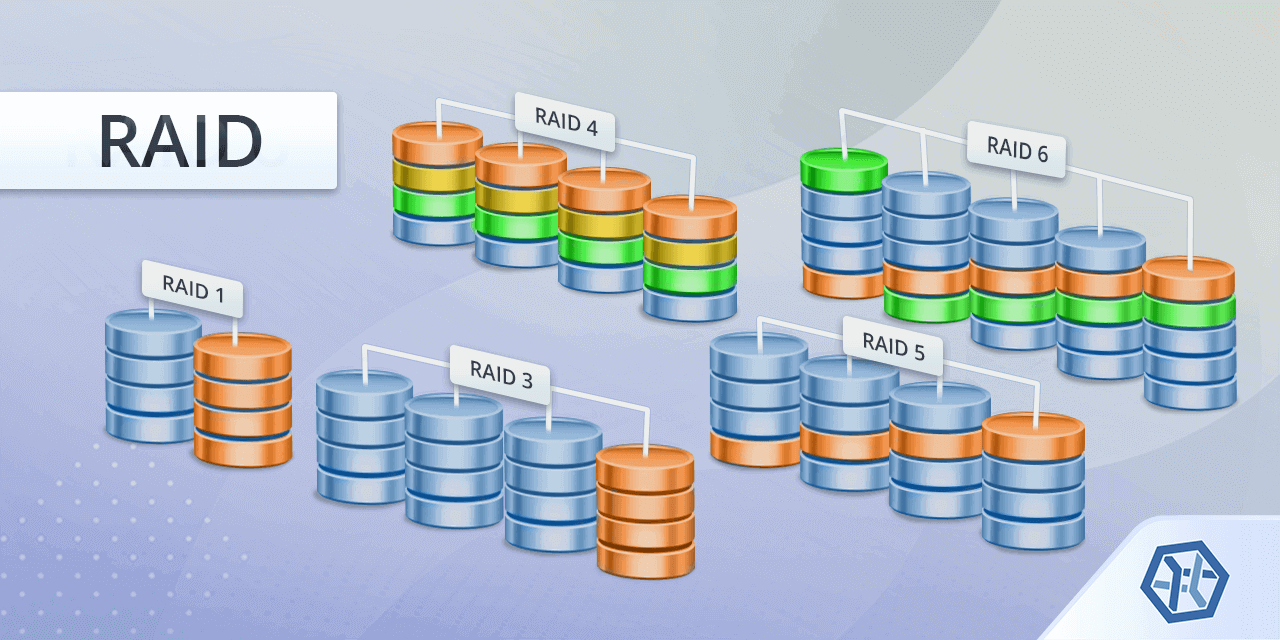
In Windows 11, we find support for various RAID configurations, both from the classic 'Dynamic Disks' functions and from the modern 'Storage Spaces' tool, which has improved greatly compared to previous versions.
These are the most common RAID levels you can configure from Windows 11:
- RAID 0 (Simple or Stripe): Add the capacity and speed of the disks, but does not offer fault toleranceIf one drive fails, you lose everything.
- RAID 1 (Two-way Mirror): Duplicate data across two drives. If one fails, the other contains a copy. Ideal for important data.
- RAID 5 (Parity): It requires at least three disks. It distributes data and parity among all of them, providing security and capacity.
- RAID 6 (Dual Parity): Similar to 5 but with two parity disks (requires five or more disks). Maximum security against multiple failures.
There are other, more advanced types, but they typically require professional controllers or a NAS. Windows 11 lets you create RAID 0, 1, and 5 arrays from Storage Spaces , including the new dual parity option (RAID 6) in the modern WinUI interface.
Built-in tools for configuring RAID in Windows 11
Windows 11 includes several tools that make it easy to create and manage RAID arrays without the need for additional software:
- Storage spaces: The simplest and most modern option, from the Settings app itself.
- Dynamic Disks – Disk Management: Classic method from Windows XP/7/8/10/11 Pro, although somewhat less recommended today.
- diskpart command and PowerShell: For advanced users who want to create RAID from the line commands.
Each method has advantages and limitations, but we'll review them all so you know which one to choose based on your needs.
Configuring Software RAID Using Storage Spaces
The easiest and most robust tool, designed for all users, is Storage Spaces. It allows you to create, manage, and modify RAID groups directly from the Windows 11 graphical interface. With the arrival of the WinUI interface, everything is much more visual and user-friendly. If you want to expand your knowledge of new visual features in Windows 11, you can visit Mica in Windows 11, the new visual material.
Basic steps to create a RAID using Storage Spaces:
- Accede to System → Storage → Storage Spaces in Advanced Storage Settings.
- Click on Create a new pool and storage space.
- Select the available disks (note: you will lose their content).
- Decide the size, name, drive letter, and resiliency type (RAID 0, 1, 5, 6, etc.).
- Select the format (NTFS is the usual), and if you want, customize the cluster size in the advanced options.
- Press on Format and wait for the process to finish.
The array will appear as a new internal drive on your computer, and you can manage its status from the Storage Spaces panel.

Types of resilience available in Storage Spaces
When creating a new space, you can choose from several security and performance models:
- Simple – Equivalent to RAID 0. Fast and adds capacity, but not at all secure.
- Bi-directional mirror – RAID 1. Data is duplicated across two disks, providing maximum protection.
- Three-way mirror – Enhanced RAID 1. Requires a minimum of five disks and protects against multiple failures.
- Parity – RAID 5. Requires a minimum of three disks; combines speed and security.
- Dual parity – RAID 6. Safer against multiple failures, requires at least five disks.
Choose the type of resilience according to the balance you are looking for between speed and protection.
Preparations before creating your RAID in Windows 11
Before creating your arrangement, be sure to follow these steps to avoid loss:
- Make a backupAll data on the disks you add to the RAID will be erased. Don't take any chances!
- Unallocate disks. In Disk Management, check that the disks are unallocated (delete any volumes if they exist).
- Check the size and featuresIt's recommended that all disks have similar capacities and physical sectors to avoid errors. You can use tools like fsutil to check the details.
Configuring RAID from Disk Management
The classic method using dynamic disks is still available in some editions of Windows 11. Previously, it was possible to create RAID 0 and RAID 1 arrays directly from Disk Management, although Microsoft now favors Storage Spaces. If you want to explore other management tools, you can refer to Listing installed programs in Windows using PowerShell.
Step by step to create a RAID from Disk Management:
- Sign in Disk manager (right click on start or search for it in the bar).
- Make sure the disks are unformatted and unpartitioned.
- Right click on one of the disks and select New mirrored volume (RAID 1) or New distributed volume (RAID 0).
- Follow the wizard by choosing disks, capacity, letter and format.
- Confirm and let Windows format and create the volume.
This method may not be available in all editions or offer as much flexibility as Storage Spaces.

Configuring Hardware RAID via BIOS/UEFI
If your motherboard supports RAID (most desktops and many workstations do), you can create the array at the hardware level from the BIOS/UEFI. Additionally, if you'd like to learn more about storage management in Windows, you can review What is a Windows EFI partition and how to manage it.
General steps:
- Enter the BIOS/UEFI at boot time (usually by pressing F2, Del, or F10 depending on the manufacturer).
- Activate RAID mode in the storage configuration, instead of AHCI.
- Access the RAID configuration utility (sometimes it's Ctrl+I or similar).
- Follow the instructions to select disks, RAID type, block size, and name.
- Save changes, exit the BIOS, and if you're installing Windows on that volume, you'll need to load the RAID drivers during installation.
This method is recommended if you want Windows to recognize the RAID from startup, especially if you are installing the operating system on that volume.

How to replace or add disks to your RAID
One advantage of Storage Spaces is that you can easily add disks or replace a damaged one . If Windows detects errors, it will notify you so you can take appropriate action.
- To add a disk, select “Add disks to pool.”
- To replace a defective disk, insert the new one and delete the old one to maintain redundancy without losing data.
How to delete or modify a RAID in Windows 11
To change the settings or delete a RAID, you can do so from the Storage Spaces panel:
- First, remove the spaces created.
- Then, delete the disk group from the properties of each drive.
- The discs will again be available individually.
Please note that these actions will erase your data, so it's essential to have up-to-date backups.
Recover deleted data or a damaged RAID in Windows 11
Have you lost access to your files or is your RAID array corrupted? All is not lost. Tools like RS RAID Retrieve and similar programs can detect and rebuild damaged disks, even in cases of corruption or RAW volumes. To better understand how to manage errors in Windows, you can consult How to Interpret Windows Blue Screen Error Codes.
Limitations and warnings of software RAID in Windows
Setting up software RAID in Windows 11 has some restrictions:
- You cannot RAID the drive where Windows is installed., except in advanced configurations or using hardware RAID.
- Depends on the operating system, so serious problems in Windows can affect access to the RAID (make backups!).
- Some features are limited depending on the Windows edition. (Home, Pro, Enterprise).
- Combining disks with different physical sectors may result in incompatibilities or errors.
Which drives to choose and hardware recommendations
Not all hard drives or SSDs are created equal. For a reliable RAID, it's best to use drives of the same capacity and similar characteristics . While you can mix sizes, you'll lose usable space: the smallest drive will be the RAID limit. For SSDs, you can use M.2 or SATA, but RAID hardware is generally better optimized for traditional HDDs. If you want to learn more about custom storage solutions, see How to create a mini installer in Windows using a BAT script.
For advanced configurations or higher speeds, PCIe expansion cards are available to expand the number of SSDs, aimed at users looking for professional solutions and higher investment.

Passionate writer about the world of bytes and technology in general. I love sharing my knowledge through writing, and that's what I'll do on this blog, show you all the most interesting things about gadgets, software, hardware, tech trends, and more. My goal is to help you navigate the digital world in a simple and entertaining way.