- Plugin paths change depending on the installation type (repository, Flatpak, etc.) Windows) and are confirmed in Preferences.
- Some add-ons of GIMP 2.8 does not work on 2.10; GMIC has adapted builds.
- For Photoshop filters (AKVIS) pspi is used, a 32-bit loader compatible with 32-bit .8bf plugins.
- After copying files, restart GIMP and verify the loading in the Plugins folders to avoid confusion.
If you work with images on a daily basis, you will know that GIMP (GNU Image Manipulation Program) is a real Swiss Army knife for editing and retouching, with the added advantage of being free and cross-platform softwareIt's available for GNU/Linux, macOS, Windows, and other systems, and its community maintains an ecosystem of add-ons that expand its capabilities without paying a fee.
In this article I explain to you, in detail and without beating around the bush, How to install plugins in GIMP in different scenarios: from the classic installation paths in Windows and Linux to the nuances of using packages like Flatpak or Snap. You'll also see real-life cases with highly sought-after add-ons like “Save for Web”, DBP (David's Batch Processor) or support for Photoshop filters (AKVIS) via pspiYou will also have official sites at hand, such as gimp.org and the portal in Spanish www.gimp.org.es, in case you want more information or download the latest version, all in spanish.
Where GIMP places plugins: paths by system and installation type
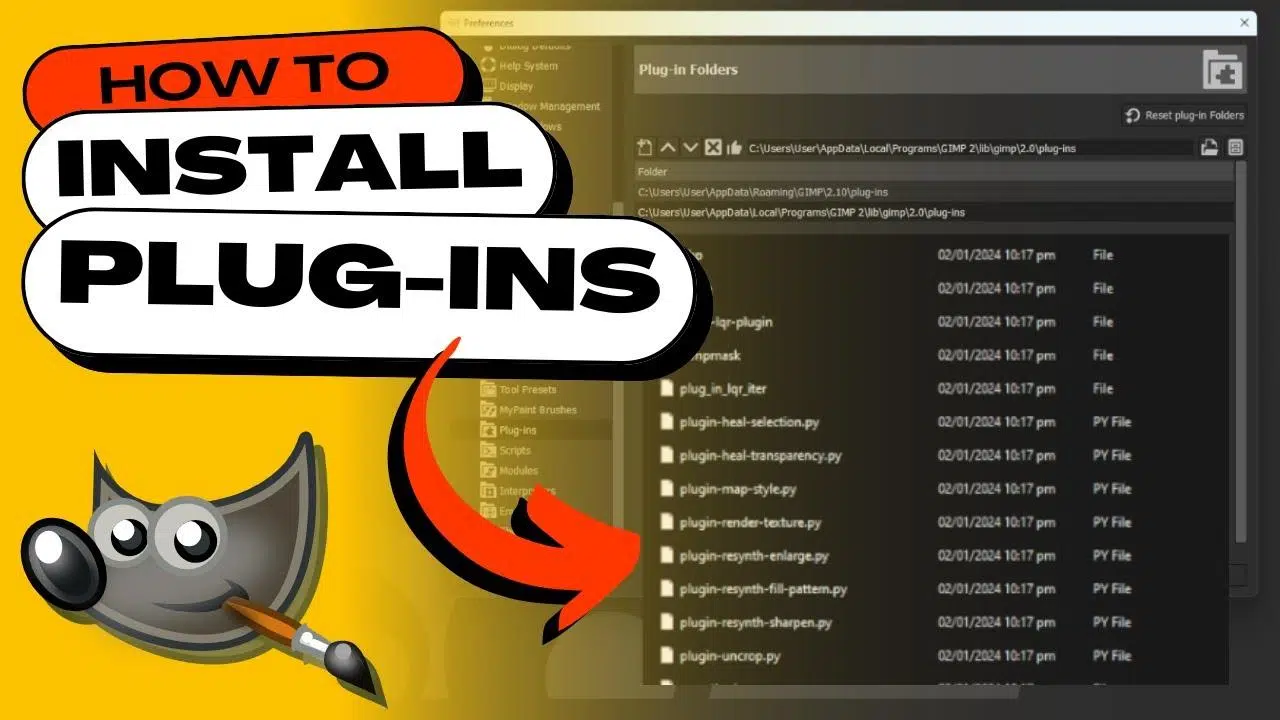
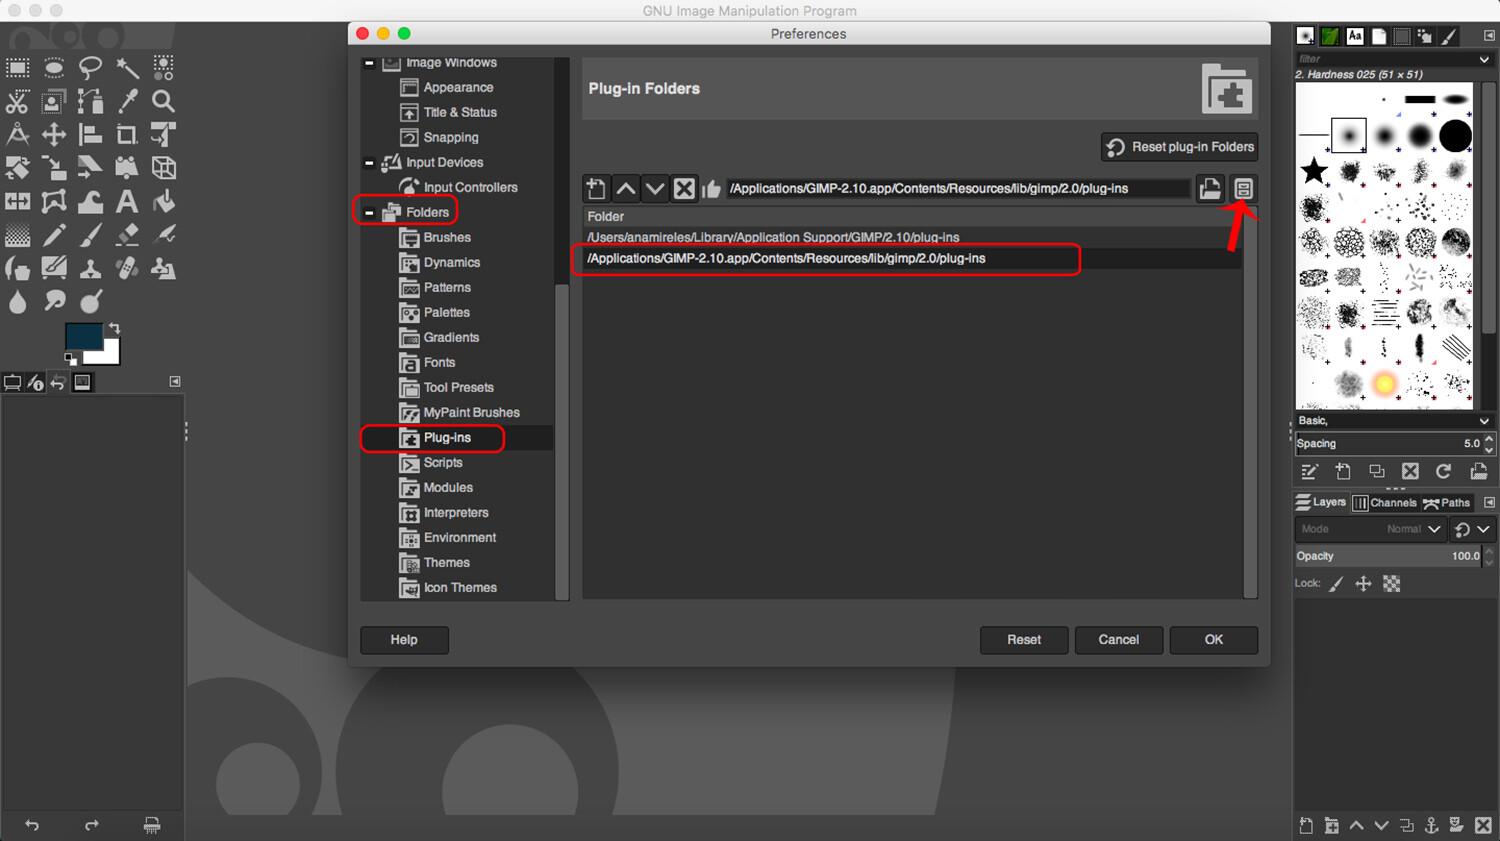
Before copying anything, it is good to know which folders does GIMP read? to load plugins. The cleanest way to view it from the app itself is to go to Edit → Preferences → Folders → Plugins. In that panel all the paths that GIMP scans when starting appear, and you save yourself the trial and error, something that usually saves long time.
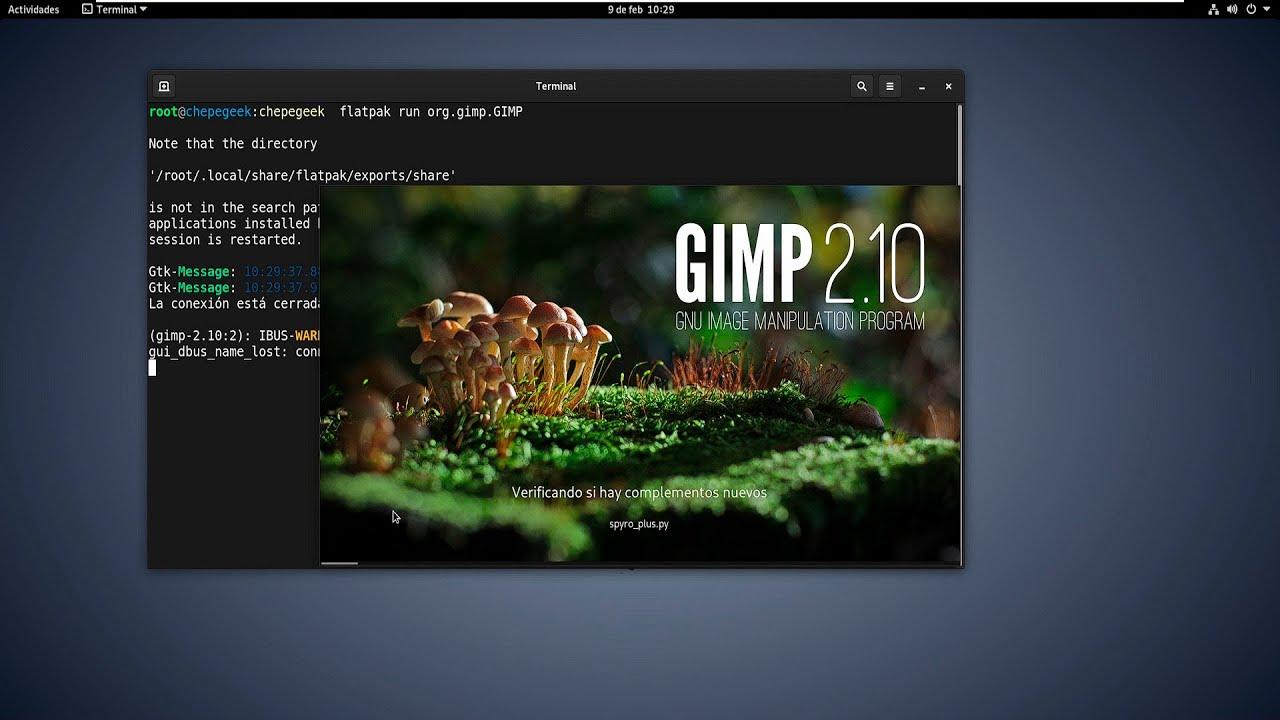
In traditional Linux installations (those from the distro's repositories), the plugin paths are usually the system and user paths. In the case of GIMP installed as Flatpak, you will see two very clear entries in Preferences → Folders → Plugins: ~/.var/app/org.gimp.GIMP/config/GIMP/2.10/plug-ins y /app/share/gimp/2.0/plug-insThe important one for you will be the first one, because it is the user folder where you can copy your plugins without touching anything in the system.
If you use GIMP as Snap The concept is similar: plugins are loaded from specific locations in the package, and generally the path you're interested in will be the user folder that GIMP shows you in Preferences. This way, even though bundling isolates the application, you can activate your extensions without fighting with global permissions.
In Windows, depending on the version, you will find routes like C:\Archivos de programa\GIMP-2.0\lib\gimp\2.0\plug-ins or, for older user profiles, something like C:\Documents and Settings\<usuario>\.gimp-2.6\plug-ins y C:\Users\<usuario>\.gimp-2.6\plug-ins. Although the version number changes, the pattern is the same: the folder plug-ins The profile or the program itself is the one that governs. If you have any doubts, go back to Preferences → Folders → Plugins and copy the exact paths GIMP shows you, so you don't fail.
One last golden note: after copying a plugin, restart GIMP. Plugins are loaded into the Boot; if you don't close and reopen, you won't see the changes even if the copy is correct, and you might go a little crazy checking folders and permissions.
Install the “Save for Web” plugin
Many people come from Photoshop with the "Save for Web" feature built in. GIMP doesn't exactly include that option by default, but it's quickly solved by installing the plugin. Save for Web, which adds a streamlined way to optimize images for the web without going crazy with the export settings.
En Linux You have several possibilities. If you use the educational distro MAX, you'll have it even easier: MAX already integrates GIMP with the “Save for Web” plugin without you having to touch anything, which is very comfortable. On Ubuntu and derivatives, you can install the registry package with the command sudo apt-get install gimp-plugin-registry, which includes this and other popular add-ons. For other distributions, the tarball was formerly used registry.gimp.org and compiles, a useful alternative if you prefer build from source or if there is no package in your repositories.
En WindowsThe process involves downloading the plugin zip and unzipping it. Then, copy the main executable to your profile's plugins folder. Traditionally, the file is called webexport.exe, and you should leave it on routes like C:\Documents and Settings\<usuario>\.gimp-2.6\plug-ins (Windows XP) or C:\Users\<usuario>\.gimp-2.6\plug-ins on more modern systems. Once pasted, close and reopen GIMP and you'll be able to access the feature; you'll see the utility available in the export or filter menus, ready to go. optimize your images.
The advantage of this plugin is clear: it streamlines the workflow for publishing on the web, avoiding the need to get into more technical dialogues when you just want to adjust format, quality, and weight. If you work with a lot of images for blogs, virtual classrooms, or stores, you'll notice the time savings. it is not a small thing.
DBP (David's Batch Processor): Installing on Windows and compiling on Linux
DBP is another classic that many people miss. This batch processor allows you to apply actions to tons of images (resize, convert formats, etc.) and, although it doesn't come installed by default, its installation is simple. totally possible with a few simple steps.
En Windows, the typical sequence is to download the package, unzip it, and copy the executable to the GIMP plugins folder. If you have the file dbp-1.1.8.zip, when you unzip you will get dbp.exe; put that file in the plugins path (for example, C:\Archivos de programa\GIMP-2.0\lib\gimp\2.0\plug-ins). Restart GIMP and DBP will be loaded, ready to automate tasks that, by hand, would take you una ethernidadAnother option is to go to the author's website at http://members.ozemail.com.au/~hodsond/dbp.html and search if there is a more recent edition.
En Linux You can compile it from source. If you have the tarball dbpSrc-1-1-9.tgz, unzip it into your home folder (right click → “Extract here”), which will create the directory dbp-1.1.9You will need the C++ compiler and the GIMP 2 development headers; on Ubuntu you can install them from the Synaptic package manager (search g ++) or from Bus Terminal to sudo apt-get install g++. Additionally, it installs the development libraries with sudo apt-get install libgimp2.0-dev, essential to link the plugin with GIMP 2.
Once that's done, open a Terminal, navigate to the code folder with cd dbp-1.1.9 and run make. If everything compiles without errors, it ends with make install to leave the plugin in place. Close the Terminal, restart GIMP, and DBP will be up and running. This will give you a proper batch process, ideal for those who work with entire folders of pictures.
Flatpak, Snap, and recent versions of GIMP: how to work around the differences
With the arrival of GIMP 2.10 several things changed, and one of the things that has confused people the most is the rise of packages like Flatpak and SnapThey're very convenient for installing recent versions, but sometimes plugins from traditional repositories are installed against the "distro's" GIMP and not against your GIMP Flatpak. The result: you open GIMP and the plugin is "not there," even though it's installed on the system. Don't worry, it can be fixed.
As I mentioned, in GIMP installed via Flatpak you should use the user folder ~/.var/app/org.gimp.GIMP/config/GIMP/2.10/plug-ins. The idea is to download the plugin by hand (for example, the tar.gz package from the metapackage gimp-plugin-registry), unzip and copy inside that folder the correct files for your plugin (often .scm for Script-Fu scripts or binaries if they are compiled plugins). Once pasted, restart GIMP and you will see the plugin available.
Of course, there is an important detail: not all plugins made for GIMP 2.8 they work in GIMP 2.10. Internal changes between versions introduced incompatibilities, so some older add-ons may fail. Fortunately, the most popular ones have been adapted. A well-known case is GMIC, whose plugin for GIMP 2.10 you can download as a zip package from its website and copy it to the corresponding path (for example, in Linux zips are published as gmic_gimp2.10_qt_debian_sid_amd64.zip). Make sure you use the specific edition for your architecture and version of GIMP, otherwise the plugin will not load. correctamente.
If you have installed GIMP from its official website (gimp.org/downloads) to have the latest build, remember that the location of plugins may differ from the repositories. Always check it at Preferences → Folders → Plugins Before copying anything, and if you mix systems (for example, you have the GIMP from the distro and the Flatpak), keep in mind that each one maintains different routes for your accessories.
Photoshop Filters (AKVIS) in GIMP with PSP: What You Need to Know
Who uses GIMP on Windows can load Photoshop filters (format .8bf) via a specific loader: the “pspi” plugin. This small bridge allows GIMP to detect some third-party filters, such as those from AKVIS, and integrate them into its menu. Filters.
The procedure is simple. First, download the package from the pspi plugin (distributed as a zip file). Be careful with this crucial point: this is a bootloader. 32 bits and only works with 32-bit filters, even if your GIMP is 64-bit. Compatibility therefore depends on you using 32-bit versions of AKVIS plugins; otherwise, the loader will not recognize the filters. .8bf.
Unzip the zip and copy the loader executable (pspi.exe) to the GIMP plugins folder. For example: C:\Archivos de programa\GIMP 2\lib\gimp\2.0\plugins. With that done, open GIMP and, within the menu Filters, you'll see an option to configure Photoshop plugins. From that dialog, press the Add Folder button, navigate to the location of your AKVIS plugins (e.g., C:\Archivos de programa (x86)\AKVIS) and confirm with Accept.
Helpful hint: It's a good idea to copy all your filters. .8bf to a separate folder and add only that path to pspi. Keeping them grouped in their own directory makes maintenance easier and prevents mixing files from different manufacturers. After restarting GIMP, you'll find AKVIS filters in the Filters menu and they'll be activated when you open an image. Keep in mind that not all filters will be 100% compatible with GIMP, especially due to differences in how each program handles the selection and canvas.
Quick tips, checks, and best practices
To save yourself a headache, write down these key ideas. First: whenever you install or copy a plugin, restart GIMP to detect it. Second: check the active route in Preferences → Folders → Plugins and use that one, not a "similar" one. Third: if you have two GIMP installed (for example, the one from the distro and the Flatpak), the plugin may have ended up in the one you don't use; check it and adjust the copy to the folder that your program actually reads. GIMP main.
Another useful check: if the plugin is a script (.scm), place it where GIMP expects Script-Fu; if it's an executable or binary, make sure it goes to the folder plug-ins. Don't mix versions: An old plugin for 2.8 may fail on 2.10; look for builds specific to your version. When in doubt, check the plugin's official website or its page on the record of plugins.
If you are working with Linux and you have to compile (as in the case of DBP), remember to first install the development dependencies, in particular libgimp2.0-dev and a C++ compiler (g++). On Ubuntu you can use Synaptic: open System → Administration → Synaptic Package Manager, search g ++, mark and install; or go to Terminal and run sudo apt-get install g++. Without those libraries, the make It will give you errors and you won't be able to to install the plugin.
For plugins packaged by the distro (such as gimp-plugin-registry on Ubuntu), if you use GIMP Flatpak it is likely that the package will be installed against the system GIMP. The practical solution is to download the tar.gz, extract and copy the files that GIMP needs yourself to ~/.var/app/org.gimp.GIMP/config/GIMP/2.10/plug-insThis maneuver avoids the packaging limits and leaves the plugin exactly where GIMP Flatpak puts it. waiting.
Don't forget reliable sources for documentation and downloads: the official site gimp.org and its Spanish portal gimp.org.es They offer guides, manuals, and links to updated builds. If the distro you use offers an older GIMP and you'd prefer something newer, gimp.org/downloads You'll find instructions for your system, including Flatpak options that are often more up-to-date than the repositories.
To close the circle, let's review the important names that have emerged. "Save for Web" gives you quick control to optimize images; DBP lets you process entire batches in just a few clicks; pspi opens the door to Photoshop filters (like those in AKVIS) on Windows, as long as they are 32 bits. And finally, GMIC stands out as a very powerful plugin that already has builds adapted to GIMP 2.10, something essential if you don't want to fight with incompatibilities between versions.
You now have a clear roadmap: identify your installation type (distro repos, Flatpak, or direct installation), confirm the paths in Preferences, copy the plugin files to the correct location, and restart GIMP. By following these four steps, you'll be able to add features to GIMP like "Save for Web," manage batches with DBP, load AKVIS filters with pspi, or add GMIC, regardless of whether you're on Linux or Windows, and without Flatpak or Snap playing tricks on you. pass.
Passionate writer about the world of bytes and technology in general. I love sharing my knowledge through writing, and that's what I'll do on this blog, show you all the most interesting things about gadgets, software, hardware, tech trends, and more. My goal is to help you navigate the digital world in a simple and entertaining way.