- Windows 11 y Windows 10 can work with VLANs, but they depend heavily on network driver support and often only allow one VLAN ID per physical interface.
- Manufacturers like Realtek, Intel Broadcom includes its own utilities and cmdlets that allow you to create multiple virtual adapters with different VLAN IDs on a single card.
- In Windows Server, NIC Teaming and Hyper-V (including Switch Embedded Teaming) allow you to manage multiple VLANs per NIC without needing drivers external, both for the host and for the Virtual machines.
- Many VLAN connectivity problems are due to mismatches between the configuration of the trunk switch, the hypervisor, and the VLAN configured within Windows or the VM.
Setting up a VLAN in Windows 11 might seem complicated at first, especially if you're coming from environments like Hyper-V and VMware , unraid, or managed switches where the VLAN concept is well-established. However, by understanding Windows limitations, network driver options, and available tools, you can achieve a fairly flexible environment, both on desktops and servers.
In this article, we'll take a step-by-step look at how to work with tagged VLANs (802.1Q) in Windows 11, Windows 10, and Windows Server . We'll cover what each edition can do, what hardware depends on (Intel, Realtek, Broadcom, etc.), how to leverage PowerShell , and how to integrate VLANs with Hyper-V for virtual machines. We'll also address several common real-world problems, such as a lack of connectivity in a Windows 11 VM on an unRAID VLAN or the need to separate iSCSI traffic into its own VLAN.
Basic concepts: what a VLAN is and what you need in Windows
A VLAN (Virtual LAN) according to the IEEE 802.1Q standard is, simply put, a way to divide a physical network into several logically separate networks. Each network packet can include a VLAN tag (VLAN ID from 1 to 4094) that indicates which virtual network that traffic belongs to.
The beauty of VLANs is that they allow you to segment the network, reduce broadcast domains, and isolate traffic (for example, separating the user network, the management network, the iSCSI storage network , or the WiFi guest network) without having to run more cables or install more physical switches.
For VLAN tagging to work, both the switch or router (trunk port) , the network card, and the operating system must understand 802.1Q. In practice, this means:
- Physical network adapter whose driver supports VLAN 802.1Q labeling.
- Managed switch or router (Cisco, HP, Mikrotik, etc.) configured with trunk and/or access ports, with the VLANs you will use.
- In Windows, a method to Assign VLAN ID to the physical NIC or virtual NICs (manufacturer's driver, dedicated tools, PowerShell or Hyper-V).
Multiple VLANs are allowed on a trunk port of a switch (or router, such as a Cisco ASR920 from an ISP). The port typically has one untagged native VLAN (PVID) and several tagged VLANs, such as untagged VLAN 1 and tagged VLANs 70, 71, and 80. The device connected to this port must be able to send and receive these tags; otherwise, it will only see the native VLAN.
Limitations and possibilities of Windows 10 and Windows 11 with VLAN
In desktop editions, such as Windows 10 and Windows 11 , VLAN support is considerably more limited than in Windows Server. By default, most drivers simply ignore any 802.1Q tags received through the physical interface, so the system only sees the port's native VLAN.
Even so, there are several approaches to getting Windows 11 to work with VLANs, from using advanced driver options to leveraging Hyper-V and virtual switches . It's important to fully understand what your machine is capable of before you get bogged down in switch configuration.
Configure a VLAN from the network adapter properties
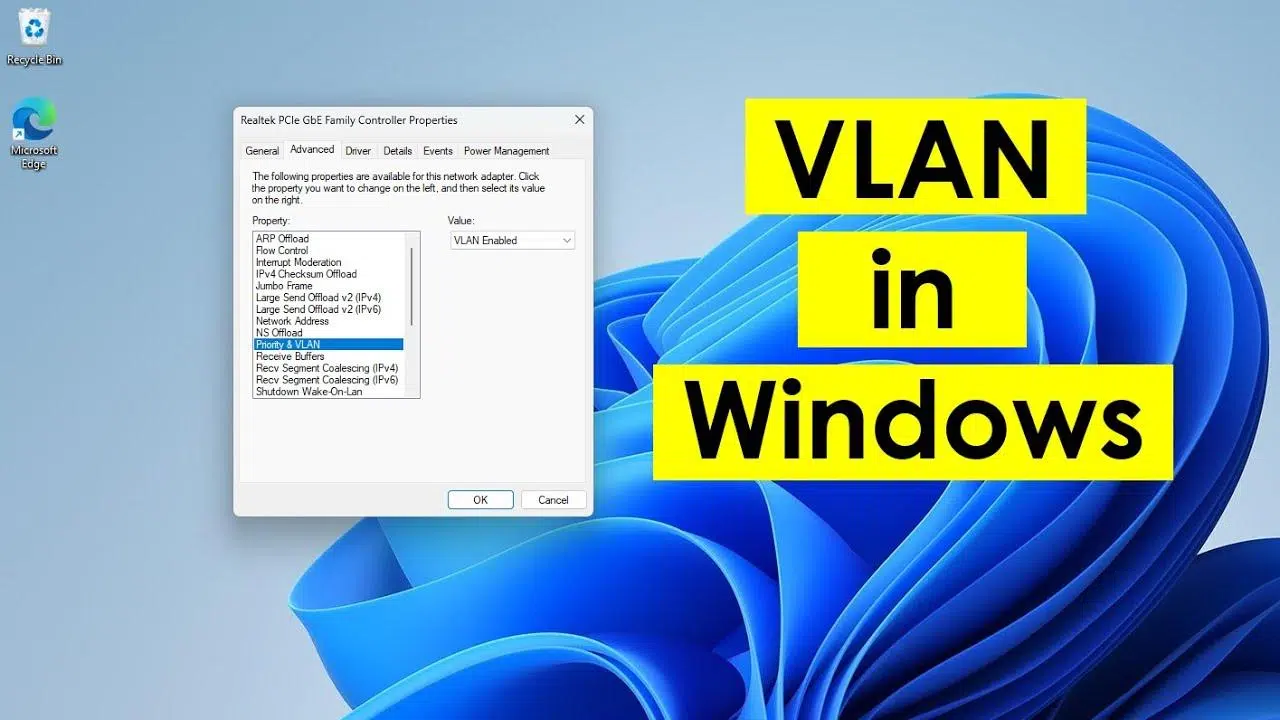
Some network adapters allow you to directly define a VLAN ID in the device's advanced settings . In Windows 10 and 11, this usually limits you to a single VLAN per physical interface, but for many home or office scenarios, this may be sufficient.
The general steps would be:
- Open the Device administrator (devmgmt.msc).
- Expand the section Network adapters and open the properties of the NIC you want to use.
- Go to the tab Advanced or similar.
- Find a property type VLAN ID, VLAN Identifier, 802.1Q VLAN or similar.
- Enter the VLAN number you want to use, for example 20, 24, 80, etc.
- In some models, you first need to activate a certain option. Packet Priority and VLAN to allow labeling.
With this method, all outgoing traffic from that card will be tagged with the VLAN you configured , and Windows will only expect incoming traffic with that same ID. It's a straightforward solution, but it only gives you one logical interface per NIC.
Assigning a VLAN with PowerShell in Windows 10/11
In modern versions of Windows 10 and Windows 11, there is an option to configure a single VLAN ID directly on an interface using PowerShell and the Set-NetAdapter cmdlet . The idea is similar to the previous method, but controlled via the command line.
Basic example for setting VLAN 24 on the "Ethernet0" adapter:
Set-NetAdapter -Name "Ethernet0" -VlanID 24
This command tells the system that the "Ethernet0" adapter will operate on VLAN 24. From there, you can configure an IP address on the associated network (for example, 192.168.24.10/24) and the connection will work as long as the switch has the port in trunk or access mode compatible with that VLAN.
Use of manufacturer tools: Realtek, Intel, Broadcom and others
Some manufacturers offer much more powerful utilities than the default Windows options for managing VLANs. These tools allow you to create multiple virtual interfaces on the same physical network card, each with its own VLAN ID.
Typically, you'll need to download and install the latest driver and the manufacturer's official utility to enable full 802.1Q support. Not all models support it, so it's always a good idea to check the controller's specifications.
Multiple VLANs on a Realtek card in Windows 10/11
On Realtek cards that support 802.1Q labeling (for example, RTL8169SC type controllers and similar) you can use the Realtek Ethernet Diagnostic Utility , an application for Windows 7/8/10/11 that, in addition to diagnostics, allows you to create virtual NICs.
The general procedure is:
- Check on the Realtek website that your network chip model supports VLAN tagging.
- Download and install the latest driver and the "Realtek Ethernet Diagnostic Utility" tool.
- Open the utility and enter the section VLAN.
- Pulsar Add or "Add" and enter the Desired VLAN ID.
- Repeat the operation to create as many logical VLANs as you need.
After doing this, new virtual adapters will appear in the Windows network connections panel , each associated with a different VLAN ID. You can assign each of them its own IP configuration (subnet, gateway, DNS, etc.) just like any other network card.
If you're still having trouble getting the VLAN to work (as some users experience when trying to use VLANs on Windows 11 VMs with unraid or VMware ), it's very possible that the Realtek driver isn't correctly implementing VLAN tagging with that specific hardware and software combination. In these cases, you might need to:
- Try alternative drivers or older/newer versions.
- Consult with the Realtek technical support if there is official VLAN support for your hardware ID.
- Assess the use of another network card with better VLAN support if segmentation is critical.
VLAN configuration on Intel cards (Intel ANS and PROSet)
Intel has offered Intel Advanced Network Services (ANS) for years to create VLANs and teaming on its adapters. Traditionally, installing the driver and the Intel PROSet option for Device Manager along with "Advanced Network Services" would display a specific VLAN tab in the physical NIC properties where you could create multiple labeled interfaces.
The problem is that in modern builds of Windows 10 and Windows 11, this feature is no longer supported in the classic panel , displaying messages like:
Intel(R) Advanced Network Services (Intel(R) ANS) Teams and VLANs are not supported on Microsoft Windows 10.
Even so, Intel has been releasing new versions of drivers and the Intel PROSet tool which, combined with PowerShell, once again allow VLAN management on many NIC models. After installing the appropriate version, cmdlets from the IntelNetCmdlets module can be used to create virtual adapters.
Import the Intel module:
Import-Module -Name "C:\Program Files\Intel\Wired Networking\IntelNetCmdlets\IntelNetCmdlets" -Scope Local
Create an untagged virtual adapter (native VLAN, VLAN 0):
Add-IntelNetVLAN -ParentName "Intel(R) Ethernet Connection I219-LM" -VLANID 0
Create a virtual adapter in a specific VLAN, for example VLAN 103 :
Add-IntelNetVLAN -ParentName "Intel(R) Ethernet Connection I219-LM" -VLANID 103
List all adapters (physical and virtual) visible to Windows:
Get-NetAdapter
Remove a VLAN that you no longer want to use:
Remove-IntelNetVLAN -ParentName "Intel(R) Ethernet Connection I219-LM" -VLANID 103
Broadcom and other manufacturers offer a similar approach through utilities such as Broadcom Advanced Control Suite , which allow you to create groups of interfaces and assign different VLAN IDs to them.
VLAN on Windows Server 2012 R2, 2016, 2019 and 2022 without third-party drivers
In server systems, especially from Windows Server 2012 R2 onwards , Microsoft offers native tools to manage multiple VLANs on the same physical NIC, without the need for special drivers (provided the card supports tagged traffic). One of the most flexible options is NIC Teaming (LBFO).
Let's imagine a very typical scenario: a Windows server connected to a trunk port with PVID 1 and VLANs 70, 71, and 80 tagged . The server is already running on the production network with an IP address like 192.168.2.1 (VLAN 1), but you need to set up an iSCSI target on VLAN 80 for storage, so that the host can see the LUNs and then expose them to virtual machines using VHDX.
The correct way to do this in Windows Server is to create additional logical interfaces associated with the tagged VLANs, either through NIC Teaming or, if you use Hyper-V, through virtual switches and dedicated management adapters.
Configuring multiple VLANs with NIC Teaming (Windows Server 2016/2019/2022)
With NIC Teaming, you can group one or more physical network cards into a "team" and, from there, define multiple virtual interfaces , each linked to a VLAN. The general process in Server Manager would be:
- OPEN server administrator and in the part of Local properties click on the link NIC Teaming Configuration.
- In the section Equipment, click on Tasks > New teamGive it a name (for example, "vTeam") and add the physical NICs you want to group.
- Once the team has been created, go to the section Adapters and interfaces and, in Tasks, select Add interface.
- Specify a name for the interface (for example, "VLAN80-iSCSI") and the corresponding VLAN ID, in this case 80.
- Repeat the process for as many VLANs as you need, keeping in mind that each device can have up to 32 virtual NICs with unique VLANs.
- Check that in
ncpa.cplThe new adapters appear and configure IP addresses, subnet masks, gateways, and DNS using the GUI or PowerShell.
In PowerShell, creating a VLAN interface on an existing device is as simple as :
Add-NetLbfoTeamNic -Team vTeam -VlanID 24 -Name VLAN24
Then you can assign an IP address and gateway to that VLAN with:
New-NetIPAddress -InterfaceAlias VLAN24 -IPAddress 192.168.24.10 -PrefixLength 24 -DefaultGateway 192.168.24.1
And set up DNS servers for that interface:
Set-DnsClientServerAddress -InterfaceAlias VLAN24 -ServerAddresses 192.168.24.12
In this way, the server can communicate simultaneously through the production VLAN, the iSCSI VLAN, and any other VLAN you need, as long as the switch port is correctly configured as a trunk.
Making VLANs and Hyper-V coexist in Windows Server
When the server also has the Hyper-V role , things get a bit more interesting, because you can use both the NIC Teaming approach and the Hyper-V virtual switch approach with VLANs . It's important to note that in Windows Server 2022, classic LBFO teaming is deprecated , and Microsoft recommends using Switch Embedded Teaming (SET) with Hyper-V.
In any case, the goal is usually the same: to create a virtual switch associated with one or more physical NICs and, from there, assign VLANs to the virtual adapters that will be used by the host itself (management operating system) and the virtual machines.
VLAN with Hyper-V in Windows Server and Windows 10/11 Pro
Hyper-V isn't limited to Windows Server; it's also available as an optional feature in Windows 10/11 Pro and Enterprise . One of its major advantages is that it allows you to manage VLANs at the virtual switch and VM adapter level without relying heavily on the type of physical network card (as long as it supports 802.1Q on the switch port).
To enable Hyper-V on a supported edition of Windows 10/11 you can use:
Enable-WindowsOptionalFeature -Online -FeatureName:Microsoft-Hyper-V -All
Once installed, you can create virtual switches from the Hyper-V Manager or with PowerShell, and assign VLANs to both the management operating system and the virtual machines.
Allow a virtual switch to use a specific VLAN
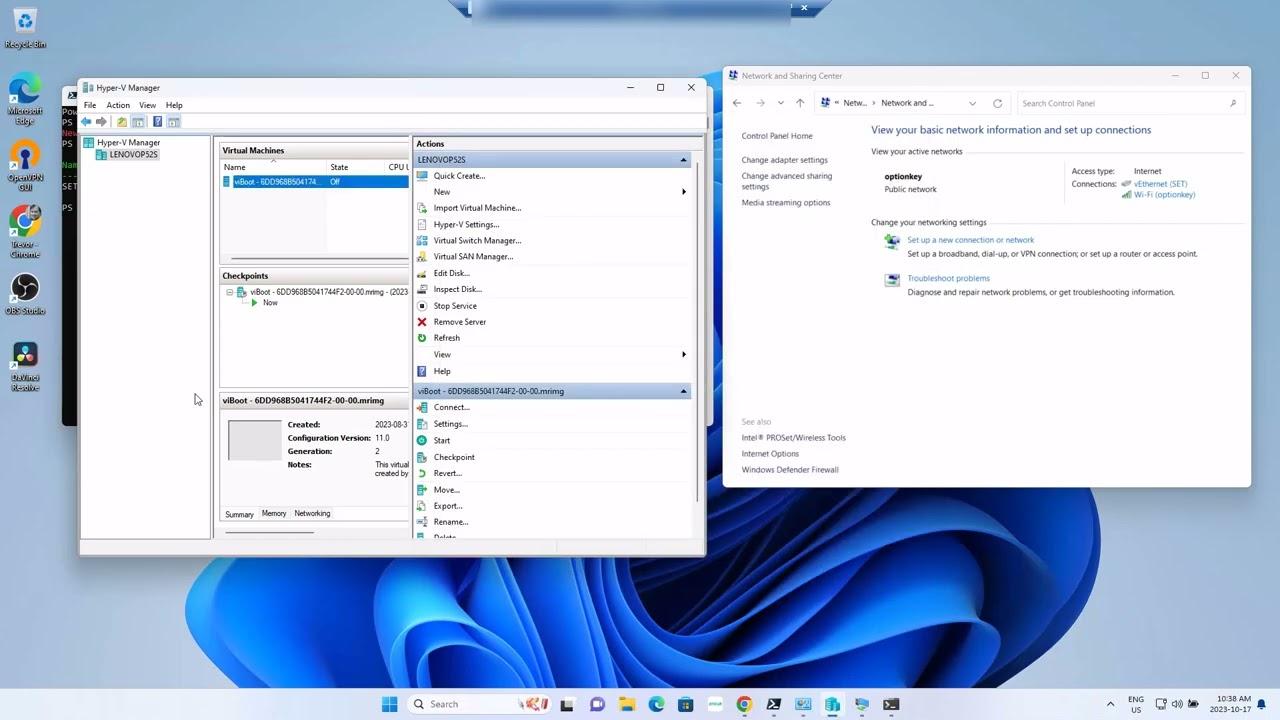
When you create an external virtual switch in Hyper-V and connect it to a physical NIC that supports VLANs, you have the option to assign a VLAN ID to the host's own traffic (the so-called "management operating system"). The GUI procedure is as follows:
- In Hyper-V Manager, in the right-hand panel, open Virtual Switch Manager.
- In the list of Virtual Switches, select the external switch connected to the physical NIC.
- In the section of VLAN Identifier, activate the box Enable virtual LAN identification for the management operating system.
- Enter the VLAN number that the host will use for its management traffic (for example, 10, 20, 80…).
- Pulsar Accept to apply the changes.
All traffic passing through the physical adapter associated with the virtual switch will be tagged with the VLAN ID defined when generated by the host operating system. In turn, virtual machines connected to that switch can have their own VLAN ID at the VM adapter level.
Assigning a VLAN to a virtual machine in Hyper-V
To ensure a virtual machine only sees traffic from a specific VLAN, you need to configure VLAN identification on its virtual network adapter . Again, the GUI process is straightforward:
- In Hyper-V Manager, in the list of virtual machines, right-click on the VM and choose Configuration (or select it and press Settings in the right panel).
- In the menu of Hardware, select the Network adapter to which the corresponding virtual switch is connected.
- go to section VLAN ID and check the option Enable virtual LAN identification.
- Enter the same VLAN ID that you configured on the switch, or the one you want to use for that specific VM if the switch is in trunk mode.
- Save changes with Accept.
If the virtual machine needs to work with multiple VLANs (for example, one interface in the production VLAN and another in a backup VLAN ), you can:
- Add more virtual network adapters connected to the corresponding switches, each with its VLAN ID.
- Or configure the adapter in trunk mode using the cmdlet
Set-VMNetworkAdapterVlanto allow a list of specific VLANs.
Advanced VLAN management in Hyper-V with PowerShell
If you prefer automation (or have many VLANs), you can create management and VM adapters with VLANs directly from PowerShell. A typical workflow would be:
Create a virtual switch linked to a physical adapter:
New-VMSwitch -Name vSwitch2 -NetAdapterName "Ethernet0" -AllowManagementOS $true
Add a management adapter to a specific VLAN (for example, 24):
Add-VMNetworkAdapter -ManagementOS -Name VLAN24 -StaticMacAddress "11-11-AA-BB-CC-DD" -SwitchName vSwitch2

Set-VMNetworkAdapterVlan -ManagementOS -VMNetworkAdapterName VLAN24 -Access -VlanId 24
This adapter will appear as another network card in the system, associated only with VLAN 24. You can repeat the process for other VLANs and, if you have virtual machines, assign them specific VLANs with:
Set-VMNetworkAdapterVlan -VMName "MiVM" -Access -VlanId 30
To list the VLANs of all VMs:
Get-VMNetworkAdapterVLAN
When working with Windows Server 2022 and Hyper-V, instead of classic NIC Teaming, it's advisable to use Switch Embedded Teaming (SET) . For example, to create a switch with embedded teaming across two physical NICs:
New-VMSwitch -Name HVVLANSwitch1 -NetAdapterName "Ethernet3","Ethernet4" -EnableEmbeddedTeaming $true
Then you can create management adapters on different VLANs:
Add-VMNetworkAdapter -ManagementOS -Name "VLAN22" -StaticMacAddress "XX-XX-XX-XX-XX-XX" -SwitchName HVVLANSwitch1

Set-VMNetworkAdapterVlan -ManagementOS -VMNetworkAdapterName "VLAN22" -Access -VlanId 22
If you want an adapter to receive traffic from multiple VLANs, you can switch to trunk mode and define a range of allowed VLANs and a native VLAN:
Get-VMNetworkAdapter -Name "tuAdaptador" | Set-VMNetworkAdapterVlan -Trunk -AllowedVlanIdList 40-69 -NativeVlanId 0
In this case, the -NativeVlanId 0 parameter indicates that VLAN 0 is used as the native VLAN for untagged traffic. This allows you to manage complex scenarios without needing multiple physical NICs.
Common problems and practical considerations when configuring VLANs in Windows 11
When working with VLANs in Windows 11 and mixed environments (Hyper-V, VMware, unraid, carrier routers, etc.), it's very common to encounter seemingly inexplicable connectivity problems . In many cases, the issue lies in how each platform interprets and applies 802.1Q tags.
A typical example is a Windows 11 VM running on unraid. The user configures a VLAN in the network portion of unraid, changes the VM's interface to a bridge type br0.20 (associated with VLAN 20), but when the machine powers on, it cannot access the internet. In these cases, it is essential to check:
- That the switch or router The port to which the unraid host is connected has the port as a trunk with VLAN 20 allowed.
- That the hypervisor (unraid, Hyper-V, VMware) The VLAN is correctly applied to the VM's virtual port.
- That within Windows 11, a different VLAN is not being forced through the virtual NIC driver.
- That the VM's IP configuration (IP, mask, gateway) actually corresponds to the network of that VLAN.
Something similar happens when comparing the behavior between Hyper-V and VMware : Hyper-V allows you to easily set the VLAN ID on both the virtual switch and each VM adapter, while in VMware ESXi/ESX there are three different tagging methods:
- EST (External Switch Tagging)All labeling is done on the physical switch, and the port groups on the virtual switch carry VLAN 0.
- VST (Virtual Switch Tagging)The virtual switch handles the labeling; each group of ports has a specific VLAN ID.
- VGT (Virtual Guest Tagging): it is the very virtual machine who labels traffic, so the port group is usually in trunk.
If setting the VLAN ID on the VM adapter works in Hyper-V but not in VMware, you may be mixing modes (for example, using VGT when the switch port expects VST) or your physical NIC driver may have lost tagging capability , as has happened with some Intel models in certain versions of Windows.
In particularly tricky cases , you might have to resort to:
- Tests with others NIC models (Intel, Broadcom, Mellanox…).
- Detailed review of the trunk port configuration of the operator's switch or router (such as a Cisco ASR920).
- Contact the manufacturer's support (Realtek, Intel, VMware) to confirm what is actually supported on the specific combination of hardware, firmware, and operating system.
Ultimately, working with VLANs in Windows 11 and server versions requires a thorough understanding of the limitations of your specific edition, the capabilities of your drivers, and the behavior of your hypervisor . With the right drivers (Realtek, Intel, Broadcom), the use of PowerShell for VLAN assignment, and, when necessary, support from Hyper-V and NIC Teaming/SET, it's possible to set up scenarios with multiple logical networks (production, iSCSI, management, backup, lab, etc.) on a small number of physical interfaces without compromising security or performance.


Passionate writer about the world of bytes and technology in general. I love sharing my knowledge through writing, and that's what I'll do on this blog, show you all the most interesting things about gadgets, software, hardware, tech trends, and more. My goal is to help you navigate the digital world in a simple and entertaining way.