- ASUS Sonic Studio integrates with official Realtek drivers and consolidates equalizer, sound effects, and profile management into a single interface.
- The equalizer, along with Bass Boost, Voice Clarity, Smart EQ, Reverb and Surround, allows you to adapt the audio to games, music and movies according to the type of headphones and personal tastes.
- Perfect Voice and Casting Enhancer improve microphone and stream audio by cleaning up noise, stabilizing volume, and applying effects to recordings and live streams as well.
- Sonic Studio III adds multi-output control and per-device profiles, although it can be finicky with updates. Windowswhich sometimes forces you to reinstall drivers or look for external alternatives.
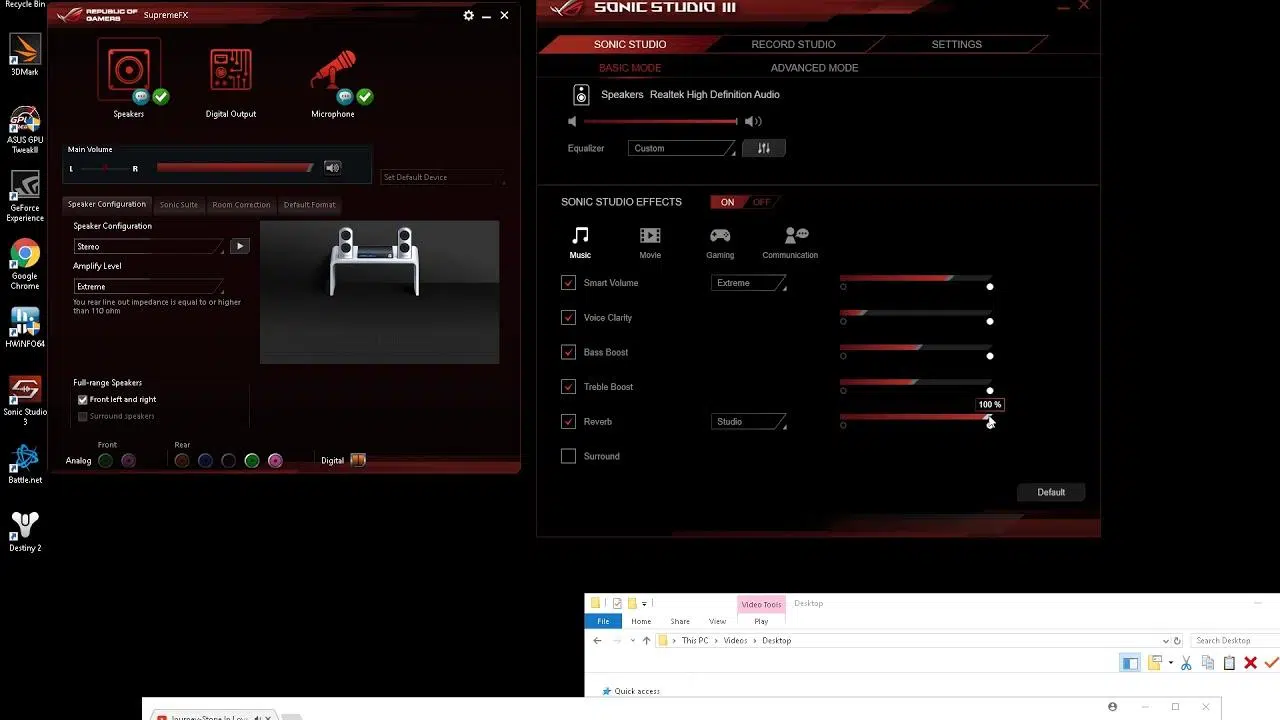
If you play PC games with an ASUS motherboard, you may very well have Sonic Studio installed without even realizing it. This small audio suite hides a powerful equalizer and a good number of effects that can make the difference between flat sound and a fully immersive experience, whether in games, movies, or music.
The problem is that many people open Sonic Studio once, tweak a couple of things, and then close it for good. Properly configuring the equalizer and other options in ASUS Sonic Studio isn't complicated , but it's helpful to understand what each control does, how the program is actually installed, and what to do when Windows Update decides to mess everything up. Let's look at it step by step, with a very practical approach and clear explanations.
What is ASUS Sonic Studio and how do I actually install it?
Sonic Studio (in its Sonic Studio II and Sonic Studio III versions) isn't just any app you download randomly. It's an audio suite developed by ASUS that integrates with the Realtek drivers specific to each motherboard , offering a central panel to control sound effects, equalization, and microphone enhancements.
Many people are going crazy looking for a separate Sonic Studio installer, but it's important to understand this: Sonic Studio doesn't have its own installer; it's included within the Realtek audio driver found on the official support page for your ASUS motherboard model. If you try to use generic Realtek drivers downloaded from another website, Sonic Studio will most likely not even appear on your system.
To check if you have it installed correctly, the recommended procedure is simple: download the audio drivers for your exact motherboard model from the official ASUS website , uninstall any previous audio drivers (if you're really fed up, even from Device Manager ), restart your computer, and then install the new driver package. Once finished, Sonic Studio should appear among your system applications.
On ROG motherboards and mid-to-high-end gaming models, Sonic Studio II or Sonic Studio III usually comes pre-installed. If you format your computer or perform a full Windows update and it disappears, the solution is always to revert to the official ASUS drivers , not to download any random executable from dubious websites.
General interface and structure of Sonic Studio II and III
Once you open Sonic Studio, you'll see that the interface is organized into several sections with tabs or blocks. The idea is that you have the output sound effects (what you hear) on one side and the input enhancements (what comes out of your microphone) on the other , as well as some special streaming functions.
Sonic Studio II focuses on classic audio effects control: equalizer, Bass Boost, Voice Clarity, Smart EQ, Reverb, and Surround , plus Perfect Voice for microphones and the Casting Enhancer module. Sonic Studio III retains these concepts but takes a leap forward in audio routing control, allowing you to assign specific applications to specific outputs (TV, speakers, headphones).
In addition, almost all versions include a quick profiles section (Game, Music, Movie, etc.), a master toggle button to activate or deactivate Sonic Studio, and a general volume control. Everything you do with the equalizer and effects is saved to the currently selected profile , so it's worth taking a few minutes to fine-tune everything.
It's important to understand that Sonic Studio works with the digital signal before it leaves the PC. This means it's compatible with virtually any headphones or speakers you connect to your computer , regardless of the brand or connection type (jack, HDMI, etc.), as long as the audio passes through the motherboard's Realtek codec.
Main Audio Controls: Equalizer, Bass Boost, Voice Clarity, Smart EQ, Reverb and Surround
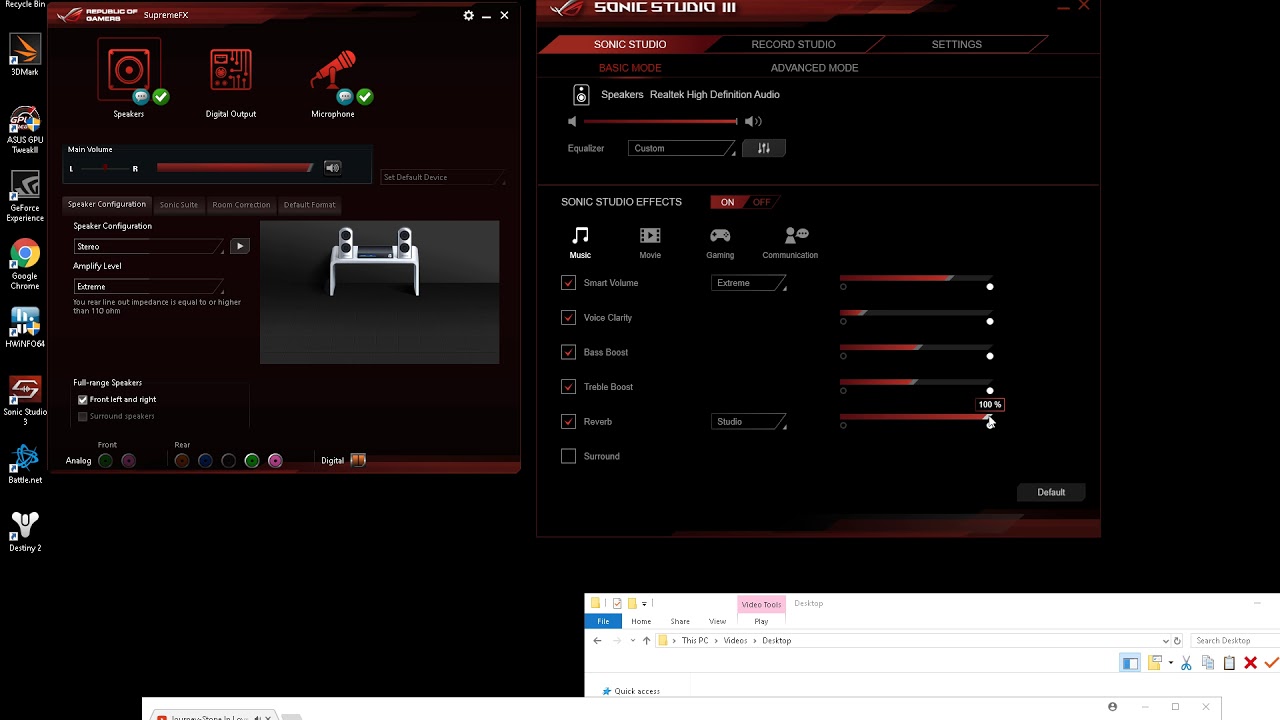
The heart of Sonic Studio's sound settings is the output effects section, where you'll find the controls that most significantly transform the audio. Each control has an activation checkbox and, in many cases, a slider or advanced settings to fine-tune the result to your liking.
Equalizer: the foundation of your personalized sound
The equalizer is probably the most important tool in all of Sonic Studio. If you also want to enhance the Windows 11 equalizer , adjusting it can complement your setup. By checking the Equalizer box, you activate a set of frequency bands (bass, mids, and treble) that you can modify by raising or lowering each slider depending on the desired result.
When the equalizer is active, the Advanced Equalizer Settings are unlocked . From there you can do two things: manually adjust each frequency band to create your own profile or select one of the presets included with the program . These presets typically include modes geared towards gaming, music, movies, or different sound styles.
The Preset Equalizer option shows you which profile is currently active. If you choose a preset, it's applied instantly, but you can always tweak it and save it as a custom profile to switch between depending on what you're doing on your PC.
If you use well-known, specialized headphones, such as the Sennheiser HD 598 or the GAME ONE (which are essentially 598s with a microphone), Sonic Studio 3 may include presets designed for them. Even so, slightly adjusting the equalizer sliders is often key to correcting dull audio , increasing footstep clarity in FPS games, or reducing excessive bass in electronic music.
Bass Boost: when you want more bass punch
The Bass Boost control is used to enhance the low frequencies of the sound . When you activate it, a slider appears that allows you to intensify or soften the bass boost, depending on whether you want it more subtle or more powerful.
This effect is most noticeable in explosions, gunshots, engines, and other impactful sounds in games and movies. Used sparingly, it creates a sense of depth, but too much can blur voices and obscure important details , so it's best to test it point by point while listening to a representative scene.
Voice Clarity: so that voices can be understood amidst the chaos
The Voice Clarity option is designed to improve the intelligibility of voices in the audio you hear . It doesn't affect your microphone, but rather what comes through your headphones or speakers: movie dialogue, NPCs in games, broadcasts, etc.
When activated, Sonic Studio detects and enhances the typical frequencies of the human voice, slightly cutting or boosting other frequencies to make them less prominent. It's ideal when you have very loud music, explosions, and sound effects and can barely understand what the characters are saying —a common problem in many AAA titles.
Smart EQ: automatic equalization for those who don't want to complicate things
If you don't feel like moving sliders and want the program itself to handle the fine-tuning, Smart EQ (sometimes called Smart Volume or Smart EQ within Sonic Studio) automatically adjusts the frequencies of the audio content to maintain deep bass and clear treble without you having to touch anything.
The logic behind this mode is that the system continuously analyzes the signal and corrects it on the fly. It's a kind of equalization "autopilot" designed for users who simply want good overall sound without getting into technical details . However, if you're a real audiophile, you'll probably prefer to leave Smart EQ disabled and use your own equalizer curve.
Reverb: simulating different spaces and environments
The Reverb section adds reverberation to the signal to simulate the acoustics of different environments , from small rooms to huge spaces like stadiums or concert halls. It's activated by checking its box, and then you can choose from several presets.
The Reverb Preset option lets you choose the type of ambient space you want to simulate , which changes how the sound is "stretched" and diffused. When properly adjusted, this can make a game or soundtrack sound much more spacious and immersive, but too much reverb can muddy subtle details. Ideally, use it judiciously and only when you're aiming for a very specific effect.
Surround: Virtual surround sound for stereo headphones
The Surround function generates a surround sound effect using simple two-channel stereo headphones . You don't need a physical 5.1 system: the software creates the sense of directionality through digital processing.
By activating Surround, Sonic Studio aims to help you perceive the direction of sounds more precisely: footsteps behind you, gunshots to your sides, voices at varying distances, or approaching vehicles . This feature is especially geared towards competitive gaming and first-person titles where the enemy's position is crucial.
To get the most out of it, combine Surround with a good equalizer setting and, if you like, a touch of Bass Boost. Many online shooter players notice a huge difference when they properly configure Surround in Sonic Studio , especially if they're starting with somewhat muffled or poorly mixed original audio from the game itself.
Profile management, tone testing, and general program options
Beyond individual effects, Sonic Studio includes several tools to organize your settings so you don't have to fiddle with them every time you switch activities. Predefined profiles and the pitch test are two key elements worth getting to know.
In the profiles section, you'll see different options like Games, Music, or Movies. Clicking on any of these profiles applies a pre-configured combination of equalization and effects designed for that specific use. It's a good starting point, although it's almost always a good idea to tweak it a bit to your liking.
The Test Tone tool lets you play a reference sound associated with the profile you're currently configuring. This allows you to hear in real time how the equalizer settings, reverb, bass boost, etc., change without having to constantly switch to a game or movie.
In addition, Sonic Studio offers options to save, open, or reset profiles . This means you can save your own custom settings, retrieve them whenever you want, or revert to factory settings if you've messed around too much and don't know how to undo the damage.
You also have several general utilities: a Sonic Studio master switch to turn its audio processing on or off , a volume control for connected devices, and a Sonic Studio Settings section where you can change the language or view a short built-in tutorial.
Perfect Voice: microphone enhancement, noise gate, and noise reduction
One of the most overlooked sections is Perfect Voice, but for team games, streaming, or video calls, it's pure gold. Perfect Voice includes tools designed to clean, stabilize, and improve the audio coming from your microphone —in other words, what others hear.
To begin, you'll see a switch that lets you turn Perfect Voice on or off globally . From there, you have several very useful controls such as volume stabilization, noise gate, and noise reduction.
The Volume Stabilizer keeps your voice at a relatively constant level . If you shout or stand too close to the microphone, it prevents annoying peaks, and if you speak more quietly, it prevents you from disappearing completely from the mix. The intensity is adjusted with a slider linked to the microphone volume control.
The Noise Gate parameter "closes" the microphone when you're not speaking , significantly reducing or eliminating background noise between phrases (keyboard, PC fan, traffic). It only allows audio to pass through when it detects a signal above a certain threshold, usually your voice.
Meanwhile, Noise Reduction works even while you're speaking . It filters out external sounds that might interfere with your voice, such as background conversations, televisions in another room, or a persistent fan. Used sparingly, it makes your voice sound much cleaner and more professional.
Additionally, there's a Reset button that returns all Perfect Voice parameters to their default values , and a Test Tone button similar to the output button, this time for testing the microphone with the active settings. You can even choose between Automatic and Manual Noise Gate mode, allowing you to decide whether the program manages the threshold itself or if you prefer to manually adjust the gate and reduction levels.
Casting Enhancer: Apply enhancements to your streams and recordings
For content creators, Sonic Studio includes a particularly interesting feature called Casting Enhancer . This feature allows all the enhancements you've configured (equalizer, voice clarity, effects, etc.) to be applied to the audio output to your recording software or streaming platform.
When Casting Enhancer is active, the system typically displays a pop-up message indicating that your recording or streaming session is being enhanced. This means your audience hears more polished audio, not just the raw sound of the game or system , while you maintain the same experience you hear through your headphones.
It's important to keep in mind that when adding effects to the output audio, plus any filters included in the streaming software itself, it's best not to overdo it. The recommended approach is to find a moderate balance in the equalizer and effects within Sonic Studio , and then supplement with a slight adjustment in OBS, XSplit, or similar software, rather than trying to let Sonic Studio do absolutely everything.
Sonic Studio III: Multi-output control and per-device profiles
Sonic Studio III takes Sonic Studio II a step further with a feature that can be key in a shared bedroom or living room: the ability to map different audio streams to different physical outputs of the device . In other words, you can decide what plays on the TV, what plays on the rear speakers, and what plays only in your headphones.
For example, you can configure YouTube and Netflix videos to output to your TV via HDMI , applying a Movie profile with enhanced bass and surround sound for a more immersive experience. Simultaneously, you can direct Spotify or Groove Music to your desktop speakers, using a Music profile that boosts the bass.
Meanwhile, your games (CS:GO, Overwatch, or whatever) can be connected to the headphone output on the front of the box with a dedicated Gaming profile, where you can activate Surround, equalization to enhance footsteps and gunshots, and a bit of Voice Clarity to understand the characters.
This audio compartmentalization lets you play games with headphones while someone else watches a show on the TV connected to the PC, without disturbing each other. Sonic Studio III acts as a complete home audio control center, managing routing and profiles quite intuitively once you have it set up.
Common problems with Sonic Studio and Realtek drivers
Not everything is perfect, and many users have found that after certain Windows Updates, Sonic Studio stops working correctly , the equalizer stops working, or the application simply doesn't even open and displays errors when starting up.
In some cases, when attempting to reinstall both the standard drivers and the UWP versions from the Microsoft Store, the installer appears to do nothing or fails to restore Sonic Studio functionality . Even after deleting the audio drivers from Device Manager and reinstalling them, the problem may persist.
The combination of Realtek driver version and Sonic Studio UWP version can be very delicate. If you use, for example, a specific version like 6.0.8971.1 with Sonic Studio 3.16.15.0 , sometimes a system update breaks that pairing, leaving you with errors when opening Sonic Studio or Radar (the audio positioning module).
Many users have concluded that the only way to get Sonic Studio fully functional again, with its equalizer working properly, is to format the system and reinstall everything from scratch, starting with the drivers from the ASUS website . Obviously, it's a very drastic solution, but when every possible combination of uninstalling, cleaning, and reinstalling has been tried and nothing works, it may be the only thing that restores stability.
It's precisely because of these kinds of headaches that some people have ended up throwing in the towel and resorting to alternative software like FXSound or Boom 3D. These are external programs that also offer advanced equalization and sound effects, without relying so heavily on specific integration with ASUS hardware . They're not exactly the same, but they can be a pretty decent backup plan when Sonic Studio refuses to cooperate.


Passionate writer about the world of bytes and technology in general. I love sharing my knowledge through writing, and that's what I'll do on this blog, show you all the most interesting things about gadgets, software, hardware, tech trends, and more. My goal is to help you navigate the digital world in a simple and entertaining way.